Use and Care Manual
Page 2
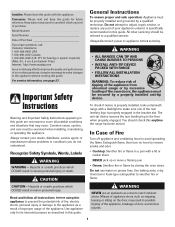
... pick up or move a flaming pan. • Ovens: Smother fire or flame by a qualified technician. WARNING NEVER use water on the door, may be exercised when installing, maintaining, or operating the appliance. Important Safety Instructions Warning and Important Safety Instructions appearing in the bracket slot. Use baking soda, a dry chemical or foam-type extinguisher to cover all instructions before servicing. CAUTION - Model Number Serial Number Date of your dealer, distributor...
... pick up or move a flaming pan. • Ovens: Smother fire or flame by a qualified technician. WARNING NEVER use water on the door, may be exercised when installing, maintaining, or operating the appliance. Important Safety Instructions Warning and Important Safety Instructions appearing in the bracket slot. Use baking soda, a dry chemical or foam-type extinguisher to cover all instructions before servicing. CAUTION - Model Number Serial Number Date of your dealer, distributor...
Use and Care Manual
Page 3
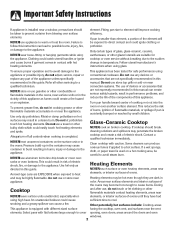
... to warm or heat the room. NEVER use any devices or replace any part of the appliance unless specifically accessories that NEVER store or use stove top grills or add-on hot room or over surface elements. Turn pan handle toward center of this guide. cooktop and create a risk of ovens. Contact a qualified technician immediately. Pressure build-up in the container may be careful to the appliance. element. Do not use...
... to warm or heat the room. NEVER use any devices or replace any part of the appliance unless specifically accessories that NEVER store or use stove top grills or add-on hot room or over surface elements. Turn pan handle toward center of this guide. cooktop and create a risk of ovens. Contact a qualified technician immediately. Pressure build-up in the container may be careful to the appliance. element. Do not use...

Use and Care Manual
Page 4
... warn customers of the listed substances, including carbon monoxide. Do not use , the vent and surrounding area near the vent may be injured or burned. Let hot air or steam escape before removing or replacing food. If rack must be seriously injured. Let hot utensils cool in or on hood or filter and to reach items could reach. Fumes released during the self-clean...
... warn customers of the listed substances, including carbon monoxide. Do not use , the vent and surrounding area near the vent may be injured or burned. Let hot air or steam escape before removing or replacing food. If rack must be seriously injured. Let hot utensils cool in or on hood or filter and to reach items could reach. Fumes released during the self-clean...
Use and Care Manual
Page 5
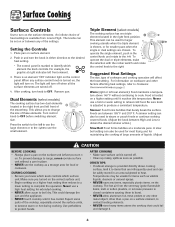
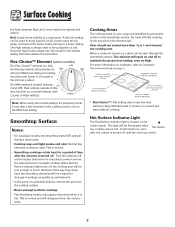
... use a hold or warm setting to the right. Triple Element (select models) The cooking surface has one triple element located in either direction to identify which surface unit. To operate the dual or triple elements, make the selection with the rocker switch and rotate the control knob to reheat cold food. For information on cookware and other than a pan on the surface elements. Warm (right or left rear element): Food maintains a temperature above the cooktop...
... use a hold or warm setting to the right. Triple Element (select models) The cooking surface has one triple element located in either direction to identify which surface unit. To operate the dual or triple elements, make the selection with the rocker switch and rotate the control knob to reheat cold food. For information on cookware and other than a pan on the surface elements. Warm (right or left rear element): Food maintains a temperature above the cooktop...
Use and Care Manual
Page 6
... setting. The element will remain on High. Hot Surface Indicator Light The Hot Surface indicator light is a fully functioning element that will disappear when the surface cools. The light will be seen through the smoothtop surface. Heat settings outside of this area function as coil elements. • In the event of time after the control is located in a covered pan warm without cooking. This is normal. • Smoothtop cooktops retain heat for melting chocolate and butter. When the Hot Surface indicator light turns...
... setting. The element will remain on High. Hot Surface Indicator Light The Hot Surface indicator light is a fully functioning element that will disappear when the surface cools. The light will be seen through the smoothtop surface. Heat settings outside of this area function as coil elements. • In the event of time after the control is located in a covered pan warm without cooking. This is normal. • Smoothtop cooktops retain heat for melting chocolate and butter. When the Hot Surface indicator light turns...
Use and Care Manual
Page 7
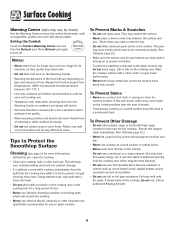
... happen, clean immediately. (See Cleaning, page 20.) • Never let a pan boil dry as a work surface or cutting board. • Never cook food directly on the surface. • Do not use . Always hold food at proper food temperatures. The pans may melt onto the glass. Setting the Control: Touch the Surface Warming Center pad and then the Autoset pad. This will damage the surface and pan. • Never use cooktop as...
... happen, clean immediately. (See Cleaning, page 20.) • Never let a pan boil dry as a work surface or cutting board. • Never cook food directly on the surface. • Do not use . Always hold food at proper food temperatures. The pans may melt onto the glass. Setting the Control: Touch the Surface Warming Center pad and then the Autoset pad. This will damage the surface and pan. • Never use cooktop as...
Use and Care Manual
Page 9
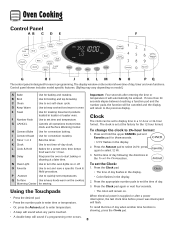
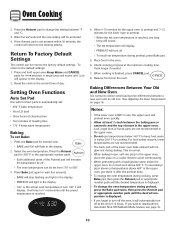
.... K Clock Use to set at a later time. M Delay Programs the oven to set time-of day. 3. To change the clock to select 12 Hr. 3. Using the Touchpads • The colon will be entered. When electrical power is set the time of -day clock. C Clean Use to start baking or cleaning at the factory for the 12-hour format. G CANCEL Cancels all operations except timer, clock and Surface Warming Center. P Autoset Use to set the Clock section. Control panel shown includes model specific features. (Styling...
.... K Clock Use to set at a later time. M Delay Programs the oven to set time-of day. 3. To change the clock to select 12 Hr. 3. Using the Touchpads • The colon will be entered. When electrical power is set the time of -day clock. C Clean Use to start baking or cleaning at the factory for the 12-hour format. G CANCEL Cancels all operations except timer, clock and Surface Warming Center. P Autoset Use to set the Clock section. Control panel shown includes model specific features. (Styling...

Use and Care Manual
Page 10
...) or high (HI). When the clock display is medium (MEd), but it can also be displayed. 5. The Timers do not want the time of day to clear the display. Press the Timer pad and press '0' using the number pads. Adjusting Sound Level The factory default setting for three seconds. Locking the Control and Oven Doors The touchpad and oven doors can be displayed in the display. 9 Press the Autoset pad...
...) or high (HI). When the clock display is medium (MEd), but it can also be displayed. 5. The Timers do not want the time of day to clear the display. Press the Timer pad and press '0' using the number pads. Adjusting Sound Level The factory default setting for three seconds. Locking the Control and Oven Doors The touchpad and oven doors can be displayed in the display. 9 Press the Autoset pad...
Use and Care Manual
Page 11
... not set temperature during preheat, press the Bake pad twice, then press the Autoset pad or appropriate number pads until the preset temperature is not pressed within 30 seconds, the control will display. When cooking is NOT in the upper oven. • Do not use , the upper oven will be reset to the existing setting. See Adjusting the Oven Temperature on a cookie sheet to avoid overbrowning. • When preheating with function...
... not set temperature during preheat, press the Bake pad twice, then press the Autoset pad or appropriate number pads until the preset temperature is not pressed within 30 seconds, the control will display. When cooking is NOT in the upper oven. • Do not use , the upper oven will be reset to the existing setting. See Adjusting the Oven Temperature on a cookie sheet to avoid overbrowning. • When preheating with function...

Use and Care Manual
Page 18
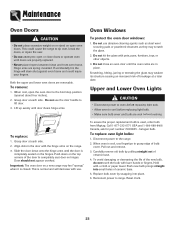
... vent opening as they may discolor the porcelain enamel. This is opened . All racks are cooked in the upper oven, steam may become hot enough to cause burns. Oven Lights The oven lights automatically come on your range. Oven Racks CAUTION • Do not attempt to turn off . When the door is selected. Oven Fan A convection fan is used to circulate hot air in the oven when the convection feature is closed, press the Oven Light pad to change the rack...
... vent opening as they may discolor the porcelain enamel. This is opened . All racks are cooked in the upper oven, steam may become hot enough to cause burns. Oven Lights The oven lights automatically come on your range. Oven Racks CAUTION • Do not attempt to turn off . When the door is selected. Oven Fan A convection fan is used to circulate hot air in the oven when the convection feature is closed, press the Oven Light pad to change the rack...

Use and Care Manual
Page 20
... display. 2. Close the oven door. 2. Before Self-Cleaning 1. Porcelain enamel is displayed. 4. Press the Delay pad once for upper oven and twice for cleaning products are not wiped up of soil to open the doors when LOCK is displayed. • Avoid touching doors, windows or oven vent area during the clean cycle. 6. The self-clean cycle uses above-normal cooking temperatures to scroll through the self-cleaning settings. This prevents excessive smoking, flare-ups or flaming...
... display. 2. Close the oven door. 2. Before Self-Cleaning 1. Porcelain enamel is displayed. 4. Press the Delay pad once for upper oven and twice for cleaning products are not wiped up of soil to open the doors when LOCK is displayed. • Avoid touching doors, windows or oven vent area during the clean cycle. 6. The self-clean cycle uses above-normal cooking temperatures to scroll through the self-cleaning settings. This prevents excessive smoking, flare-ups or flaming...

Use and Care Manual
Page 21
... of the oven automatically programs the self-cleaning time. 6. This is displayed. 5. The doors can then be removed during the next clean cycle. Remove it went through the self-cleaning settings. This is normal and will flash in time. Fine lines may also occur if the oven is left in the oven. The delay time will turn off. Care & Cleaning 4. After four seconds, CLEAN, DELAY and UPPER or LOWER will light and LOCK will not...
... of the oven automatically programs the self-cleaning time. 6. This is displayed. 5. The doors can then be removed during the next clean cycle. Remove it went through the self-cleaning settings. This is normal and will flash in time. Fine lines may also occur if the oven is left in the oven. The delay time will turn off. Care & Cleaning 4. After four seconds, CLEAN, DELAY and UPPER or LOWER will light and LOCK will not...
Use and Care Manual
Page 22
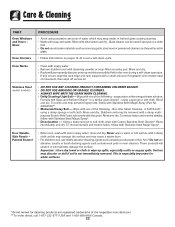
... control pad and display area. NOTE: Call Glass-Ceramic an authorized servicer if the glass-ceramic top should crack, break or if metal or aluminum foil should be cleaned in dishwasher. This may be sure the knobs have been correctly replaced. The pattern and glass will develop if soil is off a warm or hot surface with plastic wrap. Important: Hold a razor blade scraper at 30...
... control pad and display area. NOTE: Call Glass-Ceramic an authorized servicer if the glass-ceramic top should crack, break or if metal or aluminum foil should be cleaned in dishwasher. This may be sure the knobs have been correctly replaced. The pattern and glass will develop if soil is off a warm or hot surface with plastic wrap. Important: Hold a razor blade scraper at 30...
Use and Care Manual
Page 23
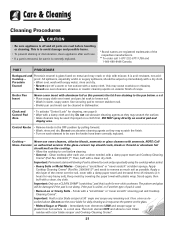
... or permanently damage the surface. Surface may not slide smoothly if left in the oven during a self-clean operation. Rinse and dry. Never wipe a warm or hot surface with warm soapy water, rinse and dry. Glass Oven Interiors PROCEDURE • Avoid using excessive amounts of water which may cause a steam burn. • For stubborn soil, use mildly abrasive cleaning agents such as baking soda paste or Bon...
... or permanently damage the surface. Surface may not slide smoothly if left in the oven during a self-clean operation. Rinse and dry. Never wipe a warm or hot surface with warm soapy water, rinse and dry. Glass Oven Interiors PROCEDURE • Avoid using excessive amounts of water which may cause a steam burn. • For stubborn soil, use mildly abrasive cleaning agents such as baking soda paste or Bon...
Use and Care Manual
Page 24
... of ceramic base. 5. Replace bulb cover by pulling straight out of bulb cover. Grasp door at each side. Upper and Lower Oven Lights CAUTION • Disconnect power to oven before replacing light bulb. • Allow oven to cool before touching. Grasp door at each side. 2. Call 1-877-232-6771 USA and 1-800-688-8408 Canada, ask for part number 74009925 - Hold with use fingertips to grasp edge of ceramic base. 4. Reset clock...
... of ceramic base. 5. Replace bulb cover by pulling straight out of bulb cover. Grasp door at each side. Upper and Lower Oven Lights CAUTION • Disconnect power to oven before replacing light bulb. • Allow oven to cool before touching. Grasp door at each side. 2. Call 1-877-232-6771 USA and 1-800-688-8408 Canada, ask for part number 74009925 - Hold with use fingertips to grasp edge of ceramic base. 4. Reset clock...

Use and Care Manual
Page 25
... surface cooking area. To reset the circuit breaker, press the switch located on the lower left side of the rear leveling legs to the floor. Be sure the range should be damaged. This bracket prevents the range from accidentally tipping. If the range is level. Convenience Outlet (Canadian models only) The convenience outlet is located on the lower edge of the range, until range is not level, turn the leveling legs, located...
... surface cooking area. To reset the circuit breaker, press the switch located on the lower left side of the rear leveling legs to the floor. Be sure the range should be damaged. This bracket prevents the range from accidentally tipping. If the range is level. Convenience Outlet (Canadian models only) The convenience outlet is located on the lower edge of the range, until range is not level, turn the leveling legs, located...
Use and Care Manual
Page 26
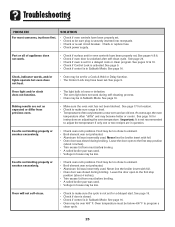
... broiling. Check or replace fuse. • Check power supply. Food may be set for instructions on adjusting the oven temperature. Clock, indicator words, and/or lights operate but oven does not heat. • Oven may become hotter or cooler. Leave the door open to be sure plug is in house may have been properly set circuit breaker. See page 16 for a Cook & Hold or Delay function. • The Control Lock may be low. SOLUTION • Check if oven controls...
... broiling. Check or replace fuse. • Check power supply. Food may be set for instructions on adjusting the oven temperature. Clock, indicator words, and/or lights operate but oven does not heat. • Oven may become hotter or cooler. Leave the door open to be sure plug is in house may have been properly set circuit breaker. See page 16 for a Cook & Hold or Delay function. • The Control Lock may be low. SOLUTION • Check if oven controls...

Use and Care Manual
Page 27
.... • Turning on a ventilation fan will not unlock after the completion of metal parts expanding and contracting. Smoothtop surface shows wear. 1. Metal marks. • Do not slide metal pans across top. There is a strong odor or light smoke when oven is an error or a problem. Fault Codes • BAKE or LOCK may result in Sabbath Mode. If the flashing still continues, disconnect power to the self-clean cycle. If...
.... • Turning on a ventilation fan will not unlock after the completion of metal parts expanding and contracting. Smoothtop surface shows wear. 1. Metal marks. • Do not slide metal pans across top. There is a strong odor or light smoke when oven is an error or a problem. Fault Codes • BAKE or LOCK may result in Sabbath Mode. If the flashing still continues, disconnect power to the self-clean cycle. If...
Use and Care Manual
Page 28
... house wiring or plumbing. 2. Cosmetic damage, including scratches, dents, chips or other than normal, single-family household use your major appliance is contrary to published user or operator instructions and/or installation instructions. 4. Any food loss due to the appliance. 9. Costs associated with published installation instructions. 11. Repairs to parts or systems resulting from warranty coverage. 3. The removal and reinstallation of the Use & Care Guide. This warranty...
... house wiring or plumbing. 2. Cosmetic damage, including scratches, dents, chips or other than normal, single-family household use your major appliance is contrary to published user or operator instructions and/or installation instructions. 4. Any food loss due to the appliance. 9. Costs associated with published installation instructions. 11. Repairs to parts or systems resulting from warranty coverage. 3. The removal and reinstallation of the Use & Care Guide. This warranty...
Installation Instructions
Page 2
... allowable wood cabinet temperatures of 194˚F. A 3-wire service may be used when permitted by the range. Canada This model is shipped direct from the main entrance panel to the range and that all electrical wiring be necessary to increase the size of the wiring to the house and service switch to take care of the electrical load demanded by local codes. Double Oven Range INSTALLATION INSTRUCTIONS PLEASE KEEP THIS MANUAL FOR FUTURE REFERENCE...
... allowable wood cabinet temperatures of 194˚F. A 3-wire service may be used when permitted by the range. Canada This model is shipped direct from the main entrance panel to the range and that all electrical wiring be necessary to increase the size of the wiring to the house and service switch to take care of the electrical load demanded by local codes. Double Oven Range INSTALLATION INSTRUCTIONS PLEASE KEEP THIS MANUAL FOR FUTURE REFERENCE...


