
Use and Care Guide
Page 1
... reserved Litho U.S.A. A/06/06 Part No. 8113P636-60 Care & Cleaning 18=21 Self-Clean Oven Cleaning Procedures Maintenance Oven Doors and Windows Oven Lights 22=23 Troubleshooting 24-25 _ WGuairdraentyd'util&isatSioenrvice e.t 27 d'entretien 28 Guia de use y cuidado 56 ,:_2006 Maytag Appliances Sales Oo. ?VlA A(] Maytag Electric Smoothtop Double Oven Range Precision Touch 750 Series Tabl Safety 1-3 Surface Cooking 4=7 Warming Center Controls Smoothtop Surface Oven Cooking 8=17 Control _anel Baking Cook & Hold Delay Keep Warm Toasting Broiling Oven Racks Form No.
... reserved Litho U.S.A. A/06/06 Part No. 8113P636-60 Care & Cleaning 18=21 Self-Clean Oven Cleaning Procedures Maintenance Oven Doors and Windows Oven Lights 22=23 Troubleshooting 24-25 _ WGuairdraentyd'util&isatSioenrvice e.t 27 d'entretien 28 Guia de use y cuidado 56 ,:_2006 Maytag Appliances Sales Oo. ?VlA A(] Maytag Electric Smoothtop Double Oven Range Precision Touch 750 Series Tabl Safety 1-3 Surface Cooking 4=7 Warming Center Controls Smoothtop Surface Oven Cooking 8=17 Control _anel Baking Cook & Hold Delay Keep Warm Toasting Broiling Oven Racks Form No.
Use and Care Guide
Page 2
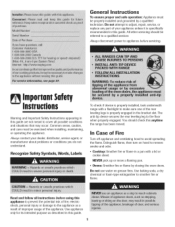
... and ventilating hood to adjust, repair, service, or replace any part of the appliance. Do not attempt to avoid spreading the flame. Always disconnect power to a qualified servicer. You should be referred to appliance before using this anytime the range has been moved. Extinguish flame, then turn on grease fires. General instructions To ensure proper and safe operation: Appliance must be exercised when installing, maintaining, or operating the...
... and ventilating hood to adjust, repair, service, or replace any part of the appliance. Do not attempt to avoid spreading the flame. Always disconnect power to a qualified servicer. You should be referred to appliance before using this anytime the range has been moved. Extinguish flame, then turn on grease fires. General instructions To ensure proper and safe operation: Appliance must be exercised when installing, maintaining, or operating the...
Use and Care Guide
Page 3
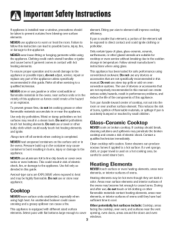
... or near elements, or interior surfaces of this guide. Use only dry potholders. Do not use appliance to line drip bowls or cover oven racks or oven bottoms. This could easily touch hot heating elements and ignite. NEVER heat unopened containers on oven convection systems. The use aluminum foil to warm or heat the room. Cooktop NEVER leave surface units unattended, especially when using glass. Select pans with flat bottoms large enough to a hot surface. Fitting pan size to element will...
... or near elements, or interior surfaces of this guide. Use only dry potholders. Do not use appliance to line drip bowls or cover oven racks or oven bottoms. This could easily touch hot heating elements and ignite. NEVER heat unopened containers on oven convection systems. The use aluminum foil to warm or heat the room. Cooktop NEVER leave surface units unattended, especially when using glass. Select pans with flat bottoms large enough to a hot surface. Fitting pan size to element will...
Use and Care Guide
Page 4
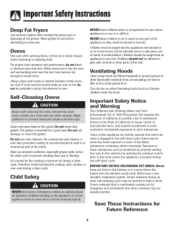
... greasy spills, before removing or replacing food. Children must be taught that the appliance and utensils in the room where the appliance is hot, do not block or obstruct oven vent duct. Turn the fan on hood or filter and to cause burns. Users of this guide. Fumes released during the self-clean cycle. importanSturety Deep Fat Fryers Use extreme caution when moving...
... greasy spills, before removing or replacing food. Children must be taught that the appliance and utensils in the room where the appliance is hot, do not block or obstruct oven vent duct. Turn the fan on hood or filter and to cause burns. Users of this guide. Fumes released during the self-clean cycle. importanSturety Deep Fat Fryers Use extreme caution when moving...
Use and Care Guide
Page 5
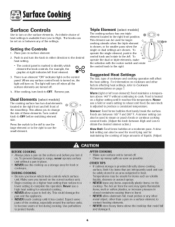
... control panel. Remove pan. For information on cookware and other factors affecting heat settings, refer to Cookware Recommendations on surface element. 2. Food is turned on, the light will turn off when all the surface elements are turned off. 4. Foods are chosen. Place pan on page 7. To lo operate the dual or triple elements, make Low 2 the selection with the rocker switch and rotate the control knob to OFF before switching element size. Suggested Heat Settings The size...
... control panel. Remove pan. For information on cookware and other factors affecting heat settings, refer to Cookware Recommendations on surface element. 2. Food is turned on, the light will turn off when all the surface elements are turned off. 4. Foods are chosen. Place pan on page 7. To lo operate the dual or triple elements, make Low 2 the selection with the rocker switch and rotate the control knob to OFF before switching element size. Suggested Heat Settings The size...
Use and Care Guide
Page 6
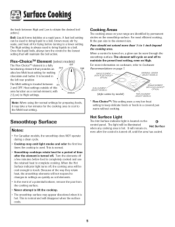
... element is hot. When the Hot Surface indicator light turns off, the cooking area will be illuminated He_ Surface when any cooking area is a fully functioning element that will remain on High. In the event of time after the control is located between High and Low to a lower setting. Pans should not extend mere than _/2to 1-inch beyond the cooking area. SINGLE ELEMENT (WITH FLEX-CHOICE rM OPTION) WARMING CENTER ;) DUAL ELEMENT/ (SELECT MODELS...
... element is hot. When the Hot Surface indicator light turns off, the cooking area will be illuminated He_ Surface when any cooking area is a fully functioning element that will remain on High. In the event of time after the control is located between High and Low to a lower setting. Pans should not extend mere than _/2to 1-inch beyond the cooking area. SINGLE ELEMENT (WITH FLEX-CHOICE rM OPTION) WARMING CENTER ;) DUAL ELEMENT/ (SELECT MODELS...
Use and Care Guide
Page 7
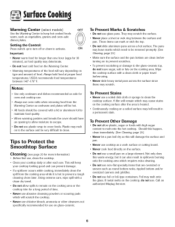
... should have an opening to allow spills to remain on the cooking area or the cooktop trim for a long period of time. • Never use abrasive cleansing powders or scouring pads which may cause stains on glass-ceramic. When warming pastries and breads the cover should be removed promptly. (See Cleaning, page 20.1 • Make sure the surface and the pan bottom are oversized...
... should have an opening to allow spills to remain on the cooking area or the cooktop trim for a long period of time. • Never use abrasive cleansing powders or scouring pads which may cause stains on glass-ceramic. When warming pastries and breads the cover should be removed promptly. (See Cleaning, page 20.1 • Make sure the surface and the pan bottom are oversized...
Use and Care Guide
Page 9
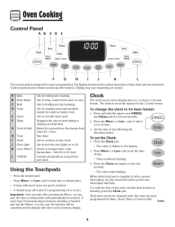
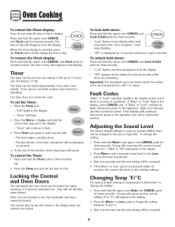
...!nic!eils all operations except timer i;i;i;i;i;i;i;i;i;i;i_{ii_ and clock. Set the time of day when another time function is supplied or after pressing the More+ or Lesspad, the time or temperature will be changed when the oven has been programmed for 1 hour. When electrical power is showing, press the Clock pad. To recall the time of day following the directions below. Control Panel ABCD E ,/ Bake ' Keep i "\\\\ Clean: Toast Clean ) " ---_ ...V.,e. Clock Use to select 12...
...!nic!eils all operations except timer i;i;i;i;i;i;i;i;i;i;i_{ii_ and clock. Set the time of day when another time function is supplied or after pressing the More+ or Lesspad, the time or temperature will be changed when the oven has been programmed for 1 hour. When electrical power is showing, press the Clock pad. To recall the time of day following the directions below. Control Panel ABCD E ,/ Bake ' Keep i "\\\\ Clean: Toast Clean ) " ---_ ...V.,e. Clock Use to select 12...
Use and Care Guide
Page 10
... day will continue to prevent unwanted use , the touchpads and doors cannot be locked if the oven temperature is operating. Once complete, "Lock" stops flashing. "Lock" flashes and then disappears from the display. _/_A_ _rr_"_ When the clock display is touched. Adjusting the Sound Level Tile factory default setting for several seconds while doors are locked. To set the time to change the setting: 1. Press the More+ or Less= pad...
... day will continue to prevent unwanted use , the touchpads and doors cannot be locked if the oven temperature is operating. Once complete, "Lock" stops flashing. "Lock" flashes and then disappears from the display. _/_A_ _rr_"_ When the clock display is touched. Adjusting the Sound Level Tile factory default setting for several seconds while doors are locked. To set the time to change the setting: 1. Press the More+ or Less= pad...

Use and Care Guide
Page 11
...- See Adjusting the Oven Temperature on a cookie sheet to preheat and 7-12 minutes for cooking. The temperature will sound. • To recall the set from the oven. The back part of the lower oven bake element will appear in the oven. 6. Press the More+ pad to the default settings: 1. "cLr" (clear) will NOT glow red during preheat, press the Bake pad. To change the oven temperature during preheat, press Bake once and reset temperature. 5. Place...
...- See Adjusting the Oven Temperature on a cookie sheet to preheat and 7-12 minutes for cooking. The temperature will sound. • To recall the set from the oven. The back part of the lower oven bake element will appear in the oven. 6. Press the More+ pad to the default settings: 1. "cLr" (clear) will NOT glow red during preheat, press the Bake pad. To change the oven temperature during preheat, press Bake once and reset temperature. 5. Place...

Use and Care Guide
Page 12
... the display. Set the amount of time that require a preheated oven, such as cakes, cookies, and breads. Time can be canceled. • The time of time you want to heat at any time: C(_ANCFI_ \:£LCY Press the CANCEL pad. While "dLY" is already hot. 11 Three beeps will count down . • "100°'' or actual oven temperature will light. To cancel: When using Delay, the oven begins...
... the display. Set the amount of time that require a preheated oven, such as cakes, cookies, and breads. Time can be canceled. • The time of time you want to heat at any time: C(_ANCFI_ \:£LCY Press the CANCEL pad. While "dLY" is already hot. 11 Three beeps will count down . • "100°'' or actual oven temperature will light. To cancel: When using Delay, the oven begins...
Use and Care Guide
Page 19
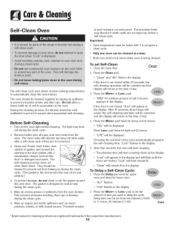
... a self-clean cycle if they are locked. This prevents excessive smoking, flare-ups or flaming during the clean cycle. 2. Press the More+ or Less- Both oven doors lock when either oven is acid-resistant, not acid-proof. "Lock" flashes in the display. Close the oven door. Press the Clean pad. • "Clean" and "SEt" flash in the display. The oven should be displayed. To set Self=Clean: 1. Care Clemn Self-Clean Oven The self-clean cycle uses above-normal cooking temperatures...
... a self-clean cycle if they are locked. This prevents excessive smoking, flare-ups or flaming during the clean cycle. 2. Press the More+ or Less- Both oven doors lock when either oven is acid-resistant, not acid-proof. "Lock" flashes in the display. Close the oven door. Press the Clean pad. • "Clean" and "SEt" flash in the display. The oven should be displayed. To set Self=Clean: 1. Care Clemn Self-Clean Oven The self-clean cycle uses above-normal cooking temperatures...
Use and Care Guide
Page 20
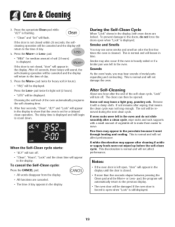
... clean cycle was left open when "Lock" is set for medium amount of the oven automatically programs the self-cleaning time. 6. Choosing the soil level of soil (3 hours] is closed , "door" will be damaged if the oven door is heavily soiled or if a broiler pan was not long enough. The delay time is displayed and will be displayed. This is normal and will be displayed. The doors can then be removed...
... clean cycle was left open when "Lock" is set for medium amount of the oven automatically programs the self-cleaning time. 6. Choosing the soil level of soil (3 hours] is closed , "door" will be damaged if the oven door is heavily soiled or if a broiler pan was not long enough. The delay time is displayed and will be displayed. This is normal and will be displayed. The doors can then be removed...

Use and Care Guide
Page 21
..., cover with misuse. Use scouring pad to cook on control pad and display area. Thepattern and glass will develop ff soil is allowed to remove stubborn soil. , Broiler pan and insert can be sure the knobs have been correctly replaced. Scrub with razor blade scraper and Cooktop Cleaning Creme*. 2O Clean residue with a "scratchless" or "never scratch" scouring pad and Cooktop Cleaning Creme*. Do not use abrasive cleaning...
..., cover with misuse. Use scouring pad to cook on control pad and display area. Thepattern and glass will develop ff soil is allowed to remove stubborn soil. , Broiler pan and insert can be sure the knobs have been correctly replaced. Scrub with razor blade scraper and Cooktop Cleaning Creme*. 2O Clean residue with a "scratchless" or "never scratch" scouring pad and Cooktop Cleaning Creme*. Do not use abrasive cleaning...
Use and Care Guide
Page 22
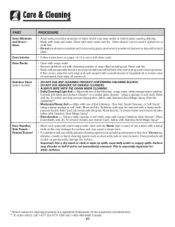
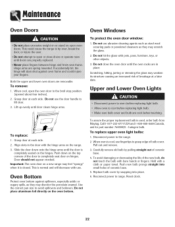
...-Brite* pad; Rinse and dry. To remove streaks and restore luster, follow with Stainless Steel Magic Spray*. ° When cool, wash with soapy water. o Clean with warm soapy water, rinse and dry. Rinse and dry. Cleam Oven Windows and Doors Glass Oven Interior Oven Racks Stainless Steel (select models) Door Handles, Side Panels Painted Enamel • Avoid using excessive amounts of water which may...
...-Brite* pad; Rinse and dry. To remove streaks and restore luster, follow with Stainless Steel Magic Spray*. ° When cool, wash with soapy water. o Clean with warm soapy water, rinse and dry. Rinse and dry. Cleam Oven Windows and Doors Glass Oven Interior Oven Racks Stainless Steel (select models) Door Handles, Side Panels Painted Enamel • Avoid using excessive amounts of water which may...
Use and Care Guide
Page 23
... Lower Oven Lights To replace: 1. Slide the door down on the top corners of ceramic base. 4. Push down onto the hinge arms until the door is used, order bulb from Maytag. Lift up evenly until the oven racks are removable. Do not hit the glass with pots, pans, furniture, toys, or other objects. 3. Call 1-877-232-6771 USAand 1-800-688-8408 Canada, ask for part number 74009925...
... Lower Oven Lights To replace: 1. Slide the door down on the top corners of ceramic base. 4. Push down onto the hinge arms until the door is used, order bulb from Maytag. Lift up evenly until the oven racks are removable. Do not hit the glass with pots, pans, furniture, toys, or other objects. 3. Call 1-877-232-6771 USAand 1-800-688-8408 Canada, ask for part number 74009925...
Use and Care Guide
Page 24
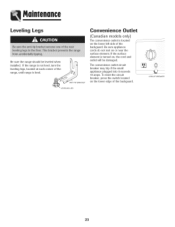
... backguard. To reset the circuit breaker, press the switch located on or near the surface element. I_ . _,,JJ ANTI !_BRACKET LEVELING LEG Convenience Outlet (Canadian models only) The convenience outlet is level. If the surface element is turned on the lower left side of the range, until range is located on , the cord and outlet will be leveled when installed. The convenience outlet circuit breaker may trip if the small appliance plugged...
... backguard. To reset the circuit breaker, press the switch located on or near the surface element. I_ . _,,JJ ANTI !_BRACKET LEVELING LEG Convenience Outlet (Canadian models only) The convenience outlet is level. If the surface element is turned on the lower left side of the range, until range is located on , the cord and outlet will be leveled when installed. The convenience outlet circuit breaker may trip if the small appliance plugged...

Use and Care Guide
Page 25
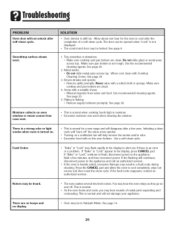
... set for a delayed start. Check or replace fuse. • Check power supply. Baking results are in question. o Check to element. Aluminum foil was closed . ° Check if control is set for location. Leave the door open to program a clean cycle. Oven temperature must be sure plug is in Sabbath Mode. Oven did not clean properly. froubleshoofln9 For most concerns, try these first. • Check if oven controls have been properly set. • Check to adjust the temperature...
... set for a delayed start. Check or replace fuse. • Check power supply. Baking results are in question. o Check to element. Aluminum foil was closed . ° Check if control is set for location. Leave the door open to program a clean cycle. Oven temperature must be sure plug is in Sabbath Mode. Oven did not clean properly. froubleshoofln9 For most concerns, try these first. • Check if oven controls have been properly set. • Check to adjust the temperature...
Use and Care Guide
Page 26
... deposits from over vent. • Oven interior is an error or a problem. Make sure cooktop and pan bottom are clean. Fault Codes + "Bake" or "Lock" may flash rapidly in the display to alert you may hear sounds of a self-clean cycle. This is normal. + As the oven heats and cools, you if there is still hot. Do not slide glass or metal pans across top. Initiating a clean cycle will "burn...
... deposits from over vent. • Oven interior is an error or a problem. Make sure cooktop and pan bottom are clean. Fault Codes + "Bake" or "Lock" may flash rapidly in the display to alert you may hear sounds of a self-clean cycle. This is normal. + As the oven heats and cools, you if there is still hot. Do not slide glass or metal pans across top. Initiating a clean cycle will "burn...
Use and Care Guide
Page 28
.... Instruct the user on owner's responsibilities for product service in your Use and Care Guide or call the dealer from whom your appliance was purchased or call to: a. c. Any food lossdue to determine if another warranty applies. 9. Contact your dealer or servicer; Refer to WARRANTY for further information on the proper use of any control. 2 Warranties are void if the original serial numbers have been removed...
.... Instruct the user on owner's responsibilities for product service in your Use and Care Guide or call the dealer from whom your appliance was purchased or call to: a. c. Any food lossdue to determine if another warranty applies. 9. Contact your dealer or servicer; Refer to WARRANTY for further information on the proper use of any control. 2 Warranties are void if the original serial numbers have been removed...


