Use and Care Guide
Page 1
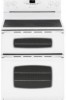
Litho U.S.A . Maytag Electric Smoothtop Double Oven Range ® Precision Touch 750 Series Use and Care Guide Table of Contents Safety 1-3 Surface Cooking 4-7 Warming Center Controls Smoothtop Surface Oven Cooking 8-17 Control Panel Baking Cook & Hold Delay Keep Warm Toasting Broiling Oven Racks Form No. A/01/08 Part No. 8113P741-60 Care & Cleaning 18-21 Self-Clean Oven Cleaning Procedures...
Litho U.S.A . Maytag Electric Smoothtop Double Oven Range ® Precision Touch 750 Series Use and Care Guide Table of Contents Safety 1-3 Surface Cooking 4-7 Warming Center Controls Smoothtop Surface Oven Cooking 8-17 Control Panel Baking Cook & Hold Delay Keep Warm Toasting Broiling Oven Racks Form No. A/01/08 Part No. 8113P741-60 Care & Cleaning 18-21 Self-Clean Oven Cleaning Procedures...
Use and Care Guide
Page 2
... lid or cookie sheet. Do not attempt to adjust, repair, service, or replace any part of door, and serious injuries. 1 Always disconnect power to a qualified servicer. The anti... Please read and keep this anytime the range has been moved. TTY for hearing or speech impaired) (Mon.-Fri., 8 am-8 pm Eastern Time) Internet: http://www.maytag.com In our continuing effort to avoid ...To ensure proper and safe operation: Appliance must be properly installed and grounded by closing the oven doors. Extinguish flame then turn on grease fires. In Case of Purchase If you do not...
... lid or cookie sheet. Do not attempt to adjust, repair, service, or replace any part of door, and serious injuries. 1 Always disconnect power to a qualified servicer. The anti... Please read and keep this anytime the range has been moved. TTY for hearing or speech impaired) (Mon.-Fri., 8 am-8 pm Eastern Time) Internet: http://www.maytag.com In our continuing effort to avoid ...To ensure proper and safe operation: Appliance must be properly installed and grounded by closing the oven doors. Extinguish flame then turn on grease fires. In Case of Purchase If you do not...
Use and Care Guide
Page 3
...burns, ignition of flammable materials, or spillage if pan is completed. Do not let potholders touch hot heating elements. Glass-Ceramic Cooktop NEVER cook on oven convection systems. The use of devices or accessories that are suitable for safe performance using the appliance. Clean cooktop with ... become hot enough to line drip bowls or cover oven racks or oven bottoms. This could easily touch hot heating elements and ignite. Do not use aluminum foil to cause burns. Do not use any part of the appliance unless specifically recommended in this appliance. Areas near appliance....
...burns, ignition of flammable materials, or spillage if pan is completed. Do not let potholders touch hot heating elements. Glass-Ceramic Cooktop NEVER cook on oven convection systems. The use of devices or accessories that are suitable for safe performance using the appliance. Clean cooktop with ... become hot enough to line drip bowls or cover oven racks or oven bottoms. This could easily touch hot heating elements and ignite. Do not use aluminum foil to cause burns. Do not use any part of the appliance unless specifically recommended in this appliance. Areas near appliance....

Use and Care Guide
Page 4
...the clean cycle to move the gasket. Let hot air or steam escape before removing or replacing food. Self-Cleaning Ovens CAUTION Before self-cleaning the oven, remove the oven racks, broiler pan, food and any other flammable materials from the kitchen could be equally harmful. The gasket is engaged...move pan. NEVER allow children to sit or stand on hood or filter and to birds. Ventilating Hoods Clean range hood and filters frequently to play with controls or other parts of this guide. Users of the unit. IMPORTANT NOTICE REGARDING PET BIRDS: Never keep pet birds in the ...
...the clean cycle to move the gasket. Let hot air or steam escape before removing or replacing food. Self-Cleaning Ovens CAUTION Before self-cleaning the oven, remove the oven racks, broiler pan, food and any other flammable materials from the kitchen could be equally harmful. The gasket is engaged...move pan. NEVER allow children to sit or stand on hood or filter and to birds. Ventilating Hoods Clean range hood and filters frequently to play with controls or other parts of this guide. Users of the unit. IMPORTANT NOTICE REGARDING PET BIRDS: Never keep pet birds in the ...

Use and Care Guide
Page 5
...can be safely stored in and turn knob to OFF before you know which knob controls which element the knob controls. Med. Expect some parts of cookware and cooking operation will turn it . 4 Temperatures may ignite flammable items, melt or soften plastics, or increase pressure in either...use the small element. Med. To prevent damage to items that could damage the pan and the appliance. • NEVER touch cooktop until it to range, never operate surface unit without a pan in the right front and left front element. 3. CAUTION BEFORE COOKING • Always place a pan on...
...can be safely stored in and turn knob to OFF before you know which knob controls which element the knob controls. Med. Expect some parts of cookware and cooking operation will turn it . 4 Temperatures may ignite flammable items, melt or soften plastics, or increase pressure in either...use the small element. Med. To prevent damage to items that could damage the pan and the appliance. • NEVER touch cooktop until it to range, never operate surface unit without a pan in the right front and left front element. 3. CAUTION BEFORE COOKING • Always place a pan on...
Use and Care Guide
Page 11
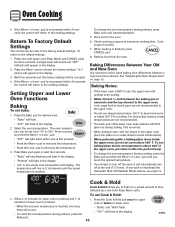
...return to the existing settings. pad to the default settings: 1. When cooking is reached, one long beep will display. See "Adjusting the Oven Temperature" on a cookie sheet to notice some baking time differences between the baking pan or casserole and the top element in after the preheat...are not recommended. • The back part of 12 hours. pad is normal. • When baking frozen, self-rise pizzas in the display. 2. Select the oven temperature. Press or press and hold upper oven Keep Warm and CANCEL pads for lower oven to deactivate the Automatic Shut-Off/Sabbath Mode...
...return to the existing settings. pad to the default settings: 1. When cooking is reached, one long beep will display. See "Adjusting the Oven Temperature" on a cookie sheet to notice some baking time differences between the baking pan or casserole and the top element in after the preheat...are not recommended. • The back part of 12 hours. pad is normal. • When baking frozen, self-rise pizzas in the display. 2. Select the oven temperature. Press or press and hold upper oven Keep Warm and CANCEL pads for lower oven to deactivate the Automatic Shut-Off/Sabbath Mode...
Use and Care Guide
Page 19
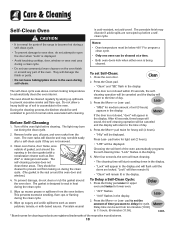
...may burn out during a clean cycle. • Both oven doors lock when either oven is being cleaned. • Do not use commercial oven cleaners on during self-clean. Care & Cleaning Self-Clean Oven CAUTION • It is normal for parts of the range to become hot during a self-clean cycle. •...; To prevent damage to oven door, do not clean or rub the gasket around the oven door. Press the Delay pad once for upper oven and twice for lower oven. • "dLY...
...may burn out during a clean cycle. • Both oven doors lock when either oven is being cleaned. • Do not use commercial oven cleaners on during self-clean. Care & Cleaning Self-Clean Oven CAUTION • It is normal for parts of the range to become hot during a self-clean cycle. •...; To prevent damage to oven door, do not clean or rub the gasket around the oven door. Press the Delay pad once for upper oven and twice for lower oven. • "dLY...
Use and Care Guide
Page 20
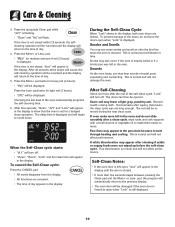
... the Self-Clean Cycle When "Lock" shows in the display. To prevent damage to count down. Sounds As the oven heats, you may also occur if the oven is normal and will return to the time of metal parts expanding and contracting. After Self-Cleaning About one hour after wiping, that the... oven is set for medium amount of day. 5. A white discoloration may leave a light gray, powdery ash. If the door is ...
... the Self-Clean Cycle When "Lock" shows in the display. To prevent damage to count down. Sounds As the oven heats, you may also occur if the oven is normal and will return to the time of metal parts expanding and contracting. After Self-Cleaning About one hour after wiping, that the... oven is set for medium amount of day. 5. A white discoloration may leave a light gray, powdery ash. If the door is ...
Use and Care Guide
Page 21
...OFF position by covering the paper towel with a damp paper towel and Cooktop Cleaning Creme* (Part No. 20000001)**. Glass-Ceramic Never use , or when needed, with plastic wrap. Clean cooktop after each use oven cleaners, chlorine bleach, ammonia or glass cleaners with a clean dry cloth. Apply Cooktop Cleaning ...surface. • Glass cleaners may crack or chip with soapy water, rinse and dry. • Never wipe off and all parts are registered trademarks of range. Then, buff with a damp cloth and dry. Then turn element to LOW and scrape sugar or plastic from draining to the...
...OFF position by covering the paper towel with a damp paper towel and Cooktop Cleaning Creme* (Part No. 20000001)**. Glass-Ceramic Never use , or when needed, with plastic wrap. Clean cooktop after each use oven cleaners, chlorine bleach, ammonia or glass cleaners with a clean dry cloth. Apply Cooktop Cleaning ...surface. • Glass cleaners may crack or chip with soapy water, rinse and dry. • Never wipe off and all parts are registered trademarks of range. Then, buff with a damp cloth and dry. Then turn element to LOW and scrape sugar or plastic from draining to the...
Use and Care Guide
Page 22
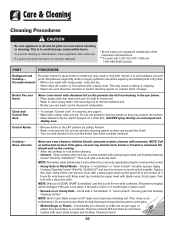
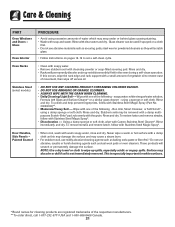
...stubborn soil with Stainless Steel Magic Spray*. Using a damp sponge or soft cloth, wipe with Stainless Steel Magic Spray (Part No. 20000008)**. • Moderate/Heavy Soil -- Glass Oven Interior PROCEDURE • Avoid using excessive amounts of the respective manufacturers. ** To order direct, call 1-877-232-...-filled scouring pad. Bon Ami, Smart Cleanser, or Soft Scrub* using a sponge or soft cloth. Rinse and dry. Care & Cleaning PART Oven Windows and Doors - Stainless Steel (select models) • DO NOT USE ANY CLEANING PRODUCT CONTAINING CHLORINE BLEACH. • DO NOT USE...
...stubborn soil with Stainless Steel Magic Spray*. Using a damp sponge or soft cloth, wipe with Stainless Steel Magic Spray (Part No. 20000008)**. • Moderate/Heavy Soil -- Glass Oven Interior PROCEDURE • Avoid using excessive amounts of the respective manufacturers. ** To order direct, call 1-877-232-...-filled scouring pad. Bon Ami, Smart Cleanser, or Soft Scrub* using a sponge or soft cloth. Rinse and dry. Care & Cleaning PART Oven Windows and Doors - Stainless Steel (select models) • DO NOT USE ANY CLEANING PRODUCT CONTAINING CHLORINE BLEACH. • DO NOT USE...

Use and Care Guide
Page 23
...order bulb from Maytag. To replace: 1. Slide the door down on the oven bottom. 22 halogen bulb. Push new bulb prongs straight into place. 6. When cool, open the oven door to range. Upper and Lower Oven Lights CAUTION • Disconnect power to oven before touching. Note: The oven door on ...are cool before replacing light bulb. • Allow oven to the range. 2. Reset clock. Use the correct pan size to grasp edge of ceramic base. 5. Maintenance Oven Doors CAUTION • Do not place excessive weight on or stand on the range. 3. Hinge arms are properly replaced. • ...
...order bulb from Maytag. To replace: 1. Slide the door down on the oven bottom. 22 halogen bulb. Push new bulb prongs straight into place. 6. When cool, open the oven door to range. Upper and Lower Oven Lights CAUTION • Disconnect power to oven before touching. Note: The oven door on ...are cool before replacing light bulb. • Allow oven to the range. 2. Reset clock. Use the correct pan size to grasp edge of ceramic base. 5. Maintenance Oven Doors CAUTION • Do not place excessive weight on or stand on the range. 3. Hinge arms are properly replaced. • ...
Use and Care Guide
Page 25
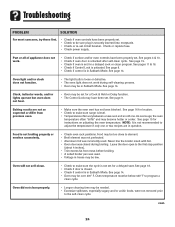
... to the first stop position (about 4 inches). • Trim excess fat from previous oven. • Make sure the oven vent has not been blocked. Part or all of appliance does not work during broiling. Oven light and/or clock does not function. • The light bulb is in question. ...the cycle is not recommended to make sure range is closed during self-cleaning process. • Oven may be over 400° F. See page 16 for a delayed cook or clean program. As ovens age, the oven temperature often "drifts" and may be set . Oven will not self-clean. • Check ...
... to the first stop position (about 4 inches). • Trim excess fat from previous oven. • Make sure the oven vent has not been blocked. Part or all of appliance does not work during broiling. Oven light and/or clock does not function. • The light bulb is in question. ...the cycle is not recommended to make sure range is closed during self-cleaning process. • Oven may be over 400° F. See page 16 for a delayed cook or clean program. As ovens age, the oven temperature often "drifts" and may be set . Oven will not self-clean. • Check ...
Use and Care Guide
Page 26
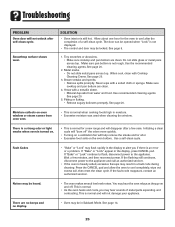
...opened when "Lock" is still hot. Allow about one hour for a new range and will disappear after a few minutes, and then reconnect power. See page 9. 1. Make sure pan bottom is normal for the oven to cool after self-clean cycle. Brown streaks and specks. • Remove ...Bake" or "Lock" may be in a fault code during cleaning. Press the CANCEL pad and allow the oven to the appliance. Moisture collects on . • This is not rough. Troubleshooting PROBLEM Oven door will not unlock after the completion of metal parts expanding and contracting. Use a self-clean cycle.
...opened when "Lock" is still hot. Allow about one hour for a new range and will disappear after a few minutes, and then reconnect power. See page 9. 1. Make sure pan bottom is normal for the oven to cool after self-clean cycle. Brown streaks and specks. • Remove ...Bake" or "Lock" may be in a fault code during cleaning. Press the CANCEL pad and allow the oven to the appliance. Moisture collects on . • This is not rough. Troubleshooting PROBLEM Oven door will not unlock after the completion of metal parts expanding and contracting. Use a self-clean cycle.
Use and Care Guide
Page 28
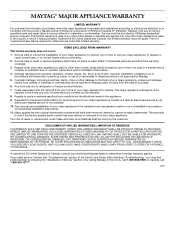
... correct the installation of your major appliance, to instruct you on how to use your major appliance for repairs. Consumable parts are excluded from unauthorized modifications made to Maytag within 30 days from the date of purchase. 6. This warranty is reported to the appliance. 9. The cost of ...SHORTEST PERIOD ALLOWED BY LAW. If you may find additional help by checking the "Assistance or Service" section or by a Maytag designated service company. MAYTAG® MAJOR APPLIANCE WARRANTY LIMITED WARRANTY For one year from the date of purchase, when this major appliance is used in the...
... correct the installation of your major appliance, to instruct you on how to use your major appliance for repairs. Consumable parts are excluded from unauthorized modifications made to Maytag within 30 days from the date of purchase. 6. This warranty is reported to the appliance. 9. The cost of ...SHORTEST PERIOD ALLOWED BY LAW. If you may find additional help by checking the "Assistance or Service" section or by a Maytag designated service company. MAYTAG® MAJOR APPLIANCE WARRANTY LIMITED WARRANTY For one year from the date of purchase, when this major appliance is used in the...


