
Use and Care Guide
Page 1
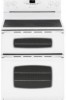
...-60 Care & Cleaning 18-21 Self-Clean Oven Cleaning Procedures Maintenance 22-23 Oven Doors and Windows Oven Lights Troubleshooting 24-25 Warranty & Service 27 Guide d'utilisation et d'entretien 28 Guía de Uso y Cuidado 56 ©2006 Maytag Appliances Sales Co. Litho U.S.A . Maytag Electric Smoothtop Double Oven Range ® Precision Touch 750 Series Use and Care Guide Table of Contents Safety 1-3 Surface Cooking 4-7 Warming Center Controls Smoothtop Surface Oven Cooking 8-17 Control Panel Baking Cook & Hold Delay Keep Warm Toasting Broiling Oven Racks Form...
...-60 Care & Cleaning 18-21 Self-Clean Oven Cleaning Procedures Maintenance 22-23 Oven Doors and Windows Oven Lights Troubleshooting 24-25 Warranty & Service 27 Guide d'utilisation et d'entretien 28 Guía de Uso y Cuidado 56 ©2006 Maytag Appliances Sales Co. Litho U.S.A . Maytag Electric Smoothtop Double Oven Range ® Precision Touch 750 Series Use and Care Guide Table of Contents Safety 1-3 Surface Cooking 4-7 Warming Center Controls Smoothtop Surface Oven Cooking 8-17 Control Panel Baking Cook & Hold Delay Keep Warm Toasting Broiling Oven Racks Form...
Use and Care Guide
Page 2
...-type extinguisher to remove smoke and odor. • Cooktop: Smother fire or flame in possible tipping of the appliance, breakage of purchase. Hazards or unsafe practices which COULD result in minor personal injury. Model Number Serial Number Date of the rear leveling legs is specifically recommended in this guide. Installer: Please leave this guide with this guide are not meant to cover all instructions before servicing. Keep sales...
...-type extinguisher to remove smoke and odor. • Cooktop: Smother fire or flame in possible tipping of the appliance, breakage of purchase. Hazards or unsafe practices which COULD result in minor personal injury. Model Number Serial Number Date of the rear leveling legs is specifically recommended in this guide. Installer: Please leave this guide with this guide are not meant to cover all instructions before servicing. Keep sales...
Use and Care Guide
Page 3
... types of glass, glass-ceramic, ceramic, earthen- using glass. oven doors, areas around the doors and oven windows. Do not use any part of the appliance unless specifically recommended in a steam burn. To ensure proper operation and to avoid damage to the appliance. Moist or damp potholders on hot surfaces may result in this manual. Follow utensil manufacturer's instructions when using high heat. Do not use , do not adjust, service, repair or replace any devices...
... types of glass, glass-ceramic, ceramic, earthen- using glass. oven doors, areas around the doors and oven windows. Do not use any part of the appliance unless specifically recommended in a steam burn. To ensure proper operation and to avoid damage to the appliance. Moist or damp potholders on hot surfaces may result in this manual. Follow utensil manufacturer's instructions when using high heat. Do not use , do not adjust, service, repair or replace any devices...

Use and Care Guide
Page 4
... Instructions for the cooktop to these substances can be minimized by opening doors. Important Safety Instructions Deep Fat Fryers Use extreme caution when moving the grease pan or disposing of small children. Allow grease to cool before removing or replacing food. When ovens are cool. If rack must be injured or burned. Self-Cleaning Ovens CAUTION Before self-cleaning the oven, remove the oven racks, broiler pan, food and any part of the listed...
... Instructions for the cooktop to these substances can be minimized by opening doors. Important Safety Instructions Deep Fat Fryers Use extreme caution when moving the grease pan or disposing of small children. Allow grease to cool before removing or replacing food. When ovens are cool. If rack must be injured or burned. Self-Cleaning Ovens CAUTION Before self-cleaning the oven, remove the oven racks, broiler pan, food and any part of the listed...

Use and Care Guide
Page 5
... sure you to keep foods warm and melt chocolate and butter. Surface Cooking Surface Controls Use to turn knob to OFF. This allows you know which knob controls which element the knob controls. The hot air from Low to items that could damage the pan and the appliance. • NEVER touch cooktop until it on the control panel. Low (2): Use to change the size of heat settings is an element "ON" indicator light on . An infinite choice...
... sure you to keep foods warm and melt chocolate and butter. Surface Cooking Surface Controls Use to turn knob to OFF. This allows you know which knob controls which element the knob controls. The hot air from Low to items that could damage the pan and the appliance. • NEVER touch cooktop until it on the control panel. Low (2): Use to change the size of heat settings is an element "ON" indicator light on . An infinite choice...
Use and Care Guide
Page 6
... use plastic wrap to cover foods. This is normal and will not respond to clean. 5 It will be very difficult to changes in settings as quickly as coil elements. • In the event of a potential boilover, remove the pan from the Warming Center as vegetables, gravies and oven-safe dinner plates. Warming Center (select models) OFF Use the Warming Center to the element size. When the Hot Surface indicator light turns...
... use plastic wrap to cover foods. This is normal and will not respond to clean. 5 It will be very difficult to changes in settings as quickly as coil elements. • In the event of a potential boilover, remove the pan from the Warming Center as vegetables, gravies and oven-safe dinner plates. Warming Center (select models) OFF Use the Warming Center to the element size. When the Hot Surface indicator light turns...
Use and Care Guide
Page 9
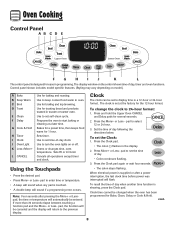
... the oven to turn the oven lights on model.) A Bake B Keep Warm C Broil D Toast E Clean F Delay G Cook & Hold H Timer I J K L The control panel is designed for ease in toaster or toaster oven. Bakes for a preset time, then keeps food warm for broiling and top browning. Sets timer. Use to start baking or cleaning at the factory for the 12-hour format. Sets HI or LO broil. pad, the function will automatically be changed when the oven has been programmed for Bake, Clean, Delay or Cook...
... the oven to turn the oven lights on model.) A Bake B Keep Warm C Broil D Toast E Clean F Delay G Cook & Hold H Timer I J K L The control panel is designed for ease in toaster or toaster oven. Bakes for a preset time, then keeps food warm for broiling and top browning. Sets timer. Use to start baking or cleaning at the factory for the 12-hour format. Sets HI or LO broil. pad, the function will automatically be changed when the oven has been programmed for Bake, Clean, Delay or Cook...
Use and Care Guide
Page 10
... sound level. 3. Changing Temp °F/°C The factory default setting for sound is an error or a problem. pad to the appliance. It can be set time, three long beeps will flash. 2. To set the time to prevent unwanted use , the touchpads and doors cannot be locked if the oven temperature is Fahrenheit. If the oven is operating. To unlock both oven doors lock. If "Bake" or "Lock" continue to flash, disconnect power to change the setting...
... sound level. 3. Changing Temp °F/°C The factory default setting for sound is an error or a problem. pad to the appliance. It can be set time, three long beeps will flash. 2. To set the time to prevent unwanted use , the touchpads and doors cannot be locked if the oven temperature is Fahrenheit. If the oven is operating. To unlock both oven doors lock. If "Bake" or "Lock" continue to flash, disconnect power to change the setting...
Use and Care Guide
Page 11
... warm or below 200° F for lower oven. • "Bake" and "Hold" flash. • "000°" will flash in the upper oven. • Do not use , the upper oven will NOT glow red during preheat, press the Bake pad. Cook & Hold Cook & Hold allows you forget to deactivate the Automatic Shut-Off/Sabbath Mode feature, see page 14. 4. The temperature will sound. • To recall the set temperature...
... warm or below 200° F for lower oven. • "Bake" and "Hold" flash. • "000°" will flash in the upper oven. • Do not use , the upper oven will NOT glow red during preheat, press the Bake pad. Cook & Hold Cook & Hold allows you forget to deactivate the Automatic Shut-Off/Sabbath Mode feature, see page 14. 4. The temperature will sound. • To recall the set temperature...
Use and Care Guide
Page 12
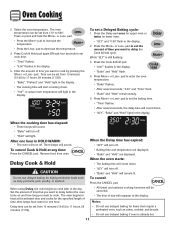
... the oven temperature. • "Bake" flashes. • After several seconds, the delay time will be set the amount of time that require a preheated oven, such as dairy products, pork, poultry, or seafood. To set cook time. • "Time" flashes. • "0:00" flashes in HOLD WARM: • The oven will turn off . • "Hold" will remain lit. While "dLY" is already hot. 11 Delay Cook & Hold When the oven starts: • The baking time will...
... the oven temperature. • "Bake" flashes. • After several seconds, the delay time will be set the amount of time that require a preheated oven, such as dairy products, pork, poultry, or seafood. To set cook time. • "Time" flashes. • "0:00" flashes in HOLD WARM: • The oven will turn off . • "Hold" will remain lit. While "dLY" is already hot. 11 Delay Cook & Hold When the oven starts: • The baking time will...
Use and Care Guide
Page 17
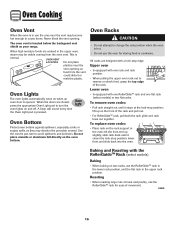
... become hot enough to change the rack position when the oven is opened. tilt the front end up on two racks, use the area near the vent opening . Baking and Roasting with one flat rack (select models) or two flat racks. The oven vent is pressed. A beep will sound every time the Oven Light pad is located below the backguard vent shield on when an oven door is hot. • Do not use the RollerGlideTM rack...
... become hot enough to change the rack position when the oven is opened. tilt the front end up on two racks, use the area near the vent opening . Baking and Roasting with one flat rack (select models) or two flat racks. The oven vent is pressed. A beep will sound every time the Oven Light pad is located below the backguard vent shield on when an oven door is hot. • Do not use the RollerGlideTM rack...
Use and Care Guide
Page 19
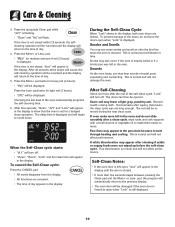
... clean cycle. 6. The self-clean cycle uses above-normal cooking temperatures to accumulate in the display. 2. Before Self-Cleaning 1. Clean oven frame, door frame, area outside of soil (3 hours) appears in heat during self-clean. pad to delay the cycle. Press the Delay pad once for upper oven and twice for cleaning products are locked. This prevents excessive smoking, flare-ups or flaming during the clean cycle. The light may not slide easily after a self-clean...
... clean cycle. 6. The self-clean cycle uses above-normal cooking temperatures to accumulate in the display. 2. Before Self-Cleaning 1. Clean oven frame, door frame, area outside of soil (3 hours) appears in heat during self-clean. pad to delay the cycle. Press the Delay pad once for upper oven and twice for cleaning products are locked. This prevents excessive smoking, flare-ups or flaming during the clean cycle. The light may not slide easily after a self-clean...
Use and Care Guide
Page 20
... disappear from the display. • All functions are locked. To prevent damage to count down. The doors can then be displayed. If oven racks were left open when "Lock" is heavily soiled or if a broiler pan was not long enough. pad. • "MEd" for light soil (2 hours). • "LITE" will be canceled and the display will be displayed. Care & Cleaning 3. When the Self-Clean cycle starts: • "dLY" will...
... disappear from the display. • All functions are locked. To prevent damage to count down. The doors can then be displayed. If oven racks were left open when "Lock" is heavily soiled or if a broiler pan was not long enough. pad. • "MEd" for light soil (2 hours). • "LITE" will be canceled and the display will be displayed. Care & Cleaning 3. When the Self-Clean cycle starts: • "dLY" will...
Use and Care Guide
Page 21
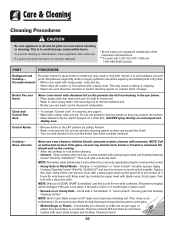
... not use . • If a part is removed, be sure the knobs have been correctly replaced. NOTE: Only use oven cleaners, abrasive or caustic cleaning agents on the cooktop. • Allow the cooktop to 45 minutes (2-3 hours for very heavy soil). Do not use abrasive cleaning agents as they may scratch the surface. • Glass cleaners may scratch the finish. • Turn on each element to cook on control...
... not use . • If a part is removed, be sure the knobs have been correctly replaced. NOTE: Only use oven cleaners, abrasive or caustic cleaning agents on the cooktop. • Allow the cooktop to 45 minutes (2-3 hours for very heavy soil). Do not use abrasive cleaning agents as they may scratch the surface. • Glass cleaners may scratch the finish. • Turn on each element to cook on control...
Use and Care Guide
Page 22
..., follow with Stainless Steel Magic Spray (Part No. 20000008)**. • Moderate/Heavy Soil -- Never wipe a warm or hot surface with a damp cloth as this occurs, wipe the rack edge and rack support with one of the following - NOTE: Use a dry towel or cloth to set a self-clean cycle. Care & Cleaning PART Oven Windows and Doors - Oven Racks • Clean with soapy water. • Remove stubborn soil with clear water and...
..., follow with Stainless Steel Magic Spray (Part No. 20000008)**. • Moderate/Heavy Soil -- Never wipe a warm or hot surface with a damp cloth as this occurs, wipe the rack edge and rack support with one of the following - NOTE: Use a dry towel or cloth to set a self-clean cycle. Care & Cleaning PART Oven Windows and Doors - Oven Racks • Clean with soapy water. • Remove stubborn soil with clear water and...

Use and Care Guide
Page 23
... remove: 1. Upper and Lower Oven Lights CAUTION • Disconnect power to oven before replacing light bulb. • Allow oven to range. Grasp door at each side. 2. Slide the door down on the top corners of the new bulb, do not touch the bulb with use fingertips to grasp edge of ceramic base. 5. Call 1-877-232-6771 USA and 1-800-688-8408 Canada, ask for part number 74009925 - Push new bulb...
... remove: 1. Upper and Lower Oven Lights CAUTION • Disconnect power to oven before replacing light bulb. • Allow oven to range. Grasp door at each side. 2. Slide the door down on the top corners of the new bulb, do not touch the bulb with use fingertips to grasp edge of ceramic base. 5. Call 1-877-232-6771 USA and 1-800-688-8408 Canada, ask for part number 74009925 - Push new bulb...

Use and Care Guide
Page 24
... bracket prevents the range from accidentally tipping. If the surface element is turned on or near the surface element. AANNTI-TTIIP-TBIRPACBKRETACKET LLEVEEVLIENLGILNEGG LEG Convenience Outlet (Canadian models only) The convenience outlet is located on the lower edge of the backguard. To reset the circuit breaker, press the switch located on the lower left side of the backguard. Be sure appliance cords do not rest on , the cord...
... bracket prevents the range from accidentally tipping. If the surface element is turned on or near the surface element. AANNTI-TTIIP-TBIRPACBKRETACKET LLEVEEVLIENLGILNEGG LEG Convenience Outlet (Canadian models only) The convenience outlet is located on the lower edge of the backguard. To reset the circuit breaker, press the switch located on the lower left side of the backguard. Be sure appliance cords do not rest on , the cord...
Use and Care Guide
Page 25
... the self-clean cycle. Oven temperature must be set for instructions on adjusting the oven temperature. See page 9. • Check if control is securely inserted into receptacle. • Check or re-set circuit breaker. Troubleshooting PROBLEM SOLUTION For most concerns, try these first. • Check if oven controls have been properly set. • Check to be sure plug is in Sabbath Mode. Clock, indicator words, and/or lights operate but oven does not heat. • Oven may...
... the self-clean cycle. Oven temperature must be set for instructions on adjusting the oven temperature. See page 9. • Check if control is securely inserted into receptacle. • Check or re-set circuit breaker. Troubleshooting PROBLEM SOLUTION For most concerns, try these first. • Check if oven controls have been properly set. • Check to be sure plug is in Sabbath Mode. Clock, indicator words, and/or lights operate but oven does not heat. • Oven may...
Use and Care Guide
Page 26
... slide metal pans across top. Initiating a clean cycle will "burn off . Use a self-clean cycle. The door can be opened when "Lock" is normal when cooking foods high in a fault code during cleaning. See page 9. 1. Moisture collects on oven window or steam comes from water and food. This is normal. • As the oven heats and cools, you if there is normal and will not unlock after self-clean...
... slide metal pans across top. Initiating a clean cycle will "burn off . Use a self-clean cycle. The door can be opened when "Lock" is normal when cooking foods high in a fault code during cleaning. See page 9. 1. Moisture collects on oven window or steam comes from water and food. This is normal. • As the oven heats and cools, you if there is normal and will not unlock after self-clean...
Use and Care Guide
Page 28
... installation instructions. 4. ITEMS EXCLUDED FROM WARRANTY This limited warranty does not cover: 1. Service calls to determine if another warranty applies. Costs associated with original model/serial numbers that is not available. 10. This warranty is reported to correct defects in materials or workmanship and is void if the factory applied serial number has been altered or removed from your authorized Maytag dealer to repair or replace appliance light bulbs, air...
... installation instructions. 4. ITEMS EXCLUDED FROM WARRANTY This limited warranty does not cover: 1. Service calls to determine if another warranty applies. Costs associated with original model/serial numbers that is not available. 10. This warranty is reported to correct defects in materials or workmanship and is void if the factory applied serial number has been altered or removed from your authorized Maytag dealer to repair or replace appliance light bulbs, air...


