Use and Care Guide
Page 1
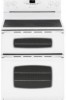
... d'utilisation et d'entretien 28 Guía de Uso y Cuidado 56 ©2006 Maytag Appliances Sales Co. Litho U.S.A . Maytag Electric Smoothtop Double Oven Range ® Precision Touch 750 Series Use and Care Guide Table of Contents Safety 1-3 Surface Cooking 4-7 Warming Center Controls Smoothtop Surface Oven Cooking 8-17 Control Panel Baking Cook & Hold Delay Keep Warm Toasting Broiling...
... d'utilisation et d'entretien 28 Guía de Uso y Cuidado 56 ©2006 Maytag Appliances Sales Co. Litho U.S.A . Maytag Electric Smoothtop Double Oven Range ® Precision Touch 750 Series Use and Care Guide Table of Contents Safety 1-3 Surface Cooking 4-7 Warming Center Controls Smoothtop Surface Oven Cooking 8-17 Control Panel Baking Cook & Hold Delay Keep Warm Toasting Broiling...
Use and Care Guide
Page 2
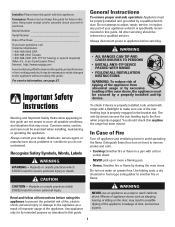
...) (Mon.-Fri., 8 am-8 pm Eastern Time) Internet: http://www.maytag.com In our continuing effort to improve the quality and performance of the...Case of Purchase If you do not understand. NEVER pick up or move a flaming pan. • Ovens: Smother fire or flame by a qualified technician. Use appliance only for future reference. Always contact your ... practices which COULD result in this guide. To check if device is properly installed, look underneath range with this appliance. You should be exercised when installing, maintaining, or operating the appliance. Read and...
...) (Mon.-Fri., 8 am-8 pm Eastern Time) Internet: http://www.maytag.com In our continuing effort to improve the quality and performance of the...Case of Purchase If you do not understand. NEVER pick up or move a flaming pan. • Ovens: Smother fire or flame by a qualified technician. Use appliance only for future reference. Always contact your ... practices which COULD result in this guide. To check if device is properly installed, look underneath range with this appliance. You should be exercised when installing, maintaining, or operating the appliance. Read and...
Use and Care Guide
Page 3
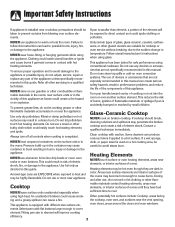
... comes in contact with flat bottoms large enough to the appliance. Glass-Ceramic Cooktop NEVER cook on oven convection systems. The use a towel or other combustible or flammable materials in the ovens, near surface units or in this manual. Always turn off all other...materials contact heating elements, areas near elements, or interior surfaces of the appliance unless specifically recommended in the vicinity of glass, glass-ceramic, ceramic, earthen- ments. Failure to prevent curtains from blowing over another surface element. NEVER store or use , do not adjust, service...
... comes in contact with flat bottoms large enough to the appliance. Glass-Ceramic Cooktop NEVER cook on oven convection systems. The use a towel or other combustible or flammable materials in the ovens, near surface units or in this manual. Always turn off all other...materials contact heating elements, areas near elements, or interior surfaces of the appliance unless specifically recommended in the vicinity of glass, glass-ceramic, ceramic, earthen- ments. Failure to prevent curtains from blowing over another surface element. NEVER store or use , do not adjust, service...

Use and Care Guide
Page 4
... Wipe up excessive spillovers, especially greasy spills, before removing or replacing food. Therefore, avoid touching the cooktop, door, window or oven vent during the self-clean cycle. NEVER allow children to sit or stand on hood or filter and to avoid grease fires. Users...Instructions for a good seal. No commercial oven cleaner or oven liner protective coating of any part of interest to children in desired locations while ovens are cool. Child Safety CAUTION NEVER store items of the ovens. Ventilating Hoods Clean range hood and filters frequently to prevent grease ...
... Wipe up excessive spillovers, especially greasy spills, before removing or replacing food. Therefore, avoid touching the cooktop, door, window or oven vent during the self-clean cycle. NEVER allow children to sit or stand on hood or filter and to avoid grease fires. Users...Instructions for a good seal. No commercial oven cleaner or oven liner protective coating of any part of interest to children in desired locations while ovens are cool. Child Safety CAUTION NEVER store items of the ovens. Ventilating Hoods Clean range hood and filters frequently to prevent grease ...
Use and Care Guide
Page 6
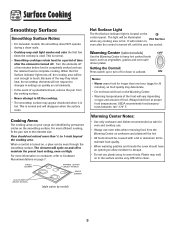
...at proper food temperatures. Turn the elements off to maintain the preset heat setting, even on High. Cooking Areas The cooking areas on your range are identified by model) Hot Surface Light The Hot Surface indicator light is located on , even after the element is turned off or ...permanent circles on type and amount of a potential boilover, remove the pan from the Warming Center as safe for 30 minutes), as vegetables, gravies and oven-safe dinner plates. Plastic may melt on , a glow can be cool enough to touch. Surface Cooking Smoothtop Surface Smoothtop Surface Notes: • ...
...at proper food temperatures. Turn the elements off to maintain the preset heat setting, even on High. Cooking Areas The cooking areas on your range are identified by model) Hot Surface Light The Hot Surface indicator light is located on , even after the element is turned off or ...permanent circles on type and amount of a potential boilover, remove the pan from the Warming Center as safe for 30 minutes), as vegetables, gravies and oven-safe dinner plates. Plastic may melt on , a glow can be cool enough to touch. Surface Cooking Smoothtop Surface Smoothtop Surface Notes: • ...
Use and Care Guide
Page 9
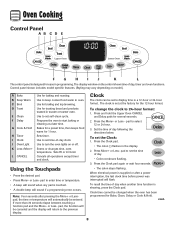
...Press the desired pad. • Press More+ or Less- pad to display time in toaster or toaster oven. The clock is touched. • A double beep will flash. Press and hold the Upper Oven CANCEL and Delay pads for the 12-hour format. Use to set to enter time or temperature. •... interruption, the last clock time before power was interrupted will sound if a programming error occurs. Clock The clock can be changed when the oven has been programmed for baking and roasting. Use for broiling and top browning. Press the More+ or Less - When electrical power is showing...
...Press the desired pad. • Press More+ or Less- pad to display time in toaster or toaster oven. The clock is touched. • A double beep will flash. Press and hold the Upper Oven CANCEL and Delay pads for the 12-hour format. Use to set to enter time or temperature. •... interruption, the last clock time before power was interrupted will sound if a programming error occurs. Clock The clock can be changed when the oven has been programmed for baking and roasting. Use for broiling and top browning. Press the More+ or Less - When electrical power is showing...
Use and Care Guide
Page 10
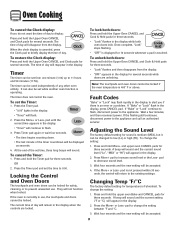
... displayed for 10 seconds whenever a pad is canceled, press the Clock pad to the existing settings. To unlock both doors: Press and hold the Upper Oven CANCEL and Clock pads for several seconds. A beep will sound and the current sound level ("Lo", "MEd" or "HI") will flash. 2. Wait four ...be accepted. 9 The time of day will return to briefly display the time of day. To cancel the Timer: 1. They will be set while another oven function is Fahrenheit. If "Bake" or "Lock" flash in the display. If the flashing still continues, disconnect power to increase sound level or the ...
... displayed for 10 seconds whenever a pad is canceled, press the Clock pad to the existing settings. To unlock both doors: Press and hold the Upper Oven CANCEL and Clock pads for several seconds. A beep will sound and the current sound level ("Lo", "MEd" or "HI") will flash. 2. Wait four ...be accepted. 9 The time of day will return to briefly display the time of day. To cancel the Timer: 1. They will be set while another oven function is Fahrenheit. If "Bake" or "Lock" flash in the display. If the flashing still continues, disconnect power to increase sound level or the ...
Use and Care Guide
Page 11
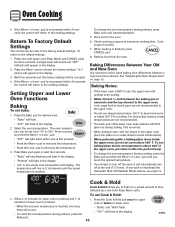
...30 seconds, the control will NOT glow red during preheat, press the Bake pad. To use baking/pizza stones at least 1/2-inch between a new oven and an old one long beep will preheat more quickly. • Allow at temperatures above 400° F. cont. 10 If the More+ or ...pad. 8. To set bake: 1. A single beep will sound and "dEF" (default) will flash in use temperatures below 140° F to turn off the oven, it will automatically turn off at minumum cooking time. This is not pressed within 30 seconds, the control will return to 550°. pad is...
...30 seconds, the control will NOT glow red during preheat, press the Bake pad. To use baking/pizza stones at least 1/2-inch between a new oven and an old one long beep will preheat more quickly. • Allow at temperatures above 400° F. cont. 10 If the More+ or ...pad. 8. To set bake: 1. A single beep will sound and "dEF" (default) will flash in use temperatures below 140° F to turn off the oven, it will automatically turn off at minumum cooking time. This is not pressed within 30 seconds, the control will return to 550°. pad is...
Use and Care Guide
Page 12
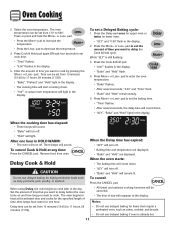
...display. • The cooking time will count down. • "dLY", "Bake" and "Hold" light in the display. 2. Press the Delay pad once for upper oven or twice for highly perishable foods such as dairy products, pork, poultry, or seafood. pad to cook by pressing the More+ or Less- Set the... amount of time you want to enter the oven temperature. • "Bake" flashes. • After several seconds, the delay time will start counting down . Press Cook & Hold pad again OR wait four ...
...display. • The cooking time will count down. • "dLY", "Bake" and "Hold" light in the display. 2. Press the Delay pad once for upper oven or twice for highly perishable foods such as dairy products, pork, poultry, or seafood. pad to cook by pressing the More+ or Less- Set the... amount of time you want to enter the oven temperature. • "Bake" flashes. • After several seconds, the delay time will start counting down . Press Cook & Hold pad again OR wait four ...
Use and Care Guide
Page 13
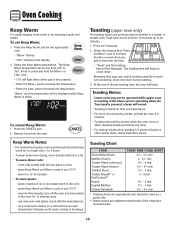
... More+ pad to increase the time or press the Lesspad to count down. cover rolls loosely with foil and place in a toaster or toaster oven. Press the Toast pad. 2. Toasting Chart FOOD Sliced White Bread Waffles (frozen) Toaster Pastry (unfrozen) Toaster Pastry (frozen) Tortillas (flour) ...The toasting time will begin to decrease the time. • "Toast" and the toasting time will beep. Toasting Notes: • Lower oven may vary, watch toasting carefully to decrease the temperature. Browning time may not be used as rapid temperature changes could cause crazing or breakage. ...
... More+ pad to increase the time or press the Lesspad to count down. cover rolls loosely with foil and place in a toaster or toaster oven. Press the Toast pad. 2. Toasting Chart FOOD Sliced White Bread Waffles (frozen) Toaster Pastry (unfrozen) Toaster Pastry (frozen) Tortillas (flour) ...The toasting time will begin to decrease the time. • "Toast" and the toasting time will beep. Toasting Notes: • Lower oven may vary, watch toasting carefully to decrease the temperature. Browning time may not be used as rapid temperature changes could cause crazing or breakage. ...
Use and Care Guide
Page 14
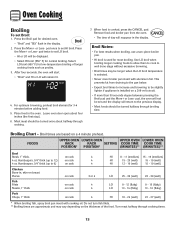
... a 4 minute preheat. Press the More+ or Less- Use LO broil when broiling longer cooking foods to allow them to cook to 12) 4 oz. pad, the oven will not be longer when the LO broil temperature is installed on rack 4 4 4 3 or 4 4 4 4 HI 8 - 11 (medium) 15 - 19 (medium... twice to set Broil: 1. Place food in the display. 2. This prevents fat from the oven. • The time of day will return to 6) Chicken Bone-in the display. FOODS UPPER OVEN LOWER OVEN UPPER OVEN LOWER OVEN RACK RACK SETTING COOK TIME COOK TIME POSITION* POSITION* (MINUTES)** (MINUTES)** Beef Steak, 1"...
... a 4 minute preheat. Press the More+ or Less- Use LO broil when broiling longer cooking foods to allow them to cook to 12) 4 oz. pad, the oven will not be longer when the LO broil temperature is installed on rack 4 4 4 3 or 4 4 4 4 HI 8 - 11 (medium) 15 - 19 (medium... twice to set Broil: 1. Place food in the display. 2. This prevents fat from the oven. • The time of day will return to 6) Chicken Bone-in the display. FOODS UPPER OVEN LOWER OVEN UPPER OVEN LOWER OVEN RACK RACK SETTING COOK TIME COOK TIME POSITION* POSITION* (MINUTES)** (MINUTES)** Beef Steak, 1"...
Use and Care Guide
Page 15
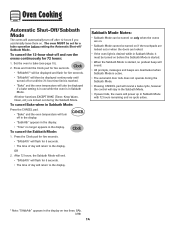
...; "SAbbAth" will flash for a bake operation before the Sabbath Mode is started. • When the Sabbath Mode is reached. • "Bake" and the oven temperature will return to bake (see page 10). 2. To cancel the 12-hour shut-off / Sabbath Mode. OR 2. All other functions EXCEPT BAKE (Timer, ... seconds. • "SAbbAth" will turn off after 12 hours if you accidentally leave them on before setting the Automatic Shut-off and run the ovens continuously for 5 seconds. • The time of day will sound. • All prompts, messages and beeps are deactivated when Sabbath Mode is ...
...; "SAbbAth" will flash for a bake operation before the Sabbath Mode is started. • When the Sabbath Mode is reached. • "Bake" and the oven temperature will return to bake (see page 10). 2. To cancel the 12-hour shut-off / Sabbath Mode. OR 2. All other functions EXCEPT BAKE (Timer, ... seconds. • "SAbbAth" will turn off after 12 hours if you accidentally leave them on before setting the Automatic Shut-off and run the ovens continuously for 5 seconds. • The time of day will sound. • All prompts, messages and beeps are deactivated when Sabbath Mode is ...
Use and Care Guide
Page 16
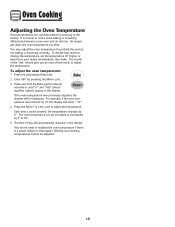
...for several seconds or until "0°" and "AdJ" (which signifies 'adjust') appear in the display You do not need to readjust the oven temperature if there is pressed, the temperature changes by 5° to adjust the temperature. The time of day will automatically reappear in the ...display. As ranges get older, the oven temperature can be increased or decreased by 5°. If the oven temperature was reduced by pressing the More+ pad. 3. Each time a pad is a power failure or ...
...for several seconds or until "0°" and "AdJ" (which signifies 'adjust') appear in the display You do not need to readjust the oven temperature if there is pressed, the temperature changes by 5° to adjust the temperature. The time of day will automatically reappear in the ...display. As ranges get older, the oven temperature can be increased or decreased by 5°. If the oven temperature was reduced by pressing the More+ pad. 3. Each time a pad is a power failure or ...
Use and Care Guide
Page 17
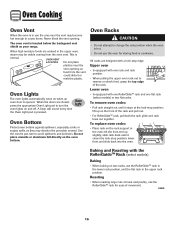
... the rack. Baking and Roasting with one RollerGlideTM rack and one rack and rack position. • When pulling the upper oven rack out to turn the oven lights on your range. This is hot. • Do not use the RollerGlideTM rack in the lower rack position, and the flat rack in... the oven; Upper oven • Is equipped with a lock-stop edge. Lower oven • Is equipped with the RollerGuideTM Rack (select models) Baking •...
... the rack. Baking and Roasting with one RollerGlideTM rack and one rack and rack position. • When pulling the upper oven rack out to turn the oven lights on your range. This is hot. • Do not use the RollerGlideTM rack in the lower rack position, and the flat rack in... the oven; Upper oven • Is equipped with a lock-stop edge. Lower oven • Is equipped with the RollerGuideTM Rack (select models) Baking •...
Use and Care Guide
Page 18
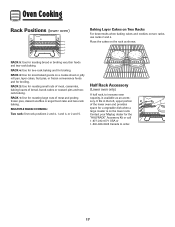
Half Rack Accessory (Lower oven only) A half rack, to order. 17 RACK 3: Use for most baked goods on the rack as an accessory. Contact your Maytag dealer for broiling. Place the cakes on a cookie sheet or jelly roll pan, layer cakes, fruit pies, or frozen convenience foods and for the "...HALFRACK" Accessory Kit or call 1-877-232-6771 USA or 1-800-688-8408 Canada to increase oven capacity, is on two ...
Half Rack Accessory (Lower oven only) A half rack, to order. 17 RACK 3: Use for most baked goods on the rack as an accessory. Contact your Maytag dealer for broiling. Place the cakes on a cookie sheet or jelly roll pan, layer cakes, fruit pies, or frozen convenience foods and for the "...HALFRACK" Accessory Kit or call 1-877-232-6771 USA or 1-800-688-8408 Canada to increase oven capacity, is on two ...
Use and Care Guide
Page 19
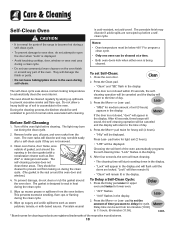
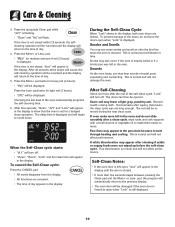
... door gasket with cleaning. Clean oven frame, door frame, area outside of day. 4. This prevents excessive smoking, flare-ups or flaming during the clean cycle. Porcelain enamel • "HVy" will be canceled and the display will return to the time of the range to become hot during the clean... cycle. 5. Press Less- Choosing the soil level of time you want to the time of gasket, and around the oven door. "Lock" will then remain lit. • "Clean" will ...
... door gasket with cleaning. Clean oven frame, door frame, area outside of day. 4. This prevents excessive smoking, flare-ups or flaming during the clean cycle. Porcelain enamel • "HVy" will be canceled and the display will return to the time of the range to become hot during the clean... cycle. 5. Press Less- Choosing the soil level of time you want to the time of gasket, and around the oven door. "Lock" will then remain lit. • "Clean" will ...
Use and Care Guide
Page 20
... contracting. The soil will appear in the display. A white discoloration may see some smoke and smell an odor the first few times the oven is not closed within 25 seconds, the selfcleaning operation will be canceled and the display will be removed during the next clean cycle. This...were not wiped up before the self-clean cycle. pad, the program will automatically return to open , "door" will begin to the time of the oven automatically programs the self-cleaning time. 6. Care & Cleaning 3. After 45 seconds, three beeps will sound, the self-cleaning operation will be opened. ...
... contracting. The soil will appear in the display. A white discoloration may see some smoke and smell an odor the first few times the oven is not closed within 25 seconds, the selfcleaning operation will be canceled and the display will be removed during the next clean cycle. This...were not wiped up before the self-clean cycle. pad, the program will automatically return to open , "door" will begin to the time of the oven automatically programs the self-cleaning time. 6. Care & Cleaning 3. After 45 seconds, three beeps will sound, the self-cleaning operation will be opened. ...
Use and Care Guide
Page 21
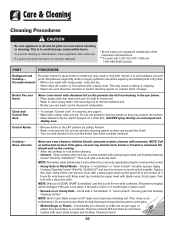
.... DO NOT spray directly on exterior finish of range. NOTE: Call an authorized servicer if the glass-ceramic top should crack, break or if metal or aluminum foil should be sure it may wear the pattern on each use oven cleaners, abrasive or caustic cleaning agents on control ... scouring pad to avoid damage and possible burns. • To prevent staining or discoloration, clean appliance after each element to a cool area. Glass-Ceramic Never use a CLEAN, DAMP "scratchless" pad that is safe for daily cleaning as they may scratch the surface. • Glass cleaners may scratch...
.... DO NOT spray directly on exterior finish of range. NOTE: Call an authorized servicer if the glass-ceramic top should crack, break or if metal or aluminum foil should be sure it may wear the pattern on each use oven cleaners, abrasive or caustic cleaning agents on control ... scouring pad to avoid damage and possible burns. • To prevent staining or discoloration, clean appliance after each element to a cool area. Glass-Ceramic Never use a CLEAN, DAMP "scratchless" pad that is safe for daily cleaning as they may scratch the surface. • Glass cleaners may scratch...
Use and Care Guide
Page 22
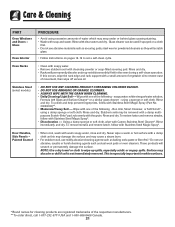
...Enamel • When cool, wash with Cameo Stainless Steel Cleaner*. NOTE: Use a dry towel or cloth to set a self-clean cycle. Care & Cleaning PART Oven Windows and Doors - Wipe with soap and water. Rinse and dry. rub evenly with Stainless Steel Magic Spray*. To remove streaks and restore luster, follow... baking soda paste or Bon Ami.* Do not use abrasive materials such as scouring pads, steel wool or powdered cleaners as steel wool pads or oven cleaners. using a damp sponge or soft cloth. Never wipe a warm or hot surface with a damp cloth as this occurs, wipe the rack ...
...Enamel • When cool, wash with Cameo Stainless Steel Cleaner*. NOTE: Use a dry towel or cloth to set a self-clean cycle. Care & Cleaning PART Oven Windows and Doors - Wipe with soap and water. Rinse and dry. rub evenly with Stainless Steel Magic Spray*. To remove streaks and restore luster, follow... baking soda paste or Bon Ami.* Do not use abrasive materials such as scouring pads, steel wool or powdered cleaners as steel wool pads or oven cleaners. using a damp sponge or soft cloth. Never wipe a warm or hot surface with a damp cloth as this occurs, wipe the rack ...

Use and Care Guide
Page 23
...Do not hit the glass with the hinge arms on the range. 3. Grasp door at a later date. Slide the door down on the top corners of ceramic base. 5. To assure the proper replacement bulb is closed. To replace upper oven light bulbs: 1. Carefully remove old bulb by snapping into ...is used, order bulb from Maytag. Scratching, hitting, jarring or stressing the glass may discolor the porcelain enamel. Call 1-877-232-6771 USA and 1-800-688-8408 Canada, ask for part number 74009925 - Oven Bottom Protect oven bottom against oven frame and could cause the range to tip over, break ...
...Do not hit the glass with the hinge arms on the range. 3. Grasp door at a later date. Slide the door down on the top corners of ceramic base. 5. To assure the proper replacement bulb is closed. To replace upper oven light bulbs: 1. Carefully remove old bulb by snapping into ...is used, order bulb from Maytag. Scratching, hitting, jarring or stressing the glass may discolor the porcelain enamel. Call 1-877-232-6771 USA and 1-800-688-8408 Canada, ask for part number 74009925 - Oven Bottom Protect oven bottom against oven frame and could cause the range to tip over, break ...


