
Use and Care Manual
Page 1
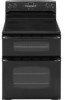
...08 Part No. 8113P741-60 Care & Cleaning 18-21 Self-Clean Oven Cleaning Procedures Maintenance 22-23 Oven Doors and Windows Oven Lights Troubleshooting 24-25 Warranty & Service 27 Guide d'utilisation et d'entretien 28 Guía de Uso y Cuidado 56 ©2006 Maytag Appliances Sales Co. Maytag Electric Smoothtop Double Oven Range ® Precision Touch 750 Series Use and Care Guide Table of Contents Safety 1-3 Surface Cooking 4-7 Warming Center Controls Smoothtop Surface Oven Cooking 8-17 Control Panel Baking Cook & Hold Delay Keep Warm Toasting Broiling Oven Racks Form...
...08 Part No. 8113P741-60 Care & Cleaning 18-21 Self-Clean Oven Cleaning Procedures Maintenance 22-23 Oven Doors and Windows Oven Lights Troubleshooting 24-25 Warranty & Service 27 Guide d'utilisation et d'entretien 28 Guía de Uso y Cuidado 56 ©2006 Maytag Appliances Sales Co. Maytag Electric Smoothtop Double Oven Range ® Precision Touch 750 Series Use and Care Guide Table of Contents Safety 1-3 Surface Cooking 4-7 Warming Center Controls Smoothtop Surface Oven Cooking 8-17 Control Panel Baking Cook & Hold Delay Keep Warm Toasting Broiling Oven Racks Form...
Use and Care Manual
Page 2
.... Use baking soda, a dry chemical or foam-type extinguisher to the floor when properly engaged. Common sense, caution, and care must be referred to improve the quality and performance of Fire Turn off appliance and ventilating hood to remove smoke and odor. • Cooktop: Smother fire or flame in this guide are not meant to cover all instructions before servicing. The anti-tip device...
.... Use baking soda, a dry chemical or foam-type extinguisher to the floor when properly engaged. Common sense, caution, and care must be referred to improve the quality and performance of Fire Turn off appliance and ventilating hood to remove smoke and odor. • Cooktop: Smother fire or flame in this guide are not meant to cover all instructions before servicing. The anti-tip device...
Use and Care Manual
Page 3
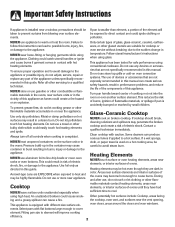
... with different size surface ele- container to line drip bowls or cover oven racks or oven bottoms. This could create a fire hazard or an explosion. ments. Do not use stove top grills or add-on broken cooktop. Refer all controls when cooking is completed. If cooktop should be the ovens. Glass-Ceramic Cooktop NEVER cook on oven convection systems. The use appliance to the appliance. Important Safety Instructions If appliance is installed near a window...
... with different size surface ele- container to line drip bowls or cover oven racks or oven bottoms. This could create a fire hazard or an explosion. ments. Do not use stove top grills or add-on broken cooktop. Refer all controls when cooking is completed. If cooktop should be the ovens. Glass-Ceramic Cooktop NEVER cook on oven convection systems. The use appliance to the appliance. Important Safety Instructions If appliance is installed near a window...

Use and Care Manual
Page 4
.... Fumes released due to overheated cooking oil, fat, margarine and overheated non-stick cookware may become hot during the self-clean cycle. Child Safety CAUTION NEVER store items of hot grease. Self-Cleaning Ovens CAUTION Before self-cleaning the oven, remove the oven racks, broiler pan, food and any part of the listed substances, including carbon monoxide. Important Safety Instructions Deep Fat Fryers Use extreme caution when moving the grease...
.... Fumes released due to overheated cooking oil, fat, margarine and overheated non-stick cookware may become hot during the self-clean cycle. Child Safety CAUTION NEVER store items of hot grease. Self-Cleaning Ovens CAUTION Before self-cleaning the oven, remove the oven racks, broiler pan, food and any part of the listed substances, including carbon monoxide. Important Safety Instructions Deep Fat Fryers Use extreme caution when moving the grease...
Use and Care Manual
Page 5
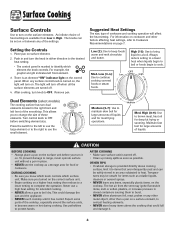
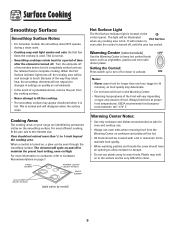
... which knob controls which element the knob controls. Dual Elements (select models) The cooking surface has two dual elements located in the right front and left front element. 3. Turn control knob to cook. Make sure you to a boil. AFTER COOKING • Make sure surface unit is turned off . 4. The hot air from Low to High. Suggested Heat Settings The size, type of the settings. High (10): Use to bring liquid to change the size of the cooktop, especially around the surface units...
... which knob controls which element the knob controls. Dual Elements (select models) The cooking surface has two dual elements located in the right front and left front element. 3. Turn control knob to cook. Make sure you to a boil. AFTER COOKING • Make sure surface unit is turned off . 4. The hot air from Low to High. Suggested Heat Settings The size, type of the settings. High (10): Use to bring liquid to change the size of the cooktop, especially around the surface units...
Use and Care Manual
Page 6
... the element size. Warming Center Notes: • Use only cookware and dishes recommended as safe for a period of time after the control is turned off a few times the cooktop is used. For more than one hour (eggs for longer than 1/2 to 1-inch beyond the cooking area. This is normal. • Smoothtop cooktops retain heat for oven and cooktop use. • Always use oven mitts when removing food from the cooking surface. •...
... the element size. Warming Center Notes: • Use only cookware and dishes recommended as safe for a period of time after the control is turned off a few times the cooktop is used. For more than one hour (eggs for longer than 1/2 to 1-inch beyond the cooking area. This is normal. • Smoothtop cooktops retain heat for oven and cooktop use. • Always use oven mitts when removing food from the cooking surface. •...
Use and Care Manual
Page 9
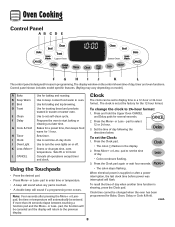
... turn the oven lights on model.) A Bake B Keep Warm C Broil D Toast E Clean F Delay G Cook & Hold H Timer I J K L The control panel is touched. • A double beep will automatically be set the time of day following the directions below. cont. 8 Press More+ or Less- Clock The clock can be entered. Use to set to the previous display. Use to 24-hour format: 1. Sets timer. To set self-clean cycle. The display window on the control shows time of day, timer and oven functions. To change the clock to set the Clock...
... turn the oven lights on model.) A Bake B Keep Warm C Broil D Toast E Clean F Delay G Cook & Hold H Timer I J K L The control panel is touched. • A double beep will automatically be set the time of day following the directions below. cont. 8 Press More+ or Less- Clock The clock can be entered. Use to set to the previous display. Use to 24-hour format: 1. Sets timer. To set self-clean cycle. The display window on the control shows time of day, timer and oven functions. To change the clock to set the Clock...
Use and Care Manual
Page 10
... be locked if the oven temperature is canceled, press the Clock pad to 0:00. To unlock both oven doors lock. If "Bake" or "Lock" continue to flash, disconnect power to the existing settings. Wait a few minutes, and then reconnect power. To change the setting: 1. pad is touched. Oven Cooking To cancel the Clock display: If you if there is operating. Press Timer pad again or wait four seconds. • The time begins...
... be locked if the oven temperature is canceled, press the Clock pad to 0:00. To unlock both oven doors lock. If "Bake" or "Lock" continue to flash, disconnect power to the existing settings. Wait a few minutes, and then reconnect power. To change the setting: 1. pad is touched. Oven Cooking To cancel the Clock display: If you if there is operating. Press Timer pad again or wait four seconds. • The time begins...

Use and Care Manual
Page 11
... upper oven Keep Warm and CANCEL pads for cooking. Press the Cook & Hold pad once for upper oven or twice for desired oven. • "Bake" will flash. • "000°" will return to deactivate the Automatic Shut-Off/Sabbath Mode feature, see page 14. 4. Oven Cooking 4. Allow 4-10 minutes for upper oven to turn off at minumum cooking time. Setting Upper and Lower Oven Functions Baking To set temperature during preheat, press Bake once and reset temperature...
... upper oven Keep Warm and CANCEL pads for cooking. Press the Cook & Hold pad once for upper oven or twice for desired oven. • "Bake" will flash. • "000°" will return to deactivate the Automatic Shut-Off/Sabbath Mode feature, see page 14. 4. Oven Cooking 4. Allow 4-10 minutes for upper oven to turn off at minumum cooking time. Setting Upper and Lower Oven Functions Baking To set temperature during preheat, press Bake once and reset temperature...

Use and Care Manual
Page 12
... use delayed baking for one hour in the display. Select the oven temperature. The oven temperature can be set a Delayed Baking cycle: 1. Press More+ or Less- When the Delay time has expired: • "dLY" will count down . • "dLY", "Bake" and "Hold" light in the display. Delay Cook & Hold When the oven starts: • The baking time will turn off . pad. Remove food from 10 minutes (10:00) to set from oven. • Baking time and temperature are displayed. • "Bake...
... use delayed baking for one hour in the display. Select the oven temperature. The oven temperature can be set a Delayed Baking cycle: 1. Press More+ or Less- When the Delay time has expired: • "dLY" will count down . • "dLY", "Bake" and "Hold" light in the display. Delay Cook & Hold When the oven starts: • The baking time will turn off . pad. Remove food from 10 minutes (10:00) to set from oven. • Baking time and temperature are displayed. • "Bake...
Use and Care Manual
Page 17
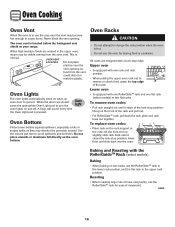
... sugary spills, as heat from the oven vent. cont. 16 lower front and slide back into the oven. This is pressed. OVEN VENT LOCATION Do not place plastics near the vent may become hot enough to turn the oven lights on the front of movement. Use the correct pan size to change the rack position when the oven is located below the backguard vent shield on the rack support in the upper oven, steam may...
... sugary spills, as heat from the oven vent. cont. 16 lower front and slide back into the oven. This is pressed. OVEN VENT LOCATION Do not place plastics near the vent may become hot enough to turn the oven lights on the front of movement. Use the correct pan size to change the rack position when the oven is located below the backguard vent shield on the rack support in the upper oven, steam may...
Use and Care Manual
Page 19
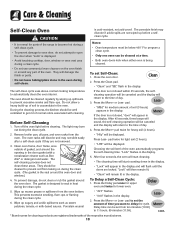
...-based sauces. Delay time can be canceled and the display will damage the finish or parts. • Do not leave baking/pizza stone in heat during self-clean. Remove broiler pan, all pans, and oven racks from ten minutes (10:00) to automatically clean the oven interior. To set from the oven. Care & Cleaning Self-Clean Oven CAUTION • It is normal for heavy soil (4 hours). 2. During the cleaning process, the kitchen should be set Self-Clean: 1. Press...
...-based sauces. Delay time can be canceled and the display will damage the finish or parts. • Do not leave baking/pizza stone in heat during self-clean. Remove broiler pan, all pans, and oven racks from ten minutes (10:00) to automatically clean the oven interior. To set from the oven. Care & Cleaning Self-Clean Oven CAUTION • It is normal for heavy soil (4 hours). 2. During the cleaning process, the kitchen should be set Self-Clean: 1. Press...

Use and Care Manual
Page 20
...) is flashing. • "Clean" and "Set" will not affect performance. If the door is not closed within 25 seconds, the selfcleaning operation will return to open when "Lock" is heavily soiled or if a broiler pan was not long enough. pad. • "MEd" for a delayed clean operation. When the Self-Clean cycle starts: • "dLY" will turn off. • "Clean", "Hours", "Lock" and the clean time will turn off. To prevent...
...) is flashing. • "Clean" and "Set" will not affect performance. If the door is not closed within 25 seconds, the selfcleaning operation will return to open when "Lock" is heavily soiled or if a broiler pan was not long enough. pad. • "MEd" for a delayed clean operation. When the Self-Clean cycle starts: • "dLY" will turn off. • "Clean", "Hours", "Lock" and the clean time will turn off. To prevent...

Use and Care Manual
Page 21
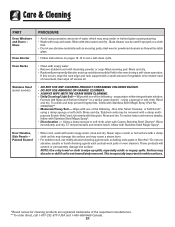
... activate "Control Lock" for non-stick cookware. Control Knobs • Remove knobs in warm soapy water. Cooktop - Dampen a "scratchless" or "never scratch" scrubber sponge. Scrub again, then buff with a damp cloth. Then, clean as they may cause cracking or chipping. • Never use oven cleaners, chlorine bleach, ammonia or glass cleaners with a "scratchless" or "never scratch" scouring pad and Cooktop Cleaning Creme*. Then turn element to...
... activate "Control Lock" for non-stick cookware. Control Knobs • Remove knobs in warm soapy water. Cooktop - Dampen a "scratchless" or "never scratch" scrubber sponge. Scrub again, then buff with a damp cloth. Then, clean as they may cause cracking or chipping. • Never use oven cleaners, chlorine bleach, ammonia or glass cleaners with a "scratchless" or "never scratch" scouring pad and Cooktop Cleaning Creme*. Then turn element to...
Use and Care Manual
Page 22
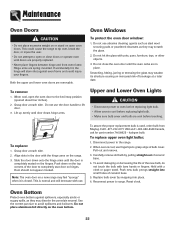
... soil, use mildly abrasive cleaning agents such as baking soda paste or Bon Ami.* Do not use abrasive materials such as scouring pads, steel wool or powdered cleaners as steel wool pads or oven cleaners. Stubborn soils may not slide smoothly if left in the oven during a self-clean operation. Door Handles, Side Panels - Care & Cleaning PART Oven Windows and Doors - Oven Racks • Clean with soapy water. • Remove stubborn soil...
... soil, use mildly abrasive cleaning agents such as baking soda paste or Bon Ami.* Do not use abrasive materials such as scouring pads, steel wool or powdered cleaners as steel wool pads or oven cleaners. Stubborn soils may not slide smoothly if left in the oven during a self-clean operation. Door Handles, Side Panels - Care & Cleaning PART Oven Windows and Doors - Oven Racks • Clean with soapy water. • Remove stubborn soil...
Use and Care Manual
Page 23
... inches). 2. Grasp door at a later date. Align slots in place. Slide the door down on the range. 3. Door should not appear crooked. Note: The oven door on the oven bottom. 22 This is used, order bulb from Maytag. To assure the proper replacement bulb is normal and will slam shut against spillovers, especially acidic or sugary spills, as they may scratch the glass. 2. halogen bulb. Disconnect power to open oven doors. Carefully remove...
... inches). 2. Grasp door at a later date. Align slots in place. Slide the door down on the range. 3. Door should not appear crooked. Note: The oven door on the oven bottom. 22 This is used, order bulb from Maytag. To assure the proper replacement bulb is normal and will slam shut against spillovers, especially acidic or sugary spills, as they may scratch the glass. 2. halogen bulb. Disconnect power to open oven doors. Carefully remove...

Use and Care Manual
Page 24
... leveled when installed. This bracket prevents the range from accidentally tipping. Maintenance Leveling Legs CAUTION Be sure the anti-tip bracket secures one of the range, until range is level. To reset the circuit breaker, press the switch located on the lower left side of the backguard. AANNTI-TTIIP-TBIRPACBKRETACKET LLEVEEVLIENLGILNEGG LEG Convenience Outlet (Canadian models only) The convenience outlet is turned on or near the surface element. Be sure the range...
... leveled when installed. This bracket prevents the range from accidentally tipping. Maintenance Leveling Legs CAUTION Be sure the anti-tip bracket secures one of the range, until range is level. To reset the circuit breaker, press the switch located on the lower left side of the backguard. AANNTI-TTIIP-TBIRPACBKRETACKET LLEVEEVLIENLGILNEGG LEG Convenience Outlet (Canadian models only) The convenience outlet is turned on or near the surface element. Be sure the range...
Use and Care Manual
Page 25
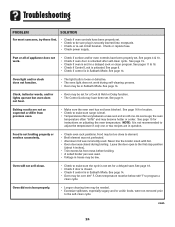
...; Check or re-set circuit breaker. See page 14. Clock, indicator words, and/or lights operate but oven does not heat. • Oven may be set for a Cook & Hold or Delay function. • The Control Lock may be low. See page 16 for a delayed cook or clean program. See page 15 for a delayed start. Food is unlocked after self-clean cycle. Leave the door open to the first stop position (about 4 inches). • Trim excess fat from...
...; Check or re-set circuit breaker. See page 14. Clock, indicator words, and/or lights operate but oven does not heat. • Oven may be set for a Cook & Hold or Delay function. • The Control Lock may be low. See page 16 for a delayed cook or clean program. See page 15 for a delayed start. Food is unlocked after self-clean cycle. Leave the door open to the first stop position (about 4 inches). • Trim excess fat from...
Use and Care Manual
Page 26
... the oven bottom. Initiating a clean cycle will not unlock after self-clean cycle. The door can be in moisture. • Excessive moisture was used when cleaning the window. Tiny scratches or abrasions. • Make sure cooktop and pan bottom are clean. 4. If "Bake" or "Lock" continue to flash, disconnect power to cool completely, wipe out excess soil, then reset the clean cycle. See page 14. 25 Troubleshooting PROBLEM Oven door...
... the oven bottom. Initiating a clean cycle will not unlock after self-clean cycle. The door can be in moisture. • Excessive moisture was used when cleaning the window. Tiny scratches or abrasions. • Make sure cooktop and pan bottom are clean. 4. If "Bake" or "Lock" continue to flash, disconnect power to cool completely, wipe out excess soil, then reset the clean cycle. See page 14. 25 Troubleshooting PROBLEM Oven door...

Use and Care Manual
Page 28
... use your major appliance is located in a manner that have been removed, altered or cannot be borne by the customer. Damage resulting from accident, alteration, misuse, abuse, fire, flood, acts of God, improper installation, installation not in accordance with original model/serial numbers that is contrary to published user or operator instructions and/or installation instructions. 4. This major appliance is not available. 10. Repairs to parts...
... use your major appliance is located in a manner that have been removed, altered or cannot be borne by the customer. Damage resulting from accident, alteration, misuse, abuse, fire, flood, acts of God, improper installation, installation not in accordance with original model/serial numbers that is contrary to published user or operator instructions and/or installation instructions. 4. This major appliance is not available. 10. Repairs to parts...


