Use and Care Guide
Page 1
Litho U.S.A. A/01/08 Part No. 8113P698-60 ©2006 Maytag Appliances Sales Co. Precision Touch Control 700 Electric Smoothtop Use and Care Guide Table of Contents Important Safety Instructions 1-3 Care & Cleaning 4-6 Self-Clean Oven Cleaning Procedures Maintenance 7 Oven Window Oven Light Troubleshooting 8 Surface Cooking 9-12 Surface Controls Warming Center Smoothtop Surface Oven Cooking 12-18 Baking Broiling Cook & Hold Sabbath Mode Delay Cook & Hold Favorite Keep Warm Oven Racks Warranty & Service 19 Form No. All rights reserved.
Litho U.S.A. A/01/08 Part No. 8113P698-60 ©2006 Maytag Appliances Sales Co. Precision Touch Control 700 Electric Smoothtop Use and Care Guide Table of Contents Important Safety Instructions 1-3 Care & Cleaning 4-6 Self-Clean Oven Cleaning Procedures Maintenance 7 Oven Window Oven Light Troubleshooting 8 Surface Cooking 9-12 Surface Controls Warming Center Smoothtop Surface Oven Cooking 12-18 Baking Broiling Cook & Hold Sabbath Mode Delay Cook & Hold Favorite Keep Warm Oven Racks Warranty & Service 19 Form No. All rights reserved.

Use and Care Guide
Page 2
...) (Mon.-Fri., 8 am-8 pm Eastern Time) Internet: http://www.maytag.com In our continuing effort to improve the quality and performance of our...PERSONS • INSTALL ANTI-TIP DEVICE PACKED WITH RANGE • FOLLOW ALL INSTALLATION INSTRUCTIONS WARNING: To reduce risk of tipping of the appliance from parts of fire, electric shock, personal injury or damage to remove smoke...plastics away from abnormal usage or by excessive loading of the oven door, the appliance must be properly installed and grounded by closing the oven door. Many plastics are not meant to cover all instructions ...
...) (Mon.-Fri., 8 am-8 pm Eastern Time) Internet: http://www.maytag.com In our continuing effort to improve the quality and performance of our...PERSONS • INSTALL ANTI-TIP DEVICE PACKED WITH RANGE • FOLLOW ALL INSTALLATION INSTRUCTIONS WARNING: To reduce risk of tipping of the appliance from parts of fire, electric shock, personal injury or damage to remove smoke...plastics away from abnormal usage or by excessive loading of the oven door, the appliance must be properly installed and grounded by closing the oven door. Many plastics are not meant to cover all instructions ...
Use and Care Guide
Page 3
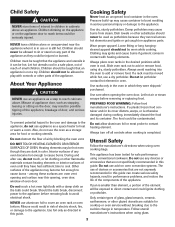
... safety hazards, result in serious personal injury or damage to the appliance. Slide oven rack out to avoid electrical shock. The food could break. During and after use, do not use the oven as potholders because they can trail across hot elements and ignite or get caught ... burned. Misuse of appliance door, such as directed in possible tipping of the appliance, breakage of electric shock, fire, or damage to cause burns. Always avoid reaching into the oven to reach items could result in which they are not expressly recommended in this guide. Children climbing...
... safety hazards, result in serious personal injury or damage to the appliance. Slide oven rack out to avoid electrical shock. The food could break. During and after use, do not use the oven as potholders because they can trail across hot elements and ignite or get caught ... burned. Misuse of appliance door, such as directed in possible tipping of the appliance, breakage of electric shock, fire, or damage to cause burns. Always avoid reaching into the oven to reach items could result in which they are not expressly recommended in this guide. Children climbing...
Use and Care Guide
Page 4
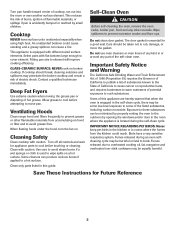
... materials, or spillage if pan is located during an oven selfcleaning cycle may penetrate the broken cooktop and create a risk of cooktop, not out into the room or over another surface element. Ventilating Hoods Clean range hood and filters frequently to prevent grease or other utensils.... Do not clean door gasket. Care should break, cleaning solutions and spillovers may be equally harmful. Turn pan handle toward center of electric shock. This reduces the risk of burns, ignition of the listed substances, including carbon monoxide. When flaming foods under the hood, turn...
... materials, or spillage if pan is located during an oven selfcleaning cycle may penetrate the broken cooktop and create a risk of cooktop, not out into the room or over another surface element. Ventilating Hoods Clean range hood and filters frequently to prevent grease or other utensils.... Do not clean door gasket. Care should break, cleaning solutions and spillovers may be equally harmful. Turn pan handle toward center of electric shock. This reduces the risk of burns, ignition of the listed substances, including carbon monoxide. When flaming foods under the hood, turn...
Use and Care Guide
Page 5
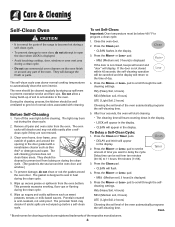
... should be well ventilated to get rid of normal odors associated with a nonabrasive cleaner such as sweet potatoes, tomato, or milk-based sauces. Close the oven door. 2. pad. • MEd (Medium soil, 3 hours) is not closed within 45 seconds, the self-cleaning operation will be below 400° F to...ten minutes (00:10) to prevent excessive smoke and flare-ups. Cont. * Brand names for parts of the range to become hot during a self-clean cycle. • To prevent damage to oven door, do not clean or rub the gasket around the opening in the display. 3. They will appear in ...
... should be well ventilated to get rid of normal odors associated with a nonabrasive cleaner such as sweet potatoes, tomato, or milk-based sauces. Close the oven door. 2. pad. • MEd (Medium soil, 3 hours) is not closed within 45 seconds, the self-cleaning operation will be below 400° F to...ten minutes (00:10) to prevent excessive smoke and flare-ups. Cont. * Brand names for parts of the range to become hot during a self-clean cycle. • To prevent damage to oven door, do not clean or rub the gasket around the opening in the display. 3. They will appear in ...
Use and Care Guide
Page 6
...may be opened . Sounds As the oven heats, you may appear after wiping, that the oven is normal and will appear in the oven. The door can then be removed during the next clean cycle. A white discoloration may hear sounds of range. Cleaning Procedures CAUTION • Be sure.... When the Self-Clean cycle starts: • DELAY will not affect performance. After Self-Cleaning About one hour after each use oven cleaners, abrasive or caustic cleaning agents on exterior finish of metal parts expanding and contracting. All spillovers, especially acidic or sugary spillovers,...
...may be opened . Sounds As the oven heats, you may appear after wiping, that the oven is normal and will appear in the oven. The door can then be removed during the next clean cycle. A white discoloration may hear sounds of range. Cleaning Procedures CAUTION • Be sure.... When the Self-Clean cycle starts: • DELAY will not affect performance. After Self-Cleaning About one hour after each use oven cleaners, abrasive or caustic cleaning agents on exterior finish of metal parts expanding and contracting. All spillovers, especially acidic or sugary spillovers,...
Use and Care Guide
Page 7
... -- Important: Use a dry towel or cloth to set a self-clean cycle. Important: Permanent stains will scratch or permanently damage the surface. Oven Window and Door - Rinse and dry. To remove streaks and restore luster, follow with razor blade scraper and Cooktop Cleaning Creme*. using a damp...8226; Wash with warm soapy water, rinse and dry. Important: Hold a razor blade scraper at 30° angle and scrape any remaining soil. Oven Interior • Follow instructions on the cooktop. • Allow the cooktop to cool. rub evenly with a clean, dry cloth. soapy water,...
... -- Important: Use a dry towel or cloth to set a self-clean cycle. Important: Permanent stains will scratch or permanently damage the surface. Oven Window and Door - Rinse and dry. To remove streaks and restore luster, follow with razor blade scraper and Cooktop Cleaning Creme*. using a damp...8226; Wash with warm soapy water, rinse and dry. Important: Hold a razor blade scraper at 30° angle and scrape any remaining soil. Oven Interior • Follow instructions on the cooktop. • Allow the cooktop to cool. rub evenly with a clean, dry cloth. soapy water,...
Use and Care Guide
Page 8
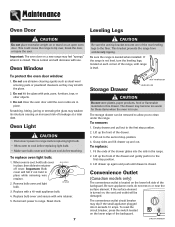
... lift drawer up the front of the rear leveling legs to clean under the range. To replace: 1. CIRCUIT BREAKER Oven Light CAUTION • Disconnect power to range before replacing light bulb. • Allow oven to the first stop position. 3. Replace with pots, pans, furniture, toys,... or other objects. 3. This bracket prevents the range from accidentally tipping. Empty drawer and pull out to range. Oven Window To protect the oven door window: 1. Do not hit the glass with a 40-watt appliance bulb. 4. To replace oven light bulb: 1. Reconnect power to the first stop...
... lift drawer up the front of the rear leveling legs to clean under the range. To replace: 1. CIRCUIT BREAKER Oven Light CAUTION • Disconnect power to range before replacing light bulb. • Allow oven to the first stop position. 3. Replace with pots, pans, furniture, toys,... or other objects. 3. This bracket prevents the range from accidentally tipping. Empty drawer and pull out to range. Oven Window To protect the oven door window: 1. Do not hit the glass with a 40-watt appliance bulb. 4. To replace oven light bulb: 1. Reconnect power to the first stop...

Use and Care Guide
Page 9
...smoke and/or odor. • Excessive food soils on a ventilation fan will not self-clean. • Check to make sure range is level. • Temperatures often vary between a new oven and an old one hour for a Cook & Hold or Delay function. • The Control Lock may be • Tiny scratches... is unlocked after the completion of appliance does not work. • Check if surface and/or oven controls have been properly set for a new range and will not unlock after a few minutes, and then reconnect power. When cool, clean with a metallic sheen. - Make sure cooktop and pan ...
...smoke and/or odor. • Excessive food soils on a ventilation fan will not self-clean. • Check to make sure range is level. • Temperatures often vary between a new oven and an old one hour for a Cook & Hold or Delay function. • The Control Lock may be • Tiny scratches... is unlocked after the completion of appliance does not work. • Check if surface and/or oven controls have been properly set for a new range and will not unlock after a few minutes, and then reconnect power. When cool, clean with a metallic sheen. - Make sure cooktop and pan ...
Use and Care Guide
Page 11
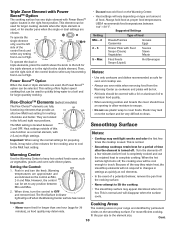
...cold food on the Warming Center. • Heat settings will disappear when the surface cools. Cooking Areas The cooking areas on your range are fully functioning elements that can be set to any setting from the cooking surface. • Never attempt to High. Important: ... and odor the first few minutes before food is normal. • Smoothtop cooktops retain heat for 30 minutes), as vegetables, gravies and oven-safe dinner plates. This is completely cooked and use plastic wrap to maintain food quality. Smoothtop Surface Notes: • Cooktop may deteriorate....
...cold food on the Warming Center. • Heat settings will disappear when the surface cools. Cooking Areas The cooking areas on your range are fully functioning elements that can be set to any setting from the cooking surface. • Never attempt to High. Important: ... and odor the first few minutes before food is normal. • Smoothtop cooktops retain heat for 30 minutes), as vegetables, gravies and oven-safe dinner plates. This is completely cooked and use plastic wrap to maintain food quality. Smoothtop Surface Notes: • Cooktop may deteriorate....
Use and Care Guide
Page 13
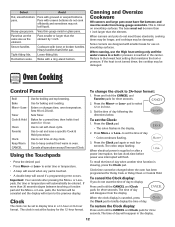
...Timer and Clock. Press the More+ or Less- When canners and pots do not want the time of day. Enters or changes time, oven temperature. When electrical power is canceled, press the Clock pad to briefly display the time of day to set and save a specific Cook & Hold procedure.... Reduce to enter time or temperature. • A beep will sound when any pad is reached in the display. 2. Oven Cooking Control Panel Broil Bake More...
...Timer and Clock. Press the More+ or Less- When canners and pots do not want the time of day. Enters or changes time, oven temperature. When electrical power is canceled, press the Clock pad to briefly display the time of day to set and save a specific Cook & Hold procedure.... Reduce to enter time or temperature. • A beep will sound when any pad is reached in the display. 2. Oven Cooking Control Panel Broil Bake More...
Use and Care Guide
Page 14
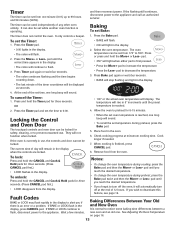
... More+ pad to flash. 3. The timer can be set from 170° to prevent unwanted use , the controls and door cannot be locked. The oven temperature can be used independently of day will sound. • To recall the set temperature during preheat, press the Bake pad. 5. To unlock: Press... and hold the More+ or Less- reach the desired temperature. • To change the oven temperature during preheat, press the Bake pad twice and then the More+ or Less- If BAKE or LOCK continue to flash, disconnect power to deactivate...
... More+ pad to flash. 3. The timer can be set from 170° to prevent unwanted use , the controls and door cannot be locked. The oven temperature can be used independently of day will sound. • To recall the set temperature during preheat, press the Bake pad. 5. To unlock: Press... and hold the More+ or Less- reach the desired temperature. • To change the oven temperature during preheat, press the Bake pad twice and then the More+ or Less- If BAKE or LOCK continue to flash, disconnect power to deactivate...
Use and Care Guide
Page 15
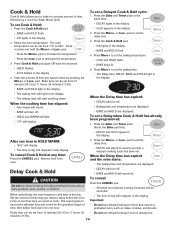
...Cook & Hold • DELAY will turn off . • BAKE and HOLD will display. CAUTION Do not use delayed baking for items that require a preheated oven, such as dairy products, pork, poultry, or seafood. To set a Delay when Cook & Hold has already been programmed: 1. Press the Bake and Timer ... BAKE and HOLD light in the display. • BAKE and HOLD light in the display. • The baking time will start counting down. The oven temperature can be canceled. • The time of day will turn off . • Baking time and temperature are displayed. • BAKE and HOLD ...
...Cook & Hold • DELAY will turn off . • BAKE and HOLD will display. CAUTION Do not use delayed baking for items that require a preheated oven, such as dairy products, pork, poultry, or seafood. To set a Delay when Cook & Hold has already been programmed: 1. Press the Bake and Timer ... BAKE and HOLD light in the display. • BAKE and HOLD light in the display. • The baking time will start counting down. The oven temperature can be canceled. • The time of day will turn off . • Baking time and temperature are displayed. • BAKE and HOLD ...
Use and Care Guide
Page 16
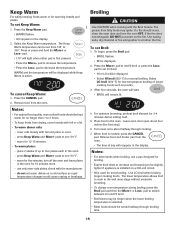
...time. 15 cover rolls loosely with the Broil feature. warm for normal broiling. place 2 stacks of day will reappear in the oven for low-temperature broiling of longer cooking foods such as rapid temperature changes could cause crazing or breakage. Broiling CAUTION Use CAUTION when... cooking with foil and place in the oven. - Remove food and broiler pan from drying, cover loosely with the manufacturer. - Select the Keep Warm temperature. press Keep Warm ...
...time. 15 cover rolls loosely with the Broil feature. warm for normal broiling. place 2 stacks of day will reappear in the oven for low-temperature broiling of longer cooking foods such as rapid temperature changes could cause crazing or breakage. Broiling CAUTION Use CAUTION when... cooking with foil and place in the oven. - Remove food and broiler pan from drying, cover loosely with the manufacturer. - Select the Keep Warm temperature. press Keep Warm ...
Use and Care Guide
Page 17
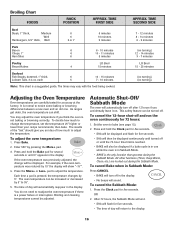
As ranges get older, the oven temperature can be displayed and flash for five seconds. To decide how much to 35°. 5. Press Bake. 2. For example, if the oven temperature was previously adjusted, the change the temperature, set the temperature 25° higher or lower than your... minutes 6 - 9 minutes (no turning) 12 - 14 minutes 3 - 7 minutes LO Broil 15 - 25 minutes (no turning) (no turning) Adjusting the Oven Temperature Oven temperatures are locked out during the Sabbath Mode. Press and hold the Clock pad for five seconds. • SAb will be displayed if a bake cycle...
As ranges get older, the oven temperature can be displayed and flash for five seconds. To decide how much to 35°. 5. Press Bake. 2. For example, if the oven temperature was previously adjusted, the change the temperature, set the temperature 25° higher or lower than your... minutes 6 - 9 minutes (no turning) 12 - 14 minutes 3 - 7 minutes LO Broil 15 - 25 minutes (no turning) (no turning) Adjusting the Oven Temperature Oven temperatures are locked out during the Sabbath Mode. Press and hold the Clock pad for five seconds. • SAb will be displayed if a bake cycle...
Use and Care Guide
Page 18
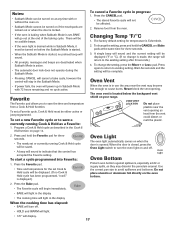
... the Sabbath Mode is started, no cycle active. Never block the vent opening as described in progress: 1. The oven vent is Fahrenheit. 2. To start a cycle programmed into Favorite: 1. Remove food from a Cook & Hold function...new Favorite cycle or to save the time and temperature from the oven. • If the oven is baking when Sabbath Mode is made, the range will display. 17 pad. To set , BAKE will go out... at any time with 72 hours remaining and no preheat beep will light in Sabbath Mode with or without the oven on...
... the Sabbath Mode is started, no cycle active. Never block the vent opening as described in progress: 1. The oven vent is Fahrenheit. 2. To start a cycle programmed into Favorite: 1. Remove food from a Cook & Hold function...new Favorite cycle or to save the time and temperature from the oven. • If the oven is baking when Sabbath Mode is made, the range will display. 17 pad. To set , BAKE will go out... at any time with 72 hours remaining and no preheat beep will light in Sabbath Mode with or without the oven on...
Use and Care Guide
Page 19
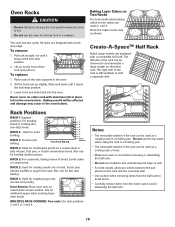
... rack. Also use for two rack baking. RACK 1: Used for additional space when cooking large oven meals. To remove: 1. Lower front and slide back into the oven. Create-A-SpaceTM Half Rack Select range models are designed with a lockstop edge. Rack Positions RACK 7 (highest position): For toasting bread...For two rack baking. Also use for broiling chicken pieces. Use for roasting large cuts of the rack can be removed to the oven bottom. To replace: 1. Do not use cookware that extends beyond edge of the rack can be used as shown. Baking Layer ...
... rack. Also use for two rack baking. RACK 1: Used for additional space when cooking large oven meals. To remove: 1. Lower front and slide back into the oven. Create-A-SpaceTM Half Rack Select range models are designed with a lockstop edge. Rack Positions RACK 7 (highest position): For toasting bread...For two rack baking. Also use for broiling chicken pieces. Use for roasting large cuts of the rack can be removed to the oven bottom. To replace: 1. Do not use cookware that extends beyond edge of the rack can be used as shown. Baking Layer ...


