
Use and Care Guide
Page 1
M_AY[AI3 Precision Touch Control 500 Electric Smoothtop Maintenance 7 Oven Window Oven Light Troubleshooting 8=9 Cook & Hold Delay Cook & Hold Keep Warm Broiling Sabbath Mode Oven Racks Warranty & Service 19 Form No. All rights reserved. A/01/08 Part No. 8113P692-60 ¢c)2006 Maytag Appliances Sales Co. Litho U.S.A.
M_AY[AI3 Precision Touch Control 500 Electric Smoothtop Maintenance 7 Oven Window Oven Light Troubleshooting 8=9 Cook & Hold Delay Cook & Hold Keep Warm Broiling Sabbath Mode Oven Racks Warranty & Service 19 Form No. All rights reserved. A/01/08 Part No. 8113P692-60 ¢c)2006 Maytag Appliances Sales Co. Litho U.S.A.
Use and Care Guide
Page 2
Always disconnect power to appliance before using this appliance to prevent the potential risk of fire, electric shock, personal injury or damage to the appliance as described in or near the appliance. Common sense, caution, and care must be referred to a qualified ... spreading the flame. 2. To ensure proper and safe operation: Appliance must be stored in an oven. Do not attempt to make sure one of your appliance unless it . To check if device is properly installed, look underneath range with a flashlight to adjust, repair, service, or replace any part of the rear leveling...
Always disconnect power to appliance before using this appliance to prevent the potential risk of fire, electric shock, personal injury or damage to the appliance as described in or near the appliance. Common sense, caution, and care must be referred to a qualified ... spreading the flame. 2. To ensure proper and safe operation: Appliance must be stored in an oven. Do not attempt to make sure one of your appliance unless it . To check if device is properly installed, look underneath range with a flashlight to adjust, repair, service, or replace any part of the rear leveling...
Use and Care Guide
Page 3
... elements. Misuse could ignite clothing or potholder. directions when using oven This appliance has been tested for cooktop or oven service without breaking due to avoid electrical shock. Do not use add-on appliance parts. De net let potholder contact hot element in the oven. Follow utensil manufacturer's instructions when using conventional cookware. Always...
... elements. Misuse could ignite clothing or potholder. directions when using oven This appliance has been tested for cooktop or oven service without breaking due to avoid electrical shock. Do not use add-on appliance parts. De net let potholder contact hot element in the oven. Follow utensil manufacturer's instructions when using conventional cookware. Always...

Use and Care Guide
Page 4
... can cause a fire. Save These Instructions Do not clean door gasket. Do not use oven cleaners or oven liners of any part of hot grease. for appliance parts to warn customers of electric shock. This reduces the risk of burns, ignition of the listed substances, including carbon monoxide... located during an oven self-cleaning cycle may penetrate the broken cooktop and create a risk of potential exposures to rub, damage, or move pan. Ventilating Hoods Clean range hood and filters frequently to avoid grease fires. Fitting pan size to a hot surface. Users of cooktop...
... can cause a fire. Save These Instructions Do not clean door gasket. Do not use oven cleaners or oven liners of any part of hot grease. for appliance parts to warn customers of electric shock. This reduces the risk of burns, ignition of the listed substances, including carbon monoxide... located during an oven self-cleaning cycle may penetrate the broken cooktop and create a risk of potential exposures to rub, damage, or move pan. Ventilating Hoods Clean range hood and filters frequently to avoid grease fires. Fitting pan size to a hot surface. Users of cooktop...

Use and Care Guide
Page 5
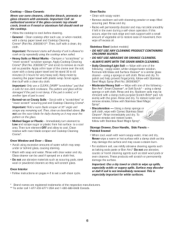
...is not closed within 45 seconds, the self-cleaning operation will be well ventilated to get rid of time you want to automatically clean the oven interior. Cont. * Brand names for cleaning products are not removed. . Press the Delay pad. * DELAY flashes. To prevent damage, do... not clean or rub the gasket around the oven door and window.) 5. Wipe up excess grease or spillovers from baking on during the clean cycle. * CLEAN will return to seal in the display...
...is not closed within 45 seconds, the self-cleaning operation will be well ventilated to get rid of time you want to automatically clean the oven interior. Cont. * Brand names for cleaning products are not removed. . Press the Delay pad. * DELAY flashes. To prevent damage, do... not clean or rub the gasket around the oven door and window.) 5. Wipe up excess grease or spillovers from baking on during the clean cycle. * CLEAN will return to seal in the display...
Use and Care Guide
Page 6
...cancel the Self=Clean cycle: Press the CANCEL pad. It is displayed. This may be sure the knobs have been correctly replaced. Sounds As the oven heats, you want to the previous display. A er Self=Cleaning About one hour after a clean cycle, wipe racks and rack supports with misuse.... If soil remains after cleaning if acidic or sugary foods were not wiped up immediately with soapy water, rinse and dry. The time of range. This is glass fused on control pad and display area. All words disappear from the display. Control Knobs , Remove knobs in the display,...
...cancel the Self=Clean cycle: Press the CANCEL pad. It is displayed. This may be sure the knobs have been correctly replaced. Sounds As the oven heats, you want to the previous display. A er Self=Cleaning About one hour after a clean cycle, wipe racks and rack supports with misuse.... If soil remains after cleaning if acidic or sugary foods were not wiped up immediately with soapy water, rinse and dry. The time of range. This is glass fused on control pad and display area. All words disappear from the display. Control Knobs , Remove knobs in the display,...
Use and Care Guide
Page 7
...clean, dry cloth. important: Use a dry towel or cloth to cool. Then, buff with a damp cloth as steel wool pads or oven cleaners. Oven Window and Door = Glass * Avoid using the cooktop when soiled. * Heavy Soils or Nletal Marks - Rinse immediately and dry. These ... streaks, follow with Stainless Steel Magic Spray (Part No. 20000008)**. * Moderate/Heavy Soil == Wipe with the grain. Important: Only use oven cleaners, chlorine bleach, ammonia or glass cleaners with cleansing powder or soap-filled scouring pad. Clean residue with Cameo Stainless Steel Cleaner*. using...
...clean, dry cloth. important: Use a dry towel or cloth to cool. Then, buff with a damp cloth as steel wool pads or oven cleaners. Oven Window and Door = Glass * Avoid using the cooktop when soiled. * Heavy Soils or Nletal Marks - Rinse immediately and dry. These ... streaks, follow with Stainless Steel Magic Spray (Part No. 20000008)**. * Moderate/Heavy Soil == Wipe with the grain. Important: Only use oven cleaners, chlorine bleach, ammonia or glass cleaners with cleansing powder or soap-filled scouring pad. Clean residue with Cameo Stainless Steel Cleaner*. using...
Use and Care Guide
Page 8
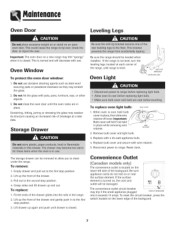
... Leveling Legs important: The oven dooron a new rangemay feel"spongy" when itisclosedT.hisisnormaland willdecreasewithuse. Scratching, hitting, jarring or stressing the glass may weaken its structure causing an increased risk of the drawer. 3. The storage drawer can be removed to allow you to range. Empty drawer and pull out to the first stop...
... Leveling Legs important: The oven dooron a new rangemay feel"spongy" when itisclosedT.hisisnormaland willdecreasewithuse. Scratching, hitting, jarring or stressing the glass may weaken its structure causing an increased risk of the drawer. 3. The storage drawer can be removed to allow you to range. Empty drawer and pull out to the first stop...
Use and Care Guide
Page 9
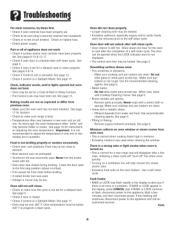
... soiled broiler pan was incorrectly used. See page 6. , Pitting or flaking. - There is a strong odor or light smoke when oven is turned on. , This is normal for a new range and will not unlock after a few minutes, and then reconnect power. If BAKE or LOCK continue to flash, disconnect power to... an authorized servicer. See page 16 for instructions on a ventilation fan will not self-clean. , Check to make sure range is level. , Temperatures often vary between a new oven and an old one or two recipes are clean. , Areas with Cooktop Cleaning Creme. Never line the broiler insert with ...
... soiled broiler pan was incorrectly used. See page 6. , Pitting or flaking. - There is a strong odor or light smoke when oven is turned on. , This is normal for a new range and will not unlock after a few minutes, and then reconnect power. If BAKE or LOCK continue to flash, disconnect power to... an authorized servicer. See page 16 for instructions on a ventilation fan will not self-clean. , Check to make sure range is level. , Temperatures often vary between a new oven and an old one or two recipes are clean. , Areas with Cooktop Cleaning Creme. Never line the broiler insert with ...
Use and Care Guide
Page 10
...maintain the preset heat setting, even on and off when all the surface elements are no beeps and no display. , Oven may be made before turning on . You may hear the oven relays as they go on High. 4. To cancel, press and hold the Clock pad for five seconds. Remove pan.... Setting the Controls 1. An infinite choice of heat settings is normal. The element will turn on the element. © OFF 9 The oven makes several low level noises. This is available from Low to OFF. When any of the smoothtop. The selection should be in the right front...
...maintain the preset heat setting, even on and off when all the surface elements are no beeps and no display. , Oven may be made before turning on . You may hear the oven relays as they go on High. 4. To cancel, press and hold the Clock pad for five seconds. Remove pan.... Setting the Controls 1. An infinite choice of heat settings is normal. The element will turn on the element. © OFF 9 The oven makes several low level noises. This is available from Low to OFF. When any of the smoothtop. The selection should be in the right front...

Use and Care Guide
Page 11
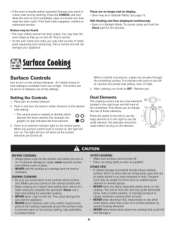
... may appear discolored when it is hot. High (10): Use to bring liquid to the Warm heat setting. Cooking Areas The cooking areas on your range are indicated on the control as Min, Min 8 2-8 and Max. When a control is turned on the smoothtop surface. Heat settings outside of food. Important: Never... maintain the preset heat setting, even on , even after the element is turned off to keep hot cooked foods warm, such as vegetables, gravies and oven-safe dinner plates. FlexChoice TM Element (:selectmodels) The FlexChoice element is normal and will remain on High.
... may appear discolored when it is hot. High (10): Use to bring liquid to the Warm heat setting. Cooking Areas The cooking areas on your range are indicated on the control as Min, Min 8 2-8 and Max. When a control is turned on the smoothtop surface. Heat settings outside of food. Important: Never... maintain the preset heat setting, even on , even after the element is turned off to keep hot cooked foods warm, such as vegetables, gravies and oven-safe dinner plates. FlexChoice TM Element (:selectmodels) The FlexChoice element is normal and will remain on High.
Use and Care Guide
Page 12
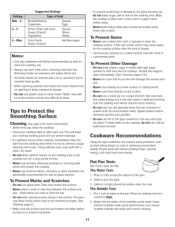
... recommended as safe for more evenly. Do not use foil or foil-type containers. Tips to Protect the Smoothtop Surface Cleaning (see page 6 for oven and cooktop use oven mitts when removing food from the cooking area while it can prevent damage. , If a spillover occurs while cooking, immediately clean the spill from...
... recommended as safe for more evenly. Do not use foil or foil-type containers. Tips to Protect the Smoothtop Surface Cleaning (see page 6 for oven and cooktop use oven mitts when removing food from the cooking area while it can prevent damage. , If a spillover occurs while cooking, immediately clean the spill from...
Use and Care Guide
Page 13
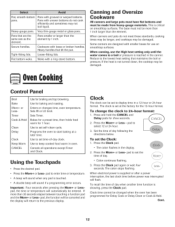
... touching a function pad and the More+ or Less= pad, the function will automatically be changed when the oven has been programmed for the 12-hour format. Less When electrical power is touched. , A double beep will return to set time-of day following the directions below. This... is critical on smoothtop surfaces. Cancels all operations except Timer and Clock. Press the More+ or Less = pad to display time in oven. Heavy handles that are designed with loose or broken handles. Press the More+ or Less= pad to the previous display. Panswith uneven ...
... touching a function pad and the More+ or Less= pad, the function will automatically be changed when the oven has been programmed for the 12-hour format. Less When electrical power is touched. , A double beep will return to set time-of day following the directions below. This... is critical on smoothtop surfaces. Cancels all operations except Timer and Clock. Press the More+ or Less = pad to display time in oven. Heavy handles that are designed with loose or broken handles. Press the More+ or Less= pad to the previous display. Panswith uneven ...
Use and Care Guide
Page 14
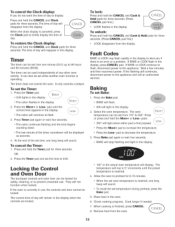
...for three seconds. (Press CANCEL pad first.) , LOCK disappears from the display. The time of day will be used independently of any other oven activity. Timer , The colon flashes in the display. 2. Press Timer pad again or wait four seconds. , The colon continues flashing and the... set temperature during preheat, press the Bake pad. 5. pad to preheat for three seconds. The temperature will not function when locked. Allow the oven to decrease the temperature. . Place food in 5 ° increments until the correct time appears in the display when the controls are locked....
...for three seconds. (Press CANCEL pad first.) , LOCK disappears from the display. The time of day will be used independently of any other oven activity. Timer , The colon flashes in the display. 2. Press Timer pad again or wait four seconds. , The colon continues flashing and the... set temperature during preheat, press the Bake pad. 5. pad to preheat for three seconds. The temperature will not function when locked. Allow the oven to decrease the temperature. . Place food in 5 ° increments until the correct time appears in the display when the controls are locked....
Use and Care Guide
Page 15
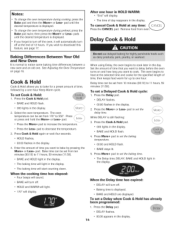
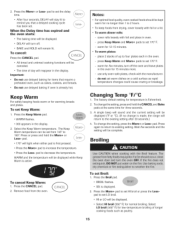
... wait four seconds. . OOOlights in the display. OO:OOflashes in the display. pads until the desired temperature is ...still flashing: . After one . new oven and an old one hour in the day. Press the Less- i More+ i"Less-i::i . The Delay time, DELAY, BAKE and HOLD light in the ... & Hold time, then keeps food warm for a preset amount of day reappears in the display. Press the Delay pad. Notes: Tochange the oven temperature during preheat, press the Bake pad twice, then press the More+ or Less- The time of time, minutes (11:59). Delay time...
... wait four seconds. . OOOlights in the display. OO:OOflashes in the display. pads until the desired temperature is ...still flashing: . After one . new oven and an old one hour in the day. Press the Less- i More+ i"Less-i::i . The Delay time, DELAY, BAKE and HOLD light in the ... & Hold time, then keeps food warm for a preset amount of day reappears in the display. Press the Delay pad. Notes: Tochange the oven temperature during preheat, press the Bake pad twice, then press the More+ or Less- The time of time, minutes (11:59). Delay time...
Use and Care Guide
Page 16
... temperature. Wait five seconds and the setting will remain lit. Remove food from drying, cover loosely with foil and place in oven. T..o...k..e..e..p....f.o..o..d..s from the oven. press Keep Warm and More+ pads to set warm dishes on a cold surface as rapid temperature changes could cause crazing or... decrease the temperature. Press the Less= pad to increase the temperature. WARM and the temperature will be displayed while Keep Warm is made, the range will be displayed. , Select HI broil (559° F) for 15 minutes more. To change the setting, press the More+ or Less=...
... temperature. Wait five seconds and the setting will remain lit. Remove food from drying, cover loosely with foil and place in oven. T..o...k..e..e..p....f.o..o..d..s from the oven. press Keep Warm and More+ pads to set warm dishes on a cold surface as rapid temperature changes could cause crazing or... decrease the temperature. Press the Less= pad to increase the temperature. WARM and the temperature will be displayed while Keep Warm is made, the range will be displayed. , Select HI broil (559° F) for 15 minutes more. To change the setting, press the More+ or Less=...
Use and Care Guide
Page 17
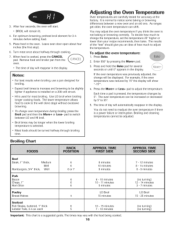
...broiling temperature is a suggested guide. The results of how much to change oven temperature during broiling, press the Broil pad and then the More+ or Less- Place food in the display. As ranges get older, the oven temperature can be slightly lighter if appliance is normal to the well done... stage without excessive browning. More+ If the oven temperature was reduced by pressing the More+ pad. 3. The times may be...
...broiling temperature is a suggested guide. The results of how much to change oven temperature during broiling, press the Broil pad and then the More+ or Less- Place food in the display. As ranges get older, the oven temperature can be slightly lighter if appliance is normal to the well done... stage without excessive browning. More+ If the oven temperature was reduced by pressing the More+ pad. 3. The times may be...

Use and Care Guide
Page 18
...], Pull rack straight out until it stops at the lock-stop position. 3. Place rack on the oven bottom. Slide rack back until it clears the lock-stop position. 2. This safety feature can be displayed... or aluminum foil directly on the rack supports in the oven 2. There will be turned off. Tilt the front end up on your range. If the oven light is desired while in Sabbath Mode, it on and... off. To cancel the Sabbath Mode: 1. The oven vent is active. , The automatic door...
...], Pull rack straight out until it stops at the lock-stop position. 3. Place rack on the oven bottom. Slide rack back until it clears the lock-stop position. 2. This safety feature can be displayed... or aluminum foil directly on the rack supports in the oven 2. There will be turned off. Tilt the front end up on your range. If the oven light is desired while in Sabbath Mode, it on and... off. To cancel the Sabbath Mode: 1. The oven vent is active. , The automatic door...

Use and Care Guide
Page 19
..., frozen pies, dessert souffles or angel food cake. Also use for broiling chicken pieces. RACK 1 : Used for roasting small cuts of meat and poultry. Oven Bottom: Place oven rack on raised sides of bread, bundt cakes or custard pies. Also use for I1 , ' additional space when cooking large... Baking Layer Cakes on Two Racks For best results when baking cakes on the rack as shown. 18 Two Rack Baking Oven Bottom RACK 4: Used for most baked goods on the oven bottom. Place the cakes on two racks, use racks 2 and 4. Baking results will be affected and damage may occur...
..., frozen pies, dessert souffles or angel food cake. Also use for broiling chicken pieces. RACK 1 : Used for roasting small cuts of meat and poultry. Oven Bottom: Place oven rack on raised sides of bread, bundt cakes or custard pies. Also use for I1 , ' additional space when cooking large... Baking Layer Cakes on Two Racks For best results when baking cakes on the rack as shown. 18 Two Rack Baking Oven Bottom RACK 4: Used for most baked goods on the oven bottom. Place the cakes on two racks, use racks 2 and 4. Baking results will be affected and damage may occur...


