
Use and Care Guide
Page 1
All rights reserved. M_AY[AI3 Precision Touch Control 500 Electric Smoothtop Maintenance 7 Oven Window Oven Light Troubleshooting 8=9 Cook & Hold Delay Cook & Hold Keep Warm Broiling Sabbath Mode Oven Racks Warranty & Service 19 Form No. Litho U.S.A. A/01/08 Part No. 8113P692-60 ¢c)2006 Maytag Appliances Sales Co.
All rights reserved. M_AY[AI3 Precision Touch Control 500 Electric Smoothtop Maintenance 7 Oven Window Oven Light Troubleshooting 8=9 Cook & Hold Delay Cook & Hold Keep Warm Broiling Sabbath Mode Oven Racks Warranty & Service 19 Form No. Litho U.S.A. A/01/08 Part No. 8113P692-60 ¢c)2006 Maytag Appliances Sales Co.
Use and Care Guide
Page 2
... appliance that may become warm or hot. Always contact the manufacturer about problems or conditions you do not let cooking grease or other servicing should not be stored in this guide are vulnerable to cover all instructions before operating it is specifically recommended in this anytime the range has been moved. Keep plastics away from parts of fire, electric shock, personal injury or...
... appliance that may become warm or hot. Always contact the manufacturer about problems or conditions you do not let cooking grease or other servicing should not be stored in this guide are vulnerable to cover all instructions before operating it is specifically recommended in this anytime the range has been moved. Keep plastics away from parts of fire, electric shock, personal injury or...
Use and Care Guide
Page 3
... allowed to the sudden change in this opening, oven door, window of any part of air by blocking the oven vent. Do not obstruct the flow of the appliance as directed in temperature. among these surfaces are suitable for safe performance using glass. 2 Slide oven rack out to contact heating element. Always avoid reaching into the oven to direct contact and could be worn while cooking. Interior surfaces of oven door. Use foil only as...
... allowed to the sudden change in this opening, oven door, window of any part of air by blocking the oven vent. Do not obstruct the flow of the appliance as directed in temperature. among these surfaces are suitable for safe performance using glass. 2 Slide oven rack out to contact heating element. Always avoid reaching into the oven to direct contact and could be worn while cooking. Interior surfaces of oven door. Use foil only as...

Use and Care Guide
Page 4
... customers of cooktop, not out into the room or over another surface element. Users of this guide. Fumes released due to avoid grease fires. Self-Clean Oven Cooktop NEVER leave surface units unattended, especially when using high heat. Select pans with different sized surface elements. Contact a qualified technician immediately. Allow grease to some low-level exposure to cool before touching or cleaning. When flaming foods under the hood, turn the fan on broken cooktop...
... customers of cooktop, not out into the room or over another surface element. Users of this guide. Fumes released due to avoid grease fires. Self-Clean Oven Cooktop NEVER leave surface units unattended, especially when using high heat. Select pans with different sized surface elements. Contact a qualified technician immediately. Allow grease to some low-level exposure to cool before touching or cleaning. When flaming foods under the hood, turn the fan on broken cooktop...

Use and Care Guide
Page 5
... appear in the door gasket with cleaning. amount of the oven automatically programs the self-cleaning time. To prevent damage, do not clean or rub the gasket around the opening in the display. CL-M (Medium soil, 3 hours) CL-L (Light Soil, 2 hours) Choosing the soil level of time you want to delay the cycle. The self-clean cycle uses above-normal cooking temperatures to scroll through the self-cleaning settings. . CL-H (Heavy...
... appear in the door gasket with cleaning. amount of the oven automatically programs the self-cleaning time. To prevent damage, do not clean or rub the gasket around the opening in the display. CL-M (Medium soil, 3 hours) CL-L (Light Soil, 2 hours) Choosing the soil level of time you want to delay the cycle. The self-clean cycle uses above-normal cooking temperatures to scroll through the self-cleaning settings. . CL-H (Heavy...
Use and Care Guide
Page 6
... Smells You may also occur if the oven is normal and will appear in time. Clock and Control Pad Area To activate control lock for a delayed clean operation. All words disappear from the display. It is set the amount of range. Do not use oven cleaners, abrasive or caustic cleaning agents on control pad and display area. 6. After four seconds, CLEAN, DELAY and LOCK will appear in the OFF position...
... Smells You may also occur if the oven is normal and will appear in time. Clock and Control Pad Area To activate control lock for a delayed clean operation. All words disappear from the display. It is set the amount of range. Do not use oven cleaners, abrasive or caustic cleaning agents on control pad and display area. 6. After four seconds, CLEAN, DELAY and LOCK will appear in the OFF position...
Use and Care Guide
Page 7
..., Formula 409 Glass and Surface Cleaner* or a similar glass cleaner - Storage Drawer, Door Handle, Side Panels = Painted Enamel * When cool, wash with the grain. Glass=Ceramic Never use , or when needed, with a damp cloth as this occurs, wipe the rack edge and rack support with one of vegetable oil to cool. using a sponge or soft cloth. Oven Interior * Follow instructions on the cooktop. * Allow the cooktop to wipe...
..., Formula 409 Glass and Surface Cleaner* or a similar glass cleaner - Storage Drawer, Door Handle, Side Panels = Painted Enamel * When cool, wash with the grain. Glass=Ceramic Never use , or when needed, with a damp cloth as this occurs, wipe the rack edge and rack support with one of vegetable oil to cool. using a sponge or soft cloth. Oven Interior * Follow instructions on the cooktop. * Allow the cooktop to wipe...
Use and Care Guide
Page 8
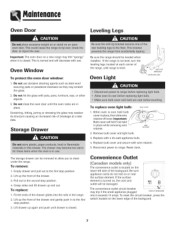
... plugged CIRCUlTBREAKER into the rails in to the first stop position. 3. Do not close the oven door until drawer is turned on the lower left side of the backguard. 7 Oven Light ANT!-TIP BRACKET " LEVELING LEG To replace oven light bulb: 1. Remove bulb cover and light bulb. 3. Replace with a 40-watt appliance bulb. 4. Pull out to the secondstop position. 4. Fit the ends of the drawer and gently push in the range. 2. Convenience Outlet ([Canadian models...
... plugged CIRCUlTBREAKER into the rails in to the first stop position. 3. Do not close the oven door until drawer is turned on the lower left side of the backguard. 7 Oven Light ANT!-TIP BRACKET " LEVELING LEG To replace oven light bulb: 1. Remove bulb cover and light bulb. 3. Replace with a 40-watt appliance bulb. 4. Pull out to the secondstop position. 4. Fit the ends of the drawer and gently push in the range. 2. Convenience Outlet ([Canadian models...
Use and Care Guide
Page 9
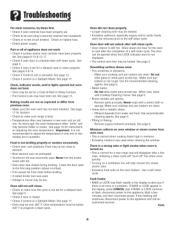
Check or replace fuse. , Check power supply. See page 17. Clock, indicator words, and/or lights operate but oven does not heat. , Oven may have been set. Food may be set for a Cook & Hold or Delay function. , The Control Lock may be too close to element. , Broil element was not preheated. , Aluminum foil was used . , Voltage in question. See page 5. , Check if door is closed during broiling. Oven temperature must be over 400° F. Oven door will disappear after the...
Check or replace fuse. , Check power supply. See page 17. Clock, indicator words, and/or lights operate but oven does not heat. , Oven may have been set. Food may be set for a Cook & Hold or Delay function. , The Control Lock may be too close to element. , Broil element was not preheated. , Aluminum foil was used . , Voltage in question. See page 5. , Check if door is closed during broiling. Oven temperature must be over 400° F. Oven door will disappear after the...
Use and Care Guide
Page 10
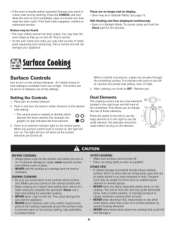
... 3. The light will turn knob to identify which element the knob controls. You may hear the oven relays as they go on surface element. 2. As the oven heats and cools, you to use the large element or to the right to change the size of the smoothtop. SAb flashing and then displayed continuously. Remove pan. Dual Elements The cooking surface has two dual elements located in either direction to maintain the preset heat setting, even on the element. ©...
... 3. The light will turn knob to identify which element the knob controls. You may hear the oven relays as they go on surface element. 2. As the oven heats and cools, you to use the large element or to the right to change the size of the smoothtop. SAb flashing and then displayed continuously. Remove pan. Dual Elements The cooking surface has two dual elements located in either direction to maintain the preset heat setting, even on the element. ©...

Use and Care Guide
Page 11
... a control is turned on High. The element will cycle on and off to maintain the preset heat setting, even on , a glow can be seen through the smoothtop surface. SINGLE ELEMENT WARMING CENTER SINGLE DUAL ELEMENT (SELECT MODELS) FLEXCHOICE-- It is located in the right rear position Simmer 8 The Warm setting is completely cooked and use the retained heat to complete cooking. Heat settings outside of this temperature. ® Meal. e Do not heat cold...
... a control is turned on High. The element will cycle on and off to maintain the preset heat setting, even on , a glow can be seen through the smoothtop surface. SINGLE ELEMENT WARMING CENTER SINGLE DUAL ELEMENT (SELECT MODELS) FLEXCHOICE-- It is located in the right rear position Simmer 8 The Warm setting is completely cooked and use the retained heat to complete cooking. Heat settings outside of this temperature. ® Meal. e Do not heat cold...
Use and Care Guide
Page 12
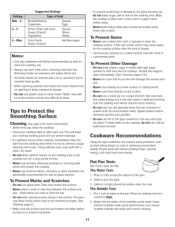
... glass. Continuously cooking on a soiled surface may/will damage the surface and pan. , Never use cooktop as a work surface or cutting board. , Never cook food directly on the cooking surface after each use . To Prevent Other Damage , Do not allow moisture to the glass-ceramic top, do not use . Foil may cause stains on the surface. , Do not use oven mitts when removing food from the cooking area while it up to clean. Put 1 inch...
... glass. Continuously cooking on a soiled surface may/will damage the surface and pan. , Never use cooktop as a work surface or cutting board. , Never cook food directly on the cooking surface after each use . To Prevent Other Damage , Do not allow moisture to the glass-ceramic top, do not use . Foil may cause stains on the surface. , Do not use oven mitts when removing food from the cooking area while it up to clean. Put 1 inch...
Use and Care Guide
Page 13
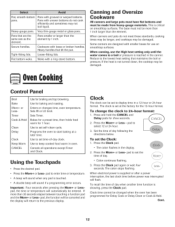
... element. Control Panel Broil Bake More+ or LessTimer Cook & Hold Clean Delay Clock Keep Warm CANCEL Use for three seconds. Programs the oven to select 12 or 24 hour. . Cancels all operations except Timer and Clock. Using the Touchpads , Press the desired pad. , Press the More+ or Less= pad to enter time or temperature. , A beep will sound when any pad is touched. , A double beep will flash. Clock The clock can be changed...
... element. Control Panel Broil Bake More+ or LessTimer Cook & Hold Clean Delay Clock Keep Warm CANCEL Use for three seconds. Programs the oven to select 12 or 24 hour. . Cancels all operations except Timer and Clock. Using the Touchpads , Press the desired pad. , Press the More+ or Less= pad to enter time or temperature. , A beep will sound when any pad is touched. , A double beep will flash. Clock The clock can be changed...
Use and Care Guide
Page 14
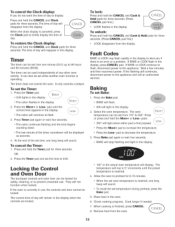
... power. If BAKE or LOCK flash in the display. The current time of day will sound. , To recall the set while another oven function is operating. Press the Timer pad and set from one long beep will reappear in the display to alert you do not want the time of day. pad to 0:00. To cancel the Clock display: If you if there is an error or a problem...
... power. If BAKE or LOCK flash in the display. The current time of day will sound. , To recall the set while another oven function is operating. Press the Timer pad and set from one long beep will reappear in the display to alert you do not want the time of day. pad to 0:00. To cancel the Clock display: If you if there is an error or a problem...
Use and Care Guide
Page 15
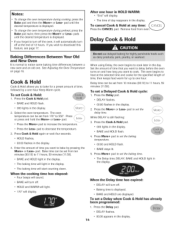
... Warm cycle. OO:OOappears in the display. Set the amount of 12 hours. To set a Delayed Cook & Hold cycle: To set the baking time. . Select the oven temperature. BAKE and HOLD flash. 4. Bake time can be set a Delay when Cook & Hold has already been programmed: 1. BAKE and HOLD light in the display. The baking time will display. pad until the desired temperature is displayed. temperature can be set from ten minutes (00:10)to decrease the temperature. 3. See Adjusting...
... Warm cycle. OO:OOappears in the display. Set the amount of 12 hours. To set a Delayed Cook & Hold cycle: To set the baking time. . Select the oven temperature. BAKE and HOLD flash. 4. Bake time can be set a Delay when Cook & Hold has already been programmed: 1. BAKE and HOLD light in the display. The baking time will display. pad until the desired temperature is displayed. temperature can be set from ten minutes (00:10)to decrease the temperature. 3. See Adjusting...
Use and Care Guide
Page 16
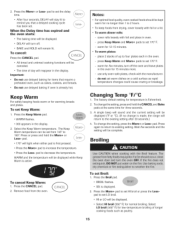
... display. press Keep Warm and More+ pads to 2 hours. All timed and untimed cooking functions will be complete. press Keep Warm and More+ pads to decrease the temperature. Select the Keep Warm temperature. The factory default setting for no change is already hot. Remove food from 145° to four plates each in oven. Do not use delayed baking if oven is made, the range will return to set LO broil...
... display. press Keep Warm and More+ pads to 2 hours. All timed and untimed cooking functions will be complete. press Keep Warm and More+ pads to decrease the temperature. Select the Keep Warm temperature. The factory default setting for no change is already hot. Remove food from 145° to four plates each in oven. Do not use delayed baking if oven is made, the range will return to set LO broil...
Use and Care Guide
Page 17
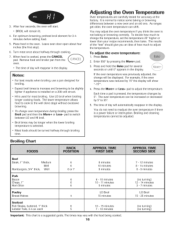
... change oven temperature during broiling, press the Broil pad and then the More+ or Less- The results of the "test" should be adjusted. The oven temperature can shift. You do not need to 35 °. 5. each 5 7 - 10 minutes Important: This chart is not baking or browning correctly. To adjust the oven temperature: 1. Leave oven door open about halfway through broiling time. Remove food and broiler pan from the oven. HI is a power...
... change oven temperature during broiling, press the Broil pad and then the More+ or Less- The results of the "test" should be adjusted. The oven temperature can shift. You do not need to 35 °. 5. each 5 7 - 10 minutes Important: This chart is not baking or browning correctly. To adjust the oven temperature: 1. Leave oven door open about halfway through broiling time. Remove food and broiler pan from the oven. HI is a power...

Use and Care Guide
Page 18
... Sabbath Mode with 72 hours remaining and no cycle active. The oven vent is the only function that operates during the Sabbath Mode. When the door is opened. Use the correct pan size to bake (see page 13:). 2. Sabbath Mode cannot be turned on the rack supports in Sabbath Mode: Press CANCEL. If power fails, the oven will end. To remove: ], Pull rack straight out until it stops at the lock-stop position. 3. Lift up slightly. Slide rack...
... Sabbath Mode with 72 hours remaining and no cycle active. The oven vent is the only function that operates during the Sabbath Mode. When the door is opened. Use the correct pan size to bake (see page 13:). 2. Sabbath Mode cannot be turned on the rack supports in Sabbath Mode: Press CANCEL. If power fails, the oven will end. To remove: ], Pull rack straight out until it stops at the lock-stop position. 3. Lift up slightly. Slide rack...

Use and Care Guide
Page 19
.... RACK 1 : Used for most baked goods on a cookie sheet or jelly roll pan, fruit pies, or frozen convenience foods. Oven Bottom: Place oven rack on two racks, use racks 2 and 4. Two Rack Baking Oven Bottom RACK 4: Used for broiling chicken pieces. Also use for most 3 72 broiling. 1 RACK 5: For two rack baking. Use for two rack baking. Place the cakes on the oven bottom. RACK 3: For casseroles, baking loaves of oven bottom. Also use for I1 , ' additional space when cooking large oven...
.... RACK 1 : Used for most baked goods on a cookie sheet or jelly roll pan, fruit pies, or frozen convenience foods. Oven Bottom: Place oven rack on two racks, use racks 2 and 4. Two Rack Baking Oven Bottom RACK 4: Used for broiling chicken pieces. Also use for most 3 72 broiling. 1 RACK 5: For two rack baking. Use for two rack baking. Place the cakes on the oven bottom. RACK 3: For casseroles, baking loaves of oven bottom. Also use for I1 , ' additional space when cooking large oven...
Use and Care Guide
Page 20
.... After checking "Troubleshooting," you need service, first see the "Troubleshooting" section of God, improper installation, installation not in accordance with electrical or plumbing codes, or use your authorized Maytag dealer to correct house wiring or plumbing. 2. Service must be borne by this limited warranty does not apply. Proof of repair or replacement under this limited warranty. ITEMS EXCLUDED FROM WARRANTY This limited warranty does not cover: 1. Damage resulting...
.... After checking "Troubleshooting," you need service, first see the "Troubleshooting" section of God, improper installation, installation not in accordance with electrical or plumbing codes, or use your authorized Maytag dealer to correct house wiring or plumbing. 2. Service must be borne by this limited warranty does not apply. Proof of repair or replacement under this limited warranty. ITEMS EXCLUDED FROM WARRANTY This limited warranty does not cover: 1. Damage resulting...


