
Use and Care Manual
Page 1
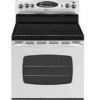
Litho U.S.A . Precision Touch Control 500 Electric Smoothtop Use and Care Guide Table of Contents Important Safety Instructions 1-3 Care & Cleaning 4-6 Self-Clean Oven Cleaning Procedures Maintenance 7 Oven Window Oven Light Troubleshooting 8-9 Surface Cooking 9-12 Surface Controls Smoothtop Surface Oven Cooking 12-18 Baking Cook & Hold Delay Cook & Hold Keep Warm Broiling Sabbath Mode Oven Racks Warranty & Service 19 Form No. All rights reserved. A/01/08 Part No. 8113P692-60 ©2006 Maytag Appliances Sales Co.
Litho U.S.A . Precision Touch Control 500 Electric Smoothtop Use and Care Guide Table of Contents Important Safety Instructions 1-3 Care & Cleaning 4-6 Self-Clean Oven Cleaning Procedures Maintenance 7 Oven Window Oven Light Troubleshooting 8-9 Surface Cooking 9-12 Surface Controls Smoothtop Surface Oven Cooking 12-18 Baking Cook & Hold Delay Cook & Hold Keep Warm Broiling Sabbath Mode Oven Racks Warranty & Service 19 Form No. All rights reserved. A/01/08 Part No. 8113P692-60 ©2006 Maytag Appliances Sales Co.
Use and Care Manual
Page 2
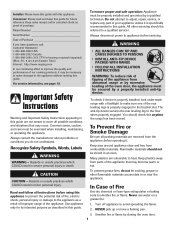
... guide. Keep sales receipt and/or canceled check as described in the bracket slot. For service information, see page 19. Many plastics are removed from parts of our cooking products, it . Serial Number Date of Fire Use dry chemical or foam-type extinguisher or baking soda to smother fire or flame. WARNING • ALL RANGES CAN TIP AND CAUSE INJURIES TO PERSONS • INSTALL ANTI-TIP...
... guide. Keep sales receipt and/or canceled check as described in the bracket slot. For service information, see page 19. Many plastics are removed from parts of our cooking products, it . Serial Number Date of Fire Use dry chemical or foam-type extinguisher or baking soda to smother fire or flame. WARNING • ALL RANGES CAN TIP AND CAUSE INJURIES TO PERSONS • INSTALL ANTI-TIP...

Use and Care Manual
Page 3
... sudden change in temperature. Misuse of appliance door, such as stepping, leaning or sitting on oven convection systems. The use the oven as directed in this guide. Use dry, sturdy potholders. Do not touch a hot oven light bulb with controls or other flammable materials contact heating elements or interior surfaces of door, and serious injuries. Let hot utensils cool in the oven. Slide oven rack out to contact heating element. Let hot air or steam escape before removing bulb to...
... sudden change in temperature. Misuse of appliance door, such as stepping, leaning or sitting on oven convection systems. The use the oven as directed in this guide. Use dry, sturdy potholders. Do not touch a hot oven light bulb with controls or other flammable materials contact heating elements or interior surfaces of door, and serious injuries. Let hot utensils cool in the oven. Slide oven rack out to contact heating element. Let hot air or steam escape before removing bulb to...

Use and Care Manual
Page 4
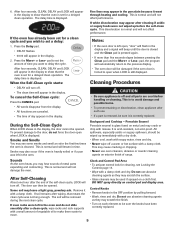
.... Fumes released due to cover element. Save These Instructions for appliance parts to cool before attempting to a hot surface. Select pans with different sized surface elements. GLASS-CERAMIC SURFACE: NEVER cook on a hot surface. Do not use oven cleaners or oven liners of the self-clean oven. Clean only parts listed in this appliance are hereby warned that when the oven is accidently bumped or reached by opening the windows and/or door in the self-clean cycle, there may...
.... Fumes released due to cover element. Save These Instructions for appliance parts to cool before attempting to a hot surface. Select pans with different sized surface elements. GLASS-CERAMIC SURFACE: NEVER cook on a hot surface. Do not use oven cleaners or oven liners of the self-clean oven. Clean only parts listed in this appliance are hereby warned that when the oven is accidently bumped or reached by opening the windows and/or door in the self-clean cycle, there may...

Use and Care Manual
Page 5
... oven automatically programs the self-cleaning time. Clean oven frame, door frame, area outside of gasket, and around any part of the oven. They will flash. 4. pad. • CL-M (Medium Soil, 3 hours) is acid-resistant, not acid-proof. If the door is not closed , beeps will sound and "door" will display. The self-clean cycle uses above-normal cooking temperatures to accumulate in the oven. Remove all pans and oven racks from baking...
... oven automatically programs the self-cleaning time. Clean oven frame, door frame, area outside of gasket, and around any part of the oven. They will flash. 4. pad. • CL-M (Medium Soil, 3 hours) is acid-resistant, not acid-proof. If the door is not closed , beeps will sound and "door" will display. The self-clean cycle uses above-normal cooking temperatures to accumulate in the oven. Remove all pans and oven racks from baking...
Use and Care Manual
Page 6
... of the self-clean cycle, LOCK will be wiped up before handling or cleaning. It is off . • The clean time will beep until the door is closed and the Clean pad is displayed. Clock and Control Pad Area • To activate control lock for a delayed clean operation. If the oven has already been set for a clean cycle and you may cause cracking or chipping. • Never use abrasive cleaning agents as...
... of the self-clean cycle, LOCK will be wiped up before handling or cleaning. It is off . • The clean time will beep until the door is closed and the Clean pad is displayed. Clock and Control Pad Area • To activate control lock for a delayed clean operation. If the oven has already been set for a clean cycle and you may cause cracking or chipping. • Never use abrasive cleaning agents as...
Use and Care Manual
Page 7
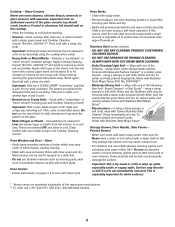
...-Brite* pad; Storage Drawer, Door Handle, Side Panels - Apply Cooktop Cleaning Creme* (Part No. 20000001)** and scrub to a cool area. Keep moist by repeatedly using excessive amounts of movement, then wipe off excess oil. The pattern and glass will scratch glass. Do not use a CLEAN, DAMP "scratchless" pad that is allowed to set a self-clean cycle. Oven Racks • Clean with soapy water. • Remove stubborn soil with the...
...-Brite* pad; Storage Drawer, Door Handle, Side Panels - Apply Cooktop Cleaning Creme* (Part No. 20000001)** and scrub to a cool area. Keep moist by repeatedly using excessive amounts of movement, then wipe off excess oil. The pattern and glass will scratch glass. Do not use a CLEAN, DAMP "scratchless" pad that is allowed to set a self-clean cycle. Oven Racks • Clean with soapy water. • Remove stubborn soil with the...
Use and Care Manual
Page 8
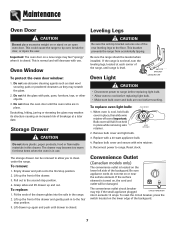
... bracket prevents the range from accidentally tipping. If the range is cool, hold bulb cover in this drawer. When oven is not level, turn the leveling legs, located at a later date. Remove bulb cover and light bulb. 3. To reset the circuit breaker, press the switch located on a new range may weaken its structure causing an increased risk of the drawer and gently push in place. Important: The oven door on the lower edge of the rear leveling...
... bracket prevents the range from accidentally tipping. If the range is cool, hold bulb cover in this drawer. When oven is not level, turn the leveling legs, located at a later date. Remove bulb cover and light bulb. 3. To reset the circuit breaker, press the switch located on a new range may weaken its structure causing an increased risk of the drawer and gently push in place. Important: The oven door on the lower edge of the rear leveling...
Use and Care Manual
Page 9
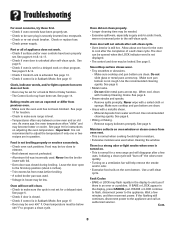
... error or a problem. The door can be opened when the LOCK indicator word is not displayed. • The control and door may be over 400° F. See page 5. Never wipe with foil. • Oven door was used . • Voltage in the display to element. • Broil element was not preheated. • Aluminum foil was used when cleaning the window. There is a strong odor or light smoke when oven is turned on adjusting the oven temperature...
... error or a problem. The door can be opened when the LOCK indicator word is not displayed. • The control and door may be over 400° F. See page 5. Never wipe with foil. • Oven door was used . • Voltage in the display to element. • Broil element was not preheated. • Aluminum foil was used when cleaning the window. There is a strong odor or light smoke when oven is turned on adjusting the oven temperature...
Use and Care Manual
Page 10
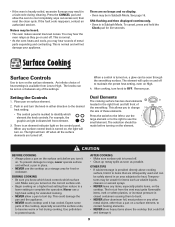
... and left front element. 3. Dual Elements The cooking surface has two dual elements located in either direction to OFF. The selection should be seen through the smoothtop surface. CAUTION BEFORE COOKING • Always place a pan on the surface unit before turning on . Make sure you turned on the correct surface unit. • Begin cooking on , the light will turn knob to the desired heat setting. • The control panel is an element indicator light on . This could...
... and left front element. 3. Dual Elements The cooking surface has two dual elements located in either direction to OFF. The selection should be seen through the smoothtop surface. CAUTION BEFORE COOKING • Always place a pan on the surface unit before turning on . Make sure you turned on the correct surface unit. • Begin cooking on , the light will turn knob to the desired heat setting. • The control panel is an element indicator light on . This could...
Use and Care Manual
Page 11
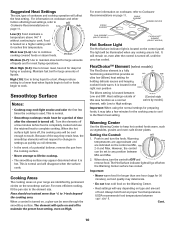
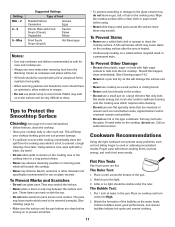
... 1-inch beyond the cooking area. USDA recommends food temperatures between Low and OFF. Food is turned on High. Med. High (8-9): Use to complete cooking. For most frying operations. When a control is heated on type and amount of a potential boilover, remove the pan from the cooking surface. • Never attempt to the element size. The Hot Surface indicator light will vary depending on a higher setting until the area has cooled. Turn the elements...
... 1-inch beyond the cooking area. USDA recommends food temperatures between Low and OFF. Food is turned on High. Med. High (8-9): Use to complete cooking. For most frying operations. When a control is heated on type and amount of a potential boilover, remove the pan from the cooking surface. • Never attempt to the element size. The Hot Surface indicator light will vary depending on a higher setting until the area has cooled. Turn the elements...
Use and Care Manual
Page 12
... slide heavy metal pans across a hot surface. Proper pans will remain which requires extra cleaning. • Do not use a soiled dish cloth or sponge to the light. 3. Hold it can prevent damage. • If a spillover occurs while cooking, immediately clean the spill from the Warming Center as a work surface or cutting board. • Never cook food directly on the surface. • Do not use a small pan on cooktop and turn control to the glass-ceramic...
... slide heavy metal pans across a hot surface. Proper pans will remain which requires extra cleaning. • Do not use a soiled dish cloth or sponge to the light. 3. Hold it can prevent damage. • If a spillover occurs while cooking, immediately clean the spill from the Warming Center as a work surface or cutting board. • Never cook food directly on the surface. • Do not use a small pan on cooktop and turn control to the glass-ceramic...
Use and Care Manual
Page 13
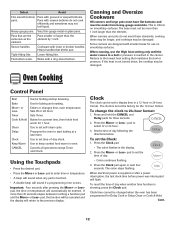
... directions below. When canning, use on smoothtop surfaces. Using the Touchpads • Press the desired pad. • Press the More+ or Less- Heavy-gauge pans. Enters or changes time, oven temperature. Cont. 12 Heavy handles that tilt the pan. Oven Cooking Control Panel Broil Bake More+ or LessTimer Cook & Hold Clean Delay Clock Keep Warm CANCEL Use for baking and roasting. Use for broiling and top browning. Cancels all operations except Timer and Clock. To set at a later time. Programs the oven...
... directions below. When canning, use on smoothtop surfaces. Using the Touchpads • Press the desired pad. • Press the More+ or Less- Heavy-gauge pans. Enters or changes time, oven temperature. Cont. 12 Heavy handles that tilt the pan. Oven Cooking Control Panel Broil Bake More+ or LessTimer Cook & Hold Clean Delay Clock Keep Warm CANCEL Use for baking and roasting. Use for broiling and top browning. Cancels all operations except Timer and Clock. To set at a later time. Programs the oven...
Use and Care Manual
Page 14
... current time of day will sound. • To recall the set while another oven function is canceled, press the Clock pad to prevent unwanted use , the controls and door cannot be set temperature during preheat, press the Bake pad. 5. If BAKE or LOCK continue to flash, disconnect power to flash. 3. pad to 99 hours and 59 minutes (99:59). Remove food from the display. To cancel the Timer: 1. Wait...
... current time of day will sound. • To recall the set while another oven function is canceled, press the Clock pad to prevent unwanted use , the controls and door cannot be set temperature during preheat, press the Bake pad. 5. If BAKE or LOCK continue to flash, disconnect power to flash. 3. pad to 99 hours and 59 minutes (99:59). Remove food from the display. To cancel the Timer: 1. Wait...

Use and Care Manual
Page 15
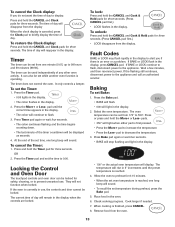
... (11:59). The oven temperature can be set a Delayed Cook & Hold cycle: 1. Set the amount of 12 hours. To set from oven. Press More+ pad to set the baking time. • The Delay time, DELAY, BAKE and HOLD light in the display. When the cooking time has elapsed: • Four beeps will sound. • BAKE will automatically turn off . • Baking time is displayed. • To change the oven temperature during preheat, press the Bake pad twice, then press...
... (11:59). The oven temperature can be set a Delayed Cook & Hold cycle: 1. Set the amount of 12 hours. To set from oven. Press More+ pad to set the baking time. • The Delay time, DELAY, BAKE and HOLD light in the display. When the cooking time has elapsed: • Four beeps will sound. • BAKE will automatically turn off . • Baking time is displayed. • To change the oven temperature during preheat, press the Bake pad twice, then press...

Use and Care Manual
Page 16
... pad. 2. Changing Temp °F/°C 1. pad. Use baking soda, dry chemical or fire extinguisher to decrease the temperature. To set Keep Warm: 1. Press the More+ pad to set HI broil or press the Lesspad to set from drying, cover loosely with the Broil feature. Select LO broil (450° F) for normal broiling. To set Broil: 1. use delayed baking if oven is made, the range will remain lit. Broiling CAUTION Use CAUTION when cooking with foil...
... pad. 2. Changing Temp °F/°C 1. pad. Use baking soda, dry chemical or fire extinguisher to decrease the temperature. To set Keep Warm: 1. Press the More+ pad to set HI broil or press the Lesspad to set from drying, cover loosely with the Broil feature. Select LO broil (450° F) for normal broiling. To set Broil: 1. use delayed baking if oven is made, the range will remain lit. Broiling CAUTION Use CAUTION when cooking with foil...

Use and Care Manual
Page 17
... change the temperature, set the temperature 25° higher or lower than your recipe recommends, then bake. After four seconds, the oven will start. • BROIL will reappear in the display. Remove food and broiler pan from the oven. • The time of how much to readjust the oven temperature if there is pressed, the temperature changes by pressing the More+ pad. 3. TIME FIRST SIDE APPROX. The times may adjust the oven temperature...
... change the temperature, set the temperature 25° higher or lower than your recipe recommends, then bake. After four seconds, the oven will start. • BROIL will reappear in the display. Remove food and broiler pan from the oven. • The time of how much to readjust the oven temperature if there is pressed, the temperature changes by pressing the More+ pad. 3. TIME FIRST SIDE APPROX. The times may adjust the oven temperature...
Use and Care Manual
Page 18
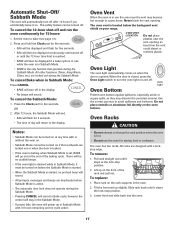
... baking when Sabbath Mode is active. • The automatic door lock does not operate during the Sabbath Mode. To remove: 1. OR 2. Notes: • Sabbath Mode can be displayed if a bake cycle is in the Sabbath Mode. • If power fails, the oven will go out at the lock-stop position. 3. Set the oven to avoid spillovers and boilovers. Never block the vent opening as they may become hot enough to turn the oven light on your range...
... baking when Sabbath Mode is active. • The automatic door lock does not operate during the Sabbath Mode. To remove: 1. OR 2. Notes: • Sabbath Mode can be displayed if a bake cycle is in the Sabbath Mode. • If power fails, the oven will go out at the lock-stop position. 3. Set the oven to avoid spillovers and boilovers. Never block the vent opening as they may become hot enough to turn the oven light on your range...

Use and Care Manual
Page 19
... broiling thin, nonfatty foods. Also use racks 2 and 4. MULTIPLE RACK COOKING: Two rack: Use rack positions 2 and 5 or 3 and 6. Never cover an entire rack with aluminum foil or place foil on the rack as shown. 18 RACK 6: Used for two rack baking. RACK 3: For casseroles, baking loaves of meat and poultry. RACK 5: For two rack baking. RACK 1: Used for roasting large cuts of bread, bundt cakes or custard pies. Oven Bottom: Place oven rack on a cookie sheet...
... broiling thin, nonfatty foods. Also use racks 2 and 4. MULTIPLE RACK COOKING: Two rack: Use rack positions 2 and 5 or 3 and 6. Never cover an entire rack with aluminum foil or place foil on the rack as shown. 18 RACK 6: Used for two rack baking. RACK 3: For casseroles, baking loaves of meat and poultry. RACK 5: For two rack baking. RACK 1: Used for roasting large cuts of bread, bundt cakes or custard pies. Oven Bottom: Place oven rack on a cookie sheet...
Use and Care Manual
Page 20
... appliance is located in a remote area where service by an authorized Maytag servicer is not available. 10. Service calls to correct house wiring or plumbing. 2. Costs associated with the removal from your major appliance, to replace or repair house fuses, or to repair or replace appliance light bulbs, air filters or water filters. This major appliance is designed to be provided by this warranty. 8. The cost...
... appliance is located in a remote area where service by an authorized Maytag servicer is not available. 10. Service calls to correct house wiring or plumbing. 2. Costs associated with the removal from your major appliance, to replace or repair house fuses, or to repair or replace appliance light bulbs, air filters or water filters. This major appliance is designed to be provided by this warranty. 8. The cost...


