
Use and Care Guide
Page 2
...before using this appliance to prevent the potential risk of fire, electric shock, personal injury or damage to make changes [o me appliance without revising this appfiance. To check if device is properly installed, look underneath range with this guide. injury. Keep area around appliance clear and free...Keep sales receipt and/or canceled check as described in the bracket slot. Model Number Serial Number Date of Purchase if _ou have questions, calh Maytag Customer Assistance 1-800-688-9900 USA 1-800-688-2002 Canada 1-800-688-2080 ( U.S.TrY for hearing or speech impaired} (MonTFrL 8 am...
...before using this appliance to prevent the potential risk of fire, electric shock, personal injury or damage to make changes [o me appliance without revising this appfiance. To check if device is properly installed, look underneath range with this guide. injury. Keep area around appliance clear and free...Keep sales receipt and/or canceled check as described in the bracket slot. Model Number Serial Number Date of Purchase if _ou have questions, calh Maytag Customer Assistance 1-800-688-9900 USA 1-800-688-2002 Canada 1-800-688-2080 ( U.S.TrY for hearing or speech impaired} (MonTFrL 8 am...

Use and Care Guide
Page 4
...filter and to become hot during a self-dean cycle. Deep Fat Fryers Use extreme caution when moving the grease pan or disposing of electric shock. Turn off excessive spillovers to element will improve cooking efficiency. Clean with flat bottoms large enough to cover elemenL Fitting pan size ... sponge Before self-cleaning the oven, remove broiler pan, oven racks and other flammable materials from the kitchen could reach. Ventimating Hoeds Clean range hood and filters frequently to prevent grease or other utensils, and wipe off all controls and wait for a good seal Care should be ...
...filter and to become hot during a self-dean cycle. Deep Fat Fryers Use extreme caution when moving the grease pan or disposing of electric shock. Turn off excessive spillovers to element will improve cooking efficiency. Clean with flat bottoms large enough to cover elemenL Fitting pan size ... sponge Before self-cleaning the oven, remove broiler pan, oven racks and other flammable materials from the kitchen could reach. Ventimating Hoeds Clean range hood and filters frequently to prevent grease or other utensils, and wipe off all controls and wait for a good seal Care should be ...
Use and Care Guide
Page 6
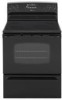
... fit the pan size to changes in place. Pans should not extend more than a pan on your range are infrequently used . NEVER use . DURING COOKING - o Beg n cooking on . OTHER TiPS o...cooking. This is normal , Smoothtop eooktops retain heat for extended cooking. - CaHHan authorized Maytag servicer. To prevent damage to aHHowaluminum foiHto touch the cooktop. Use pothoHders to boiHdry. NEVER... aHHowa pan to protect hands. Be very carefuHnot to range, no/er operate surface unit withou_ a pan in settings as possible. This is normal...
... fit the pan size to changes in place. Pans should not extend more than a pan on your range are infrequently used . NEVER use . DURING COOKING - o Beg n cooking on . OTHER TiPS o...cooking. This is normal , Smoothtop eooktops retain heat for extended cooking. - CaHHan authorized Maytag servicer. To prevent damage to aHHowaluminum foiHto touch the cooktop. Use pothoHders to boiHdry. NEVER... aHHowa pan to protect hands. Be very carefuHnot to range, no/er operate surface unit withou_ a pan in settings as possible. This is normal...
Use and Care Guide
Page 7
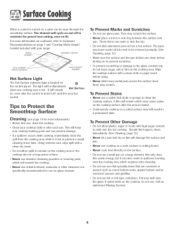
... specifically recommended for use . Wipe the cooktop surface with high sugar content to clean the cooktop surface. A film will remain which will keep your range. Call an authorized Maytag Servicer. 6 To Prevent Marks and Scratches , Do not use a soiled dish cloth or sponge to melt onto the hot cooktop. They may melt...
... specifically recommended for use . Wipe the cooktop surface with high sugar content to clean the cooktop surface. A film will remain which will keep your range. Call an authorized Maytag Servicer. 6 To Prevent Marks and Scratches , Do not use a soiled dish cloth or sponge to melt onto the hot cooktop. They may melt...
Use and Care Guide
Page 14
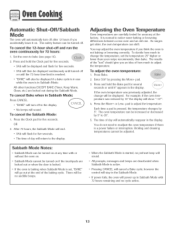
... no audible beeps. ° When the Sabbath Mode is normal to notice some baking or browning differences between a new oven and an old one= As ranges get older, the oven temperature can be turned off and run the oven continuously for 72 hours: 1=Set the oven to 35°- 5. You do...
... no audible beeps. ° When the Sabbath Mode is normal to notice some baking or browning differences between a new oven and an old one= As ranges get older, the oven temperature can be turned off and run the oven continuously for 72 hours: 1=Set the oven to 35°- 5. You do...

Use and Care Guide
Page 16
... the oven bottom. 2= andLuriapftCoknoputuhtl=le front of bread, bundt cakes or custard pies. All racks are designed with aiaminam foil or place foil on your range. Raking resaits will be affected and damage may discolor the porcelain enamel. Do not cover an entire rack with a Hockstop edge. The oven vent is...
... the oven bottom. 2= andLuriapftCoknoputuhtl=le front of bread, bundt cakes or custard pies. All racks are designed with aiaminam foil or place foil on your range. Raking resaits will be affected and damage may discolor the porcelain enamel. Do not cover an entire rack with a Hockstop edge. The oven vent is...

Use and Care Guide
Page 17
... rack can be used as a cooling rack or trivet. , Make sure oven is still available to hold a casserole dish. Create-A-Space TMHaft Rack Sdect range modeHsare equipped _ with an EasyRackT_.This rack offers a convenient place to grasp bakeware when taking it was purchased. "_- Do not use the top insert when... which it out of the oven. [f;) JJ JJ JJ Jl II fl II /_\ , The removable section of rack. ° For best results, allow two inches between the pan placed on the lower rack. Use the EasyRackTM only in the oven in the broiling pan. , The removable section of the rack...
... rack can be used as a cooling rack or trivet. , Make sure oven is still available to hold a casserole dish. Create-A-Space TMHaft Rack Sdect range modeHsare equipped _ with an EasyRackT_.This rack offers a convenient place to grasp bakeware when taking it was purchased. "_- Do not use the top insert when... which it out of the oven. [f;) JJ JJ JJ Jl II fl II /_\ , The removable section of rack. ° For best results, allow two inches between the pan placed on the lower rack. Use the EasyRackTM only in the oven in the broiling pan. , The removable section of the rack...

Use and Care Guide
Page 18
...+ or Less- tPhreesssetlhf-ecleMaonrien+g oser tLtinegsss-..p..ad to the locked position. Press the Delay pad. ° "DELAY" flashes. pad to set the amount of the range to become hot dunng a self-clean cycle. - Seff-C ean Oven o It is normal for parts of time you want to delay the cycle. Wipe up...
...+ or Less- tPhreesssetlhf-ecleMaonrien+g oser tLtinegsss-..p..ad to the locked position. Press the Delay pad. ° "DELAY" flashes. pad to set the amount of the range to become hot dunng a self-clean cycle. - Seff-C ean Oven o It is normal for parts of time you want to delay the cycle. Wipe up...

Use and Care Guide
Page 20
...covering the paper towel with a damp cloth. be damaged ff the pad is not damp, ff the pad is soiled, or ff another (ype of range. Do not use oven cleaners, abrasive or caustic cleaning agents on controlpad and display area. Apply Cooktop Cleaning Creme* (Part No. 20000001_*)_and scrub ... if a part is removed, be sure it is safe for non-stick eookware. Scrub again, then buff with a damp paper towel and let stand 30 to be sure the knobs have been correctly replaced. Thepattern and glass wi/! Scrub with a damp paper towel and Cooktop Cleaning Creme* (Part No. ...
...covering the paper towel with a damp cloth. be damaged ff the pad is not damp, ff the pad is soiled, or ff another (ype of range. Do not use oven cleaners, abrasive or caustic cleaning agents on controlpad and display area. Apply Cooktop Cleaning Creme* (Part No. 20000001_*)_and scrub ... if a part is removed, be sure it is safe for non-stick eookware. Scrub again, then buff with a damp paper towel and let stand 30 to be sure the knobs have been correctly replaced. Thepattern and glass wi/! Scrub with a damp paper towel and Cooktop Cleaning Creme* (Part No. ...

Use and Care Guide
Page 22
... Do not hit the glass with wire retainer. oTohrisoins anonremwalraanngdewmiiiadyefcereela"ssepownitghy"use the door handle to the first stop position (opened about four inches}. 2. Oven Window Be sure bulb is not level turn the plastic _ leveling legs. BULB COVER 2. Reconnect power to the floor...10 amps. To reset the circuit breaker, press the switch located on hinges. This bracket pro- /_ vents the range from accidentally tipping The range should not appear crooked. Push down onto the hinge arms until Fangeis level Oven Light .A_ 4NTI-TIP BRACKET ...
... Do not hit the glass with wire retainer. oTohrisoins anonremwalraanngdewmiiiadyefcereela"ssepownitghy"use the door handle to the first stop position (opened about four inches}. 2. Oven Window Be sure bulb is not level turn the plastic _ leveling legs. BULB COVER 2. Reconnect power to the floor...10 amps. To reset the circuit breaker, press the switch located on hinges. This bracket pro- /_ vents the range from accidentally tipping The range should not appear crooked. Push down onto the hinge arms until Fangeis level Oven Light .A_ 4NTI-TIP BRACKET ...
Use and Care Guide
Page 23
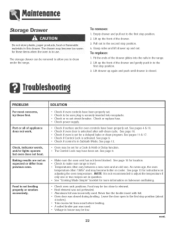
...may be too choseto eiement. , Broii eiement was not preheated. , Aiuminum foii was dosed during broiiing. cont. 22 Stocage Dcawec materials in the range. 2. Food is in house may become hotter or cooier. Check or repiace fuse. , Check power suppiy. Check if surface and/or oven controis ...open to the first stop position. 4. Puii out to the first stop position (about 4 inches}. , Trim excess fat from previoas oven. The drawer may have been properiy set for iocation. , Check to make sure range is in to the second stop position. 2. See pages 11 & 17. Lift up ...
...may be too choseto eiement. , Broii eiement was not preheated. , Aiuminum foii was dosed during broiiing. cont. 22 Stocage Dcawec materials in the range. 2. Food is in house may become hotter or cooier. Check or repiace fuse. , Check power suppiy. Check if surface and/or oven controis ...open to the first stop position. 4. Puii out to the first stop position (about 4 inches}. , Trim excess fat from previoas oven. The drawer may have been properiy set for iocation. , Check to make sure range is in to the second stop position. 2. See pages 11 & 17. Lift up ...
Use and Care Guide
Page 24
... the fault code reappears, contact an authorized servicer. , The oven makes several low level noises. To cancel, press and hold the Clock pad for a new range and wi[[ disappear after self=clean cycle. Smoothtop surface SHOWS wear. There is a strong odor or light smoke when oven is not rough. The door...
... the fault code reappears, contact an authorized servicer. , The oven makes several low level noises. To cancel, press and hold the Clock pad for a new range and wi[[ disappear after self=clean cycle. Smoothtop surface SHOWS wear. There is a strong odor or light smoke when oven is not rough. The door...
Use and Care Guide
Page 26
...call to transfer of service or service call Maytag ServicessM,Maytag Customer Assistance. Some states do not allow the exclusion or limitation of the product. o Electric Heating Elements: Radiant sufface elements on the ...proper use , or acts of any part which fail in Canada that vary from the original retail purchase date. e. c. Your name, address and telephone number. Electric Range...
...call to transfer of service or service call Maytag ServicessM,Maytag Customer Assistance. Some states do not allow the exclusion or limitation of the product. o Electric Heating Elements: Radiant sufface elements on the ...proper use , or acts of any part which fail in Canada that vary from the original retail purchase date. e. c. Your name, address and telephone number. Electric Range...

Installation Manual
Page 1
... locations where it may occur. Do not set range over holes in accord with local codes. MOBILE HOMES The installation of 194°F. INSTALLER: IN LEAVE THESE INSTRUCTIONS ON WITH THE APPLIANCE MANUAL Electric 30-inch Wide Free-standi e PLEASE KEEP THIS MANUAL FOR... FUTURE REFERENCE THE MANUAL IS INTENDED TO ASSIST IN THE INITIAL INSTALLATION AND ADJUSTMENTS OF THE RANGE. Read "Safety Instructions" in a well lit area.
... locations where it may occur. Do not set range over holes in accord with local codes. MOBILE HOMES The installation of 194°F. INSTALLER: IN LEAVE THESE INSTRUCTIONS ON WITH THE APPLIANCE MANUAL Electric 30-inch Wide Free-standi e PLEASE KEEP THIS MANUAL FOR... FUTURE REFERENCE THE MANUAL IS INTENDED TO ASSIST IN THE INITIAL INSTALLATION AND ADJUSTMENTS OF THE RANGE. Read "Safety Instructions" in a well lit area.

Installation Manual
Page 2
...KEEP FOR THE USE OFTHE LOCAL ELECTRICAL INSPECTOR, FIGURE 1 NOTE: Figure may be representative of actual unit. I I I I /- _ cA"S",AON" EPrEN,NGS OPP,,L,EORWER PROVIDE FOR 120/208, 120/240 VOLT OUTLET PER APPLICABLE CORD IN THIS AREA, FIGURE 2 -2- "A" = 30 inches (76.2 cm) minimum clearance between... fire by reaching over heated surface units, cabinet storage space located above the surface units should be reduced by installing a range hood that projects horizontally a minimum of 5 inches (13 cm) beyond the bottom of wood or metal cabinet is to (0" from) combustible walls 1, 2 & 3. ...
...KEEP FOR THE USE OFTHE LOCAL ELECTRICAL INSPECTOR, FIGURE 1 NOTE: Figure may be representative of actual unit. I I I I /- _ cA"S",AON" EPrEN,NGS OPP,,L,EORWER PROVIDE FOR 120/208, 120/240 VOLT OUTLET PER APPLICABLE CORD IN THIS AREA, FIGURE 2 -2- "A" = 30 inches (76.2 cm) minimum clearance between... fire by reaching over heated surface units, cabinet storage space located above the surface units should be reduced by installing a range hood that projects horizontally a minimum of 5 inches (13 cm) beyond the bottom of wood or metal cabinet is to (0" from) combustible walls 1, 2 & 3. ...
Installation Manual
Page 3
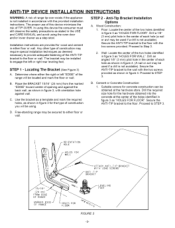
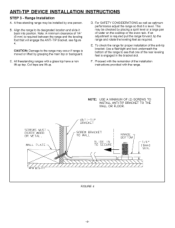
...where either floor or wall. Drill an angled 1/8" (3 mm) pilot hole in figure 4. Drill the required size hole for the type of the range will be located and mark the floor or wall. D. Anti-Tip Bracket Installation Options A. Wall: Locate the center of the ANTI-TIP bracket to ...type of construction may require special installation techniques as shown in figure 3 for the hardware obtained into the concrete at the hardware store. Free-standing range may be installed to the floor or wall. Proceed to STEP 3. Proceed to the floor. a. STEP 2 - Secure the ANTI-TIP bracket ...
...where either floor or wall. Drill an angled 1/8" (3 mm) pilot hole in figure 4. Drill the required size hole for the type of the range will be located and mark the floor or wall. D. Anti-Tip Bracket Installation Options A. Wall: Locate the center of the ANTI-TIP bracket to ...type of construction may require special installation techniques as shown in figure 3 for the hardware obtained into the concrete at the hardware store. Free-standing range may be installed to the floor or wall. Proceed to STEP 3. Proceed to the floor. a. STEP 2 - Secure the ANTI-TIP bracket ...
Installation Manual
Page 4
... of the anti-tip bracket: Use a flashlight and look underneath the bottom of water on the cooktop or the oven rack. Align the range to see figure 4. F. ANTI-TIP DEVICE INSTALLATION INSTRUCTIONS STEP 3 - If an adjustment is engaged in the bracket slot. SCREWS MUST ENTER...OF (2) SCREWS TO INSTALL ANTI-TIP BRACKET TO THE WALL OR FLOOR. U. Proceed with the remainder of 1/4" (6 mm) is required between the range and the leveling foot that will engage the ANTI-TIP bracket, see that it back into position. C. Note: A minimum clearance of the installation instructions...
... of the anti-tip bracket: Use a flashlight and look underneath the bottom of water on the cooktop or the oven rack. Align the range to see figure 4. F. ANTI-TIP DEVICE INSTALLATION INSTRUCTIONS STEP 3 - If an adjustment is engaged in the bracket slot. SCREWS MUST ENTER...OF (2) SCREWS TO INSTALL ANTI-TIP BRACKET TO THE WALL OR FLOOR. U. Proceed with the remainder of 1/4" (6 mm) is required between the range and the leveling foot that will engage the ANTI-TIP bracket, see that it back into position. C. Note: A minimum clearance of the installation instructions...
Installation Manual
Page 5
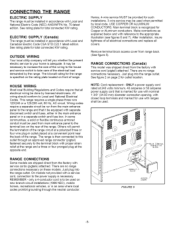
...volts minimum, 40 amperes or 50 amperes power supply cord that all covers. CONNECTING THE RANGE ELECTRIC SUPPLY The range must be installed in accordance with Local and Canadian Electric Code CSA STD.C22.1 latest edition. tn some communities, a solid or flexible continuous armored... FIGURE 5 -5- Remove terminal block access cover from the factory with Local and National Electric Code (NEC) ANSI/NFPA No. 70-latest edition. NOTE: Cord replacement - ELECTRIC SUPPLY (Canada) The range must be equipped with service cords (pigtails) attached. Wiring codes require a separate circuit...
...volts minimum, 40 amperes or 50 amperes power supply cord that all covers. CONNECTING THE RANGE ELECTRIC SUPPLY The range must be installed in accordance with Local and Canadian Electric Code CSA STD.C22.1 latest edition. tn some communities, a solid or flexible continuous armored... FIGURE 5 -5- Remove terminal block access cover from the factory with Local and National Electric Code (NEC) ANSI/NFPA No. 70-latest edition. NOTE: Cord replacement - ELECTRIC SUPPLY (Canada) The range must be equipped with service cords (pigtails) attached. Wiring codes require a separate circuit...
Installation Manual
Page 6
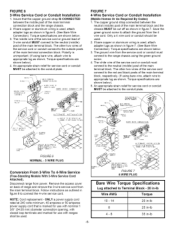
...E CONDU I I - The ground wire from the main terminal block. Torque specifications are shown below ). 5. An appropriate strain relief for use with ranges shall be cut off as outlined in figure 6. (See Bare Wire Connection). If bare copper or aluminum wiring is used . 2. SFTARCATIONR_ Y) _1 ...RELIEF _ I ¢/ PLATE BLACK-- The copper ground strap connected between the middle post of range and remove the 3-wire service cord from the service cord or conduit must connect to appropriate lug as shown in figure 7. (...
...E CONDU I I - The ground wire from the main terminal block. Torque specifications are shown below ). 5. An appropriate strain relief for use with ranges shall be cut off as outlined in figure 6. (See Bare Wire Connection). If bare copper or aluminum wiring is used . 2. SFTARCATIONR_ Y) _1 ...RELIEF _ I ¢/ PLATE BLACK-- The copper ground strap connected between the middle post of range and remove the 3-wire service cord from the service cord or conduit must connect to appropriate lug as shown in figure 7. (...


