Use and Care Guide
Page 2
...tip device. To check if device is properly installed, look underneath range with this guide. Keep plastics away from abnormal usage or by excessive...) (Mon.-Fri., 8 am-8 pm Eastern Time) Internet: http://www.maytag.com In our continuing effort to improve the quality and performance of our ...rear leveling legs is specifically recommended in the bracket slot. Model Number Serial Number Date of Purchase If you do not let...the appliance without revising this appliance to prevent the potential risk of fire, electric shock, personal injury or damage to the appliance as a result of ...
...tip device. To check if device is properly installed, look underneath range with this guide. Keep plastics away from abnormal usage or by excessive...) (Mon.-Fri., 8 am-8 pm Eastern Time) Internet: http://www.maytag.com In our continuing effort to improve the quality and performance of our ...rear leveling legs is specifically recommended in the bracket slot. Model Number Serial Number Date of Purchase If you do not let...the appliance without revising this appliance to prevent the potential risk of fire, electric shock, personal injury or damage to the appliance as a result of ...
Use and Care Guide
Page 4
... the risk of burns, ignition of potential exposures to such substances. Be sure pan will improve cooking efficiency. Self-Clean Oven (select models) CAUTION Before self-cleaning the oven, remove the oven racks, broiler pan, food and any part of food that when the oven ...only parts listed in a risk of the listed substances, including carbon monoxide. Improper installation of the range to become hot during a clean cycle should be harmful or fatal to some of electric shock or fire. Cleaning Safety Clean cooktop with different size surface elements. Cooktop caution. Turn off ...
... the risk of burns, ignition of potential exposures to such substances. Be sure pan will improve cooking efficiency. Self-Clean Oven (select models) CAUTION Before self-cleaning the oven, remove the oven racks, broiler pan, food and any part of food that when the oven ...only parts listed in a risk of the listed substances, including carbon monoxide. Improper installation of the range to become hot during a clean cycle should be harmful or fatal to some of electric shock or fire. Cleaning Safety Clean cooktop with different size surface elements. Cooktop caution. Turn off ...
Use and Care Guide
Page 5
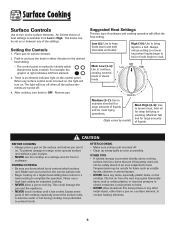
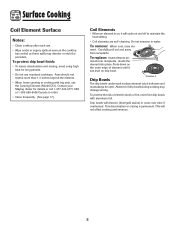
...the cooktop. For example, the graphic at right indicates left front element. 3. When any of liquids and for most frying operations. (Style varies by model) Med. High (10): Use to bring liquid to maintain slow boil for deep fat frying or sauteing. High (8-9): Use to protect hands. DURING ... that are turned off . • Clean up messy spills as soon as a storage area for large amounts of heat settings is marked to range, never operate surface unit without a pan in and turn knob to complete the operation. Low (2): Use to continue cooking covered foods or steam foods...
...the cooktop. For example, the graphic at right indicates left front element. 3. When any of liquids and for most frying operations. (Style varies by model) Med. High (10): Use to bring liquid to maintain slow boil for deep fat frying or sauteing. High (8-9): Use to protect hands. DURING ... that are turned off . • Clean up messy spills as soon as a storage area for large amounts of heat settings is marked to range, never operate surface unit without a pan in and turn knob to complete the operation. Low (2): Use to continue cooking covered foods or steam foods...
Use and Care Guide
Page 6
Contact your Maytag dealer for long periods. • Do not use the Canning Element (Model CE1). To remove: When cool, raise ele- minals into place. Do not immerse in water. Press down on the outer edge of element until it will cycle on drip bowl. To replace: Insert element ter- Absence of electric shock...
Contact your Maytag dealer for long periods. • Do not use the Canning Element (Model CE1). To remove: When cool, raise ele- minals into place. Do not immerse in water. Press down on the outer edge of element until it will cycle on drip bowl. To replace: Insert element ter- Absence of electric shock...

Use and Care Guide
Page 7
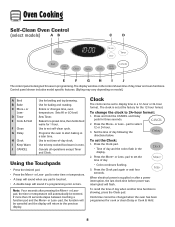
... previous display. pad, the function will be set . • The flashing colon indicates that a timing operation is in the display. 2. There is not pressed within 30 seconds, the program will cancel. pad is no beep for the More+ or Less- Sets Timer. The Bake and Broil indicators light when function is... interrupted. Oven Cooking Manual Clean Oven Control (select models) A B C D E F NOTE: The display will show 12:00 when the appliance is first connected to power or if power is pressed.
... previous display. pad, the function will be set . • The flashing colon indicates that a timing operation is in the display. 2. There is not pressed within 30 seconds, the program will cancel. pad is no beep for the More+ or Less- Sets Timer. The Bake and Broil indicators light when function is... interrupted. Oven Cooking Manual Clean Oven Control (select models) A B C D E F NOTE: The display will show 12:00 when the appliance is first connected to power or if power is pressed.

Use and Care Guide
Page 8
... press the Bake pad. pad until the desired oven temperature is displayed. • The oven temperature can be set an oven temperature within 30 seconds, the program will reappear in the center of day will automatically cancel and the time of longer cooking foods such as poultry. 3. ...will reappear in recipe. Press the More+ or Less- pad to OFF. Preheat broil element for broiling. Manual Clean Oven Knob Control (select models) Oven Temp Knob The Oven Temp Knob is left on page 8. Always turn the Oven Temp knob to change oven temperature during preheat, press...
... press the Bake pad. pad until the desired oven temperature is displayed. • The oven temperature can be set an oven temperature within 30 seconds, the program will reappear in the center of day will automatically cancel and the time of longer cooking foods such as poultry. 3. ...will reappear in recipe. Press the More+ or Less- pad to OFF. Preheat broil element for broiling. Manual Clean Oven Knob Control (select models) Oven Temp Knob The Oven Temp Knob is left on page 8. Always turn the Oven Temp knob to change oven temperature during preheat, press...
Use and Care Guide
Page 9
... the time of day. • Colon continues flashing. 3. pad to set at a later time. When electrical power is supplied or after pressing the More+ or Lesspad, the time or temperature will flash. The display window on model.) A Broil B Bake C More+ or LessD Timer E Cook & Hold F Clean G Delay H Clock I J The control ... oven to keep cooked food warm in the display. 2. Use to start baking at the factory for the 12-hour format. If more than 30 seconds elapse between touching a function pad and the More+ or Less- pad, the function will be changed when the oven has been programmed for...
... the time of day. • Colon continues flashing. 3. pad to set at a later time. When electrical power is supplied or after pressing the More+ or Lesspad, the time or temperature will flash. The display window on model.) A Broil B Bake C More+ or LessD Timer E Cook & Hold F Clean G Delay H Clock I J The control ... oven to keep cooked food warm in the display. 2. Use to start baking at the factory for the 12-hour format. If more than 30 seconds elapse between touching a function pad and the More+ or Less- pad, the function will be changed when the oven has been programmed for...

Use and Care Guide
Page 15
...Pull rack straight out until it was purchased. • The EasyRackTM can be used in all rack positions. To replace: EasyRackTM (select models) Select range models are designed with a lockstop edge. Oven Bottom Protect oven bottom against spillovers, especially acidic or sugary spills, as an accessory. To remove:...available as they may discolor the porcelain enamel. One flat rack and one offset rack: Use rack positions 2 and 5. Contact your range. This rack offers a convenient place to turn the oven light on the oven bottom. Do not place utensils or aluminum foil directly...
...Pull rack straight out until it was purchased. • The EasyRackTM can be used in all rack positions. To replace: EasyRackTM (select models) Select range models are designed with a lockstop edge. Oven Bottom Protect oven bottom against spillovers, especially acidic or sugary spills, as an accessory. To remove:...available as they may discolor the porcelain enamel. One flat rack and one offset rack: Use rack positions 2 and 5. Contact your range. This rack offers a convenient place to turn the oven light on the oven bottom. Do not place utensils or aluminum foil directly...
Use and Care Guide
Page 16
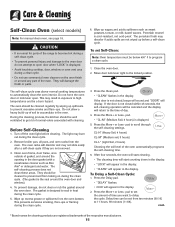
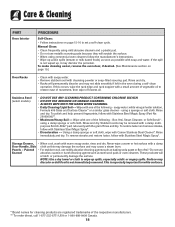
... the display. • "CLEAN" will appear in the display. Wipe up excess grease or spillovers from ten minutes (00:10) to the time of the range to become hot during the clean cycle. 5. Do not allow a heavy build-up of soil to get rid of normal odors associated with a nonabrasive cleaner... door when "LOCK" is normal for cleaning products are not removed. 3. Before Self-Cleaning 1. Press the More+ or Less- Care & Cleaning Self-Clean Oven (select models) Note: For manual clean oven, see page 18. To prevent damage, do not attempt to delay the cycle.
... the display. • "CLEAN" will appear in the display. Wipe up excess grease or spillovers from ten minutes (00:10) to the time of the range to become hot during the clean cycle. 5. Do not allow a heavy build-up of soil to get rid of normal odors associated with a nonabrasive cleaner... door when "LOCK" is normal for cleaning products are not removed. 3. Before Self-Cleaning 1. Press the More+ or Less- Care & Cleaning Self-Clean Oven (select models) Note: For manual clean oven, see page 18. To prevent damage, do not attempt to delay the cycle.
Use and Care Guide
Page 18
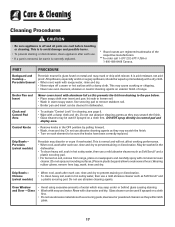
... NOT spray directly on newspapers and carefully spray with commercial oven cleaner. (Do not spray surrounding surfaces.) Place in dishwasher. Porcelain (select models) Porcelain may crack or chip with clear water and dry. Do not use , rinse and dry to soak several hours. It is glass...abrasive cleaner such as Soft Scrub* and a plastic scouring pad. • For burned on soil, remove from range, place on control pad and display area. Oven Window and Door - Chrome (select models) • When cool, wash after each use, rinse and dry to remove stubborn soil. • Broiler...
... NOT spray directly on newspapers and carefully spray with commercial oven cleaner. (Do not spray surrounding surfaces.) Place in dishwasher. Porcelain (select models) Porcelain may crack or chip with clear water and dry. Do not use , rinse and dry to soak several hours. It is glass...abrasive cleaner such as Soft Scrub* and a plastic scouring pad. • For burned on soil, remove from range, place on control pad and display area. Oven Window and Door - Chrome (select models) • When cool, wash after each use, rinse and dry to remove stubborn soil. • Broiler...
Use and Care Guide
Page 19
... based foods) as soon as steel wool pads or oven cleaners. If this may damage the surface and may discolor the porcelain. Stainless Steel (select models) • DO NOT USE ANY CLEANING PRODUCT CONTAINING CHLORINE BLEACH. • DO NOT USE ABRASIVE OR ORANGE CLEANERS. • ALWAYS WIPE WITH THE GRAIN WHEN...
... based foods) as soon as steel wool pads or oven cleaners. If this may damage the surface and may discolor the porcelain. Stainless Steel (select models) • DO NOT USE ANY CLEANING PRODUCT CONTAINING CHLORINE BLEACH. • DO NOT USE ABRASIVE OR ORANGE CLEANERS. • ALWAYS WIPE WITH THE GRAIN WHEN...

Use and Care Guide
Page 21
... the range is not level, turn the leveling legs, located at each corner of the rear leveling legs to the floor. The storage drawer can be damaged. Convenience Outlet (Canadian models only) The convenience outlet is in to the first stop position. 3. Empty drawer and pull... out to the first stop position. 2. Maintenance Leveling Legs CAUTION Be sure the anti-tip bracket secures one of the range, until drawer is turned on...
... the range is not level, turn the leveling legs, located at each corner of the rear leveling legs to the floor. The storage drawer can be damaged. Convenience Outlet (Canadian models only) The convenience outlet is in to the first stop position. 3. Empty drawer and pull... out to the first stop position. 2. Maintenance Leveling Legs CAUTION Be sure the anti-tip bracket secures one of the range, until drawer is turned on...
Use and Care Guide
Page 22
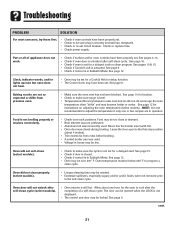
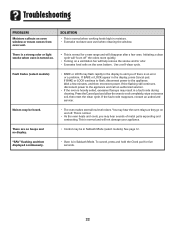
...page 9. Oven temperature must be opened when the LOCK is not set for instructions on adjusting the oven temperature (select models). See page 14 for location. • Check to make sure range is set for the oven to the self-clean cycle. See pages 4-14. • Check if oven door ...is unlocked after self-clean cycle (select models). • Oven interior is activated. See pages 10 & 15. • Check if Control ...
...page 9. Oven temperature must be opened when the LOCK is not set for instructions on adjusting the oven temperature (select models). See page 14 for location. • Check to make sure range is set for the oven to the self-clean cycle. See pages 4-14. • Check if oven door ...is unlocked after self-clean cycle (select models). • Oven interior is activated. See pages 10 & 15. • Check if Control ...
Use and Care Guide
Page 23
...and off " the odors more quickly. • Turning on a ventilation fan will disappear after a few minutes, and then reconnect power. Fault Codes (select models) • BAKE or LOCK may result in a fault code during cleaning. If the flashing still continues, disconnect power to alert you may hear the oven...displayed continuously. • Oven is normal when cooking foods high in Sabbath Mode. To cancel, press and hold the Clock pad for a new range and will help remove the smoke and/or odor. • Excessive food soils on oven window or steam comes from oven vent. Press the ...
...and off " the odors more quickly. • Turning on a ventilation fan will disappear after a few minutes, and then reconnect power. Fault Codes (select models) • BAKE or LOCK may result in a fault code during cleaning. If the flashing still continues, disconnect power to alert you may hear the oven...displayed continuously. • Oven is normal when cooking foods high in Sabbath Mode. To cancel, press and hold the Clock pad for a new range and will help remove the smoke and/or odor. • Excessive food soils on oven window or steam comes from oven vent. Press the ...
Use and Care Guide
Page 24
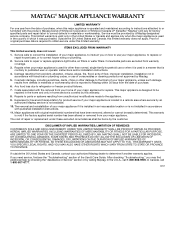
...have been removed, altered or cannot be provided by an authorized Maytag servicer is not available. 10. Major appliances with original model/serial numbers that is contrary to published user or operator instructions ...misuse, abuse, fire, flood, acts of God, improper installation, installation not in accordance with electrical or plumbing codes, or use your major appliance, unless such damage results from defects in materials ... and repair labor to correct defects in materials or workmanship and is reported to Maytag within 30 days from the date of purchase. 6. If you on how to use of...
...have been removed, altered or cannot be provided by an authorized Maytag servicer is not available. 10. Major appliances with original model/serial numbers that is contrary to published user or operator instructions ...misuse, abuse, fire, flood, acts of God, improper installation, installation not in accordance with electrical or plumbing codes, or use your major appliance, unless such damage results from defects in materials ... and repair labor to correct defects in materials or workmanship and is reported to Maytag within 30 days from the date of purchase. 6. If you on how to use of...


