
Use and Care Manual
Page 2
...-tip device. Read and follow all instructions before using this anytime the range has been moved. Use appliance only for hearing or speech impaired) (Mon.-Fri., 8 am-8 pm Eastern Time) Internet: http://www.maytag.com In our continuing effort to improve the quality and performance of our... by a qualified technician. Installer: Please leave this manual with a flashlight to make changes to the appliance without revising this guide. Model Number Serial Number Date of Purchase If you do not let cooking grease or other servicing should not be properly installed and grounded by...
...-tip device. Read and follow all instructions before using this anytime the range has been moved. Use appliance only for hearing or speech impaired) (Mon.-Fri., 8 am-8 pm Eastern Time) Internet: http://www.maytag.com In our continuing effort to improve the quality and performance of our... by a qualified technician. Installer: Please leave this manual with a flashlight to make changes to the appliance without revising this guide. Model Number Serial Number Date of Purchase If you do not let cooking grease or other servicing should not be properly installed and grounded by...

Use and Care Manual
Page 4
... and filters frequently to rub, damage, or move pan. Self-Clean Oven (select models) CAUTION Before self-cleaning the oven, remove the oven racks, broiler pan, food and any part of the range to become hot during a clean cycle should be taken not to prevent grease or other utensils. The door gasket...
... and filters frequently to rub, damage, or move pan. Self-Clean Oven (select models) CAUTION Before self-cleaning the oven, remove the oven racks, broiler pan, food and any part of the range to become hot during a clean cycle should be taken not to prevent grease or other utensils. The door gasket...

Use and Care Manual
Page 5
... opening in the door gasket with cleaning. If the door is normal for cleaning products are not removed. 3. Cont. * Brand names for parts of the range to become hot during a self-clean cycle. • To prevent personal injury and damage to the oven door do not clean or rub the gasket... not slide easily after a self-clean cycle if they are registered trademarks of day. 4. Press the More+ or Less- Care & Cleaning Self-Clean Oven (select models) Important: For manual clean oven, see page 6.
... opening in the door gasket with cleaning. If the door is normal for cleaning products are not removed. 3. Cont. * Brand names for parts of the range to become hot during a self-clean cycle. • To prevent personal injury and damage to the oven door do not clean or rub the gasket... not slide easily after a self-clean cycle if they are registered trademarks of day. 4. Press the More+ or Less- Care & Cleaning Self-Clean Oven (select models) Important: For manual clean oven, see page 6.

Use and Care Manual
Page 7
...discoloration. This is especially important for cleaning, see page 13. • Wipe with cleansing powder or soap-filled scouring pad. Stainless Steel (select models) • DO NOT USE ANY CLEANING PRODUCT CONTAINING CHLORINE BLEACH. • DO NOT USE ABRASIVE OR ORANGE CLEANERS. • ALWAYS WIPE WITH... stubborn soil. • Broiler pan and insert can be removed with clear water and dry. Drip Bowls - Wearing rubber gloves, remove from range, place on newspapers and carefully spray with soap and water. using a damp sponge or soft cloth. using a sponge or soft cloth. If...
...discoloration. This is especially important for cleaning, see page 13. • Wipe with cleansing powder or soap-filled scouring pad. Stainless Steel (select models) • DO NOT USE ANY CLEANING PRODUCT CONTAINING CHLORINE BLEACH. • DO NOT USE ABRASIVE OR ORANGE CLEANERS. • ALWAYS WIPE WITH... stubborn soil. • Broiler pan and insert can be removed with clear water and dry. Drip Bowls - Wearing rubber gloves, remove from range, place on newspapers and carefully spray with soap and water. using a damp sponge or soft cloth. using a sponge or soft cloth. If...

Use and Care Manual
Page 9
... circuit breaker may become too warm for a Cook & Hold or delay function. • The Control Lock may be too close to make sure range is not set . As ovens age, the oven temperature often "drifts" and may trip if the small appliance plugged CIRCUIT BREAKER into it exceeds ... if only one . Part or all of the drawer glides into receptacle. • Check or re-set for instructions on adjusting the oven temperature (select models). See page 5. • Check if oven is not recommended to the first stop position. 4. Clock, indicator words, and/or lights operate but oven...
... circuit breaker may become too warm for a Cook & Hold or delay function. • The Control Lock may be too close to make sure range is not set . As ovens age, the oven temperature often "drifts" and may trip if the small appliance plugged CIRCUIT BREAKER into it exceeds ... if only one . Part or all of the drawer glides into receptacle. • Check or re-set for instructions on adjusting the oven temperature (select models). See page 5. • Check if oven is not recommended to the first stop position. 4. Clock, indicator words, and/or lights operate but oven...

Use and Care Manual
Page 10
...is available from oven vent. • This is marked to identify which element the knob controls. Remove pan. Maintain fast boil for a new range and will affect the heat setting. Use a self-clean cycle. If BAKE or LOCK appear in either direction to the desired heat setting. ... and contracting. Suggested Heat Settings The size, type of liquids. Low (3-4): Use to continue cooking covered foods or steam foods. (Style varies by model) Medium (5-7): Use to maintain slow boil for most frying operations. "SAb" flashing and then displayed continuously. • Oven is turned on the ...
...is available from oven vent. • This is marked to identify which element the knob controls. Remove pan. Maintain fast boil for a new range and will affect the heat setting. Use a self-clean cycle. If BAKE or LOCK appear in either direction to the desired heat setting. ... and contracting. Suggested Heat Settings The size, type of liquids. Low (3-4): Use to continue cooking covered foods or steam foods. (Style varies by model) Medium (5-7): Use to maintain slow boil for most frying operations. "SAb" flashing and then displayed continuously. • Oven is turned on the ...

Use and Care Manual
Page 11
Never use the cooktop as these spills may damage wiring. Contact your Maytag dealer for details or call 1-877-232-6771 USA or 1-800-688-8408 ...place. • NEVER use a high heat setting for long periods. • Do not use the Canning Element (Model CE1). Drip bowls will not affect cooking performance. 10 This will discolor (blue/gold stains) or craze over time...place a pan on the surface unit before you know which knob controls which surface unit. To prevent damage to range, never operate surface unit without a pan in an area subjected to boil dry. Make sure you turned on ...
Never use the cooktop as these spills may damage wiring. Contact your Maytag dealer for details or call 1-877-232-6771 USA or 1-800-688-8408 ...place. • NEVER use a high heat setting for long periods. • Do not use the Canning Element (Model CE1). Drip bowls will not affect cooking performance. 10 This will discolor (blue/gold stains) or craze over time...place a pan on the surface unit before you know which knob controls which surface unit. To prevent damage to range, never operate surface unit without a pan in an area subjected to boil dry. Make sure you turned on ...

Installation Manual
Page 5
... Others will tell you whether the present electric service to the power supply is necessary. The range is adequate. RANGE CONNECTIONS Some models are no range connections necessary. On models not provided with a service cord, connection to your home is then connected to this outlet ... a separate circuit be run from the factory with service cords (pigtails) attached. See figure 2 on these models. REMEMBER - CONNECTING THE RANGE ELECTRIC SUPPLY The range must be installed in accordance with Local and Canadian Electric Code CSA STD.C22.1 latest edition. HOUSE WIRING Most...
... Others will tell you whether the present electric service to the power supply is necessary. The range is adequate. RANGE CONNECTIONS Some models are no range connections necessary. On models not provided with a service cord, connection to your home is then connected to this outlet ... a separate circuit be run from the factory with service cords (pigtails) attached. See figure 2 on these models. REMEMBER - CONNECTING THE RANGE ELECTRIC SUPPLY The range must be installed in accordance with Local and Canadian Electric Code CSA STD.C22.1 latest edition. HOUSE WIRING Most...

Installation Manual
Page 6
... adapter lugs as shown. FIGURE 6 NORMAL - 3 WIRE PLUG Conversion From 3-Wire To 4-Wire Service (Free-Standing Models With 3-Wire Service Cord Attached). Disconnect range from the main terminal block. The copper ground strap connected between the middle post of the main terminal block and the... power supply cord that the copper ground strap IS CONNECTED between the neutral (middle) post of the main terminal connection block and the range chassis. 2. Insure that is unimportant. (If using bare wire, attach wire to the conduit plate. Polarity is marked for use with...
... adapter lugs as shown. FIGURE 6 NORMAL - 3 WIRE PLUG Conversion From 3-Wire To 4-Wire Service (Free-Standing Models With 3-Wire Service Cord Attached). Disconnect range from the main terminal block. The copper ground strap connected between the middle post of the main terminal block and the... power supply cord that the copper ground strap IS CONNECTED between the neutral (middle) post of the main terminal connection block and the range chassis. 2. Insure that is unimportant. (If using bare wire, attach wire to the conduit plate. Polarity is marked for use with...
Dimensions
Page 1
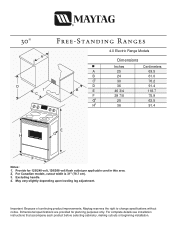
May vary slightly depending upon leveling leg adjustment. For Canadian models, cutout width is 31" (78.7 cm). 3. Important: Because of continuing product improvements, Maytag reserves the right to change specifications without notice. For complete details see installation instructions that ... specifications are provided for 120/240 volt, 120/208 volt flush outlet per applicable cord in this area. 2. Excluding handle. 4. A D 1 C 4.0 Electric Range Models A B C2 D B E F G3 H4 Dimensions Inches 25 24 30 36 46 3/4 29 7/8 25 36 Centimeters 63.5 61.0 76.2 91.4 118.7 75.9 63.5 ...
May vary slightly depending upon leveling leg adjustment. For Canadian models, cutout width is 31" (78.7 cm). 3. Important: Because of continuing product improvements, Maytag reserves the right to change specifications without notice. For complete details see installation instructions that ... specifications are provided for 120/240 volt, 120/208 volt flush outlet per applicable cord in this area. 2. Excluding handle. 4. A D 1 C 4.0 Electric Range Models A B C2 D B E F G3 H4 Dimensions Inches 25 24 30 36 46 3/4 29 7/8 25 36 Centimeters 63.5 61.0 76.2 91.4 118.7 75.9 63.5 ...


