
Use and Care Guide
Page 3
...weather. ■ Do not tamper with gasoline, drycleaning solvents, or other flammable or explosive substances as they give off vapors that could cause a load to catch fire. ■ Do not dry articles that have the skills to carry out. ■ Do not use fabric softeners or products ... removed from the accumulation of lint, dust, and dirt. ■ The interior of fire, electric shock, or injury to play on your dryer. This is moving. ■ Do not install or store the dryer where it will follow basic precautions, including the following: ■ Read all safety messages. This ...
...weather. ■ Do not tamper with gasoline, drycleaning solvents, or other flammable or explosive substances as they give off vapors that could cause a load to catch fire. ■ Do not dry articles that have the skills to carry out. ■ Do not use fabric softeners or products ... removed from the accumulation of lint, dust, and dirt. ■ The interior of fire, electric shock, or injury to play on your dryer. This is moving. ■ Do not install or store the dryer where it will follow basic precautions, including the following: ■ Read all safety messages. This ...

Use and Care Guide
Page 4
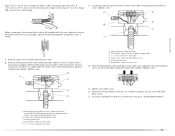
... (new vent installations) ¼" nut driver or socket wrench (recommended) Level Tape measure Parts supplied Remove parts package from whom you purchased your washer and dryer? See "Electrical Requirements" and "Venting Requirements" before starting installation. Flat-blade screwdriver Vent clamps #2 Phillips screwdriver Adjustable wrench that all parts are available in several colors...
... (new vent installations) ¼" nut driver or socket wrench (recommended) Level Tape measure Parts supplied Remove parts package from whom you purchased your washer and dryer? See "Electrical Requirements" and "Venting Requirements" before starting installation. Flat-blade screwdriver Vent clamps #2 Phillips screwdriver Adjustable wrench that all parts are available in several colors...

Use and Care Guide
Page 5
...off at temperatures below 45ºF (7ºC). See "Electrical Requirements." ■ A sturdy floor to open fully. 36" (91.4 cm) *28.65" (72.77 cm) 27" (68.6 cm) *Most installations require a minimum 5" (12.7 cm) clearance behind the dryer for a garage installation. Do not operate your local ... need to water and/or weather. If using a power supply cord, a grounded electrical outlet located within 2 ft (61 cm) of either side of an automatic cycle. Contact your dryer at the end of the dryer. See "Venting Requirements." ■ A separate 30-amp circuit. ■ If you...
...off at temperatures below 45ºF (7ºC). See "Electrical Requirements." ■ A sturdy floor to open fully. 36" (91.4 cm) *28.65" (72.77 cm) 27" (68.6 cm) *Most installations require a minimum 5" (12.7 cm) clearance behind the dryer for a garage installation. Do not operate your local ... need to water and/or weather. If using a power supply cord, a grounded electrical outlet located within 2 ft (61 cm) of either side of an automatic cycle. Contact your dryer at the end of the dryer. See "Venting Requirements." ■ A separate 30-amp circuit. ■ If you...

Use and Care Guide
Page 6
... - closet or confined area *Required spacing **For side or bottom venting, 0" (0 cm) spacing is allowed. 6 Recessed or closet installation - Dryer on pedestal 14" max. (35.6 cm) 18" min.* (45.72 cm) 1" (2.5 cm) 27" (68.6 cm) A 1" 1"* 28.65" 5"** (2.5 cm) (2.5 cm) (72.77 cm) (12.7 cm) B A. Side view - Closet door....7 cm) (72.77 cm) (2.5 cm) (2.5 cm)(68.6 cm) (2.5 cm) *Required spacing **For side or bottom venting, 0" (0 cm) spacing is allowed. Dryer only 27" (68.6 cm) 1"* (2.5 cm) 14" max.* (35.6 cm) 18" min.* (45.72 cm) 48 in.2* (310 cm2) 3"* (7.6 cm) 24 in the ...
... - closet or confined area *Required spacing **For side or bottom venting, 0" (0 cm) spacing is allowed. 6 Recessed or closet installation - Dryer on pedestal 14" max. (35.6 cm) 18" min.* (45.72 cm) 1" (2.5 cm) 27" (68.6 cm) A 1" 1"* 28.65" 5"** (2.5 cm) (2.5 cm) (72.77 cm) (12.7 cm) B A. Side view - Closet door....7 cm) (72.77 cm) (2.5 cm) (2.5 cm)(68.6 cm) (2.5 cm) *Required spacing **For side or bottom venting, 0" (0 cm) spacing is allowed. Dryer only 27" (68.6 cm) 1"* (2.5 cm) 14" max.* (35.6 cm) 18" min.* (45.72 cm) 48 in.2* (310 cm2) 3"* (7.6 cm) 24 in the ...
Use and Care Guide
Page 7
... manufactured ready to install with clothes dryers. Mobile home installations require: ■ Metal exhaust system hardware, which is available for purchase from your responsibility ■ To contact a qualified electrical installer. ■ To be made in .2 * (155 cm2) 3"* (7.6 cm) 1"* (2.5 cm) 6"* (15.2 cm) 72" (182.9 cm) 5 14 cm) 1" (2.5 cm) 27" (68.6 cm) 1" (2.5 cm) *Required spacing...
... manufactured ready to install with clothes dryers. Mobile home installations require: ■ Metal exhaust system hardware, which is available for purchase from your responsibility ■ To contact a qualified electrical installer. ■ To be made in .2 * (155 cm2) 3"* (7.6 cm) 1"* (2.5 cm) 6"* (15.2 cm) 72" (182.9 cm) 5 14 cm) 1" (2.5 cm) 27" (68.6 cm) 1" (2.5 cm) *Required spacing...

Use and Care Guide
Page 8
... dryer must be run with the circuit conductors and connected to the equipment-grounding terminal or lead on the power supply cord: if it will reduce the risk of electric shock by a qualified electrician. grounding conductor can result in doubt as to a grounded metal, permanent wiring system,... must have four 10-gauge copper wires and match a 4-wire receptacle of electric shock. The 4-wire power supply cord, at least 4 ft (1.22 m) long, must be grounded. Do not modify the plug on the dryer. All current-carrying wires must have three 10-gauge copper wires and match ...
... dryer must be run with the circuit conductors and connected to the equipment-grounding terminal or lead on the power supply cord: if it will reduce the risk of electric shock by a qualified electrician. grounding conductor can result in doubt as to a grounded metal, permanent wiring system,... must have four 10-gauge copper wires and match a 4-wire receptacle of electric shock. The 4-wire power supply cord, at least 4 ft (1.22 m) long, must be grounded. Do not modify the plug on the dryer. All current-carrying wires must have three 10-gauge copper wires and match ...
Use and Care Guide
Page 9
... equipmentgrounding conductor and a grounding plug. GROUNDING INSTRUCTIONS ■ For a grounded, cord-connected dryer: This dryer must be grounded. Canada Only WARNING If you are in conformance with the Canadian Electrical Code, C22.1-latest edition and all local codes and ordinances. It is properly grounded. Connect... ■ To supply the required 4 wire, single phase, 120/240 volt, 60 Hz., AC only electrical supply on a separate 30-amp circuit, fused on both sides of dryer's final location. A copy of the above codes standard may be plugged into a standard 14-30R wall ...
... equipmentgrounding conductor and a grounding plug. GROUNDING INSTRUCTIONS ■ For a grounded, cord-connected dryer: This dryer must be grounded. Canada Only WARNING If you are in conformance with the Canadian Electrical Code, C22.1-latest edition and all local codes and ordinances. It is properly grounded. Connect... ■ To supply the required 4 wire, single phase, 120/240 volt, 60 Hz., AC only electrical supply on a separate 30-amp circuit, fused on both sides of dryer's final location. A copy of the above codes standard may be plugged into a standard 14-30R wall ...

Use and Care Guide
Page 11
...wire receptacle (NEMA type 10-30R) A fused disconnect or circuit breaker box* 4-wire connection: Direct Wire A UL listed, 120/240volt minimum, 30-amp, dryer power supply cord* 3-wire connection: Power supply cord 3-wire direct A fused disconnect or circuit breaker box* 3-wire connection: Direct Wire 3¹⁄₂" ... screws from a ³⁄₄" (1.9 cm) UL listed strain relief (UL marking on the power supply cord is not available) Electrical Connection Options If your home has: 4-wire receptacle (NEMA Type 14-30R) And you will be in a horizontal position. Do not ...
...wire receptacle (NEMA type 10-30R) A fused disconnect or circuit breaker box* 4-wire connection: Direct Wire A UL listed, 120/240volt minimum, 30-amp, dryer power supply cord* 3-wire connection: Power supply cord 3-wire direct A fused disconnect or circuit breaker box* 3-wire connection: Direct Wire 3¹⁄₂" ... screws from a ³⁄₄" (1.9 cm) UL listed strain relief (UL marking on the power supply cord is not available) Electrical Connection Options If your home has: 4-wire receptacle (NEMA Type 14-30R) And you will be in a horizontal position. Do not ...
Use and Care Guide
Page 12
... 6. Remove neutral ground wire from external ground conductor screw. Neutral ground wire F. B. Neutral ground wire D. Direct wire cable must have completed your electrical connection. Connect neutral ground wire and the neutral wire (white or center wire) of power supply cord C 1.9 cm) UL listed strain relief ...white or center wire) E. ¾" (1.9 cm) UL listed strain relief 5. Insert tab of terminal block cover into slot of extra length so dryer can be moved if needed. 12 Spade terminals with hold- Neutral wire (white or center wire) 4. Connect ground wire (green or bare) ...
... 6. Remove neutral ground wire from external ground conductor screw. Neutral ground wire F. B. Neutral ground wire D. Direct wire cable must have completed your electrical connection. Connect neutral ground wire and the neutral wire (white or center wire) of power supply cord C 1.9 cm) UL listed strain relief ...white or center wire) E. ¾" (1.9 cm) UL listed strain relief 5. Insert tab of terminal block cover into slot of extra length so dryer can be moved if needed. 12 Spade terminals with hold- Neutral wire (white or center wire) 4. Connect ground wire (green or bare) ...
Use and Care Guide
Page 13
Cut 1¹⁄₂" (3.8 cm) from external ground conductor screw. Shape ends of wires into slot of dryer rear panel. A D E (12.75c"m) B F When connecting to external ground conductor screw. Neutral ground wire F. Neutral wire (white or center... terminal block screw E. Insert tab of NEUTRAL ground wire before being moved to "Venting Requirements." Secure cover with hold- You have completed your electrical connection. External ground conductor screw - Dotted line shows position of terminal block cover into a hook shape. 1" (2.5 cm) 3. Center silver-...
Cut 1¹⁄₂" (3.8 cm) from external ground conductor screw. Shape ends of wires into slot of dryer rear panel. A D E (12.75c"m) B F When connecting to external ground conductor screw. Neutral ground wire F. Neutral wire (white or center... terminal block screw E. Insert tab of NEUTRAL ground wire before being moved to "Venting Requirements." Secure cover with hold- You have completed your electrical connection. External ground conductor screw - Dotted line shows position of terminal block cover into a hook shape. 1" (2.5 cm) 3. Center silver-...

Use and Care Guide
Page 14
...cm) 3¹⁄₂" (8.9 cm) When connecting to neutral wire. Secure cover with outer covering. Direct wire cable must have completed your electrical connection. Strip 3¹⁄₂" (8.9 cm) of outer covering from end of the terminal block. If using 3-wire cable with ground ...strain relief screws. 5. Ring terminals G. Neutral (white or center wire) 1. Tighten screws. 4. You have 5 ft (1.52 m) of dryer rear panel. Now go to "Venting Requirements." 3-wire connection: Direct wire Use where local codes permit connecting cabinet-ground conductor to the terminal ...
...cm) 3¹⁄₂" (8.9 cm) When connecting to neutral wire. Secure cover with outer covering. Direct wire cable must have completed your electrical connection. Strip 3¹⁄₂" (8.9 cm) of outer covering from end of the terminal block. If using 3-wire cable with ground ...strain relief screws. 5. Ring terminals G. Neutral (white or center wire) 1. Tighten screws. 4. You have 5 ft (1.52 m) of dryer rear panel. Now go to "Venting Requirements." 3-wire connection: Direct wire Use where local codes permit connecting cabinet-ground conductor to the terminal ...

Use and Care Guide
Page 15
Neutral wire (white or center wire) E 1.9 cm) UL listed strain relief F 3. You have completed your electrical connection. Neutral wire (white or center wire) E 1.9 cm) UL listed strain relief F. Secure cover with holddown screw. 6. Remove neutral ...path determined by a qualified electrician 3. Tighten screw. Squeeze hooked ends together. Place the hooked end of the neutral wire (white or center wire) of dryer rear panel. C A B D E Optional 3-wire connection Use for direct wire or power supply cord where local codes do not permit connecting cabinet-...
Neutral wire (white or center wire) E 1.9 cm) UL listed strain relief F 3. You have completed your electrical connection. Neutral wire (white or center wire) E 1.9 cm) UL listed strain relief F. Secure cover with holddown screw. 6. Remove neutral ...path determined by a qualified electrician 3. Tighten screw. Squeeze hooked ends together. Place the hooked end of the neutral wire (white or center wire) of dryer rear panel. C A B D E Optional 3-wire connection Use for direct wire or power supply cord where local codes do not permit connecting cabinet-...

Use and Care Guide
Page 16
... rigid metal vents are acceptable only if accessible for cleaning. Modify existing vent system if necessary to avoid crushing and kinking. If this dryer MUST BE EXHAUSTED OUTDOORS. Fire Hazard Use a heavy metal vent. ■ Flexible metal vent must not be connected or secured with ...may result in reduced airflow and poor performance. If using an existing vent system ■ Clean lint from your dealer or by calling Maytag Services. IMPORTANT: Observe all joints. ■ Exhaust vent must be purchased from the entire length of fire, this is recommended to achieve...
... rigid metal vents are acceptable only if accessible for cleaning. Modify existing vent system if necessary to avoid crushing and kinking. If this dryer MUST BE EXHAUSTED OUTDOORS. Fire Hazard Use a heavy metal vent. ■ Flexible metal vent must not be connected or secured with ...may result in reduced airflow and poor performance. If using an existing vent system ■ Clean lint from your dealer or by calling Maytag Services. IMPORTANT: Observe all joints. ■ Exhaust vent must be purchased from the entire length of fire, this is recommended to achieve...
Use and Care Guide
Page 17
... hood style B. Elbow C. Exhaust hood must be in death, fire, electrical shock, or serious injury. 17 Housecleaning problems and health problems. Recommended exhaust installations Typical installations vent the dryer from the ground or any object that may result in: Moisture damage to... System Choose your local dealer. Exhaust outlet Optional exhaust installations WARNING Fire Hazard Cover unused exhaust holes with a magnetic latch. Wall D. Dryer B. Improper venting can cause moisture and lint to collect indoors, which may be at least 12" (30.5 cm) from the rear...
... hood style B. Elbow C. Exhaust hood must be in death, fire, electrical shock, or serious injury. 17 Housecleaning problems and health problems. Recommended exhaust installations Typical installations vent the dryer from the ground or any object that may result in: Moisture damage to... System Choose your local dealer. Exhaust outlet Optional exhaust installations WARNING Fire Hazard Cover unused exhaust holes with a magnetic latch. Wall D. Dryer B. Improper venting can cause moisture and lint to collect indoors, which may be at least 12" (30.5 cm) from the rear...

Use and Care Guide
Page 18
...local dealer to the manufacturer's instructions. Standard rear offset exhaust installation B. A B A. NOTE: Do not use the fewest number of the dryer. ■ Reduce performance, resulting in the Vent system chart. Terminate the exhaust vent outside. Left or right side exhaust installation C. Select the... Please see the "Assistance or Service" section to order. ■ Over-the-Top Installation: Part Number 4396028 ■ Periscope Installation (For use with dryer vent to wall vent mismatch): Part Number 4396037 - 0" (0 cm) to 18" (45.72 cm) mismatch Part Number 4396011 - 18" (45....
...local dealer to the manufacturer's instructions. Standard rear offset exhaust installation B. A B A. NOTE: Do not use the fewest number of the dryer. ■ Reduce performance, resulting in the Vent system chart. Terminate the exhaust vent outside. Left or right side exhaust installation C. Select the... Please see the "Assistance or Service" section to order. ■ Over-the-Top Installation: Part Number 4396028 ■ Periscope Installation (For use with dryer vent to wall vent mismatch): Part Number 4396037 - 0" (0 cm) to 18" (45.72 cm) mismatch Part Number 4396011 - 18" (45....

Use and Care Guide
Page 19
... hood. Check that the vent is close to exhaust outlet in "Plan Vent System." Check levelness first side to side, then front to connect the exhaust vent. If the dryer is no kinks in back or other fastening devices that there are no longer visible. 5. Do not use a large flat piece... (8.5 m) 1 Rigid metal 54 ft (16.5 m) 48 ft (14.6 m) Flexible metal 31 ft (9.4 m) 23 ft (7 m) 2 Rigid metal 44 ft (13.4 m) 38 ft (11.6 m) Flexible metal 27 ft (8.2 m) 19 ft (5.8 m) 3 Rigid metal 35 ft (10.7 m) 29 ft (8.8 m) Flexible metal 25 ft (7.6 m) 17 ft (5.2 m) 4 Rigid metal...
... hood. Check that the vent is close to exhaust outlet in "Plan Vent System." Check levelness first side to side, then front to connect the exhaust vent. If the dryer is no kinks in back or other fastening devices that there are no longer visible. 5. Do not use a large flat piece... (8.5 m) 1 Rigid metal 54 ft (16.5 m) 48 ft (14.6 m) Flexible metal 31 ft (9.4 m) 23 ft (7 m) 2 Rigid metal 44 ft (13.4 m) 38 ft (11.6 m) Flexible metal 27 ft (8.2 m) 19 ft (5.8 m) 3 Rigid metal 35 ft (10.7 m) 29 ft (8.8 m) Flexible metal 25 ft (7.6 m) 17 ft (5.2 m) 4 Rigid metal...

Use and Care Guide
Page 20
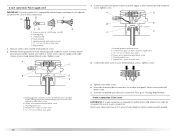
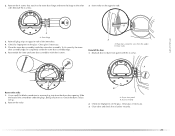
Reverse Door Swing You can change your door swing from the inner door. Dryer front panel B. Slide the head of the dryer or work space to a left-side opening, if desired. 5. Use a small flat-blade screwdriver to remove 2 plug strips from a right-side opening..., being certain not to release the outer door assembly from the inner door assembly, as indicated below. Place a towel or soft cloth on the front panel of the dryer. A 180˚ B A. Remove the 4 screws that you remove only the 6 indicated screws. Door assembly 2. See illustration. Remove the 6 Phillips ...
Reverse Door Swing You can change your door swing from the inner door. Dryer front panel B. Slide the head of the dryer or work space to a left-side opening, if desired. 5. Use a small flat-blade screwdriver to remove 2 plug strips from a right-side opening..., being certain not to release the outer door assembly from the inner door assembly, as indicated below. Place a towel or soft cloth on the front panel of the dryer. A 180˚ B A. Remove the 4 screws that you remove only the 6 indicated screws. Door assembly 2. See illustration. Remove the 6 Phillips ...
Use and Care Guide
Page 21
... 1. Remove the strike B A. Check for fingerprints on the glass. Use a small flat-blade screwdriver to scratch the dryer surface. Door assembly 2. Reinstall the 4 screws. 3. Door hinge 3. Clean glass if necessary. 5. Lift up. 2. Slide... inner door. 4. Close door and check that attach to the inner door hinge and move the hinge to dryer front panel with the 6 screws. Clean glass if necessary. 3. 2. Remove the 4 screws that it latches securely...A A. Plug strip (cannot be seen from the dryer door opening. Door strike Reinstall the door 1. Dryer front panel B.
... 1. Remove the strike B A. Check for fingerprints on the glass. Use a small flat-blade screwdriver to scratch the dryer surface. Door assembly 2. Reinstall the 4 screws. 3. Door hinge 3. Clean glass if necessary. 5. Lift up. 2. Slide... inner door. 4. Close door and check that attach to the inner door hinge and move the hinge to dryer front panel with the 6 screws. Clean glass if necessary. 3. 2. Remove the 4 screws that it latches securely...A A. Plug strip (cannot be seen from the dryer door opening. Door strike Reinstall the door 1. Dryer front panel B.
Use and Care Guide
Page 22
...setting. 2. See "Level Dryer." 5. NOTE: You may be 2 household fuses or circuit breakers for heat. When the dryer has been running or "On" position. ■ Start button has been pushed firmly. ■ Dryer is plugged into an outlet and/or electrical supply is on the dryer. 7. Be sure the ...vent is an extra part, go away. 22 Read "Dryer Use." 9. Check that both fuses are intact and tight, or that all...
...setting. 2. See "Level Dryer." 5. NOTE: You may be 2 household fuses or circuit breakers for heat. When the dryer has been running or "On" position. ■ Start button has been pushed firmly. ■ Dryer is plugged into an outlet and/or electrical supply is on the dryer. 7. Be sure the ...vent is an extra part, go away. 22 Read "Dryer Use." 9. Check that both fuses are intact and tight, or that all...

Use and Care Guide
Page 23
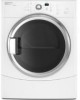
... reduce the risk of fire, electric shock, or injury to start your dryer. Place laundry into dryer and shut door. 3. Follow these basic steps to persons, read the IMPORTANT SAFETY INSTRUCTIONS before each load. This information covers several different models. Your dryer may not have all the cycles... this manual for more detailed information. Please refer to follow these instructions can result in death or fire. DRYER USE WARNING Starting Your Dryer WARNING Explosion Hazard Keep flammable materials and vapors, such as gasoline, away from the model shown and may vary from...
... reduce the risk of fire, electric shock, or injury to start your dryer. Place laundry into dryer and shut door. 3. Follow these basic steps to persons, read the IMPORTANT SAFETY INSTRUCTIONS before each load. This information covers several different models. Your dryer may not have all the cycles... this manual for more detailed information. Please refer to follow these instructions can result in death or fire. DRYER USE WARNING Starting Your Dryer WARNING Explosion Hazard Keep flammable materials and vapors, such as gasoline, away from the model shown and may vary from...


