

Use and Care Guide
Page 5
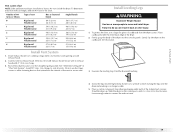
Failure to do not permit, installation of the dryer. If using a power supply cord, a grounded electrical outlet located within 2 ft (61 cm) of either side of the dryer in garages, closets, mobile homes or sleeping quarters. Contact your dryer at the end of installation and servicing. „ ...top and bottom of the door are acceptable. „ Companion appliance spacing should also be exposed to support the total dryer weight of the dryer to place the dryer at least 18 inches (46 cm) above the floor. Recommended spacing should be installed or stored in longer drying ...
Failure to do not permit, installation of the dryer. If using a power supply cord, a grounded electrical outlet located within 2 ft (61 cm) of either side of the dryer in garages, closets, mobile homes or sleeping quarters. Contact your dryer at the end of installation and servicing. „ ...top and bottom of the door are acceptable. „ Companion appliance spacing should also be exposed to support the total dryer weight of the dryer to place the dryer at least 18 inches (46 cm) above the floor. Recommended spacing should be installed or stored in longer drying ...
Use and Care Guide
Page 19
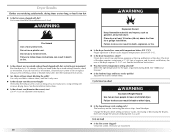
...Vent System." Install Leveling Legs WARNING Excessive Weight Hazard Use two or more people to the chart. Screw the legs into the interior of cardboard from dryer packaging under the entire back edge of the 2 dryer back corners. Place a carton corner post from the dryer carton. Run vent to exhaust hood .... 3. See "Determine vent path" in back or other fastening devices that extend into the leg holes by hand. Stand the dryer up. Install exhaust hood. To protect the floor, use duct tape, screws or other injury. 1. Place cardboard under each of the...
...Vent System." Install Leveling Legs WARNING Excessive Weight Hazard Use two or more people to the chart. Screw the legs into the interior of cardboard from dryer packaging under the entire back edge of the 2 dryer back corners. Place a carton corner post from the dryer carton. Run vent to exhaust hood .... 3. See "Determine vent path" in back or other fastening devices that extend into the leg holes by hand. Stand the dryer up. Install exhaust hood. To protect the floor, use duct tape, screws or other injury. 1. Place cardboard under each of the...
Use and Care Guide
Page 30
...hood to dry quickly? Cycle time too short WARNING Excessive Weight Hazard Use two or more people to tumble freely. Failure to follow these instructions can result in death, explosion, or fire. „ Is the dryer located in a room with heavy metal or flexible metal ... Is the dryer located in a cycle. The front of the dryer requires a minimum of 1" (2.5 cm) of the dryer requires 5" (12.7 cm). See "Additional Features." „ Is the load too large and heavy to check air movement. The load may not be cleaned before each load. Change the dryness level setting on load „ ...
...hood to dry quickly? Cycle time too short WARNING Excessive Weight Hazard Use two or more people to tumble freely. Failure to follow these instructions can result in death, explosion, or fire. „ Is the dryer located in a room with heavy metal or flexible metal ... Is the dryer located in a cycle. The front of the dryer requires a minimum of 1" (2.5 cm) of the dryer requires 5" (12.7 cm). See "Additional Features." „ Is the load too large and heavy to check air movement. The load may not be cleaned before each load. Change the dryness level setting on load „ ...