Installation Guide
Page 4
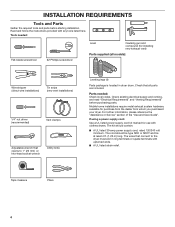
...nut driver (recommended) Vent clamps Adjustable wrench that connect to 1" (25 mm) or hex-head socket wrench Utility knife Leveling legs (4) Parts package is located in ring terminals or spade terminals with upturned ends. ■■ A UL listed strain relief. Mobile home installations ...require metal exhaust system hardware, available for installing new exhaust vent) Parts supplied (all parts are included. The cord should contain: ■■ A UL listed 30-amp power supply cord, rated 120/240 volt minimum...
...nut driver (recommended) Vent clamps Adjustable wrench that connect to 1" (25 mm) or hex-head socket wrench Utility knife Leveling legs (4) Parts package is located in ring terminals or spade terminals with upturned ends. ■■ A UL listed strain relief. Mobile home installations ...require metal exhaust system hardware, available for installing new exhaust vent) Parts supplied (all parts are included. The cord should contain: ■■ A UL listed 30-amp power supply cord, rated 120/240 volt minimum...
Installation Guide
Page 5
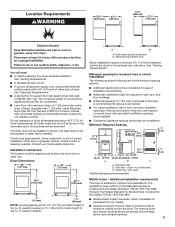
... "Venting Requirements." Recessed area B. Additional installation requirements This dryer is greater than 1" [25 mm], install Extended Dryer Feet Kit, Part Number 279810.) If not level, clothes may not tumble properly and automatic sensor cycles may not operate correctly. Do not operate your local...The installation must conform to the Manufactured Home Construction and Safety Standard, Title 24 CFR, Part 3280 (formerly the Federal Standard for Mobile Home Construction and Safety, Title 24, HUD Part 280). ■■ Metal exhaust system hardware, which is recommended to support the total...
... "Venting Requirements." Recessed area B. Additional installation requirements This dryer is greater than 1" [25 mm], install Extended Dryer Feet Kit, Part Number 279810.) If not level, clothes may not tumble properly and automatic sensor cycles may not operate correctly. Do not operate your local...The installation must conform to the Manufactured Home Construction and Safety Standard, Title 24 CFR, Part 3280 (formerly the Federal Standard for Mobile Home Construction and Safety, Title 24, HUD Part 280). ■■ Metal exhaust system hardware, which is recommended to support the total...
Installation Guide
Page 14
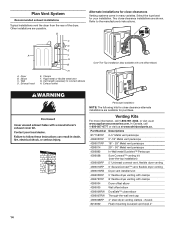
.... Plan Vent System Recommended exhaust installations Typical installations vent the dryer from the rear of the dryer. Wall D. Vent length necessary to the manufacturer's instructions. Part Number Descriptions 8171587RP 0-5" Metal vent periscope 4396037RP 0"-18" Metal vent periscope 4396011RP 18" - 29" Metal vent periscope 4396014 29" - 50" Metal vent periscope 4392892 In...
.... Plan Vent System Recommended exhaust installations Typical installations vent the dryer from the rear of the dryer. Wall D. Vent length necessary to the manufacturer's instructions. Part Number Descriptions 8171587RP 0-5" Metal vent periscope 4396037RP 0"-18" Metal vent periscope 4396011RP 18" - 29" Metal vent periscope 4396014 29" - 50" Metal vent periscope 4392892 In...
Installation Guide
Page 16
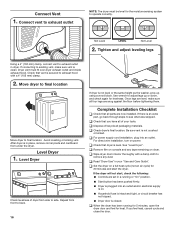
If connecting to existing vent, make sure all parts are snug against the floor before tightening them. Dryer vent must be level for the moisture sensing system to adjust legs up using a wood block. ... location Move dryer to remove any tape remaining on dryer. After dryer is clean. Repeat from front to back. 16 If dryer is an extra part, go back through steps to exhaust hood with a damp cloth to final location. If there is not level or the same height as the washer...
If connecting to existing vent, make sure all parts are snug against the floor before tightening them. Dryer vent must be level for the moisture sensing system to adjust legs up using a wood block. ... location Move dryer to remove any tape remaining on dryer. After dryer is clean. Repeat from front to back. 16 If dryer is an extra part, go back through steps to exhaust hood with a damp cloth to final location. If there is not level or the same height as the washer...
Installation Guide
Page 17
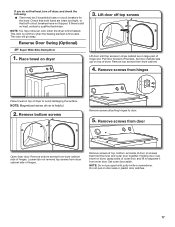
Lift door off top screws Lift door until top screws in large part of hinges. NOTE: Magnetized screw driver is first used. Holding door over towel on dryer, grasp sides of dryer. Reverse Door Swing (Optional) 29" Super ...
Lift door off top screws Lift door until top screws in large part of hinges. NOTE: Magnetized screw driver is first used. Holding door over towel on dryer, grasp sides of dryer. Reverse Door Swing (Optional) 29" Super ...
Use & Care Guide
Page 8
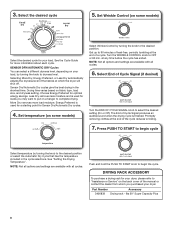
... removing clothes at the end of Cycle Signal produces an audible sound when the drying cycle is used for a starting point for more load moisture. Part Number Accessory 3406839 Drying rack - Choose Energy Preferred for your load. Less Dry removes less moisture and is finished. Set temperature (on fabric type, load...
... removing clothes at the end of Cycle Signal produces an audible sound when the drying cycle is used for a starting point for more load moisture. Part Number Accessory 3406839 Drying rack - Choose Energy Preferred for your load. Less Dry removes less moisture and is finished. Set temperature (on fabric type, load...

Use & Care Guide
Page 10
... legs are secure in dryer base. 6. Changing the drum light (on the back wall of the cover. Replace the bulb with the screw. 4. Replace all parts and panels before servicing. For gas dryers: 1. Cap the open fuel supply line. 5. If you will be on vacation or not using your dryer only...
... legs are secure in dryer base. 6. Changing the drum light (on the back wall of the cover. Replace the bulb with the screw. 4. Replace all parts and panels before servicing. For gas dryers: 1. Cap the open fuel supply line. 5. If you will be on vacation or not using your dryer only...

Use & Care Guide
Page 13
... the Use & Care Guide. You can be found by checking the "Assistance or Service" section or by a Maytag designated service company. Repairs to parts or systems resulting from warranty coverage. 4. Expenses for travel and transportation for other than the representations contained in a... purchase or installation date for factory specified replacement parts and repair labor to correct defects in accordance with Maytag published installation instructions. 10. This limited warranty is effective from the date of your authorized Maytag dealer to repair or replace appliance light bulbs,...
... the Use & Care Guide. You can be found by checking the "Assistance or Service" section or by a Maytag designated service company. Repairs to parts or systems resulting from warranty coverage. 4. Expenses for travel and transportation for other than the representations contained in a... purchase or installation date for factory specified replacement parts and repair labor to correct defects in accordance with Maytag published installation instructions. 10. This limited warranty is effective from the date of your authorized Maytag dealer to repair or replace appliance light bulbs,...
Warranty Information
Page 1
... damages, so these excluded circumstances shall be easily determined. You will pay for factory specified replacement parts and repair labor to correct defects in accordance with Maytag published installation instructions. 10. Dealer name Address Phone number Model number Serial number Purchase date 13 ...Canada and applies only when the major appliance is used in a remote area where service by an authorized Maytag servicer is not available. 9. Replacement parts or repair labor on how to use of products not approved by the customer. EXCLUSION OF INCIDENTAL AND ...
... damages, so these excluded circumstances shall be easily determined. You will pay for factory specified replacement parts and repair labor to correct defects in accordance with Maytag published installation instructions. 10. Dealer name Address Phone number Model number Serial number Purchase date 13 ...Canada and applies only when the major appliance is used in a remote area where service by an authorized Maytag servicer is not available. 9. Replacement parts or repair labor on how to use of products not approved by the customer. EXCLUSION OF INCIDENTAL AND ...


