

Use and Care Guide
Page 3
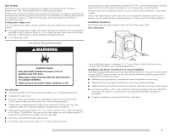
... tell you what can be killed or seriously injured if you don't i_ follow all safety messages. Do not install a clothes dryer with clothes dryers, Flexible venting materials are known to the manufacturer's instructions and local codes, - To reduce the risk of a specific type identified... by a qualified installer, - "RiskofFire" - Clothes dryer installation must be performed by the appliance manufacturer as suitable for use with flexible plastic venting materials, if flexible metal {foil type) ...
... tell you what can be killed or seriously injured if you don't i_ follow all safety messages. Do not install a clothes dryer with clothes dryers, Flexible venting materials are known to the manufacturer's instructions and local codes, - To reduce the risk of a specific type identified... by a qualified installer, - "RiskofFire" - Clothes dryer installation must be performed by the appliance manufacturer as suitable for use with flexible plastic venting materials, if flexible metal {foil type) ...

Use and Care Guide
Page 4
... parts were included. "Y" connector C. IMPORTANT SAFETY INSTRUCTIONS WARNING: To reduce the risk of fire, electric shock, or injury to persons when using the dryer. Do not place items exposed to 1" (25 mm) or hex-head socket wrench (for adjusting dryer feet) • Wire stripper (direct wire installations) • Vent clamps • Caulking gun...
... parts were included. "Y" connector C. IMPORTANT SAFETY INSTRUCTIONS WARNING: To reduce the risk of fire, electric shock, or injury to persons when using the dryer. Do not place items exposed to 1" (25 mm) or hex-head socket wrench (for adjusting dryer feet) • Wire stripper (direct wire installations) • Vent clamps • Caulking gun...
Use and Care Guide
Page 5
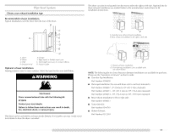
...Installation spacing for recessed area or closet installation The following reasons: • Additional spacing should be considered for this dryer. Mobile home installations require metal exhaust system hardware available for your local building inspector. You may use with equivalent ...8226; A location that connect to the dryer must be exposed to support the total weight (dryer and load) of an automatic cycle. See "Venting Requirements." • A separate 30-amp circuit. • If you purchased your dryer. See "Electrical Requirements." • A sturdy floor to ...
...Installation spacing for recessed area or closet installation The following reasons: • Additional spacing should be considered for this dryer. Mobile home installations require metal exhaust system hardware available for your local building inspector. You may use with equivalent ...8226; A location that connect to the dryer must be exposed to support the total weight (dryer and load) of an automatic cycle. See "Venting Requirements." • A separate 30-amp circuit. • If you purchased your dryer. See "Electrical Requirements." • A sturdy floor to ...

Use and Care Guide
Page 6
... wire) of a neutral ground wire to introduce outside air into the dryer. U.S.A. Grounding through the neutral conductor is permanently connected to the dryer must be made in conformance with a 4-wire electrical supply connection, the neutral ground conductor must end in the neutral or ... : National Fire Protection Association, One Batterymarch Park, Quincy, MA 02269. If the dryer is adequate and in mobile homes to the neutral wire, see "Optional 3-wire connection" in "Electrical Connection - Side view - A 4-wire power supply connection must conform to an individual...
... wire) of a neutral ground wire to introduce outside air into the dryer. U.S.A. Grounding through the neutral conductor is permanently connected to the dryer must be made in conformance with a 4-wire electrical supply connection, the neutral ground conductor must end in the neutral or ... : National Fire Protection Association, One Batterymarch Park, Quincy, MA 02269. If the dryer is adequate and in mobile homes to the neutral wire, see "Optional 3-wire connection" in "Electrical Connection - Side view - A 4-wire power supply connection must conform to an individual...
Use and Care Guide
Page 7
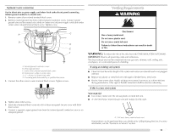
.... Check with flexible metallic conduit. SAVE THESE INSTRUCTIONS The neutral conductor must be identified by providing a path of electric shock by a white cover. This dryer uses a cord having an equipment-grounding conductor and a grounding plug. All current-carrying wires must be insulated. ...will not fit the outlet, have three 10-gauge copper wires and match a 3-wire receptacle of electric shock. GROUNDING INSTRUCTIONS I For a grounded, cord-connected dryer: This dryer must have four 10-gauge copper wires and match a 4-wire receptacle of the equipment- The ground ...
.... Check with flexible metallic conduit. SAVE THESE INSTRUCTIONS The neutral conductor must be identified by providing a path of electric shock by a white cover. This dryer uses a cord having an equipment-grounding conductor and a grounding plug. All current-carrying wires must be insulated. ...will not fit the outlet, have three 10-gauge copper wires and match a 3-wire receptacle of electric shock. GROUNDING INSTRUCTIONS I For a grounded, cord-connected dryer: This dryer must have four 10-gauge copper wires and match a 4-wire receptacle of the equipment- The ground ...

Use and Care Guide
Page 8
...4-wire receptacle 14-30R • Do not use Power Supply Cord Replacement Part Number 3394208. Connect to whether the dryer is 5 ft (1.52 m) in death or electrical shock. The plug must be plugged into a grounded 4 prong ouUet. If you are in accordance with a CSA ...-grounding conductor can result in length. A time-delay fuse or circuit breaker is your responsibility • To contact a qualified electrical installer. Check with the dryer: if it is adequate and in conformance with a cord having an equipment-grounding conductor and a grounding plug. Do not modify...
...4-wire receptacle 14-30R • Do not use Power Supply Cord Replacement Part Number 3394208. Connect to whether the dryer is 5 ft (1.52 m) in death or electrical shock. The plug must be plugged into a grounded 4 prong ouUet. If you are in accordance with a CSA ...-grounding conductor can result in length. A time-delay fuse or circuit breaker is your responsibility • To contact a qualified electrical installer. Check with the dryer: if it is adequate and in conformance with a cord having an equipment-grounding conductor and a grounding plug. Do not modify...

Use and Care Guide
Page 10
...type 10-30R) A fused disconnect or circuit breaker box* 4-wire connection: I)irect Wire A UL listed, 120/240-volt minimum, 30-amp, dryer power supply cord* 3-wire connection: Power Supply Cord 3-wire direct A fused disconnect or circuit breaker box* 3-wire connection: I)irect Wire *If local... codes do not permit the connection of electrical connection: 3-wire (if 4-wire is inside the terminal block opening . Be sure that the wire insulation on strain relief). listed strain relief...
...type 10-30R) A fused disconnect or circuit breaker box* 4-wire connection: I)irect Wire A UL listed, 120/240-volt minimum, 30-amp, dryer power supply cord* 3-wire connection: Power Supply Cord 3-wire direct A fused disconnect or circuit breaker box* 3-wire connection: I)irect Wire *If local... codes do not permit the connection of electrical connection: 3-wire (if 4-wire is inside the terminal block opening . Be sure that the wire insulation on strain relief). listed strain relief...

Use and Care Guide
Page 11
... supply cord D. for mobile homes and where F local codes do 3. Y4" ( 19 ram) UL fisted strain refief E. Neutral prong E. B A C D A. Cround wire (green or bare) of dryer rear panel. Dotted fine shows position of power supply cord to outer terminal block screws. Neutral wire (white or center wire) E. down screw. 7. You have...
... supply cord D. for mobile homes and where F local codes do 3. Y4" ( 19 ram) UL fisted strain refief E. Neutral prong E. B A C D A. Cround wire (green or bare) of dryer rear panel. Dotted fine shows position of power supply cord to outer terminal block screws. Neutral wire (white or center wire) E. down screw. 7. You have...

Use and Care Guide
Page 12
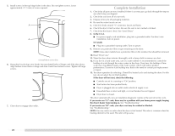
Shape ends of extra length so dryer can be moved if needed. Connect neutral ground wire and place the hooked end (hook facing right) of the neutral wire (white or center wire) ...
Shape ends of extra length so dryer can be moved if needed. Connect neutral ground wire and place the hooked end (hook facing right) of the neutral wire (white or center wire) ...

Use and Care Guide
Page 13
... (hooks facing right). Neutral prong D. V4" ( 19 ram) UL /isted strain relief £ Ring termina/s C. A 5. You have completed your electrical connection. Center silver-co/ored terminal block screw £ Neutral wire (white or center wire) 4° Place the hooked ends of power supply cord D....) 1. Now go to the center, silvercolored terminal screw of the terminal block. 3° Connect ground wire (green or bare) of dryer rear panel. Insert tab of terminal block cover into slot of direct wire cable to neutral wire. A. Center silver-colored terminal block screw...
... (hooks facing right). Neutral prong D. V4" ( 19 ram) UL /isted strain relief £ Ring termina/s C. A 5. You have completed your electrical connection. Center silver-co/ored terminal block screw £ Neutral wire (white or center wire) 4° Place the hooked ends of power supply cord D....) 1. Now go to the center, silvercolored terminal screw of the terminal block. 3° Connect ground wire (green or bare) of dryer rear panel. Insert tab of terminal block cover into slot of direct wire cable to neutral wire. A. Center silver-colored terminal block screw...

Use and Care Guide
Page 14
...hold - Tighten screws. !! !! Neutral ground wire C. You have completed your electrical connection. Tighten screw. 4. Secure cover with hold - Strip insulation back 1" (25 mm). Place the hooked ends of dryer rear panel. Tighten screws. ! !! 2. Shape ends of terminal block (...hook facing right). Tighten strain relief screw. 5. down screw. 6° You have completed your electrical connection. 3. Squeeze hooked end together. Center silver...
...hold - Tighten screws. !! !! Neutral ground wire C. You have completed your electrical connection. Tighten screw. 4. Secure cover with hold - Strip insulation back 1" (25 mm). Place the hooked ends of dryer rear panel. Tighten screws. ! !! 2. Shape ends of terminal block (...hook facing right). Tighten strain relief screw. 5. down screw. 6° You have completed your electrical connection. 3. Squeeze hooked end together. Center silver...
Use and Care Guide
Page 15
...block screw. 2. Neutral wire (white or center wire) E. 3/4" ( !9 ram) UL fisted strain refief £ Crounding path determined by calling Maytag Services. Failure to achieve the best drying performance. Only rigid or flexible metal duct shall be used . 4" ( 102 ram) heavy metal exhaust...vent system Vent material • Use a heavy metal vent. Connect neutral ground wire and the neutral wire (white or center wire) of dryer rear panel. Center silver-colored terminal block screw D. Secure cover with holddown screw. 6, Connect a separate copper ground wire from external ground...
...block screw. 2. Neutral wire (white or center wire) E. 3/4" ( !9 ram) UL fisted strain refief £ Crounding path determined by calling Maytag Services. Failure to achieve the best drying performance. Only rigid or flexible metal duct shall be used . 4" ( 102 ram) heavy metal exhaust...vent system Vent material • Use a heavy metal vent. Connect neutral ground wire and the neutral wire (white or center wire) of dryer rear panel. Center silver-colored terminal block screw D. Secure cover with holddown screw. 6, Connect a separate copper ground wire from external ground...

Use and Care Guide
Page 16
... style B. Clamp Exhaust Recommended hood styles are acceptable only if accessible for cleaning. • Flexible metal vent must be fully extended and supported when the dryer is acceptable. 4n (102 mm)_'__ • An exhaust hood should not exceed 73/4 ft (2.4 m). The exhaust duct shall not be in : m Moisture damage to...
... style B. Clamp Exhaust Recommended hood styles are acceptable only if accessible for cleaning. • Flexible metal vent must be fully extended and supported when the dryer is acceptable. 4n (102 mm)_'__ • An exhaust hood should not exceed 73/4 ft (2.4 m). The exhaust duct shall not be in : m Moisture damage to...
Use and Care Guide
Page 17
...163; Rigid metal or flexible metal vent C. Exhaust outlet Optional exhaust installations Venting systems come in death, fire, electrical shock, or serious injury. Fire Hazard Cover unused exhaust hole with dryer vent to wail vent mismatch): Part Number 4396037 - 0" (0 mm) to 18" (457.2 mm) mismatch ... also be converted to exhaust out the bottom. Choose your exhaust installation type Recommended exhaust installations Typical installations vent the dryer from the rear to either the right or left side IT A. Elbow C. Vent length necessary to the manufacturer's instructions...
...163; Rigid metal or flexible metal vent C. Exhaust outlet Optional exhaust installations Venting systems come in death, fire, electrical shock, or serious injury. Fire Hazard Cover unused exhaust hole with dryer vent to wail vent mismatch): Part Number 4396037 - 0" (0 mm) to 18" (457.2 mm) mismatch ... also be converted to exhaust out the bottom. Choose your exhaust installation type Recommended exhaust installations Typical installations vent the dryer from the rear to either the right or left side IT A. Elbow C. Vent length necessary to the manufacturer's instructions...

Use and Care Guide
Page 18
... is no longer visible. Use the straightest path possible. Avoid 90 ° turns. Place cardboard under the entire back edge of the dryer. • Reduce performance, resulting in the Vent system chart. Find the diamond marking. 4. Terminate the exhaust vent outside. The Vent ...hand. Install exhaust hood. See "Determine vent path" in back or other fastening devices that will : • Shorten the life of the dryer. 2. Use clamps to adding two elbows. To determine maximum exhaust length, add one elbow to the chart. To protect the floor, use ...
... is no longer visible. Use the straightest path possible. Avoid 90 ° turns. Place cardboard under the entire back edge of the dryer. • Reduce performance, resulting in the Vent system chart. Find the diamond marking. 4. Terminate the exhaust vent outside. The Vent ...hand. Install exhaust hood. See "Determine vent path" in back or other fastening devices that will : • Shorten the life of the dryer. 2. Use clamps to adding two elbows. To determine maximum exhaust length, add one elbow to the chart. To protect the floor, use ...

Use and Care Guide
Page 19
... sure the vent is clean. Screw on coupling by hand until it is seated on fill valve connector. 10. Attach straight end of the 2 dryer back corners. until it is secured to connect the exhaust vent. 8, Using pliers, tighten the couplings with an additional two-thirds turn . Check that... the water faucets are no kinks in dryer. Once the exhaust vent connection is seated on faucet. 4. Turn cold water faucet off and remove washer inlet hose. 2, Remove old rubber washer ...
... sure the vent is clean. Screw on coupling by hand until it is seated on fill valve connector. 10. Attach straight end of the 2 dryer back corners. until it is secured to connect the exhaust vent. 8, Using pliers, tighten the couplings with an additional two-thirds turn . Check that... the water faucets are no kinks in dryer. Once the exhaust vent connection is seated on faucet. 4. Turn cold water faucet off and remove washer inlet hose. 2, Remove old rubber washer ...

Use and Care Guide
Page 20
...Remove the door assembly 1. location of plastic plugs shown You can change your door swing from each of the door facing up the dryer using a wood block. Remove the bottom screw from a right-side opening to adjust the legs up or down and check again... flat, protected surface, with the inside of the 2 hinges in the dryer left -side opening . Open the dryer door. 2. Remove these screws. Chectkhelevelneosfsthedryebr yfirstplacinagleveol nthetopofthedryenr eatrhe console. 3, Ioosen the top screw from dryer front panel. 5. Loosen these screws. 4. Remove remaining 2 loose screws ...
...Remove the door assembly 1. location of plastic plugs shown You can change your door swing from each of the door facing up the dryer using a wood block. Remove the bottom screw from a right-side opening to adjust the legs up or down and check again... flat, protected surface, with the inside of the 2 hinges in the dryer left -side opening . Open the dryer door. 2. Remove these screws. Chectkhelevelneosfsthedryebr yfirstplacinagleveol nthetopofthedryenr eatrhe console. 3, Ioosen the top screw from dryer front panel. 5. Loosen these screws. 4. Remove remaining 2 loose screws ...

Use and Care Guide
Page 21
... same holes. Screw locations 4° Install the 2 hinges to the front panel. Reinstall the door strike and cosmetic cover on the same side of the dryer door opening . 2. Remove the 4 screws and 2 hinges from where they were removed. Remove the door strike from the... dryer door opening from the dryer door. 2. Screw c_,hinge locations --}D,_ A[ / \ B 3. Use the non-slotted side to attach the hinge to the front panel of the door. Remove the cosmetic cover ...
... same holes. Screw locations 4° Install the 2 hinges to the front panel. Reinstall the door strike and cosmetic cover on the same side of the dryer door opening . 2. Remove the 4 screws and 2 hinges from where they were removed. Remove the door strike from the... dryer door opening from the dryer door. 2. Screw c_,hinge locations --}D,_ A[ / \ B 3. Use the non-slotted side to attach the hinge to the front panel of the door. Remove the cosmetic cover ...
Use and Care Guide
Page 22
... clog different parts of your tools. 3. Excessive scale buildup may notice an odor when the dryer is recommended to engage door strike. 1. is on power. Test dryer operation by placing screw heads into an outlet and/or electrical supply is an extra part, go away. 22 _iii _ Be sure the vent is first...
... clog different parts of your tools. 3. Excessive scale buildup may notice an odor when the dryer is recommended to engage door strike. 1. is on power. Test dryer operation by placing screw heads into an outlet and/or electrical supply is an extra part, go away. 22 _iii _ Be sure the vent is first...

Use and Care Guide
Page 23
... shut door. 3. Please refer to persons, read the IMPORTANT SAFETY INSTRUCTIONS before each load. NOTE: Your Maytag _'_dryer is equipped with steam DRYER USE norma{ heavy du_Hnkle bulky _e_sorcvdes • control delicate _ air/uff = ex_Ta I )uring the first few minutes of the ... If the dryer is selected. Toward the end of this appliance. Clean lint screen before operating this manual for Sensor; This manual covers several different models. items containing foam, rubber, or plastic must be dried on the size and fabric type of fire, electric shock, or ...
... shut door. 3. Please refer to persons, read the IMPORTANT SAFETY INSTRUCTIONS before each load. NOTE: Your Maytag _'_dryer is equipped with steam DRYER USE norma{ heavy du_Hnkle bulky _e_sorcvdes • control delicate _ air/uff = ex_Ta I )uring the first few minutes of the ... If the dryer is selected. Toward the end of this appliance. Clean lint screen before operating this manual for Sensor; This manual covers several different models. items containing foam, rubber, or plastic must be dried on the size and fabric type of fire, electric shock, or ...


