
Use & Care Guide
Page 5
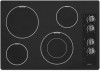
... 5 Left front control knob (with speed heat) B. Hot surface indicator light A. Left front control knob E. Cooktop on indicator light F. COOKTOP USE This manual covers different models. Right rear control knob C. Right front control knob E. Hot surface indicator light G. Left rear control knob (with melt) C. The cooktop you have some or all...
... 5 Left front control knob (with speed heat) B. Hot surface indicator light A. Left front control knob E. Cooktop on indicator light F. COOKTOP USE This manual covers different models. Right rear control knob C. Right front control knob E. Hot surface indicator light G. Left rear control knob (with melt) C. The cooktop you have some or all...
Use & Care Guide
Page 6
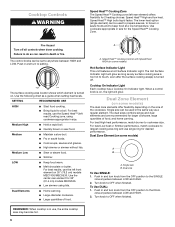
... largest cooking area ring and use the Speed Heat™ (left rear) Cooking zone, using lids. Dual Zone Element (on 30" (76.2 cm) models MEC7430/MEC9530. Single size B. To Use DUAL: 1. Turn knob to a boil. Use the following chart as any surface cooking area is too hot to...sauces, to brown or saute foods and to setting. The dual sizes combine single and dual elements and are recommended for 36" (91.4 cm) models MEC9536. ■ Low simmer using cookware appropriate in size. Turn knob to cookware size. Cooktop On Indicator Light Each cooktop has a Cooktop On ...
... largest cooking area ring and use the Speed Heat™ (left rear) Cooking zone, using lids. Dual Zone Element (on 30" (76.2 cm) models MEC7430/MEC9530. Single size B. To Use DUAL: 1. Turn knob to a boil. Use the following chart as any surface cooking area is too hot to...sauces, to brown or saute foods and to setting. The dual sizes combine single and dual elements and are recommended for 36" (91.4 cm) models MEC9536. ■ Low simmer using cookware appropriate in size. Turn knob to cookware size. Cooktop On Indicator Light Each cooktop has a Cooktop On ...
Use & Care Guide
Page 8
...on the properties of aluminum. Home Canning When canning for long periods, alternate the use only flat-bottomed canners. ■ On coil element models, the installation of a Canning Unit Kit is a factor in cookware. Companies that manufacture home canning products can leave permanent marks on 2... surface cooking areas, elements or surface burners at the same time. ■ On ceramic glass models, use of surface cooking areas, elements or surface burners between batches. A nonstick finish has the same characteristics as a base they can...
...on the properties of aluminum. Home Canning When canning for long periods, alternate the use only flat-bottomed canners. ■ On coil element models, the installation of a Canning Unit Kit is a factor in cookware. Companies that manufacture home canning products can leave permanent marks on 2... surface cooking areas, elements or surface burners at the same time. ■ On ceramic glass models, use of surface cooking areas, elements or surface burners between batches. A nonstick finish has the same characteristics as a base they can...

Use & Care Guide
Page 9
... from aluminum and copper ■ Cooktop Polishing Creme: Clean as soon as an accessory. You may be ordered as an accessory. Burned-on some models, do not soak knobs. Repeat for stubborn soils, and can be ordered as cooktop has cooled down . Rub creme into surface with a damp ... or oven cleaner. Always follow label instructions on surface and scrape. Rub creme into surface with a damp paper towel or soft cloth. On some models) To avoid damage to order. ■ Liquid detergent or all controls are off and the oven and cooktop are cool. Light to moderate soil ...
... from aluminum and copper ■ Cooktop Polishing Creme: Clean as soon as an accessory. You may be ordered as an accessory. Burned-on some models, do not soak knobs. Repeat for stubborn soils, and can be ordered as cooktop has cooled down . Rub creme into surface with a damp ... or oven cleaner. Always follow label instructions on surface and scrape. Rub creme into surface with a damp paper towel or soft cloth. On some models) To avoid damage to order. ■ Liquid detergent or all controls are off and the oven and cooktop are cool. Light to moderate soil ...
Use & Care Guide
Page 11
... your area, call . Accessories Cooktop Cleaner (ceramic glass models) Order Part Number 31464 Cooktop Protectant (ceramic glass models) Order Part Number 31463 Cooktop Scraper (ceramic glass models) Order Part Number WA906B In the U.S.A. Call Maytag Customer eXperience Center toll free: 1-800-688-9900, or... visit our website at www.maytag.ca. Maytag® appliances designated service technicians are trained to your appliance. When calling, please know the purchase date and the complete model and serial number of a service call the following customer assistance...
... your area, call . Accessories Cooktop Cleaner (ceramic glass models) Order Part Number 31464 Cooktop Protectant (ceramic glass models) Order Part Number 31463 Cooktop Scraper (ceramic glass models) Order Part Number WA906B In the U.S.A. Call Maytag Customer eXperience Center toll free: 1-800-688-9900, or... visit our website at www.maytag.ca. Maytag® appliances designated service technicians are trained to your appliance. When calling, please know the purchase date and the complete model and serial number of a service call the following customer assistance...

Use & Care Guide
Page 12
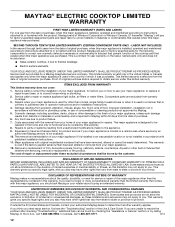
...location or is not installed in accordance with published installation instructions. 11. LIMITATION OF REMEDIES; Service calls to product failure. 7. MAYTAG® ELECTRIC COOKTOP LIMITED WARRANTY FIRST YEAR LIMITED WARRANTY (PARTS AND LABOR) For one year from the date of purchase, ...only when the major appliance is used in this limited warranty. Major appliances with original model/serial numbers that interfere with servicing, removal or replacement of purchase. 6. MAYTAG SHALL NOT BE LIABLE FOR INCIDENTAL OR CONSEQUENTIAL DAMAGES. This limited warranty is designed ...
...location or is not installed in accordance with published installation instructions. 11. LIMITATION OF REMEDIES; Service calls to product failure. 7. MAYTAG® ELECTRIC COOKTOP LIMITED WARRANTY FIRST YEAR LIMITED WARRANTY (PARTS AND LABOR) For one year from the date of purchase, ...only when the major appliance is used in this limited warranty. Major appliances with original model/serial numbers that interfere with servicing, removal or replacement of purchase. 6. MAYTAG SHALL NOT BE LIABLE FOR INCIDENTAL OR CONSEQUENTIAL DAMAGES. This limited warranty is designed ...

Use & Care Guide
Page 13
You must provide proof of purchase or installation date for future reference. Dealer name Address Phone number Model number Serial number Purchase date 13 Write down the following information about your major appliance to better help you obtain assistance or service if you ever need to know your sales slip together for in-warranty service. Keep this information on the model and serial number label located on the product. You can find this book and your complete model number and serial number. You will need it.
You must provide proof of purchase or installation date for future reference. Dealer name Address Phone number Model number Serial number Purchase date 13 Write down the following information about your major appliance to better help you obtain assistance or service if you ever need to know your sales slip together for in-warranty service. Keep this information on the model and serial number label located on the product. You can find this book and your complete model number and serial number. You will need it.
Installation Guide
Page 2
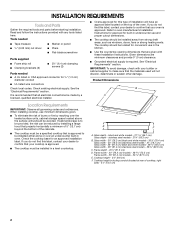
... Ovens approved for built-in a level countertop. See "Electrical Requirements" section. black and white models - 21 55.1 cm) Glass depth - Frame width - 30" (76.2 cm) models - 28 73.5 cm) Frame width - 36" (91.4 cm) models - 34 87.5 cm) E. Given dimensions are given with these Installation Instructions. If cabinet storage... dealer to make sure that is required. IMPORTANT: To avoid damage, check with any tools listed here. stainless steel models - 21¾" (55.3 cm) B. INSTALLATION REQUIREMENTS Tools and Parts Gather the required tools and parts before starting installation.
... Ovens approved for built-in a level countertop. See "Electrical Requirements" section. black and white models - 21 55.1 cm) Glass depth - Frame width - 30" (76.2 cm) models - 28 73.5 cm) Frame width - 36" (91.4 cm) models - 34 87.5 cm) E. Given dimensions are given with these Installation Instructions. If cabinet storage... dealer to make sure that is required. IMPORTANT: To avoid damage, check with any tools listed here. stainless steel models - 21¾" (55.3 cm) B. INSTALLATION REQUIREMENTS Tools and Parts Gather the required tools and parts before starting installation.
Installation Guide
Page 3
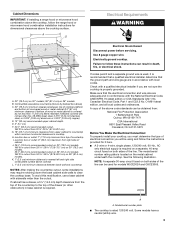
... box or outlet: 7" (17.8 cm) minimum from right side of cabinet J. 29¹⁄₂" (74.9 cm) recommended cutout on 30" (76.2 cm) models. Failure to the top of the drawer (or other obstruction) in base cabinet is required. Check with not less than No. 28 MSG sheet steel... use a base cabinet with local codes. If codes permit and a separate ground wire is used for models W5CE3024 and G9CE3065. The model/serial number rating plate is rated 120/240 volt. Model/serial number plate ■ The cooktop is located on the metal cabinet underneath the cooktop. Cabinet Dimensions ...
... box or outlet: 7" (17.8 cm) minimum from right side of cabinet J. 29¹⁄₂" (74.9 cm) recommended cutout on 30" (76.2 cm) models. Failure to the top of the drawer (or other obstruction) in base cabinet is required. Check with not less than No. 28 MSG sheet steel... use a base cabinet with local codes. If codes permit and a separate ground wire is used for models W5CE3024 and G9CE3065. The model/serial number rating plate is rated 120/240 volt. Model/serial number plate ■ The cooktop is located on the metal cabinet underneath the cooktop. Cabinet Dimensions ...

Installation Guide
Page 4
... should not be installed before or after the cooktop is already provided at cooktop base ends. 30" (76.2 cm) and 36" (91.4 cm) traditional knob models A B C B C A. Using 2 or more people to allow as much slack as possible between the junction box and the cooktop so that the front edge of copper...
... should not be installed before or after the cooktop is already provided at cooktop base ends. 30" (76.2 cm) and 36" (91.4 cm) traditional knob models A B C B C A. Using 2 or more people to allow as much slack as possible between the junction box and the cooktop so that the front edge of copper...
Warranty Information
Page 1
... it is installed in an inaccessible location or is not installed in accordance with published installation instructions. 11. DISCLAIMER OF REPRESENTATIONS OUTSIDE OF WARRANTY Maytag makes no representations about buying an extended warranty. EXCLUSION OF INCIDENTAL AND CONSEQUENTIAL DAMAGES YOUR SOLE AND EXCLUSIVE REMEDY UNDER THIS LIMITED WARRANTY SHALL BE..., first see the "Troubleshooting" section of the Use & Care Guide. If you also may have other than the limited warranty that comes with original model/serial numbers that is not available. 10. In Canada, call 1-800-688-9900.
... it is installed in an inaccessible location or is not installed in accordance with published installation instructions. 11. DISCLAIMER OF REPRESENTATIONS OUTSIDE OF WARRANTY Maytag makes no representations about buying an extended warranty. EXCLUSION OF INCIDENTAL AND CONSEQUENTIAL DAMAGES YOUR SOLE AND EXCLUSIVE REMEDY UNDER THIS LIMITED WARRANTY SHALL BE..., first see the "Troubleshooting" section of the Use & Care Guide. If you also may have other than the limited warranty that comes with original model/serial numbers that is not available. 10. In Canada, call 1-800-688-9900.

Warranty Information
Page 2
Write down the following information about your complete model number and serial number. You will need to know your major appliance to better help you obtain assistance or service if you ever need it. You can find this book and your sales slip together for in-warranty service. Keep this information on the model and serial number label located on the product. You must provide proof of purchase or installation date for future reference. Dealer name Address Phone number Model number Serial number Purchase date 13
Write down the following information about your complete model number and serial number. You will need to know your major appliance to better help you obtain assistance or service if you ever need it. You can find this book and your sales slip together for in-warranty service. Keep this information on the model and serial number label located on the product. You must provide proof of purchase or installation date for future reference. Dealer name Address Phone number Model number Serial number Purchase date 13

Installing Oven Under Cooktop
Page 1
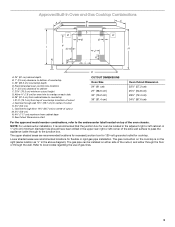
... 22¹⁄₂" (57.2 cm) 25¹⁄₂" (64.8 cm) 28½" (72.4 cm) 34¹⁄₂" (87.6 cm) For the approved model number combinations, refer to the undercounter label located on top of the oven chassis and on the bottom of the side wall surface to pass...
... 22¹⁄₂" (57.2 cm) 25¹⁄₂" (64.8 cm) 28½" (72.4 cm) 34¹⁄₂" (87.6 cm) For the approved model number combinations, refer to the undercounter label located on top of the oven chassis and on the bottom of the side wall surface to pass...

Installing Oven Under Cooktop
Page 2
...) 30" (76.2 cm) Oven Cutout Dimension 22¹⁄₂" (57.2 cm) 25¹⁄₂" (64.8 cm) 28½" (72.4 cm) For the approved model number combinations, refer to the junction box. 2 H. I D E C F G H A. 24" (61 cm) cabinet depth B. 25" (63.5 cm) countertop depth C. If dimension "F" is recommended that the junction boxes...
...) 30" (76.2 cm) Oven Cutout Dimension 22¹⁄₂" (57.2 cm) 25¹⁄₂" (64.8 cm) 28½" (72.4 cm) For the approved model number combinations, refer to the junction box. 2 H. I D E C F G H A. 24" (61 cm) cabinet depth B. 25" (63.5 cm) countertop depth C. If dimension "F" is recommended that the junction boxes...
Installing Oven Under Cooktop
Page 3
... 22¹⁄₂" (57.2 cm) 25¹⁄₂" (64.8 cm) 28½" (72.4 cm) 34¹⁄₂" (87.6 cm) For the approved model number combinations, refer to bottom of the oven chassis. The gas connection on the cooktop is recommended that the junction box for cooktop. Lower shaded...
... 22¹⁄₂" (57.2 cm) 25¹⁄₂" (64.8 cm) 28½" (72.4 cm) 34¹⁄₂" (87.6 cm) For the approved model number combinations, refer to bottom of the oven chassis. The gas connection on the cooktop is recommended that the junction box for cooktop. Lower shaded...
