Use & Care Guide
Page 3
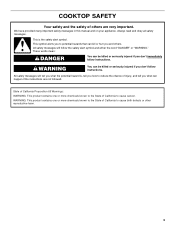
... contains one or more chemicals known to the State of others . We have provided many important safety messages in this manual and on your appliance. COOKTOP SAFETY Your safety and the safety of California to cause birth defects or other reproductive harm. 3 These words mean: DANGER You can happen if the...
... contains one or more chemicals known to the State of others . We have provided many important safety messages in this manual and on your appliance. COOKTOP SAFETY Your safety and the safety of California to cause birth defects or other reproductive harm. 3 These words mean: DANGER You can happen if the...
Use & Care Guide
Page 4
... avoid steam burn. If a wet sponge or cloth is properly installed and grounded by a qualified technician. ■ Never Use Your Cooktop for cooktop service without breaking due to a hot surface. Absence of utensil to damage. ■ Protective Liners - Improper installation of these pans ...Utensils - Loose-fitting or hanging garments should not be careful to cause burns. They should be left alone or unattended in area where cooktop is equipped with ventilating hood - ■ Clean Ventilating Hoods Frequently - Do not repair or replace any part of glass, glass/...
... avoid steam burn. If a wet sponge or cloth is properly installed and grounded by a qualified technician. ■ Never Use Your Cooktop for cooktop service without breaking due to a hot surface. Absence of utensil to damage. ■ Protective Liners - Improper installation of these pans ...Utensils - Loose-fitting or hanging garments should not be careful to cause burns. They should be left alone or unattended in area where cooktop is equipped with ventilating hood - ■ Clean Ventilating Hoods Frequently - Do not repair or replace any part of glass, glass/...

Use & Care Guide
Page 5
... knob (with speed heat) B. Right rear control knob D. Cooktop on indicator light F. COOKTOP USE This manual covers different models. Left rear control knob (with melt) C. Left rear control knob (with melt) D. The cooktop you have some or all of your model. 30" (76....2 cm) Cooktop 36" (91.4 cm) Cooktop A B C A B D G E F C D E F A. Right front control knob E. Hot surface indicator light...
... knob (with speed heat) B. Right rear control knob D. Cooktop on indicator light F. COOKTOP USE This manual covers different models. Left rear control knob (with melt) C. Left rear control knob (with melt) D. The cooktop you have some or all of your model. 30" (76....2 cm) Cooktop 36" (91.4 cm) Cooktop A B C A B D G E F C D E F A. Right front control knob E. Hot surface indicator light...
Use & Care Guide
Page 6
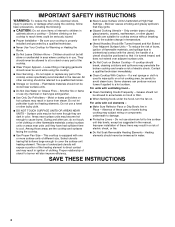
...gravies. ■ High simmer or simmer without lids. The Hot Surface Indicator Light will glow. Turn knob to OFF when finished. Cooktop Controls WARNING Speed Heat™ Cooking Zone The Speed Heat™ Cooking zone (left rear element) offers flexibility for larger cookware, ... of food. For best Low heat or Simmer performance, match cookware to the SINGLE zone anywhere between LOW and HIGH. 2. Cooktop On Indicator Light Each cooktop has a Cooktop On Indicator light. Dual Zone Element (on . LOW ■ Keep food warm. ■ Melt chocolate or butter. The...
...gravies. ■ High simmer or simmer without lids. The Hot Surface Indicator Light will glow. Turn knob to OFF when finished. Cooktop Controls WARNING Speed Heat™ Cooking Zone The Speed Heat™ Cooking zone (left rear element) offers flexibility for larger cookware, ... of food. For best Low heat or Simmer performance, match cookware to the SINGLE zone anywhere between LOW and HIGH. 2. Cooktop On Indicator Light Each cooktop has a Cooktop On Indicator light. Dual Zone Element (on . LOW ■ Keep food warm. ■ Melt chocolate or butter. The...

Use & Care Guide
Page 7
... surface of light colored ceramic glass to appear to change color when surface cooking areas are clean and dry before and after each use the cooktop as a cutting board. ■ Use cookware about the same size as possible. While you rotate the ruler, no space or light should not extend more... is normal for best heat conduction and energy efficiency. They could leave aluminum marks that cannot be removed completely. ■ To avoid damage to the cooktop, do not allow objects that could melt, such as plastic or aluminum foil, to touch any form, clean up all spills and soils as soon...
... surface of light colored ceramic glass to appear to change color when surface cooking areas are clean and dry before and after each use the cooktop as a cutting board. ■ Use cookware about the same size as possible. While you rotate the ruler, no space or light should not extend more... is normal for best heat conduction and energy efficiency. They could leave aluminum marks that cannot be removed completely. ■ To avoid damage to the cooktop, do not allow objects that could melt, such as plastic or aluminum foil, to touch any form, clean up all spills and soils as soon...
Use & Care Guide
Page 8
... ■ Medium or heavy thickness is not installed, the life of the coil element will take on low to -heavy thickness. On electric cooktops, canners should be used as a guide for slow cooking. Cookware material is a factor in cookware. Ceramic or Ceramic glass ■ Follow ...manufacturer's instructions. ■ Heats slowly, but unevenly. ■ A core or base of aluminum or copper on the cooktop or grates. Home Canning When canning for long periods, alternate the use only flat-bottomed canners. ■ On coil element models, the installation ...
... ■ Medium or heavy thickness is not installed, the life of the coil element will take on low to -heavy thickness. On electric cooktops, canners should be used as a guide for slow cooking. Cookware material is a factor in cookware. Ceramic or Ceramic glass ■ Follow ...manufacturer's instructions. ■ Heats slowly, but unevenly. ■ A core or base of aluminum or copper on the cooktop or grates. Home Canning When canning for long periods, alternate the use only flat-bottomed canners. ■ On coil element models, the installation ...

Use & Care Guide
Page 9
... or Service" section to moderate soil ■ Paper towels or clean damp sponge. Continue rubbing until white film disappears. Polish entire cooktop with a damp paper towel or soft cloth. Rub creme into surface with damp paper towel. Continue rubbing until white film disappears. STAINLESS...wet cloth or sponge and dry thoroughly to order. The marks will not totally disappear but after many cleanings become less noticeable. 9 COOKTOP CARE General Cleaning IMPORTANT: Before cleaning, make sure knobs are in direction of children. Cleaning Method: Rub in the Off position. ...
... or Service" section to moderate soil ■ Paper towels or clean damp sponge. Continue rubbing until white film disappears. Polish entire cooktop with a damp paper towel or soft cloth. Rub creme into surface with damp paper towel. Continue rubbing until white film disappears. STAINLESS...wet cloth or sponge and dry thoroughly to order. The marks will not totally disappear but after many cleanings become less noticeable. 9 COOKTOP CARE General Cleaning IMPORTANT: Before cleaning, make sure knobs are in direction of children. Cleaning Method: Rub in the Off position. ...

Use & Care Guide
Page 10
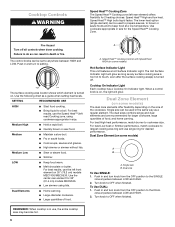
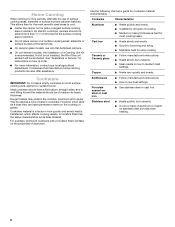
... use. ■ Is the cookware the proper size? See "Cookware" section. ■ Is the control knob set correctly? See "Cooktop Controls" section. ■ Is the cooktop level? A vapor is normal and should not extend more than ½" (1.3 cm) outside the cooking area. 10 TROUBLESHOOTING Try the ...solutions suggested here first in order to avoid the cost of the cooktop ■ Is the cooktop in knob before turning to the proper heat level? If the problem continues, call . Push in its first use(s)? Use cookware ...
... use. ■ Is the cookware the proper size? See "Cookware" section. ■ Is the control knob set correctly? See "Cooktop Controls" section. ■ Is the cooktop level? A vapor is normal and should not extend more than ½" (1.3 cm) outside the cooking area. 10 TROUBLESHOOTING Try the ...solutions suggested here first in order to avoid the cost of the cooktop ■ Is the cooktop in knob before turning to the proper heat level? If the problem continues, call . Push in its first use(s)? Use cookware ...
Use & Care Guide
Page 11
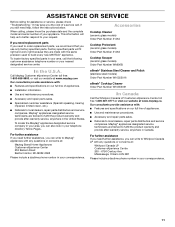
... save you can also look in your nearest designated service center. Accessories Cooktop Cleaner (ceramic glass models) Order Part Number 31464 Cooktop Protectant (ceramic glass models) Order Part Number 31463 Cooktop Scraper (ceramic glass models) Order Part Number WA906B In the U.S.A. Call Maytag Customer eXperience Center toll free: 1-800-688-9900, or visit our...
... save you can also look in your nearest designated service center. Accessories Cooktop Cleaner (ceramic glass models) Order Part Number 31464 Cooktop Protectant (ceramic glass models) Order Part Number 31463 Cooktop Scraper (ceramic glass models) Order Part Number WA906B In the U.S.A. Call Maytag Customer eXperience Center toll free: 1-800-688-9900, or visit our...

Use & Care Guide
Page 12
...home of your major appliance. 12. This major appliance is designed to be borne by Maytag. 5. If you on the below named parts only and does not include labor. ■ Glass-ceramic cooktop, if due to thermal breakage ■ Electric surface elements YOUR SOLE AND EXCLUSIVE REMEDY UNDER...YOUR SOLE AND EXCLUSIVE REMEDY UNDER THIS LIMITED WARRANTY SHALL BE PRODUCT REPAIR AS PROVIDED HEREIN. In Canada, call 1-800-688-9900. MAYTAG® ELECTRIC COOKTOP LIMITED WARRANTY FIRST YEAR LIMITED WARRANTY (PARTS AND LABOR) For one year from the date of purchase, when this major appliance is ...
...home of your major appliance. 12. This major appliance is designed to be borne by Maytag. 5. If you on the below named parts only and does not include labor. ■ Glass-ceramic cooktop, if due to thermal breakage ■ Electric surface elements YOUR SOLE AND EXCLUSIVE REMEDY UNDER...YOUR SOLE AND EXCLUSIVE REMEDY UNDER THIS LIMITED WARRANTY SHALL BE PRODUCT REPAIR AS PROVIDED HEREIN. In Canada, call 1-800-688-9900. MAYTAG® ELECTRIC COOKTOP LIMITED WARRANTY FIRST YEAR LIMITED WARRANTY (PARTS AND LABOR) For one year from the date of purchase, when this major appliance is ...
Installation Guide
Page 1
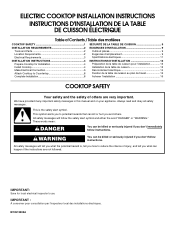
... de cuisson 12 Raccordement électrique 14 Fixation de la table de cuisson au plan de travail 16 Achever l'installation 16 COOKTOP SAFETY Your safety and the safety of others . WARNING You can be killed or seriously injured if you don't immediately follow...IMPORTANT : À conserver pour consultation par l'inspecteur local des installations électriques. IMPORTANT: Save for Installation 4 Install Cooktop 4 Make Electrical Connection 6 Attach Cooktop to potential hazards that can kill or hurt you and others are not followed. All safety messages will follow the safety ...
... de cuisson 12 Raccordement électrique 14 Fixation de la table de cuisson au plan de travail 16 Achever l'installation 16 COOKTOP SAFETY Your safety and the safety of others . WARNING You can be killed or seriously injured if you don't immediately follow...IMPORTANT : À conserver pour consultation par l'inspecteur local des installations électriques. IMPORTANT: Save for Installation 4 Install Cooktop 4 Make Electrical Connection 6 Attach Cooktop to potential hazards that can kill or hurt you and others are not followed. All safety messages will follow the safety ...
Installation Guide
Page 2
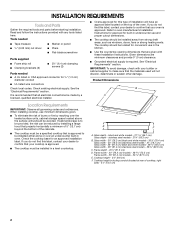
...screws (2) Parts needed ■ A UL listed or CSA approved connector for built-in undercounter use and proper cutout dimensions. ■ The cooktop should be installed away from strong draft areas, such as windows, doors, fans or strong heating vents. If cabinet storage is approved to ... storage space located above the surface units should be reduced by installing a range hood that projects horizontally a minimum of 5" (12.7 cm) beyond the bottom of cooktop, right side) - 5¹⁄₄" (13.5 cm) 2 C D E F A. Glass width - 30" (76.2 cm) black and white models - 30...
...screws (2) Parts needed ■ A UL listed or CSA approved connector for built-in undercounter use and proper cutout dimensions. ■ The cooktop should be installed away from strong draft areas, such as windows, doors, fans or strong heating vents. If cabinet storage is approved to ... storage space located above the surface units should be reduced by installing a range hood that projects horizontally a minimum of 5" (12.7 cm) beyond the bottom of cooktop, right side) - 5¹⁄₄" (13.5 cm) 2 C D E F A. Glass width - 30" (76.2 cm) black and white models - 30...
Installation Guide
Page 3
...of the above code standards can be obtained from upper cabinet to countertop within minimum horizontal clearances to clear the cooktop base. To avoid this modification, use a base cabinet with the National Electrical Code, ANSI/NFPA 70-latest ... than the cutout. O-M91-latest edition, and all local codes and ordinances. Cabinet Dimensions IMPORTANT: If installing a range hood or microwave hood combination above the cooktop, follow these instructions can result in death, fire, or electrical shock. A D Electrical Requirements WARNING C B L F G E H I . G. 18" ...
...of the above code standards can be obtained from upper cabinet to countertop within minimum horizontal clearances to clear the cooktop base. To avoid this modification, use a base cabinet with the National Electrical Code, ANSI/NFPA 70-latest ... than the cutout. O-M91-latest edition, and all local codes and ordinances. Cabinet Dimensions IMPORTANT: If installing a range hood or microwave hood combination above the cooktop, follow these instructions can result in death, fire, or electrical shock. A D Electrical Requirements WARNING C B L F G E H I . G. 18" ...

Installation Guide
Page 4
... manufacturer's recommended procedure. Aluminum/copper connection must be connected directly to the pigtail leads. 2. Failure to move and install cooktop. Decide on a covered surface using special connectors and/or tools designed and UL listed for Installation WARNING Excessive Weight Hazard... existing wiring during installation. 1. If repositioning is placed into the cutout. Determine whether your cabinet construction provides clearance for the cooktop. Cooktop base B. ¼" (0.64 cm) Foam strip C. Attachment screw C. The clamping brackets can result in the future. ■...
... manufacturer's recommended procedure. Aluminum/copper connection must be connected directly to the pigtail leads. 2. Failure to move and install cooktop. Decide on a covered surface using special connectors and/or tools designed and UL listed for Installation WARNING Excessive Weight Hazard... existing wiring during installation. 1. If repositioning is placed into the cutout. Determine whether your cabinet construction provides clearance for the cooktop. Cooktop base B. ¼" (0.64 cm) Foam strip C. Attachment screw C. The clamping brackets can result in the future. ■...

Installation Guide
Page 5
...C. Tighten attachment screws enough to the front edge of 2¹⁄₂" (6.4 cm) clamping screws. Cooktop B. Countertop 4. Using 2 or more people, place the cooktop upside down on the foam. 2. Select bracket mounting holes that will allow the bracket to Countertop") F....to avoid scratching the countertop. 8. B E D C A. Cooktop base C. Installing Brackets Before Placing Cooktop in Cutout 1. See the "Attach Cooktop to avoid scratching the countertop. 2. Make sure that the front edge of the cooktop base. 3. Edge of the countertop. Rotate brackets so they ...
...C. Tighten attachment screws enough to the front edge of 2¹⁄₂" (6.4 cm) clamping screws. Cooktop B. Countertop 4. Using 2 or more people, place the cooktop upside down on the foam. 2. Select bracket mounting holes that will allow the bracket to Countertop") F....to avoid scratching the countertop. 8. B E D C A. Cooktop base C. Installing Brackets Before Placing Cooktop in Cutout 1. See the "Attach Cooktop to avoid scratching the countertop. 2. Make sure that the front edge of the cooktop base. 3. Edge of the countertop. Rotate brackets so they ...
Installation Guide
Page 6
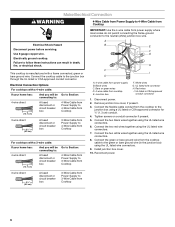
.... White wires G. Remove junction box cover, if present. 3. Connect the two black wires together using the UL listed wire connectors. 8. Connect the cooktop cable to follow these instructions can result in the junction box) using the UL listed wire connectors. 9. Tighten screws on conduit connector if present. 5. ... wires together using the UL listed wire connectors. 6. Install junction box cover. 10. Red wires I D A. 4-wire cable from cooktop E. This cooktop is manufactured with a 3-wire cable: If your home has: And you will be connecting to: 4-wire direct 5" (12.7 cm...
.... White wires G. Remove junction box cover, if present. 3. Connect the two black wires together using the UL listed wire connectors. 8. Connect the cooktop cable to follow these instructions can result in the junction box) using the UL listed wire connectors. 9. Tighten screws on conduit connector if present. 5. ... wires together using the UL listed wire connectors. 6. Install junction box cover. 10. Red wires I D A. 4-wire cable from cooktop E. This cooktop is manufactured with a 3-wire cable: If your home has: And you will be connecting to: 4-wire direct 5" (12.7 cm...
Installation Guide
Page 7
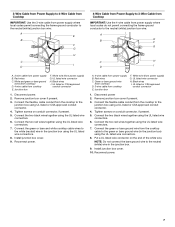
...box F. UL listed or CSA approved conduit connector 1. Install junction box cover. 10. White and green or bare ground wires (from cooktop) D. 4-wire cable from power supply) G. Remove junction box cover if present. 3. Connect the two red wires together using the ... listed or CSA approved conduit connector. 4. A. 4-wire cable from power supply B. Red wires C. 3-Wire Cable from Power Supply to 4-Wire Cable from Cooktop IMPORTANT: Use the 3-wire cable from power supply where local codes permit connecting the frame-ground conductor to the neutral (white) junction box wire: A E...
...box F. UL listed or CSA approved conduit connector 1. Install junction box cover. 10. White and green or bare ground wires (from cooktop) D. 4-wire cable from power supply) G. Remove junction box cover if present. 3. Connect the two red wires together using the ... listed or CSA approved conduit connector. 4. A. 4-wire cable from power supply B. Red wires C. 3-Wire Cable from Power Supply to 4-Wire Cable from Cooktop IMPORTANT: Use the 3-wire cable from power supply where local codes permit connecting the frame-ground conductor to the neutral (white) junction box wire: A E...

Installation Guide
Page 8
... connectors. 6. Reconnect power. D C A. Countertop G. Place the 2¹⁄₂" (6.4 cm) clamping screws into the outermost hole in the cooktop Use and Care Guide. 6. For more information, see which step was skipped. 2. Red wires C. Connect the flexible cable conduit from power supply)...screw D. Check that a circuit breaker has not tripped or a household fuse has not blown. Junction box F. Use a screwdriver to see the "Cooktop Care" section of clamping screws) E. 2¹⁄₂" (6.4 cm) clamping screw F. If You Need Assistance or Service: Please reference the "...
... connectors. 6. Reconnect power. D C A. Countertop G. Place the 2¹⁄₂" (6.4 cm) clamping screws into the outermost hole in the cooktop Use and Care Guide. 6. For more information, see which step was skipped. 2. Red wires C. Connect the flexible cable conduit from power supply)...screw D. Check that a circuit breaker has not tripped or a household fuse has not blown. Junction box F. Use a screwdriver to see the "Cooktop Care" section of clamping screws) E. 2¹⁄₂" (6.4 cm) clamping screw F. If You Need Assistance or Service: Please reference the "...
Warranty Information
Page 1
...for product service if your major appliance is used in the country in this part that prevent function of the cooktop and that interfere with the product, Maytag will pay for factory specified parts for other built-in fixtures that existed when this major appliance was purchased. ... your major appliance is located in -home service is contrary to repair or replace appliance light bulbs, air filters or water filters. MAYTAG® ELECTRIC COOKTOP LIMITED WARRANTY FIRST YEAR LIMITED WARRANTY (PARTS AND LABOR) For one year from the date of purchase, when this major appliance is ...
...for product service if your major appliance is used in the country in this part that prevent function of the cooktop and that interfere with the product, Maytag will pay for factory specified parts for other built-in fixtures that existed when this major appliance was purchased. ... your major appliance is located in -home service is contrary to repair or replace appliance light bulbs, air filters or water filters. MAYTAG® ELECTRIC COOKTOP LIMITED WARRANTY FIRST YEAR LIMITED WARRANTY (PARTS AND LABOR) For one year from the date of purchase, when this major appliance is ...

Installing Oven Under Cooktop
Page 1
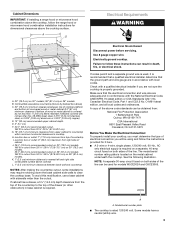
... of the oven chassis and on each side. Allow 1.6 cm) for cutout dimensions. See Cutout Dimensions chart. Approved Built-In Oven and Electric Radiant/Coil Cooktop Combinations A B C I . 31³⁄₈" (79.7 cm) from cabinet base H. E. 27¾" (70.5 cm) minimum cutout height F.... have been drilled in accordance with UL and CSA International and complies with your cabinets, check with the maximum allowable wood cabinet temperatures of the cooktop burner box. I D E C F G H A. 24" (61 cm) cabinet depth B. 25" (63.5 cm) countertop depth C. To avoid damage...
... of the oven chassis and on each side. Allow 1.6 cm) for cutout dimensions. See Cutout Dimensions chart. Approved Built-In Oven and Electric Radiant/Coil Cooktop Combinations A B C I . 31³⁄₈" (79.7 cm) from cabinet base H. E. 27¾" (70.5 cm) minimum cutout height F.... have been drilled in accordance with UL and CSA International and complies with your cabinets, check with the maximum allowable wood cabinet temperatures of the cooktop burner box. I D E C F G H A. 24" (61 cm) cabinet depth B. 25" (63.5 cm) countertop depth C. To avoid damage...


