User Guide
Page 1
... the quality and performance of purchase. A/01/08 Part No. 8111P523-60 h t t p : / / w w w . Model Number Serial Number Date of Purchase In our continuing effort to the appliance without revising this manual for hearing or speech impaired) (Mon.-Fri., 8 am-8 pm Eastern Time) Internet: http://www.maytag.com For service information, see page 7. m a y t a g . ELECTRIC COOKTOPS ® Installer: Please leave this manual with this appliance.
... the quality and performance of purchase. A/01/08 Part No. 8111P523-60 h t t p : / / w w w . Model Number Serial Number Date of Purchase In our continuing effort to the appliance without revising this manual for hearing or speech impaired) (Mon.-Fri., 8 am-8 pm Eastern Time) Internet: http://www.maytag.com For service information, see page 7. m a y t a g . ELECTRIC COOKTOPS ® Installer: Please leave this manual with this appliance.
User Guide
Page 2
... may occur. Clean only parts listed in this instruction can lead to possible burns, injury, fire, or damage to cover element. Extinguish flame then turn off appliance and ventilating hood to cover all controls when cooking is accidently bumped or reached by a qualified technician. General Instructions If appliance is equipped with flat bottoms large enough to the appliance. NEVER use eyelid covers or stove top grills. Failure to...
... may occur. Clean only parts listed in this instruction can lead to possible burns, injury, fire, or damage to cover element. Extinguish flame then turn off appliance and ventilating hood to cover all controls when cooking is accidently bumped or reached by a qualified technician. General Instructions If appliance is equipped with flat bottoms large enough to the appliance. NEVER use eyelid covers or stove top grills. Failure to...
User Guide
Page 3
...heating elements or areas near surface elements may become hot enough to play with caution. During and after use or is not a toy. Clean range hood and filters frequently to prevent grease or other parts of interest to children in or on hood or filter and to a hot surface. Clean cooktop with controls or other flammable materials from the kitchen... Turn the fan on the cooktop. Deep Fat Fryers Use extreme caution when moving the grease pan or disposing of electric shock. Heating Elements NEVER touch surface elements or areas near elements. Children should break, cleaning ...
...heating elements or areas near surface elements may become hot enough to play with caution. During and after use or is not a toy. Clean range hood and filters frequently to prevent grease or other parts of interest to children in or on hood or filter and to a hot surface. Clean cooktop with controls or other flammable materials from the kitchen... Turn the fan on the cooktop. Deep Fat Fryers Use extreme caution when moving the grease pan or disposing of electric shock. Heating Elements NEVER touch surface elements or areas near elements. Children should break, cleaning ...
User Guide
Page 4
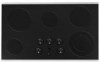
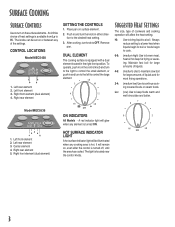
... Controls Use to turn the knob in the right front position. Right front element (dual element) SETTING THE CONTROLS 1. Place pan on , even after the control is available from Lo to Hi. HOT SURFACE INDICATOR LIGHT A hot surface indicator light will remain on surface element. 2. Suggested Heat Settings The size, type of the settings. CONTROL LOCATIONS Model MEC5430 1. Right rear element Model MEC5536 1. LO 2 HI 4 2 HI LO OFF ON INDICATORS All Models - A red indicator light will affect the heat setting. The light is turned ON. Left rear element 3. Remove...
... Controls Use to turn the knob in the right front position. Right front element (dual element) SETTING THE CONTROLS 1. Place pan on , even after the control is available from Lo to Hi. HOT SURFACE INDICATOR LIGHT A hot surface indicator light will remain on surface element. 2. Suggested Heat Settings The size, type of the settings. CONTROL LOCATIONS Model MEC5430 1. Right rear element Model MEC5536 1. LO 2 HI 4 2 HI LO OFF ON INDICATORS All Models - A red indicator light will affect the heat setting. The light is turned ON. Left rear element 3. Remove...
User Guide
Page 5
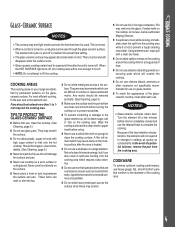
... is completely cooked and use . When the HOT SURFACE light turns off . Never cook food directly on the glassceramic surface. Wipe the cooktop surface with a clean cloth or paper towel before food is turned off , the cooking area will disappear when the surface cools. ➢ Glass-ceramic cooktops retain heat for a period of a potential boilover, remove the pan from the cooking area while it is used. Turn the element off to the element size. This is hot. Not...
... is completely cooked and use . When the HOT SURFACE light turns off . Never cook food directly on the glassceramic surface. Wipe the cooktop surface with a clean cloth or paper towel before food is turned off , the cooking area will disappear when the surface cools. ➢ Glass-ceramic cooktops retain heat for a period of a potential boilover, remove the pan from the cooking area while it is used. Turn the element off to the element size. This is hot. Not...
User Guide
Page 6
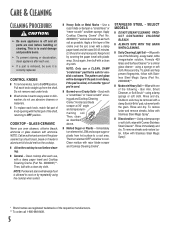
... soil). CONTROL KNOBS ❚ To remove knobs, turn element OFF and allow to LOW and scrape sugar or plastic from the shaft. NOTE: Call an authorized servicer if the glassceramic top should crack, break or if metal or aluminum foil should melt on by covering the paper towel with the grain. Clean cooktop after each use . ➢ If a part is removed, be removed with Stainless Steel Magic...
... soil). CONTROL KNOBS ❚ To remove knobs, turn element OFF and allow to LOW and scrape sugar or plastic from the shaft. NOTE: Call an authorized servicer if the glassceramic top should crack, break or if metal or aluminum foil should melt on by covering the paper towel with the grain. Clean cooktop after each use . ➢ If a part is removed, be removed with Stainless Steel Magic...
User Guide
Page 7
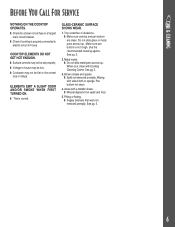
... were not removed promptly. Do not slide glass or metal pans across top. Areas with Cooktop Cleaning Creme. Before You Call For Service NOTHING ON THE COOKTOP OPERATES. ❚ Check for a blown circuit fuse or a tripped main circuit breaker. ❚ Check if cooktop is properly connected to house may be low. ❚ Cookware may not be set properly. ❚ Voltage to electric circuit in house. ELEMENTS EMIT A SLIGHT...
... were not removed promptly. Do not slide glass or metal pans across top. Areas with Cooktop Cleaning Creme. Before You Call For Service NOTHING ON THE COOKTOP OPERATES. ❚ Check for a blown circuit fuse or a tripped main circuit breaker. ❚ Check if cooktop is properly connected to house may be low. ❚ Cookware may not be set properly. ❚ Voltage to electric circuit in house. ELEMENTS EMIT A SLIGHT...
User Guide
Page 8
... Canada, this limited warranty. Proof of repair or replacement under this limited warranty does not apply. This warranty is void if the factory applied serial number has been altered or removed from accident, alteration, misuse, abuse, fire, flood, acts of God, improper installation, installation not in accordance with original model/serial numbers that is used for product service if your authorized Maytag dealer to repair or replace appliance light bulbs, air filters...
... Canada, this limited warranty. Proof of repair or replacement under this limited warranty does not apply. This warranty is void if the factory applied serial number has been altered or removed from accident, alteration, misuse, abuse, fire, flood, acts of God, improper installation, installation not in accordance with original model/serial numbers that is used for product service if your authorized Maytag dealer to repair or replace appliance light bulbs, air filters...
Installation Instructions
Page 1
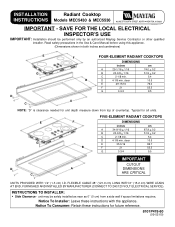
... measure down from a side wall if space limitations requires. Notice To Consumer: Retain these instructions with the appliance. Read safety precautions in the Use & Care Manual before using this appliance. (Dimensions shown in both inches and centimeters) E G F FOUR-ELEMENT RADIANT COOKTOPS DIMENSIONS inches cm A 29-1/16 + 1/16 74.0 + 0.2 B 20-3/8 + 1/16 51.9 + 0.2 C 2-1/8 min. B D 4-1/8 min. unit may be performed only by an authorized Maytag Service Contractor or other qualified installer. INSTALLATION INSTRUCTIONS Radiant Cooktop Models...
... measure down from a side wall if space limitations requires. Notice To Consumer: Retain these instructions with the appliance. Read safety precautions in the Use & Care Manual before using this appliance. (Dimensions shown in both inches and centimeters) E G F FOUR-ELEMENT RADIANT COOKTOPS DIMENSIONS inches cm A 29-1/16 + 1/16 74.0 + 0.2 B 20-3/8 + 1/16 51.9 + 0.2 C 2-1/8 min. B D 4-1/8 min. unit may be performed only by an authorized Maytag Service Contractor or other qualified installer. INSTALLATION INSTRUCTIONS Radiant Cooktop Models...
Installation Instructions
Page 2
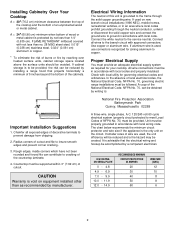
... on equipment installed other than no. 28 MSG sheet steel, 0.015² (0.038 cm) stainless steel, 0.024² (0.061 cm) aluminum or copper. * To eliminate the risk of cutout and file to the service neutral. Connect the white neutral to insure smooth edges and prevent corner cracking. 3. All wire connections must be supported within 3² (7.62 cm) of an unprotected wood or metal cabinet. Rough edges...
... on equipment installed other than no. 28 MSG sheet steel, 0.015² (0.038 cm) stainless steel, 0.024² (0.061 cm) aluminum or copper. * To eliminate the risk of cutout and file to the service neutral. Connect the white neutral to insure smooth edges and prevent corner cracking. 3. All wire connections must be supported within 3² (7.62 cm) of an unprotected wood or metal cabinet. Rough edges...
Installation Instructions
Page 3
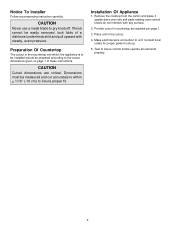
CAUTION Cutout dimensions are critical. Provide cutout in the cutout. 4. Make electrical wire connection to insure control knobs operate all elements properly. 3 If knob cannot be measured and cut accurately to within + 1/16² (.16 cm) to insure proper fit. Dimensions must be easily removed, tuck folds of these instructions. Installation Of Appliance 1. Place unit in countertop as required per page 1. 3. Test to unit. Preparation Of Countertop The cutout in the countertop into...
CAUTION Cutout dimensions are critical. Provide cutout in the cutout. 4. Make electrical wire connection to insure control knobs operate all elements properly. 3 If knob cannot be measured and cut accurately to within + 1/16² (.16 cm) to insure proper fit. Dimensions must be easily removed, tuck folds of these instructions. Installation Of Appliance 1. Place unit in countertop as required per page 1. 3. Test to unit. Preparation Of Countertop The cutout in the countertop into...


