
User Guide
Page 1
... Serial Number Date of Purchase In our continuing effort to the appliance without revising this appliance. m a y t a g . TTY for future reference. ELECTRIC COOKTOPS ® Installer: Please leave this manual with this guide. c o m © 2006 Maytag Appliances Sales Co. Keep sales receipt and/or cancelled check as proof of our cooking products, it may be necessary...
... Serial Number Date of Purchase In our continuing effort to the appliance without revising this appliance. m a y t a g . TTY for future reference. ELECTRIC COOKTOPS ® Installer: Please leave this manual with this guide. c o m © 2006 Maytag Appliances Sales Co. Keep sales receipt and/or cancelled check as proof of our cooking products, it may be necessary...
User Guide
Page 2
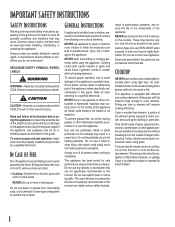
...EXPLOSIVE when exposed to heat and may result in a steam burn. Cooktop NEVER leave surface units unattended especially when using the appliance. This reduces the risk of burns, ignition of flammable materials, or spillage if pan is installed near surface units or in the vicinity of this appliance as a.... Always contact your dealer, distributor, service agent, or manufacturer about problems or conditions you do not understand. In Case of fire, electric shock, personal injury or damage to smother fire or flame. Hazards or unsafe practices which COULD result in this manual.
...EXPLOSIVE when exposed to heat and may result in a steam burn. Cooktop NEVER leave surface units unattended especially when using the appliance. This reduces the risk of burns, ignition of flammable materials, or spillage if pan is installed near surface units or in the vicinity of this appliance as a.... Always contact your dealer, distributor, service agent, or manufacturer about problems or conditions you do not understand. In Case of fire, electric shock, personal injury or damage to smother fire or flame. Hazards or unsafe practices which COULD result in this manual.
User Guide
Page 8
...installation instructions. 11. The cost of consumables or cleaning products not approved by this major appliance is operated and maintained according to instructions attached to or furnished with electrical...alteration, misuse, abuse, fire, flood, acts of God, improper installation, installation not in accordance with the product, Maytag brand of your major appliance, unless such damage results from defects ...shall be repaired in the home and only in which it is reported to Maytag within 30 days from warranty coverage. 3. ITEMS EXCLUDED FROM WARRANTY This limited warranty does ...
...installation instructions. 11. The cost of consumables or cleaning products not approved by this major appliance is operated and maintained according to instructions attached to or furnished with electrical...alteration, misuse, abuse, fire, flood, acts of God, improper installation, installation not in accordance with the product, Maytag brand of your major appliance, unless such damage results from defects ...shall be repaired in the home and only in which it is reported to Maytag within 30 days from warranty coverage. 3. ITEMS EXCLUDED FROM WARRANTY This limited warranty does ...
Installation Instructions
Page 1
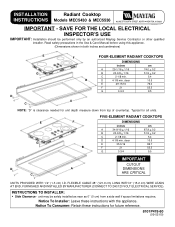
..., IA 50208 IMPORTANT - B D 4-1/8 min. EE G A F F G B B FIVE-ELEMENT RADIANT COOKTOPS DIMENSIONS inches cm A 34-9/16 + 1/16 87.9 + 0.2 B 20-3/8 + 1/16 51.9 + 0.2 C 2-1/8 min. 5.4 D 4-1/8 min. unit may be performed only by an authorized Maytag Service Contractor or other qualified installer. SAVE FOR THE LOCAL ELECTRICAL INSPECTOR'S USE IMPORTANT: Installation should be safely installed as near as 0² (0 cm) from top of...
..., IA 50208 IMPORTANT - B D 4-1/8 min. EE G A F F G B B FIVE-ELEMENT RADIANT COOKTOPS DIMENSIONS inches cm A 34-9/16 + 1/16 87.9 + 0.2 B 20-3/8 + 1/16 51.9 + 0.2 C 2-1/8 min. 5.4 D 4-1/8 min. unit may be performed only by an authorized Maytag Service Contractor or other qualified installer. SAVE FOR THE LOCAL ELECTRICAL INSPECTOR'S USE IMPORTANT: Installation should be safely installed as near as 0² (0 cm) from top of...
Installation Instructions
Page 2
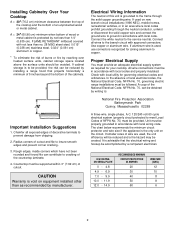
Installing Cabinetry Over Your Cooktop A = 30² (76.2 cm) minimum clearance between the top of the cooktop and the bottom of the cabinets. If cabinet storage is to be provided, the risk can be reduced by installing a range hood that the electrical wiring and hookup be in accordance with local utility for governing electrical...solid copper grounding wire. If used , use connectors recognized for your cooktop. Use copper or aluminum wire. If aluminum wire is advisable that projects horizontally a minimum of 5 inches beyond the bottom of an unprotected wood or metal cabinet. It is...
Installing Cabinetry Over Your Cooktop A = 30² (76.2 cm) minimum clearance between the top of the cooktop and the bottom of the cabinets. If cabinet storage is to be provided, the risk can be reduced by installing a range hood that the electrical wiring and hookup be in accordance with local utility for governing electrical...solid copper grounding wire. If used , use connectors recognized for your cooktop. Use copper or aluminum wire. If aluminum wire is advisable that projects horizontally a minimum of 5 inches beyond the bottom of an unprotected wood or metal cabinet. It is...
Installation Instructions
Page 3
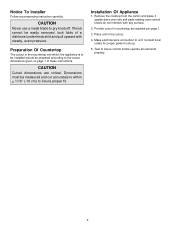
... in the cutout. 4. Place unit in countertop as required per page 1. 3. If knob cannot be easily removed, tuck folds of these instructions. Installation Of Appliance 1. Make electrical wire connection to pry knob off. Preparation Of Countertop The cutout in the countertop into which the appliance is to be... installed should be measured and cut accurately to within + 1/16² (.16 cm) to the cutout dimensions given on page 1 of a dishtowel under knob skirt and pull upward with any surface. 2. Remove the cooktop from the carton and place it upside ...
... in the cutout. 4. Place unit in countertop as required per page 1. 3. If knob cannot be easily removed, tuck folds of these instructions. Installation Of Appliance 1. Make electrical wire connection to pry knob off. Preparation Of Countertop The cutout in the countertop into which the appliance is to be... installed should be measured and cut accurately to within + 1/16² (.16 cm) to the cutout dimensions given on page 1 of a dishtowel under knob skirt and pull upward with any surface. 2. Remove the cooktop from the carton and place it upside ...
