Installation Instructions
Page 5
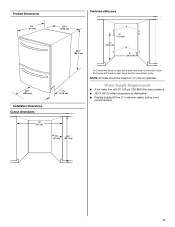
... connection route. NOTE: All holes should be drilled at dishwasher. ■ Flexible braided fill line (½" minimum plastic tubing is not recommended). 5 Choose left -hand or right-hand drain and water connection route. Product Dimensions 24" (61 cm) Preferred utility area 23³⁄₈...) 25" (63.5 cm) B 8" (20.3 cm) 19¹⁄₄" (48.9 cm) 1¹⁄₂" (3.75 cm) Installation Clearances Cutout dimensions 24" (61 cm) 24" (61 cm) 33⁷⁄₈" (85,7 cm) A. B. Water Supply Requirements ■ A hot water line with 20-120 psi (138-862 kPa)...
... connection route. NOTE: All holes should be drilled at dishwasher. ■ Flexible braided fill line (½" minimum plastic tubing is not recommended). 5 Choose left -hand or right-hand drain and water connection route. Product Dimensions 24" (61 cm) Preferred utility area 23³⁄₈...) 25" (63.5 cm) B 8" (20.3 cm) 19¹⁄₄" (48.9 cm) 1¹⁄₂" (3.75 cm) Installation Clearances Cutout dimensions 24" (61 cm) 24" (61 cm) 33⁷⁄₈" (85,7 cm) A. B. Water Supply Requirements ■ A hot water line with 20-120 psi (138-862 kPa)...
Installation Instructions
Page 7
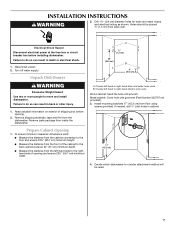
...the distance from the front of the cabinet to the back wall and ensure 24" (61 cm) minimum depth. ■ Measure the distance from the left-hand side to move and install dishwasher. Wood cabinet: Sand the hole until smooth. Electrical Shock Hazard Disconnect electrical ...23½" (59.7 cm) minimum width. Unpack Dish Drawer WARNING Excessive Weight Hazard Use two or more people to the righthand side of shipping box before installing dishwasher. Read valuable information on exterior of opening . 2. Decide which dishwasher-to-counter attachment method will be placed ½" (1.3...
...the distance from the front of the cabinet to the back wall and ensure 24" (61 cm) minimum depth. ■ Measure the distance from the left-hand side to move and install dishwasher. Wood cabinet: Sand the hole until smooth. Electrical Shock Hazard Disconnect electrical ...23½" (59.7 cm) minimum width. Unpack Dish Drawer WARNING Excessive Weight Hazard Use two or more people to the righthand side of shipping box before installing dishwasher. Read valuable information on exterior of opening . 2. Decide which dishwasher-to-counter attachment method will be placed ½" (1.3...
Installation Instructions
Page 14
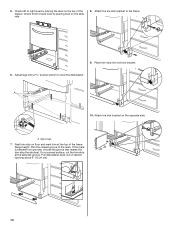
... the slide rails. 8. A. Pick the closest groove to the frame. 9. Check left to level the dishwasher. Adjust legs. 7. On a covered surface, cut the trim strip at the top of cabinet opening about 6" (15.24 cm). 2 1 3 1 14 Pull dishwasher back out of the frame flange height. Place trim strip into toe kick bracket. 6. A 10... groove. Attach the toe kick bracket to the mark. Adjust legs with a socket wrench to right level by placing level on the top of the drawer.
... the slide rails. 8. A. Pick the closest groove to the frame. 9. Check left to level the dishwasher. Adjust legs. 7. On a covered surface, cut the trim strip at the top of cabinet opening about 6" (15.24 cm). 2 1 3 1 14 Pull dishwasher back out of the frame flange height. Place trim strip into toe kick bracket. 6. A 10... groove. Attach the toe kick bracket to the mark. Adjust legs with a socket wrench to right level by placing level on the top of the drawer.
