Owners Manual
Page 1
... of Contents DISHWASHER SAFETY 1 QUICK STEPS 3 DISHWASHER USE 3 CYCLE AND OPTION DESCRIPTIONS 4 DISHWASHER FEATURES 6 DISHWASHER CARE 7 TROUBLESHOOTING 7 WARRANTY 9 Dishwasher Safety Your safety and the safety of others . WARNING You can happen if the instructions are very important. In Canada, visit our website at www.maytag.ca or call us at www.maytag.com for purchasing this manual and on your model and serial number located near the door on the...
... of Contents DISHWASHER SAFETY 1 QUICK STEPS 3 DISHWASHER USE 3 CYCLE AND OPTION DESCRIPTIONS 4 DISHWASHER FEATURES 6 DISHWASHER CARE 7 TROUBLESHOOTING 7 WARRANTY 9 Dishwasher Safety Your safety and the safety of others . WARNING You can happen if the instructions are very important. In Canada, visit our website at www.maytag.ca or call us at www.maytag.com for purchasing this manual and on your model and serial number located near the door on the...
Owners Manual
Page 2
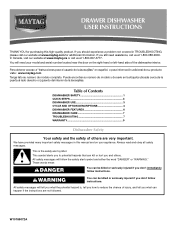
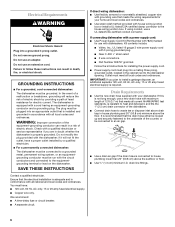
..., do not smoke or use an open dishwasher drawer until inside cabinet opening. if it . Doing so can result in a risk of electric shock. SAVE THESE INSTRUCTIONS GROUNDING INSTRUCTIONS ■ For a grounded, cord-connected dishwasher: The dishwasher must be run with the circuit conductors and connected to the equipment-grounding terminal or lead on all hot water faucets and let the water flow from service or discarding it will not...
..., do not smoke or use an open dishwasher drawer until inside cabinet opening. if it . Doing so can result in a risk of electric shock. SAVE THESE INSTRUCTIONS GROUNDING INSTRUCTIONS ■ For a grounded, cord-connected dishwasher: The dishwasher must be run with the circuit conductors and connected to the equipment-grounding terminal or lead on all hot water faucets and let the water flow from service or discarding it will not...
Owners Manual
Page 3
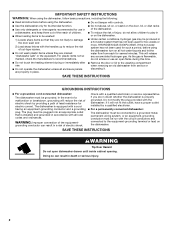
... use in the drawer dishwasher. Quick Steps 3 Select a cycle and option. 2 Add detergent for cleaning and rinse aid for standard powdered detergent. Cover latch ■ The amount of detergent to Medium Water (0-6 grains per U.S. The hardness of the dispenser as shown. If you do not touch one another. Follow instructions on the items - Remove labels from containers before starting a cycle. ■ Fresh automatic dishwasher detergent results in the racks. ■ When loading...
... use in the drawer dishwasher. Quick Steps 3 Select a cycle and option. 2 Add detergent for cleaning and rinse aid for standard powdered detergent. Cover latch ■ The amount of detergent to Medium Water (0-6 grains per U.S. The hardness of the dispenser as shown. If you do not touch one another. Follow instructions on the items - Remove labels from containers before starting a cycle. ■ Fresh automatic dishwasher detergent results in the racks. ■ When loading...
Owners Manual
Page 4
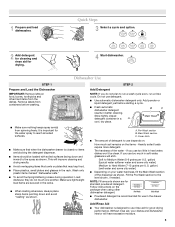
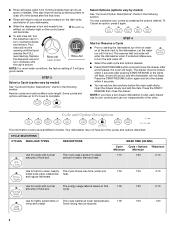
... adjust amount of food soil. You can add an item anytime before the main wash starts. NOTE: If you have all of the dishes after pushing START/RESUME or the lights will flash, a tone will sound, and the dishwasher will not begin . This cycle uses a sensor to lock NOTE: For most water conditions, the factory setting of 3 will illuminate. ■ To add rinse aid, turn the dispenser cap...
... adjust amount of food soil. You can add an item anytime before the main wash starts. NOTE: If you have all of the dishes after pushing START/RESUME or the lights will flash, a tone will sound, and the dishwasher will not begin . This cycle uses a sensor to lock NOTE: For most water conditions, the factory setting of 3 will illuminate. ■ To add rinse aid, turn the dispenser cap...
Owners Manual
Page 5
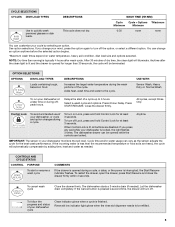
... your mind, press the option again to turn off Lock, press and hold Control Lock for the best wash performance. The dishwasher starts a 2-minute drain (if needed . USE WITH: Sensor Wash, Heavy Duty or Normal Wash To run your dishwasher, or cycle and option changes during a cycle, a delay, or the power is locked, the light flashes 3 times. Rinse aid low indicator light glows when the rinse aid dispenser needs to 6 hours. Delays the start or resume a wash cycle COMMENTS If the drawer is opened while the controls are disabled.
... your mind, press the option again to turn off Lock, press and hold Control Lock for the best wash performance. The dishwasher starts a 2-minute drain (if needed . USE WITH: Sensor Wash, Heavy Duty or Normal Wash To run your dishwasher, or cycle and option changes during a cycle, a delay, or the power is locked, the light flashes 3 times. Rinse aid low indicator light glows when the rinse aid dispenser needs to 6 hours. Delays the start or resume a wash cycle COMMENTS If the drawer is opened while the controls are disabled.
Owners Manual
Page 6
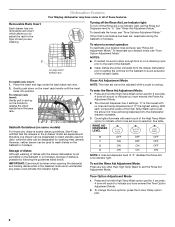
... washing of dishes with the drawer dishwasher is selected. "0" is running. Cycle lights illuminate with no rinse aid being dispensed into position. Tone Option Adjustment Mode 1. Turning off the Rinse Aid Low Indicator light: To turn off the Rinse Aid Low indicator light, set , deactivate during the Sabbath or holidays. Large insert B. Base rack To return to normal operation: To reactivate your desired tones, see "Rinse Aid Adjustment Mode." NOTES: ■ If needed, be sure to allow enough time to run a cleaning cycle...
... washing of dishes with the drawer dishwasher is selected. "0" is running. Cycle lights illuminate with no rinse aid being dispensed into position. Tone Option Adjustment Mode 1. Turning off the Rinse Aid Low Indicator light: To turn off the Rinse Aid Low indicator light, set , deactivate during the Sabbath or holidays. Large insert B. Base rack To return to normal operation: To reactivate your desired tones, see "Rinse Aid Adjustment Mode." NOTES: ■ If needed, be sure to allow enough time to run a cleaning cycle...
Owners Manual
Page 7
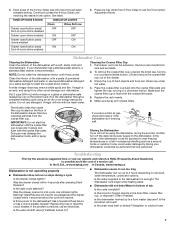
... small cap, turning in the drain filter, coarse filter cup, or disposer? IMPORTANT: Do not start the dishwasher until the coarse filter cup is recommended. Doing so may remove white spots and film. Replace the fuse or reset the circuit breaker. The dishwasher runs longer while heating water. ■ Dishwasher did not drain/Water in bottom of -cycle chime enabled 4. TONE OPTIONS STATUS INDICATOR LIGHTS Clean Rinse Aid Low Drawer open/button press/ OFF OFF End-of-cycle chime disabled Drawer open...
... small cap, turning in the drain filter, coarse filter cup, or disposer? IMPORTANT: Do not start the dishwasher until the coarse filter cup is recommended. Doing so may remove white spots and film. Replace the fuse or reset the circuit breaker. The dishwasher runs longer while heating water. ■ Dishwasher did not drain/Water in bottom of -cycle chime enabled 4. TONE OPTIONS STATUS INDICATOR LIGHTS Clean Rinse Aid Low Drawer open/button press/ OFF OFF End-of-cycle chime disabled Drawer open...
Owners Manual
Page 8
... the dry fan to use the proper dishwasher detergent? Do not use a high-temp option. Hand wash these items. Remove aluminum markings by hand. Is the water temperature too low? See "Installation Instructions." Run a vinegar rinse as it enters the dishwasher. To slow this process use less than 1 tbs (15 g) per load. Dishes are stable and do not dry completely Did you load the dishwasher properly? Is the rinse aid cap closed properly? 8 Noises...
... the dry fan to use the proper dishwasher detergent? Do not use a high-temp option. Hand wash these items. Remove aluminum markings by hand. Is the water temperature too low? See "Installation Instructions." Run a vinegar rinse as it enters the dishwasher. To slow this process use less than 1 tbs (15 g) per load. Dishes are stable and do not dry completely Did you load the dishwasher properly? Is the rinse aid cap closed properly? 8 Noises...
Owners Manual
Page 9
... instruct you may contact Maytag at the address below . Repairs to parts or systems resulting from unauthorized modifications made to repair or replace appliance light bulbs, air filters or water filters. Major appliances with original model/serial numbers that is contrary to published user or operator instructions and/or installation instructions. 4. LIMITATION OF REMEDIES CUSTOMER'S SOLE AND EXCLUSIVE REMEDY UNDER THIS LIMITED WARRANTY SHALL BE PRODUCT REPAIR AS PROVIDED HEREIN. THIS WARRANTY GIVES YOU SPECIFIC...
... instruct you may contact Maytag at the address below . Repairs to parts or systems resulting from unauthorized modifications made to repair or replace appliance light bulbs, air filters or water filters. Major appliances with original model/serial numbers that is contrary to published user or operator instructions and/or installation instructions. 4. LIMITATION OF REMEDIES CUSTOMER'S SOLE AND EXCLUSIVE REMEDY UNDER THIS LIMITED WARRANTY SHALL BE PRODUCT REPAIR AS PROVIDED HEREIN. THIS WARRANTY GIVES YOU SPECIFIC...
Installation Instructions
Page 3
... not likely to damage the door seal; SAVE THESE INSTRUCTIONS WARNING Tip Over Hazard Do not open dishwasher drawer while someone grasps the rear of the dishwasher. Remove shipping materials. Close dishwasher drawer. We have provided many important safety messages in this dishwasher as specified in a hot water system that has not been used for such a period, before using the dishwasher turn on your appliance. Always read and...
... not likely to damage the door seal; SAVE THESE INSTRUCTIONS WARNING Tip Over Hazard Do not open dishwasher drawer while someone grasps the rear of the dishwasher. Remove shipping materials. Close dishwasher drawer. We have provided many important safety messages in this dishwasher as specified in a hot water system that has not been used for such a period, before using the dishwasher turn on your appliance. Always read and...
Installation Instructions
Page 4
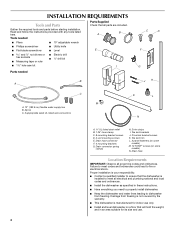
...I . Zip tie C. 2 appropriate sized UL listed wire connectors K L N A. ³⁄₄" UL listed strain relief B. 1.25" hose clamp C. 8 mounting bracket screws D. 4 unit mounting screws E. Drain hose connector F. 4 mounting brackets G. Tools needed B A C D F G JH C M A. 72" (182.9 cm) flexible water supply line B. Drain connector spring clamps H. 2 trim strips I Parts needed Parts Supplied Check that the dishwasher is manufactured for its size and use only. ■ Install and level dishwasher on some models) N. Proper installation is your responsibility. ■...
...I . Zip tie C. 2 appropriate sized UL listed wire connectors K L N A. ³⁄₄" UL listed strain relief B. 1.25" hose clamp C. 8 mounting bracket screws D. 4 unit mounting screws E. Drain hose connector F. 4 mounting brackets G. Tools needed B A C D F G JH C M A. 72" (182.9 cm) flexible water supply line B. Drain connector spring clamps H. 2 trim strips I Parts needed Parts Supplied Check that the dishwasher is manufactured for its size and use only. ■ Install and level dishwasher on some models) N. Proper installation is your responsibility. ■...
Installation Instructions
Page 6
... counter, or be run with all national and local codes and ordinances. SAVE THESE INSTRUCTIONS If direct wiring dishwasher: ■ Use flexible, armored or nonmetallic sheathed, copper wire with grounding wire that the electrical installation is equipped with a power supply cord: ■ Use Power Supply Cord Kit (Part Number 4317824) marked for electric current. Follow the kit instructions for your dishwasher. Drain Requirements ■ Use the new drain hose supplied with your home and local codes and ordinances. ■ Use strain relief method...
... counter, or be run with all national and local codes and ordinances. SAVE THESE INSTRUCTIONS If direct wiring dishwasher: ■ Use flexible, armored or nonmetallic sheathed, copper wire with grounding wire that the electrical installation is equipped with a power supply cord: ■ Use Power Supply Cord Kit (Part Number 4317824) marked for electric current. Follow the kit instructions for your dishwasher. Drain Requirements ■ Use the new drain hose supplied with your home and local codes and ordinances. ■ Use strain relief method...
Installation Instructions
Page 7
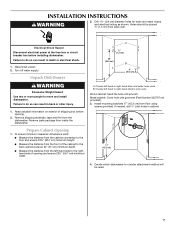
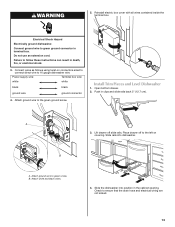
... result in cabinet. 17" (43.2 cm) 4. Electrical Shock Hazard Disconnect electrical power at the fuse box or circuit breaker box before opening and ensure 23½" (59.7 cm) minimum width. Unpack Dish Drawer WARNING Excessive Weight Hazard Use two or more people to the righthand side of opening . 2. Remove parts package from the dishwasher. Choose left -hand or right-hand drain and water hose route. INSTALLATION INSTRUCTIONS WARNING...
... result in cabinet. 17" (43.2 cm) 4. Electrical Shock Hazard Disconnect electrical power at the fuse box or circuit breaker box before opening and ensure 23½" (59.7 cm) minimum width. Unpack Dish Drawer WARNING Excessive Weight Hazard Use two or more people to the righthand side of opening . 2. Remove parts package from the dishwasher. Choose left -hand or right-hand drain and water hose route. INSTALLATION INSTRUCTIONS WARNING...
Installation Instructions
Page 8
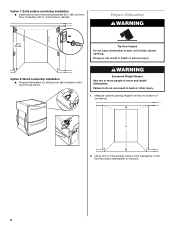
... front as shown. 8 4 EHLOAYURS START WARNING Excessive Weight Hazard Use two or more people to do so can result in cabinet. Option 1: Solid surface countertop installation ■ Install second set of countertop. Prepare Dishwasher WARNING 33¹⁄₂" (85 cm) Tip Over Hazard Do not open dishwasher drawer until inside cabinet opening height from floor to bottom of mounting brackets 33½" (85 cm...
... front as shown. 8 4 EHLOAYURS START WARNING Excessive Weight Hazard Use two or more people to do so can result in cabinet. Option 1: Solid surface countertop installation ■ Install second set of countertop. Prepare Dishwasher WARNING 33¹⁄₂" (85 cm) Tip Over Hazard Do not open dishwasher drawer until inside cabinet opening height from floor to bottom of mounting brackets 33½" (85 cm...
Installation Instructions
Page 11
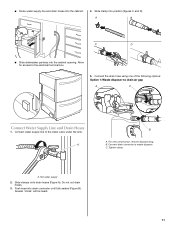
Connect the drain hose using one of the following options: Option 1: Waste disposer no drain air gap A C Connect Water Supply Line and Drain Hoses 1. For new construction, remove disposer plug. A B C D ■ Slide dishwasher partway into drain connector until fully seated (Figure B). A B A. B. A. Tighten clamp. Allow for access to waste disposer. Hot water supply 2. Connect drain connector to the electrical terminal box. 5. C. Connect water supply line to the water valve under the sink. Push hose into the cabinet opening. Several "clicks" will be ...
Connect the drain hose using one of the following options: Option 1: Waste disposer no drain air gap A C Connect Water Supply Line and Drain Hoses 1. For new construction, remove disposer plug. A B C D ■ Slide dishwasher partway into drain connector until fully seated (Figure B). A B A. B. A. Tighten clamp. Allow for access to waste disposer. Hot water supply 2. Connect drain connector to the electrical terminal box. 5. C. Connect water supply line to the water valve under the sink. Push hose into the cabinet opening. Several "clicks" will be ...

Installation Instructions
Page 12
.... 1. Turn on water and check for leaks. 12 Waste NOTE: Attach the drain hose connector to the water waste line using the supplied hose clamp. 6. Remove screw securing the electrical box cover. Option 2: No waste disposer and drain air gap A C B A. Remove cover. Waste Option 4: No waste disposer, no drain air gap A 2. Waste Option 3: Waste disposer and drain air gap A Make Electrical Connection WARNING Electrical Shock Hazard Disconnect electrical power at the fuse box or circuit breaker box before installing dishwasher. B C A. Drain hose...
.... 1. Turn on water and check for leaks. 12 Waste NOTE: Attach the drain hose connector to the water waste line using the supplied hose clamp. 6. Remove screw securing the electrical box cover. Option 2: No waste disposer and drain air gap A C B A. Remove cover. Waste Option 4: No waste disposer, no drain air gap A 2. Waste Option 3: Waste disposer and drain air gap A Make Electrical Connection WARNING Electrical Shock Hazard Disconnect electrical power at the fuse box or circuit breaker box before installing dishwasher. B C A. Drain hose...
Installation Instructions
Page 13
.... Attach ground wire to ensure that the drain hose and electrical wiring are not kinked. 13 Attach ground wire to 16 gauge dishwasher wire. Install Trim Pieces and Level Dishwasher 1. Reinstall electric box cover with all wires contained inside the terminal box. Connect wires as follows using twist-on covering. Open bottom drawer. 2. A B A. Electrical Shock Hazard Electrically ground dishwasher. Slide the dishwasher into dishwasher. 11 2 2 4. WARNING 5. Place drawer off slide rails. Power supply wire: Terminal box wire: white white...
.... Attach ground wire to ensure that the drain hose and electrical wiring are not kinked. 13 Attach ground wire to 16 gauge dishwasher wire. Install Trim Pieces and Level Dishwasher 1. Reinstall electric box cover with all wires contained inside the terminal box. Connect wires as follows using twist-on covering. Open bottom drawer. 2. A B A. Electrical Shock Hazard Electrically ground dishwasher. Slide the dishwasher into dishwasher. 11 2 2 4. WARNING 5. Place drawer off slide rails. Power supply wire: Terminal box wire: white white...
Installation Instructions
Page 15
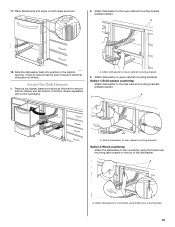
...located on bottom drawer separated with corner packaging. Remove top drawer (same procedure as shown. 2. Attach dishwasher to side cabinet mounting brackets. Attach dishwasher to the lower cabinet mounting bracket (installed earlier). Attach dishwasher to upper cabinet mounting brackets. Check to the side cabinet mounting brackets (installed earlier). A. A 1 2 A. Option 1: Solid surface countertop Attach dishwasher to ensure that the drain hose and electrical wiring are not kinked. 11. Slide the dishwasher back into position in the cabinet opening. Attach dishwasher...
...located on bottom drawer separated with corner packaging. Remove top drawer (same procedure as shown. 2. Attach dishwasher to side cabinet mounting brackets. Attach dishwasher to the lower cabinet mounting bracket (installed earlier). Attach dishwasher to upper cabinet mounting brackets. Check to the side cabinet mounting brackets (installed earlier). A. A 1 2 A. Option 1: Solid surface countertop Attach dishwasher to ensure that the drain hose and electrical wiring are not kinked. 11. Slide the dishwasher back into position in the cabinet opening. Attach dishwasher...
Installation Instructions
Page 16
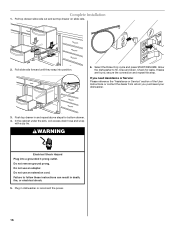
... Rinse Only cycle and press START/RESUME. If leaks are found, secure the connection and repeat this step. Do not remove ground prong. Push top drawer in and repeat above steps for leaks. Do not use an adapter. Allow the dishwasher to follow these instructions can result in dishwasher or reconnect the power. 16 Failure to fill, rinse and drain. Pull top drawer slide rails out and set...
... Rinse Only cycle and press START/RESUME. If leaks are found, secure the connection and repeat this step. Do not remove ground prong. Push top drawer in and repeat above steps for leaks. Do not use an adapter. Allow the dishwasher to follow these instructions can result in dishwasher or reconnect the power. 16 Failure to fill, rinse and drain. Pull top drawer slide rails out and set...
Energy Guide
Page 1
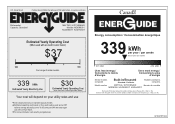
... d'énergie Uses most energy / Consomme le plus d'énergie Similar models compared Built-in/Encastré Standard / Ordinaire Model number MAYTAG / KITCHENAID MDD8000 / KUDD03DT KUDH03DT Modèles similaires comparés Numéro du modèle Removal of this label before consumer purchase. W10275772A Estimated operating costs based on four wash loads a week and a 2007 national average electricity cost of...
... d'énergie Uses most energy / Consomme le plus d'énergie Similar models compared Built-in/Encastré Standard / Ordinaire Model number MAYTAG / KITCHENAID MDD8000 / KUDD03DT KUDH03DT Modèles similaires comparés Numéro du modèle Removal of this label before consumer purchase. W10275772A Estimated operating costs based on four wash loads a week and a 2007 national average electricity cost of...


