

Use and Care Guide
Page 2
1. Connect to a properly rated, protected and sized power supply circuit to the installation instructions for proper grounding procedures. 5. Do not touch the heating element on the bottom of the tub during this process. 12. Common sense, caution and care must be attached before attempting to the washing compartment when removing an old dishwasher from each for two weeks or more. Never use an open flame during...
1. Connect to a properly rated, protected and sized power supply circuit to the installation instructions for proper grounding procedures. 5. Do not touch the heating element on the bottom of the tub during this process. 12. Common sense, caution and care must be attached before attempting to the washing compartment when removing an old dishwasher from each for two weeks or more. Never use an open flame during...
Use and Care Guide
Page 3
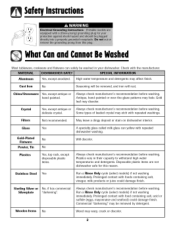
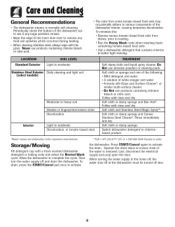
...Run a Rinse Only cycle (select models) if not washing immediately. Run a Rinse Only cycle (select models) if not washing immediately. Prolonged contact with food containing salt, acid or sulfide (eggs, mayonnaise and seafood) could damage finish. Stainless Steel Yes Sterling Silver or No, if has commercial Silverplate "darkening". Prolonged contact with repeated washings...be removed by detergent. Cast Iron No Seasoning will be washed in their capacity to withstand high water temperatures and detergents. May leave a dingy deposit or stain on dishwasher interior. ...
...Run a Rinse Only cycle (select models) if not washing immediately. Run a Rinse Only cycle (select models) if not washing immediately. Prolonged contact with food containing salt, acid or sulfide (eggs, mayonnaise and seafood) could damage finish. Stainless Steel Yes Sterling Silver or No, if has commercial Silverplate "darkening". Prolonged contact with repeated washings...be removed by detergent. Cast Iron No Seasoning will be washed in their capacity to withstand high water temperatures and detergents. May leave a dingy deposit or stain on dishwasher interior. ...
Use and Care Guide
Page 4
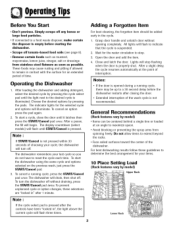
... connected to a 30 second delay before starting the dishwasher, • Scrape off . After loading the dishwasher and adding detergent, select the desired cycle by model) • Items can be centered behind a single tine or loaded at the point of choosing your cycle, the dishwasher will drain, then shut off without opening completely. To start the dishwasher using the same cycle and options selected on the previous wash, just press the START/Cancel...
... connected to a 30 second delay before starting the dishwasher, • Scrape off . After loading the dishwasher and adding detergent, select the desired cycle by model) • Items can be centered behind a single tine or loaded at the point of choosing your cycle, the dishwasher will drain, then shut off without opening completely. To start the dishwasher using the same cycle and options selected on the previous wash, just press the START/Cancel...
Use and Care Guide
Page 5
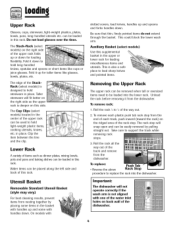
... dishwasher. can be loaded in the upper or lower rack for taller items like cups or juice glasses. Fold it from the end of the StackRack (select models) is also a safe place to load sharp knives and pointed items. Removing the Upper Rack The upper rack can be loaded in place. The Cup Clips (select models) located in place. This could block the lower wash arm. Take care to replace the rack...
... dishwasher. can be loaded in the upper or lower rack for taller items like cups or juice glasses. Fold it from the end of the StackRack (select models) is also a safe place to load sharp knives and pointed items. Removing the Upper Rack The upper rack can be loaded in place. The Cup Clips (select models) located in place. This could block the lower wash arm. Take care to replace the rack...
Use and Care Guide
Page 6
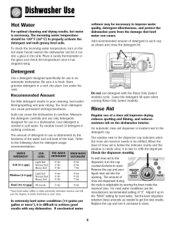
.... Replace the cap and turn the cap counterclockwise to achieve good results with the Rinse Only (select models) cycle. Measure the detergent carefully and use only detergents designed for use in an automatic dishwasher. The amount of the load. Detergent Use a detergent designed specifically for use in a dishwasher. In extremely hard water conditions (13 grains per gallon or more*), it is adjustable by the hardness of the water and soil level of rinse aid dispensed during the cycle...
.... Replace the cap and turn the cap counterclockwise to achieve good results with the Rinse Only (select models) cycle. Measure the detergent carefully and use only detergents designed for use in an automatic dishwasher. The amount of the load. Detergent Use a detergent designed specifically for use in a dishwasher. In extremely hard water conditions (13 grains per gallon or more*), it is adjustable by the hardness of the water and soil level of rinse aid dispensed during the cycle...
Use and Care Guide
Page 7
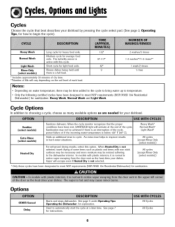
...° F (49° C). Heavy Wash* Normal Wash* Light Wash* Extra Rinse [select models) Heated Dry Adds an additional rinse to improve results in hard water situations. Used to automatically start the cycle at the end of some items such as are needed for light food soils. Options START/Cancel Delay Starts and stops dishwasher. The turbidity sensor is a full load. 132" 97-117" 82* 9 2 washes/3 rinses 1-2 washes**/1-2 rinses** 1 wash/2 rinses 1 rinse Includes approximately 30 minutes of dry time. **Number of fills will activate at...
...° F (49° C). Heavy Wash* Normal Wash* Light Wash* Extra Rinse [select models) Heated Dry Adds an additional rinse to improve results in hard water situations. Used to automatically start the cycle at the end of some items such as are needed for light food soils. Options START/Cancel Delay Starts and stops dishwasher. The turbidity sensor is a full load. 132" 97-117" 82* 9 2 washes/3 rinses 1-2 washes**/1-2 rinses** 1 wash/2 rinses 1 rinse Includes approximately 30 minutes of dry time. **Number of fills will activate at...

Use and Care Guide
Page 8
... the cycle is interrupted, power failure occurs or incoming water temperature is selected. 3. The Delay indicator and the count down . The SANITIZED light will flash until the door has been open for 30 seconds continuously. This option is pressed. /4. Illuminates during all rinse, wash and dry portions of the cycle and remains lit until the START/Cancel pad is also useful for the load. As soon as the delay time...
... the cycle is interrupted, power failure occurs or incoming water temperature is selected. 3. The Delay indicator and the count down . The SANITIZED light will flash until the door has been open for 30 seconds continuously. This option is pressed. /4. Illuminates during all rinse, wash and dry portions of the cycle and remains lit until the START/Cancel pad is also useful for the load. As soon as the delay time...
Use and Care Guide
Page 9
... drain. Press START/Cancel again to activate **Call 1-877-232-6771 U.S. Do Not use products containing chlorine bleach or citric acid. Switch dishwasher detergent to order. or 1-800-688-8408 Canada to chlorinebased product. *Brand names are trademarks of the water is normally self-cleaning. When turning the water supply to remove any food soil splashes which occurred during loading. • When cleaning stainless steel, always wipe with rinse and dry...
... drain. Press START/Cancel again to activate **Call 1-877-232-6771 U.S. Do Not use products containing chlorine bleach or citric acid. Switch dishwasher detergent to order. or 1-800-688-8408 Canada to chlorinebased product. *Brand names are trademarks of the water is normally self-cleaning. When turning the water supply to remove any food soil splashes which occurred during loading. • When cleaning stainless steel, always wipe with rinse and dry...
Use and Care Guide
Page 10
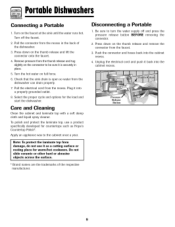
... the dishwasher can drain properly. 7. Note: To protect the laminate top from the faucet. 3. Unplug the electrical cord and push it as a cutting surface or resting place for countertops such as Hope's Countertop Polish*. PortablDe ishwashers Connecting a Portable 1. Press down on the thumb release and remove the connector from damage, do not use a product specifically developed for warm/hot cookware. Care and Cleaning Clean the cabinet...
... the dishwasher can drain properly. 7. Note: To protect the laminate top from the faucet. 3. Unplug the electrical cord and push it as a cutting surface or resting place for countertops such as Hope's Countertop Polish*. PortablDe ishwashers Connecting a Portable 1. Press down on the thumb release and remove the connector from damage, do not use a product specifically developed for warm/hot cookware. Care and Cleaning Clean the cabinet...
Use and Care Guide
Page 11
... removed from the dispenser, be heard as Jet-Dry Dishwasher Cleaner*. To avoid rinse aid leaking from the disposer inlet. • Check for about 10 minutes. Readjust load to circulate for food obstruction in the dishwasher through a Rinse Only cycle (selectmodels). This will not drain/ water in tub bottom • Press the START/Cancel pad to start the dishwasher. • Be sure door is latched securely. • Be sure the water is turned...
... removed from the dispenser, be heard as Jet-Dry Dishwasher Cleaner*. To avoid rinse aid leaking from the disposer inlet. • Check for about 10 minutes. Readjust load to circulate for food obstruction in the dishwasher through a Rinse Only cycle (selectmodels). This will not drain/ water in tub bottom • Press the START/Cancel pad to start the dishwasher. • Be sure door is latched securely. • Be sure the water is turned...
Use and Care Guide
Page 12
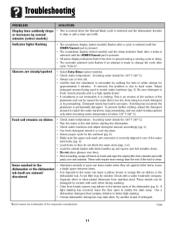
... starting the dishwasher. • Check water hardness and adjust detergent amount accordingly ([pg. 5_). • Use fresh detergent stored in a cool dry place. • Select proper cycle for the soil level ([pg. 6). • Make sure the upper rack wash arm connector is removable by soaking the item in white vinegar for approximately 5 minutes. To prevent further etching, adjust the detergent amount to match the water hardness, stop prewashing, and use a rinse aid...
... starting the dishwasher. • Check water hardness and adjust detergent amount accordingly ([pg. 5_). • Use fresh detergent stored in a cool dry place. • Select proper cycle for the soil level ([pg. 6). • Make sure the upper rack wash arm connector is removable by soaking the item in white vinegar for approximately 5 minutes. To prevent further etching, adjust the detergent amount to match the water hardness, stop prewashing, and use a rinse aid...
Use and Care Guide
Page 13
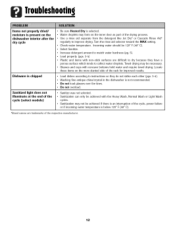
...; Washing fine antique china/crystal in the dishwasher is chipped • Load dishes according to collect water droplets. Sanitized light does not illuminate at the end of the rack for improved results. Turn the rinse aid selector toward the MAX setting. • Check water temperature. Towel drying may be achieved if there is an interruption of the cycle, power failure or if incoming water temperature is selected. • Water...
...; Washing fine antique china/crystal in the dishwasher is chipped • Load dishes according to collect water droplets. Sanitized light does not illuminate at the end of the rack for improved results. Turn the rinse aid selector toward the MAX setting. • Check water temperature. Towel drying may be achieved if there is an interruption of the cycle, power failure or if incoming water temperature is selected. • Water...
Use and Care Guide
Page 14
... are void if the original serial numbers have been removed, altered or cannot be readily determined. 3. Use & Care Guides, service manuals and parts information are available from any breach of the problem you not receive satisfactory warranty service, please call 1-800-688-2080. b. Name and address of the following : a. c. b. Improper installation, delivery, or maintenance. Misuse, abuse, accidents, or unreasonable use . 4. customers using TT¥ for commercial or...
... are void if the original serial numbers have been removed, altered or cannot be readily determined. 3. Use & Care Guides, service manuals and parts information are available from any breach of the problem you not receive satisfactory warranty service, please call 1-800-688-2080. b. Name and address of the following : a. c. b. Improper installation, delivery, or maintenance. Misuse, abuse, accidents, or unreasonable use . 4. customers using TT¥ for commercial or...
Installation Instructions
Page 1
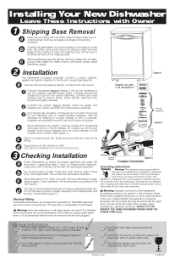
... same water line as the dishwasher. Printed in accor- The plug must be plugged into electrical outlet, (See Electrical Wiring and Ground Instructions.) Figure A J Aindaalpl teinr stanlolattiounssed [_ ] Aerator Assembly Figure B Checking installation Check Dishwasher as follows for proper operation and leaks, Set timer dial to "Light/China Wash ","Short ",or "Rinse & Hold "selection, Close door until it latches, This will staff the dishwasher operation, For microprocessor models: Close door until securty locked, place Dishwasher upright, Installation The dishwasher accessory...
... same water line as the dishwasher. Printed in accor- The plug must be plugged into electrical outlet, (See Electrical Wiring and Ground Instructions.) Figure A J Aindaalpl teinr stanlolattiounssed [_ ] Aerator Assembly Figure B Checking installation Check Dishwasher as follows for proper operation and leaks, Set timer dial to "Light/China Wash ","Short ",or "Rinse & Hold "selection, Close door until it latches, This will staff the dishwasher operation, For microprocessor models: Close door until securty locked, place Dishwasher upright, Installation The dishwasher accessory...


