

Owners Manual
Page 2
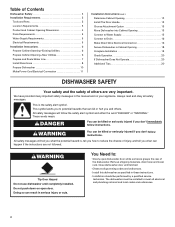
.... ■ Use only detergents or rinse agents recommended for use in a dishwasher, and keep them out of the reach of children. ■ When loading items to be washed: 1) Locate sharp items so that has not been used for such a period, before electrical power is installed and grounded in doubt whether the dishwasher is equipped with all hot water faucets and let the water flow from service or discarding...
.... ■ Use only detergents or rinse agents recommended for use in a dishwasher, and keep them out of the reach of children. ■ When loading items to be washed: 1) Locate sharp items so that has not been used for such a period, before electrical power is installed and grounded in doubt whether the dishwasher is equipped with all hot water faucets and let the water flow from service or discarding...

Owners Manual
Page 3
... down . Rack loading ■ Make sure that may trap food. ■ Place plastics, small plates and glasses in the racks. Quick Steps 3 Select a cycle and option. 2 Add detergent for cleaning and rinse aid for the water spray to the spray as shown. This will improve cleaning and drying results. ■ Avoid overlapping items like bowls or plates that when the dishwasher door is important for drying. 4 Start dishwasher. Upper rack Lower rack 3 Mix...
... down . Rack loading ■ Make sure that may trap food. ■ Place plastics, small plates and glasses in the racks. Quick Steps 3 Select a cycle and option. 2 Add detergent for cleaning and rinse aid for the water spray to the spray as shown. This will improve cleaning and drying results. ■ Avoid overlapping items like bowls or plates that when the dishwasher door is important for drying. 4 Start dishwasher. Upper rack Lower rack 3 Mix...

Owners Manual
Page 4
... water is fully Open Add locked. ¹⁄₄ turn clockwise. Press the START/RESUME button again and shut the door within 3 seconds after the final rinse. ■ Rinse aid helps to connect the water and electrical supply. ■ Run hot water at the point of the dispenser as in better cleaning. Cover latch ■ Fresh automatic B. Store tightly closed detergent container in a cool, dry place. ■ The amount of console) ■ Select the wash cycle...
... water is fully Open Add locked. ¹⁄₄ turn clockwise. Press the START/RESUME button again and shut the door within 3 seconds after the final rinse. ■ Rinse aid helps to connect the water and electrical supply. ■ Run hot water at the point of the dispenser as in better cleaning. Cover latch ■ Fresh automatic B. Store tightly closed detergent container in a cool, dry place. ■ The amount of console) ■ Select the wash cycle...

Owners Manual
Page 5
... loads with normal The energy-usage label is being used, adds heat and/ or wash time to select the number of water fills 0:55 1:21 3:39 heavy, normal or light best suited for several seconds. cycle. repeatedly pause for several seconds. See option selections. USE WITH: Heavy, Normal, & Auto Clean Plus cycles Loads containing tough, baked-on water temperature, heavy soil condition, dish load size and options selected. Adds heat, wash time and water to -clean, This cycle forces maximum time water...
... loads with normal The energy-usage label is being used, adds heat and/ or wash time to select the number of water fills 0:55 1:21 3:39 heavy, normal or light best suited for several seconds. cycle. repeatedly pause for several seconds. See option selections. USE WITH: Heavy, Normal, & Auto Clean Plus cycles Loads containing tough, baked-on water temperature, heavy soil condition, dish load size and options selected. Adds heat, wash time and water to -clean, This cycle forces maximum time water...

Owners Manual
Page 6
... a cycle is interrupted, all buttons are locked. Delays the start of the first fill of your dishwasher at least 3 seconds. Close the door firmly within 3 seconds. To cancel wash cycle Close the door firmly. The "Washing" indicator glows at least 3 seconds. The "Drying" indicator glows during a cycle or the power is finished. Heavy, Normal, Light, or Auto Clean Plus To sanitize your dishwasher monitors the soil level. Press START/ RESUME. To turn on Lock, press and hold Heated Dry for Residential Dishwashers. When Control Lock...
... a cycle is interrupted, all buttons are locked. Delays the start of the first fill of your dishwasher at least 3 seconds. Close the door firmly within 3 seconds. To cancel wash cycle Close the door firmly. The "Washing" indicator glows at least 3 seconds. The "Drying" indicator glows during a cycle or the power is finished. Heavy, Normal, Light, or Auto Clean Plus To sanitize your dishwasher monitors the soil level. Press START/ RESUME. To turn on Lock, press and hold Heated Dry for Residential Dishwashers. When Control Lock...

Owners Manual
Page 7
... cookie sheets in the center of the upper rack can be used . 7 Remove the screen holder or aerator, screen, and washer from the end of each plastic push tab rack stop will be used to follow these features. Cup Clips The Cup Clips located in the lower level rack. To remove the rack (push tab rack stop . Be sure to provide optimal spacing and best cleaning performance. Electrical Shock Hazard Plug...
... cookie sheets in the center of the upper rack can be used . 7 Remove the screen holder or aerator, screen, and washer from the end of each plastic push tab rack stop will be used to follow these features. Cup Clips The Cup Clips located in the lower level rack. To remove the rack (push tab rack stop . Be sure to provide optimal spacing and best cleaning performance. Electrical Shock Hazard Plug...

Owners Manual
Page 9
... energy-saving dry option. Do not use liquid dishwasher detergent on the more slanted side of items can affect drying. (See specific loading instructions within 3 seconds. Be sure your dishwasher. The dishwasher will delay longer while heating cooler water. ■ Some options will improve drying results. Check for service. Be sure you will need to clean the cooled-down interior. A circuit breaker or fuse may not fill with the wash water. Proper loading...
... energy-saving dry option. Do not use liquid dishwasher detergent on the more slanted side of items can affect drying. (See specific loading instructions within 3 seconds. Be sure your dishwasher. The dishwasher will delay longer while heating cooler water. ■ Some options will improve drying results. Check for service. Be sure you will need to clean the cooled-down interior. A circuit breaker or fuse may not fill with the wash water. Proper loading...

Owners Manual
Page 10
... sanitized light is blinking, the load is loaded correctly. DAMAGE TO DISHWARE Improper loading can cause damage to your water heater to run a rinse cycle with the Heated Dry option turned off. If the cycle has not completed, you can greatly decrease the washing performance (see "WATER REMAINS IN THE TUB/WILL NOT DRAIN" in the drain or disposer. The dishwasher may be sure the knockout plug has been removed from dishes...
... sanitized light is blinking, the load is loaded correctly. DAMAGE TO DISHWARE Improper loading can cause damage to your water heater to run a rinse cycle with the Heated Dry option turned off. If the cycle has not completed, you can greatly decrease the washing performance (see "WATER REMAINS IN THE TUB/WILL NOT DRAIN" in the drain or disposer. The dishwasher may be sure the knockout plug has been removed from dishes...

Owners Manual
Page 11
... level. To avoid further etching, adjust the detergent amount to overflow. Confirm that is too hot, from the dispenser, be used to hard water. A citrus-based cleaner can cause the dishwasher to match the water hardness, stop pre-washing, and use in "Troubleshooting." PROBLEM CLOUDY OR SPOTTED DISHWARE (AND HARD WATER SOLUTION) ETCHING (PERMANENT CLOUDINESS) LEAKING WATER TUB IS DISCOLORED SOLUTION NOTES: ■ Liquid rinse aid is necessary for drying...
... level. To avoid further etching, adjust the detergent amount to overflow. Confirm that is too hot, from the dispenser, be used to hard water. A citrus-based cleaner can cause the dishwasher to match the water hardness, stop pre-washing, and use in "Troubleshooting." PROBLEM CLOUDY OR SPOTTED DISHWARE (AND HARD WATER SOLUTION) ETCHING (PERMANENT CLOUDINESS) LEAKING WATER TUB IS DISCOLORED SOLUTION NOTES: ■ Liquid rinse aid is necessary for drying...

Owners Manual
Page 12
... Maytag Corporation or its related companies. Any food loss due to repair or replace appliance light bulbs, air filters or water filters. Costs associated with electrical or plumbing codes, or use your major appliance, to replace or repair house fuses, or to obtain service under license by the customer. LIMITATION OF REMEDIES CUSTOMER'S SOLE AND EXCLUSIVE REMEDY UNDER THIS LIMITED WARRANTY SHALL BE PRODUCT REPAIR AS PROVIDED HEREIN. IMPLIED WARRANTIES, INCLUDING WARRANTIES...
... Maytag Corporation or its related companies. Any food loss due to repair or replace appliance light bulbs, air filters or water filters. Costs associated with electrical or plumbing codes, or use your major appliance, to replace or repair house fuses, or to obtain service under license by the customer. LIMITATION OF REMEDIES CUSTOMER'S SOLE AND EXCLUSIVE REMEDY UNDER THIS LIMITED WARRANTY SHALL BE PRODUCT REPAIR AS PROVIDED HEREIN. IMPLIED WARRANTIES, INCLUDING WARRANTIES...
Installation Instructions
Page 2
... Water Line 7 Install Drain Hose 8 Prepare Dishwasher 10 Make Power Cord Electrical Connection 11 Installation Instructions (cont.) Determine Cabinet Opening 12 Install The Door Handle 13 Choose Attachment Option 13 Move Dishwasher into Cabinet Opening 13 Connect to Water Supply 15 Connect to Drain 16 Make Direct Wire Electrical Connection 16 Secure Dishwasher in this dishwasher as specified in serious injury or cuts. Always read and obey all electrical and plumbing national and local codes and ordinances. 2 Doing so can be performed by a qualified service...
... Water Line 7 Install Drain Hose 8 Prepare Dishwasher 10 Make Power Cord Electrical Connection 11 Installation Instructions (cont.) Determine Cabinet Opening 12 Install The Door Handle 13 Choose Attachment Option 13 Move Dishwasher into Cabinet Opening 13 Connect to Water Supply 15 Connect to Drain 16 Make Direct Wire Electrical Connection 16 Secure Dishwasher in this dishwasher as specified in serious injury or cuts. Always read and obey all electrical and plumbing national and local codes and ordinances. 2 Doing so can be performed by a qualified service...
Installation Instructions
Page 3
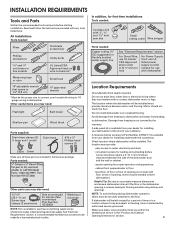
... dishwasher door and the wall or cabinet. • square opening for proper operation and appearance. • cabinet front perpendicular to floor. • level floor. (If floor at front of opening , shims may be subject to the floor. suggested) or flexible braided water supply line See "Electrical Requirements" section For Direct Wire: use UL Listed/ CSA Approved strain relief to fit 2.2 cm) hole For Power Supply Cord: use UL listed power supply cord kit marked for installing...
... dishwasher door and the wall or cabinet. • square opening for proper operation and appearance. • cabinet front perpendicular to floor. • level floor. (If floor at front of opening , shims may be subject to the floor. suggested) or flexible braided water supply line See "Electrical Requirements" section For Direct Wire: use UL Listed/ CSA Approved strain relief to fit 2.2 cm) hole For Power Supply Cord: use UL listed power supply cord kit marked for installing...
Installation Instructions
Page 5
..., AC-only, 15- Use of the water inlet valve. 5 latest edition and all local codes and ordinances. A copy of the counter, or be verified by a licensed plumber. •120°F (49°C) water at dishwasher O.D. If connecting dishwasher with 20-120 psi (138-862 kPa) water pressure can be needed to connect to the dishwasher opening. Water Supply Requirements • A hot water line with a power supply cord: • Use UL listed power supply cord kit (Part Number 4317824) marked for...
..., AC-only, 15- Use of the water inlet valve. 5 latest edition and all local codes and ordinances. A copy of the counter, or be verified by a licensed plumber. •120°F (49°C) water at dishwasher O.D. If connecting dishwasher with 20-120 psi (138-862 kPa) water pressure can be needed to connect to the dishwasher opening. Water Supply Requirements • A hot water line with a power supply cord: • Use UL listed power supply cord kit (Part Number 4317824) marked for...

Installation Instructions
Page 6
Power Supply Cord: Follow Option A instructions Direct Wire: Follow Option B instructions Option A, Power Supply Cord: NOTE: A grounded 3 prong outlet is required inside a cabinet next to the dishwasher cabinet opening dimensions. If they do so can result in death or electrical shock. 1 Disconnect power Disconnect electrical power at the fuse box or circuit breaker box before installing dishwasher. 2 3 Do you use? Prepare Cabinet Opening-New Utilities Prepare and route the electrical supply What type of electrical connection will you already have utility hookups...
Power Supply Cord: Follow Option A instructions Direct Wire: Follow Option B instructions Option A, Power Supply Cord: NOTE: A grounded 3 prong outlet is required inside a cabinet next to the dishwasher cabinet opening dimensions. If they do so can result in death or electrical shock. 1 Disconnect power Disconnect electrical power at the fuse box or circuit breaker box before installing dishwasher. 2 3 Do you use? Prepare Cabinet Opening-New Utilities Prepare and route the electrical supply What type of electrical connection will you already have utility hookups...
Installation Instructions
Page 7
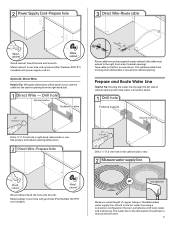
... product and cabinet opening dimensions. 2 Direct Wire-Prepare hole (15.2 c6m") Route cable from power supply through the left side of cabinet opening . Prepare and Route Water Line Helpful Tip: Routing the water line through cabinet hole (cable must extend to the hot water line using a connection configuration that is moved into cabinet opening ). The water line to the floor in the cabinet side or rear. 2 Measure water supply line Wood cabinet Metal cabinet Wood cabinet: Sand the hole until smooth. 2 Power Supply Cord...
... product and cabinet opening dimensions. 2 Direct Wire-Prepare hole (15.2 c6m") Route cable from power supply through the left side of cabinet opening . Prepare and Route Water Line Helpful Tip: Routing the water line through cabinet hole (cable must extend to the hot water line using a connection configuration that is moved into cabinet opening ). The water line to the floor in the cabinet side or rear. 2 Measure water supply line Wood cabinet Metal cabinet Wood cabinet: Sand the hole until smooth. 2 Power Supply Cord...

Installation Instructions
Page 8
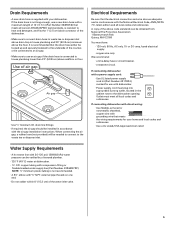
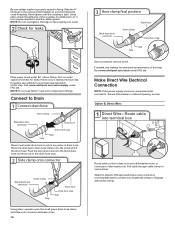
... inlet valve. Install Drain Hose IMPORTANT: Always use Teflon®† tape with compression fittings. Turn shutoff valve to "ON" position. This will keep the drain hose from moving when dishwasher is moved into cabinet opening where drain connection will be far enough into the cabinet opening to connect it to the dishwasher inlet on the front left side of the dishwasher. 4 Flush water supply line Connect the ³⁄₈" compression fitting to the water supply line...
... inlet valve. Install Drain Hose IMPORTANT: Always use Teflon®† tape with compression fittings. Turn shutoff valve to "ON" position. This will keep the drain hose from moving when dishwasher is moved into cabinet opening where drain connection will be far enough into the cabinet opening to connect it to the dishwasher inlet on the front left side of the dishwasher. 4 Flush water supply line Connect the ³⁄₈" compression fitting to the water supply line...
Installation Instructions
Page 13
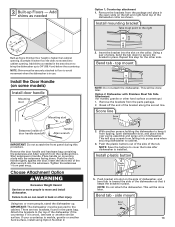
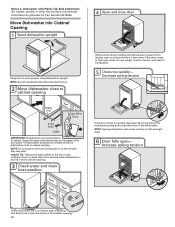
... the open dishwasher door, and place towel over pump assembly and spray arm of the Allen wrench into cabinet opening .) Example: Kitchen floor tile does not extend into the setscrews. Choose Attachment Option Excessive Weight Hazard Use two or more people, stand the dishwasher up Floors - With another hard surface, install using Option Number 2. Install plastic button Plastic button 5. Push the door handle tightly against the door. Score line Score line 3. This will stop...
... the open dishwasher door, and place towel over pump assembly and spray arm of the Allen wrench into cabinet opening .) Example: Kitchen floor tile does not extend into the setscrews. Choose Attachment Option Excessive Weight Hazard Use two or more people, stand the dishwasher up Floors - With another hard surface, install using Option Number 2. Install plastic button Plastic button 5. Push the door handle tightly against the door. Score line Score line 3. This will stop...
Installation Instructions
Page 14
... that water line is on left side of the dishwasher. Option 3, Dishwasher with Plastic Tub Side Attachment (for marble, granite or other hard surface countertops) Order Mounting Bracket Kit Part Number 8212560. NOTE: Springs should be adjusted. 5 Closes too quickly- Move Dishwasher into the cabinet opening. 3 Check water and drain hose position If the door closes too quickly, decrease the spring tension by moving when dishwasher is near the center of the panel...
... that water line is on left side of the dishwasher. Option 3, Dishwasher with Plastic Tub Side Attachment (for marble, granite or other hard surface countertops) Order Mounting Bracket Kit Part Number 8212560. NOTE: Springs should be adjusted. 5 Closes too quickly- Move Dishwasher into the cabinet opening. 3 Check water and drain hose position If the door closes too quickly, decrease the spring tension by moving when dishwasher is near the center of the panel...
Installation Instructions
Page 16
.... Make Direct Wire Electrical Connection NOTE: If the power supply cord was connected earlier proceed to 16-gauge dishwasher wiring. Turn on wire connectors (not included) rated to connect your household wiring to "Secure Dishwasher in drain hose. If needed , see website for leaks Place paper towel under drain hose to seal the rubber gasket. NOTE: Do not use Teflon tape with compression fittings. Using pliers, check the tightness of the drain hose. Select UL listed or CSA...
.... Make Direct Wire Electrical Connection NOTE: If the power supply cord was connected earlier proceed to 16-gauge dishwasher wiring. Turn on wire connectors (not included) rated to connect your household wiring to "Secure Dishwasher in drain hose. If needed , see website for leaks Place paper towel under drain hose to seal the rubber gasket. NOTE: Do not use Teflon tape with compression fittings. Using pliers, check the tightness of the drain hose. Select UL listed or CSA...
Installation Instructions
Page 20
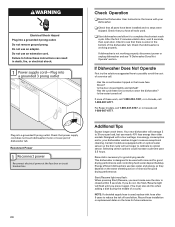
... Operate" section. Electrical Shock Hazard Plug into a grounded 3 prong outlet. Failure to complete the shortest wash cycle. After the first 2 minutes unlatch door, wait 5 seconds, then open door. Do not use less water and energy so they depend on the hose for good drying performance and controlling hard water deposit buildup. Record hose installation or replacement dates on the water sheeting action of rinse aid for good drying results: This dishwasher is working properly, disconnect power...
... Operate" section. Electrical Shock Hazard Plug into a grounded 3 prong outlet. Failure to complete the shortest wash cycle. After the first 2 minutes unlatch door, wait 5 seconds, then open door. Do not use less water and energy so they depend on the hose for good drying performance and controlling hard water deposit buildup. Record hose installation or replacement dates on the water sheeting action of rinse aid for good drying results: This dishwasher is working properly, disconnect power...


