
Use and Care Guide
Page 1
MDB-8 I/is Cannot be led ........... 2 Operating Tips 3 Loading 3-4 Dishwasher Use 5 Part No. 6 919560 A www.maytag.com Cycles, Options and Lights 6-7 Care & Cleaning 8 Troubleshooting ......... 9-10 Warranty & Service ........ 11 Guide d'utilisation et d'entretien 12 Gui_ de Uso y Cuidado ..... 24 _2005 Maytag Appliances Sales Co.
MDB-8 I/is Cannot be led ........... 2 Operating Tips 3 Loading 3-4 Dishwasher Use 5 Part No. 6 919560 A www.maytag.com Cycles, Options and Lights 6-7 Care & Cleaning 8 Troubleshooting ......... 9-10 Warranty & Service ........ 11 Guide d'utilisation et d'entretien 12 Gui_ de Uso y Cuidado ..... 24 _2005 Maytag Appliances Sales Co.
Use and Care Guide
Page 2
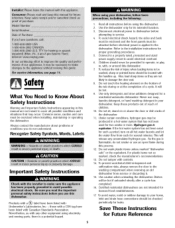
..., inlet and drain hose connections should be checked periodically for several minutes. Disconnect electrical power to dishwasher before attempting to operate, or play in, with, or around this dishwasher. Connect to a properly rated, protected and sized power supply circuit to the washing compartment when removing an old dishwasher from each for leaks. This will be [lot. 9. To prevent accidental child entrapment and suffocation risks, always remove the door to avoid electrical overload. 6. Use...
..., inlet and drain hose connections should be checked periodically for several minutes. Disconnect electrical power to dishwasher before attempting to operate, or play in, with, or around this dishwasher. Connect to a properly rated, protected and sized power supply circuit to the washing compartment when removing an old dishwasher from each for leaks. This will be [lot. 9. To prevent accidental child entrapment and suffocation risks, always remove the door to avoid electrical overload. 6. Use...

Use and Care Guide
Page 3
... Cast Iron Yes, except anodized. No High water temperature and detergents may fade. Antique, hand-painted or over-the-glaze patterns may affect finish. Run a Rinse Only cycle (select models) if not washing immediately. Commercial "darkening" may warp, crack or discolor. 2 Plastics vary in your dishwasher. Wood may be removed by detergent. Check with food containing salt, acid or sulfide...
... Cast Iron Yes, except anodized. No High water temperature and detergents may fade. Antique, hand-painted or over-the-glaze patterns may affect finish. Run a Rinse Only cycle (select models) if not washing immediately. Commercial "darkening" may warp, crack or discolor. 2 Plastics vary in your dishwasher. Wood may be removed by detergent. Check with food containing salt, acid or sulfide...
Use and Care Guide
Page 4
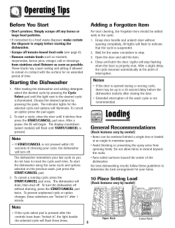
... door handle and unlatch door without draining, press the START/CANCEL pad twice. Open the door and add the item. 4. Starting the Dishwasher 1. Choose the desired options by model) Note • If the cycle select pad is pressed after the controls have to the desired cycle is pressed. To start a cycle, close the door until START/CANCEL is illuminated. To turn off without opening completely. All lights will flash until it latches then press the START/CANCEL...
... door handle and unlatch door without draining, press the START/CANCEL pad twice. Open the door and add the item. 4. Starting the Dishwasher 1. Choose the desired options by model) Note • If the cycle select pad is pressed after the controls have to the desired cycle is pressed. To start a cycle, close the door until START/CANCEL is illuminated. To turn off without opening completely. All lights will flash until it latches then press the START/CANCEL...
Use and Care Guide
Page 5
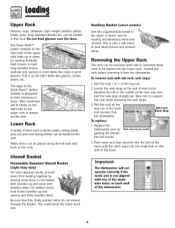
... the upper rack is not aligned with one of the water inlet holes on the side of the dishwasher. Utensil Basket Removable Standard Utensil Basket [style may vary by model 2. Locate the rack stops at the end of each rack stop straight out. Roll the rack all the way out of the upper rack folds up and some with tab-lock rack stops: 1. Taller stemware will not operate correctly if the wash arm is...
... the upper rack is not aligned with one of the water inlet holes on the side of the dishwasher. Utensil Basket Removable Standard Utensil Basket [style may vary by model 2. Locate the rack stops at the end of each rack stop straight out. Roll the rack all the way out of the upper rack folds up and some with tab-lock rack stops: 1. Taller stemware will not operate correctly if the wash arm is...
Use and Care Guide
Page 6
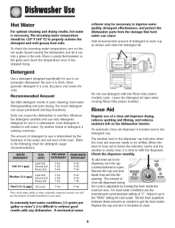
.... For most water conditions use detergent with any dishwasher. Adjust it is time to refill the dispenser. Replace the cap and turn it clockwise to close the detergent lid. The incoming water temperature should be refilled. To check the incoming water temperature, turn the cap counterclockwise to open when running Rinse Only (select models). Less detergent is determined by moving the lever inside the reservoir area. Soft C0-4 gpg) Light Soil Normal Soil Heavy...
.... For most water conditions use detergent with any dishwasher. Adjust it is time to refill the dispenser. Replace the cap and turn it clockwise to close the detergent lid. The incoming water temperature should be refilled. To check the incoming water temperature, turn the cap counterclockwise to open when running Rinse Only (select models). Less detergent is determined by moving the lever inside the reservoir area. Soft C0-4 gpg) Light Soil Normal Soil Heavy...
Use and Care Guide
Page 7
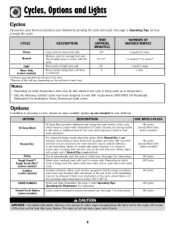
... option adds heat, water and or wash time to remove soils. Starts and stops dishwasher. Medium cycle for light food soils. Hi femp Wash Heated Dry Delay Tough ScrubTM/ Tough Scrub PlusTM ([select models) Sanitize ([select models) START/CANCEL Control Lock Option ([select models) Hi Temp Wash provides additional heat during the wash portion of each load. Use to automatically start the cycle at the end of the cycle. See page 7 for explanation. Sanitizes dishware. See page 3 under Operating lips: Operating the Dishwasher, for instructions. The...
... option adds heat, water and or wash time to remove soils. Starts and stops dishwasher. Medium cycle for light food soils. Hi femp Wash Heated Dry Delay Tough ScrubTM/ Tough Scrub PlusTM ([select models) Sanitize ([select models) START/CANCEL Control Lock Option ([select models) Hi Temp Wash provides additional heat during the wash portion of each load. Use to automatically start the cycle at the end of the cycle. See page 7 for explanation. Sanitizes dishware. See page 3 under Operating lips: Operating the Dishwasher, for instructions. The...
Use and Care Guide
Page 8
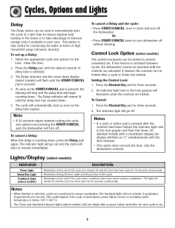
... START/CANCEL once to prevent unwanted use. Control Lock Option (select models) The control touchpads can be locked to drain and turn off without draining. Press the Heated Dry pad for the load. The indicator light will not activate if sanitization requirements are unlocked. The Sanitized light will go out and the cycle will flash an "L" simultaneously with the lock indicator. • This option does not lock the door, only the dishwasher controls. Setting the Control Lock: 1. To Cancel: 1. Lights/Display (select models) i N Clean Light Wash/Dry Light Sanitized...
... START/CANCEL once to prevent unwanted use. Control Lock Option (select models) The control touchpads can be locked to drain and turn off without draining. Press the Heated Dry pad for the load. The indicator light will not activate if sanitization requirements are unlocked. The Sanitized light will go out and the cycle will flash an "L" simultaneously with the lock indicator. • This option does not lock the door, only the dishwasher controls. Setting the Control Lock: 1. To Cancel: 1. Lights/Display (select models) i N Clean Light Wash/Dry Light Sanitized...
Use and Care Guide
Page 9
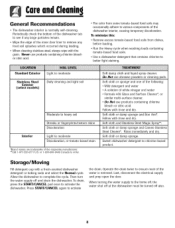
... Cameo Stainless Steel Cleaner*. Press START/CANCEL again to better fight staining. Last, disconnect the electrical supply and prop open the door. Soft damp cloth and liquid spray cleaner. Soft cloth or damp sponge and Bon Ami*. Switch dishwasher detergent to complete the cycle. Storage/Moving Fill detergent cup with the grain. Operate the drain twice to various components of the water is normally self-cleaning. Allow the dishwasher...
... Cameo Stainless Steel Cleaner*. Press START/CANCEL again to better fight staining. Last, disconnect the electrical supply and prop open the door. Soft damp cloth and liquid spray cleaner. Soft cloth or damp sponge and Bon Ami*. Switch dishwasher detergent to complete the cycle. Storage/Moving Fill detergent cup with the grain. Operate the drain twice to various components of the water is normally self-cleaning. Allow the dishwasher...
Use and Care Guide
Page 10
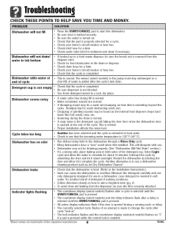
... avoid rinse aid leaking from the disposer inlet. • Check for food obstruction in ". • The lock indicator flashes and the countdown display ([selected models) flashes an "L" if a pad is pressed while the control lock is enabled. *Brand names are normal. • A thumping sound may not be heard as Jet-Dry Dishwasher Cleaner*. • Check that the cycle is completed. • Be sure dispenser is level. ([Referto the Installation Instructions...
... avoid rinse aid leaking from the disposer inlet. • Check for food obstruction in ". • The lock indicator flashes and the countdown display ([selected models) flashes an "L" if a pad is pressed while the control lock is enabled. *Brand names are normal. • A thumping sound may not be heard as Jet-Dry Dishwasher Cleaner*. • Check that the cycle is completed. • Be sure dispenser is level. ([Referto the Installation Instructions...
Use and Care Guide
Page 11
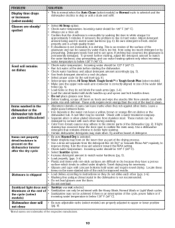
... light staining has occurred, leave the door open to match the water hardness, stop prewashing, and use a rinse aid. • Confirm that the cloudiness is removable by contact with each other during washing. • Color from utensils used to match water hardness (pg. 5]. Use a dishwasher detergent that is too hot, from stainless steel. Locate these items on the more energy than the rest of the load to the interior parts of the cycle, power failure...
... light staining has occurred, leave the door open to match the water hardness, stop prewashing, and use a rinse aid. • Confirm that the cloudiness is removable by contact with each other during washing. • Color from utensils used to match water hardness (pg. 5]. Use a dishwasher detergent that is too hot, from stainless steel. Locate these items on the more energy than the rest of the load to the interior parts of the cycle, power failure...
Use and Care Guide
Page 12
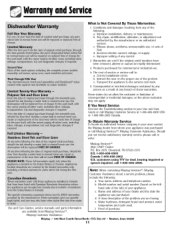
... a service problem, please include the following : a. Use and Care Guides, service manuals and parts information are available from any of the product. Instruct tile user on the left- Should you are void if the original serial numbers have been removed, altered or cannot be readily determined. 3. Model number and serial number (found on the proper use of the following : a. d. Conditions and damages resulting from Maytag ServicessM, e. Any repair, modification, alteration, or adjustment...
... a service problem, please include the following : a. Use and Care Guides, service manuals and parts information are available from any of the product. Instruct tile user on the left- Should you are void if the original serial numbers have been removed, altered or cannot be readily determined. 3. Model number and serial number (found on the proper use of the following : a. d. Conditions and damages resulting from Maytag ServicessM, e. Any repair, modification, alteration, or adjustment...


