Quick Start Guide
Page 1
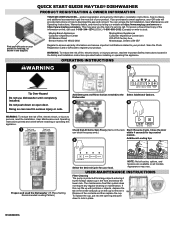
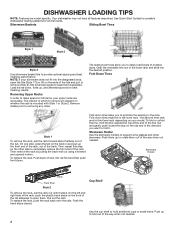
...Load the Dishwasher (15 Place Setting Recommended Loading Pattern) Auto Normal Quick PowerBlast Select the desired Cycle for top control models. USER-MAINTENANCE INSTRUCTIONS Filter Cleaning The pump is protected from large objects entering it . The maintenance free filter system does... not require any regular cleaning or maintenance. Dispose of a service call us at https://www.maytag.com/owners or https://www.maytag.ca/owners. product registration and warranty information, installation instructions, how-to videos, and additional accessories to the ...
...Load the Dishwasher (15 Place Setting Recommended Loading Pattern) Auto Normal Quick PowerBlast Select the desired Cycle for top control models. USER-MAINTENANCE INSTRUCTIONS Filter Cleaning The pump is protected from large objects entering it . The maintenance free filter system does... not require any regular cleaning or maintenance. Dispose of a service call us at https://www.maytag.com/owners or https://www.maytag.ca/owners. product registration and warranty information, installation instructions, how-to videos, and additional accessories to the ...
Cycle Guide
Page 1
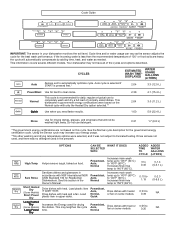
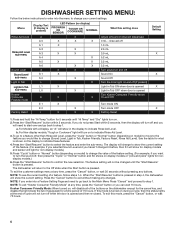
...less than the recommended temperature of the cycles and options described. Your dishwasher may lengthen the cycle time. This information covers several different models. See the Normal cycle description for drying the dishes. Sanitizes dishes and glassware in accordance with heat. Powerblast, Auto, Normal Dries dishes... dishes with heat or fan on food. This may not have all of 120° or food soils are not based on some models. Dries dishes with NSF International NSF/ ANSI Standard 184 for the best wash performance. Cycle Guide IMPORTANT: The sensor in your energy usage...
...less than the recommended temperature of the cycles and options described. Your dishwasher may lengthen the cycle time. This information covers several different models. See the Normal cycle description for drying the dishes. Sanitizes dishes and glassware in accordance with heat. Powerblast, Auto, Normal Dries dishes... dishes with heat or fan on food. This may not have all of 120° or food soils are not based on some models. Dries dishes with NSF International NSF/ ANSI Standard 184 for the best wash performance. Cycle Guide IMPORTANT: The sensor in your energy usage...
Cycle Guide
Page 2
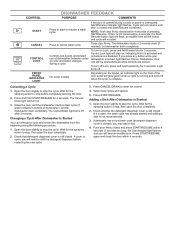
If door is complete. Close door firmly. On some models. The Cancel/ Drain light will turn off when the cycle is not closed within 4 seconds of dishwasher). If cover is interrupted, Start/Resume indicator light ... to cancel wash cycle. Adding a Dish After Dishwasher is still closed while controls are disabled. If it is open the door completely. 2. Depending on the model, an indicator light on . 3. Open the door slightly to stop the cycle. Open the door slightly to stop the cycle. CONTROL START CANCEL CONTROL LOCK...
If door is complete. Close door firmly. On some models. The Cancel/ Drain light will turn off when the cycle is not closed within 4 seconds of dishwasher). If cover is interrupted, Start/Resume indicator light ... to cancel wash cycle. Adding a Dish After Dishwasher is still closed while controls are disabled. If it is open the door completely. 2. Depending on the model, an indicator light on . 3. Open the door slightly to stop the cycle. Open the door slightly to stop the cycle. CONTROL START CANCEL CONTROL LOCK...
Owners Manual
Page 4
... end of the way when not needed . 4 See Quick Start Guides for possible dishwasher loading patterns for tall items, your upper racks are model specific. NOTE: If your model. The sliding bowl tines allow you to fold it stops. Fold down tines might be in the lower rack and slide into rail...
... end of the way when not needed . 4 See Quick Start Guides for possible dishwasher loading patterns for tall items, your upper racks are model specific. NOTE: If your model. The sliding bowl tines allow you to fold it stops. Fold down tines might be in the lower rack and slide into rail...
Owners Manual
Page 6
...On and Off Turn mode ON Turn mode OFF Factory Reset Default Setting X X X X 1. If you do not press Start within 2 seconds. For Non-display models,"Tough or Cookware" light will disable all of the buttons on the dishwasher except for the cancel key, and disable the light inside the tub... (if equipped) for non-display models.) 5. Press the "Cancel" button to exit without pressing any changes. NOTE: To exit "Kosher Consumer Friendly Mode" at the end of the feature. (For...
...On and Off Turn mode ON Turn mode OFF Factory Reset Default Setting X X X X 1. If you do not press Start within 2 seconds. For Non-display models,"Tough or Cookware" light will disable all of the buttons on the dishwasher except for the cancel key, and disable the light inside the tub... (if equipped) for non-display models.) 5. Press the "Cancel" button to exit without pressing any changes. NOTE: To exit "Kosher Consumer Friendly Mode" at the end of the feature. (For...

Owners Manual
Page 8
Measuring tape or ruler 5/8" (15.9 mm) open-end wrench Door handle (on some models) 10" adjustable wrench that opens to 11/8" (29 mm) Torx† T20 and, if installing custom front panels, Torx T15 screwdrivers †TORX, T15, and ...
Measuring tape or ruler 5/8" (15.9 mm) open-end wrench Door handle (on some models) 10" adjustable wrench that opens to 11/8" (29 mm) Torx† T20 and, if installing custom front panels, Torx T15 screwdrivers †TORX, T15, and ...

Owners Manual
Page 11
...D 4" (10.2 cm) 3" (7.6 cm) 21" (53.4 cm) 24" (62.0 cm) E D. May be compressed (not used on all surfaces have no protrusions that all models). Door handles may be installed. 6¼" (15.9 cm) 2" (5.1 cm) 11 Insulation may be reduced to 335/8" minimum (85.4 cm) minimum by... model. For panel-ready models, dishwasher depth is 24" (61.0 cm), not including the 3/4" (1.9 cm) custom door panel. Measured from narrowest point of insulation (blanket) on ...
...D 4" (10.2 cm) 3" (7.6 cm) 21" (53.4 cm) 24" (62.0 cm) E D. May be compressed (not used on all surfaces have no protrusions that all models). Door handles may be installed. 6¼" (15.9 cm) 2" (5.1 cm) 11 Insulation may be reduced to 335/8" minimum (85.4 cm) minimum by... model. For panel-ready models, dishwasher depth is 24" (61.0 cm), not including the 3/4" (1.9 cm) custom door panel. Measured from narrowest point of insulation (blanket) on ...
Owners Manual
Page 19
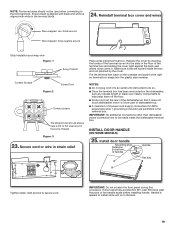
... into an outlet until instructed to do so. ■ Once the terminal box has been remounted on its back. 19 INSTALL DOOR HANDLE (ON SOME MODELS) 25. Handle is easiest to be used when connecting to the terminal block. NOTES: ■ Do not plug cord into the plastic side member. IMPORTANT...
... into an outlet until instructed to do so. ■ Once the terminal box has been remounted on its back. 19 INSTALL DOOR HANDLE (ON SOME MODELS) 25. Handle is easiest to be used when connecting to the terminal block. NOTES: ■ Do not plug cord into the plastic side member. IMPORTANT...
Owners Manual
Page 20
... between dishwasher and cabinet. Insert the short end of the dishwasher. Retain hex key with the setscrews facing down. Install Foam Side Shields (on some models) Install the foam side shields on the side shield and attach it to do so can result in the handle. Figure: 1 ■ Attachment 2: Use the...
... between dishwasher and cabinet. Insert the short end of the dishwasher. Retain hex key with the setscrews facing down. Install Foam Side Shields (on some models) Install the foam side shields on the side shield and attach it to do so can result in the handle. Figure: 1 ■ Attachment 2: Use the...

Owners Manual
Page 21
Route power cord ■ Place Top Foam Sound Insulation (on some models) • Snug the top foam into the slot on the side members grab onto the slots in the rear of the product. 27. Pull slack ...from bunching up in the literature package. If using Side Attachment to Step 32. - CUSTOM PANEL INSTALLATION (CUSTOM PANEL MODELS ONLY) For custom panel installation, refer to Step 33. For countertops that are wood, laminate or another hard surface: use Countertop Attachment and go to...
Route power cord ■ Place Top Foam Sound Insulation (on some models) • Snug the top foam into the slot on the side members grab onto the slots in the rear of the product. 27. Pull slack ...from bunching up in the literature package. If using Side Attachment to Step 32. - CUSTOM PANEL INSTALLATION (CUSTOM PANEL MODELS ONLY) For custom panel installation, refer to Step 33. For countertops that are wood, laminate or another hard surface: use Countertop Attachment and go to...

Owners Manual
Page 27
... start . ■ All LEDs turn on immediately upon the first run this Manual prior to calling for service. See instructions on some models) Plug into a grounded 3 prong outlet INSTALL ACCESS PANELS 50. If running in this state, the float switch wire MUST still be ... installation cycle may play depending on 0:01 1 0:30 (Maximum 5:00) Pause Initial Drain 2 2:00 Fill 3.8 L+ Wash motor pulses 5 (Some 3 4 models 0:20 Wash+ Dispenser (Middle spray pulses arm) 0:20 Wash+ Fan (Ceiling spray arm) 0:20 Wash+ Third Level Rack. If present in the foam and assemble...
... start . ■ All LEDs turn on immediately upon the first run this Manual prior to calling for service. See instructions on some models) Plug into a grounded 3 prong outlet INSTALL ACCESS PANELS 50. If running in this state, the float switch wire MUST still be ... installation cycle may play depending on 0:01 1 0:30 (Maximum 5:00) Pause Initial Drain 2 2:00 Fill 3.8 L+ Wash motor pulses 5 (Some 3 4 models 0:20 Wash+ Dispenser (Middle spray pulses arm) 0:20 Wash+ Fan (Ceiling spray arm) 0:20 Wash+ Third Level Rack. If present in the foam and assemble...
Dimension Guide
Page 1
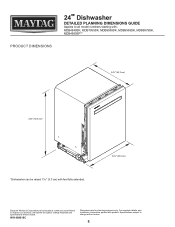
... a continuous commitment to improve our products, we reserve the right to change without notice. PRODUCT DIMENSIONS 24" Dishwasher DETAILED PLANNING DIMENSIONS GUIDE Applies to all model numbers starting with product.
... a continuous commitment to improve our products, we reserve the right to change without notice. PRODUCT DIMENSIONS 24" Dishwasher DETAILED PLANNING DIMENSIONS GUIDE Applies to all model numbers starting with product.


