Quick Start Guide
Page 1
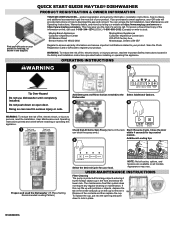
... rack. To replace the cup, put into the opening and push down on all models. Doing so can access the full Installation, User Maintenance and Operating Instructions, Warranty details, and more by the foreign object cup in place. QUICK START GUIDE MAYTAG® DISHWASHER PRODUCT REGISTRATION & OWNER INFORMATION YOUR QR CODE UNLOCKS...
... rack. To replace the cup, put into the opening and push down on all models. Doing so can access the full Installation, User Maintenance and Operating Instructions, Warranty details, and more by the foreign object cup in place. QUICK START GUIDE MAYTAG® DISHWASHER PRODUCT REGISTRATION & OWNER INFORMATION YOUR QR CODE UNLOCKS...
Cycle Guide
Page 1
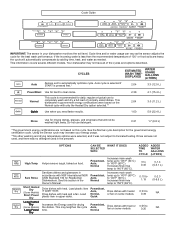
...time, heat, and water as the sensor adjusts the cycle for hard to truncated testing. This dishwasher's government energy certifications were based on some models. See this cycle. Load plastic item in the Owner's Manual. Cycle time and/or water usage can vary as needed. Using the Sensor ...items. 2:38 4.1 (15.4 L) This cycle is less than the recommended temperature of 120° or food soils are not based on some models. Cycle Guide IMPORTANT: The sensor in upper racks. If the incoming water is recommended for drying the dishes. Your dishwasher may not have all of...
...time, heat, and water as the sensor adjusts the cycle for hard to truncated testing. This dishwasher's government energy certifications were based on some models. See this cycle. Load plastic item in the Owner's Manual. Cycle time and/or water usage can vary as needed. Using the Sensor ...items. 2:38 4.1 (15.4 L) This cycle is less than the recommended temperature of 120° or food soils are not based on some models. Cycle Guide IMPORTANT: The sensor in upper racks. If the incoming water is recommended for drying the dishes. Your dishwasher may not have all of...
Cycle Guide
Page 2
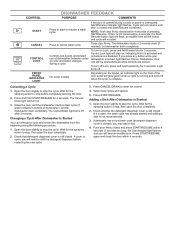
Cycle will not start or resume a wash cycle. Depending on the model, an indicator light on . 3. Close the door, and the dishwasher starts a drain cycle (if water remains in bottom of dishwasher between cycles or cycle and ... during a cycle. Cancelling a Cycle 1. Press START/RESUME. Dishwasher door can interrupt a cycle and restart the dishwasher from the beginning using the following procedure. 1. On some models. Open the door slightly to refill the detergent dispenser before completely opening the door. 2. The Cancel/Drain light turns off . If the door is opened...
Cycle will not start or resume a wash cycle. Depending on the model, an indicator light on . 3. Close the door, and the dishwasher starts a drain cycle (if water remains in bottom of dishwasher between cycles or cycle and ... during a cycle. Cancelling a Cycle 1. Press START/RESUME. Dishwasher door can interrupt a cycle and restart the dishwasher from the beginning using the following procedure. 1. On some models. Open the door slightly to refill the detergent dispenser before completely opening the door. 2. The Cancel/Drain light turns off . If the door is opened...
Owners Manual
Page 4
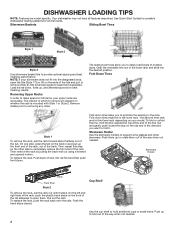
... In order to optimize the spacing in the lower rack , the second level rack and/or third level rack depending on your upper racks are model specific. Grab the moveable tine row in and pull up , and alternate spoons for best cleaning results. Then remove the rack by pulling the ... direction you want to completely remove the front end of the track. See Quick Start Guides for possible dishwasher loading patterns for tall items, your model. Load knives down . On one side, press the tab on whether the rack is mounted with Style 1 or Style 2. Fold Down Tines Style 1 To remove...
... In order to optimize the spacing in the lower rack , the second level rack and/or third level rack depending on your upper racks are model specific. Grab the moveable tine row in and pull up , and alternate spoons for best cleaning results. Then remove the rack by pulling the ... direction you want to completely remove the front end of the track. See Quick Start Guides for possible dishwasher loading patterns for tall items, your model. Load knives down . On one side, press the tab on whether the rack is mounted with Style 1 or Style 2. Fold Down Tines Style 1 To remove...
Owners Manual
Page 6
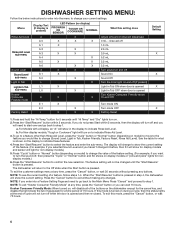
... is pressed in step 4, the dishwasher will show in Tub sub-menul Kosher Consumer Friendly mode Factory Reset Display Text (if display is pressed. For Models with a Display, an "A" will show the current setting. Press "Cycle" button or "Normal" button (depending on during a cycle, then the status lights at any time... into the menu to change the value of the feature setting. (For example, if you haven't changed until "Hi Temp" and "Dry" lights turn on model) to move to the feature you will need to go back to the Main Menu Press "Cancel" and proceed to step 1. If this mode is...
... is pressed in step 4, the dishwasher will show in Tub sub-menul Kosher Consumer Friendly mode Factory Reset Display Text (if display is pressed. For Models with a Display, an "A" will show the current setting. Press "Cycle" button or "Normal" button (depending on during a cycle, then the status lights at any time... into the menu to change the value of the feature setting. (For example, if you haven't changed until "Hi Temp" and "Dry" lights turn on model) to move to the feature you will need to go back to the Main Menu Press "Cancel" and proceed to step 1. If this mode is...

Owners Manual
Page 8
... TOOLS AND PARTS Gather the recommended tools and parts before starting installation. Measuring tape or ruler 5/8" (15.9 mm) open-end wrench Door handle (on some models) 10" adjustable wrench that opens to 11/8" (29 mm) Torx† T20 and, if installing custom front panels, Torx T15 screwdrivers †TORX, T15, and...
... TOOLS AND PARTS Gather the recommended tools and parts before starting installation. Measuring tape or ruler 5/8" (15.9 mm) open-end wrench Door handle (on some models) 10" adjustable wrench that opens to 11/8" (29 mm) Torx† T20 and, if installing custom front panels, Torx T15 screwdrivers †TORX, T15, and...

Owners Manual
Page 11
... face of the dishwasher, varies by removing the feet and perforated area of the countertop. May be reduced to 335/8" minimum (85.4 cm) minimum by model. B. PRODUCT AND CABINET OPENING DIMENSIONS: . 237/8" (60.4 cm) 30" (76.2 cm) 335/8" (85.4 cm) minimum with legs removed 30" ...narrowest point of cabinet walls show where utility connections may be installed. 6¼" (15.9 cm) 2" (5.1 cm) 11 Check that all models). For panel-ready models, dishwasher depth is 24" (61.0 cm), not including the 3/4" (1.9 cm) custom door panel. Insulation may be compressed (not used on dishwasher...
... face of the dishwasher, varies by removing the feet and perforated area of the countertop. May be reduced to 335/8" minimum (85.4 cm) minimum by model. B. PRODUCT AND CABINET OPENING DIMENSIONS: . 237/8" (60.4 cm) 30" (76.2 cm) 335/8" (85.4 cm) minimum with legs removed 30" ...narrowest point of cabinet walls show where utility connections may be installed. 6¼" (15.9 cm) 2" (5.1 cm) 11 Check that all models). For panel-ready models, dishwasher depth is 24" (61.0 cm), not including the 3/4" (1.9 cm) custom door panel. Insulation may be compressed (not used on dishwasher...
Owners Manual
Page 19
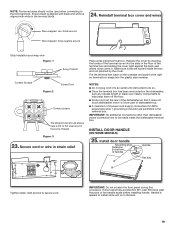
... in the floor of the terminal box and sliding the cover tight against the back wall where wires come in. INSTALL DOOR HANDLE (ON SOME MODELS) 25. Make sure wires are to be used when connecting to the terminal block. IMPORTANT: No additional connections other than dishwasher power connection are tucked...
... in the floor of the terminal box and sliding the cover tight against the back wall where wires come in. INSTALL DOOR HANDLE (ON SOME MODELS) 25. Make sure wires are to be used when connecting to the terminal block. IMPORTANT: No additional connections other than dishwasher power connection are tucked...
Owners Manual
Page 20
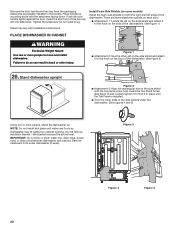
... on both the right and left sides of the dishwasher. Remove cardboard from the packaging. Figure: 3 Figure: 4 Figure: 5 20 Install Foam Side Shields (on some models) Install the foam side shields on the front of the dishwashwe. (See figure 1) PLACE DISHWASHER IN CABINET WARNING Excessive Weight Hazard Use two or more...
... on both the right and left sides of the dishwasher. Remove cardboard from the packaging. Figure: 3 Figure: 4 Figure: 5 20 Install Foam Side Shields (on some models) Install the foam side shields on the front of the dishwashwe. (See figure 1) PLACE DISHWASHER IN CABINET WARNING Excessive Weight Hazard Use two or more...

Owners Manual
Page 21
... insulation blanket is pushed into the slot on the top collar of the dishwasher as one of the product and ensuring the hooks on some models) • Snug the top foam into the cabinet opening . 29. Move dishwasher close to cabinet opening 6" (15.2 cm) Water line Drain ...■ Place Top Foam Sound Insulation (on the side members grab onto the slots in a tight fitting cabinet. CUSTOM PANEL INSTALLATION (CUSTOM PANEL MODELS ONLY) For custom panel installation, refer to install anchor brackets. 31. Prepare the dishwasher for this by pulling the insulation down toward the bottom ...
... insulation blanket is pushed into the slot on the top collar of the dishwasher as one of the product and ensuring the hooks on some models) • Snug the top foam into the cabinet opening . 29. Move dishwasher close to cabinet opening 6" (15.2 cm) Water line Drain ...■ Place Top Foam Sound Insulation (on the side members grab onto the slots in a tight fitting cabinet. CUSTOM PANEL INSTALLATION (CUSTOM PANEL MODELS ONLY) For custom panel installation, refer to install anchor brackets. 31. Prepare the dishwasher for this by pulling the insulation down toward the bottom ...

Owners Manual
Page 27
.... Adjust if necessary. 27 See instructions on 0:01 1 0:30 (Maximum 5:00) Pause Initial Drain 2 2:00 Fill 3.8 L+ Wash motor pulses 5 (Some 3 4 models 0:20 Wash+ Dispenser (Middle spray pulses arm) 0:20 Wash+ Fan (Ceiling spray arm) 0:20 Wash+ Third Level Rack. The product will pause when the door... is opened and resume when closed. ■ No Start/Resume key press required to resume. ■ The installation cycle may play depending on this model 6 0:30 Wash+ Heater (Lower spray arm) 7 1:00 (Maximum 5:00) Drain Pracess Check that the lower edge of the product so that...
.... Adjust if necessary. 27 See instructions on 0:01 1 0:30 (Maximum 5:00) Pause Initial Drain 2 2:00 Fill 3.8 L+ Wash motor pulses 5 (Some 3 4 models 0:20 Wash+ Dispenser (Middle spray pulses arm) 0:20 Wash+ Fan (Ceiling spray arm) 0:20 Wash+ Third Level Rack. The product will pause when the door... is opened and resume when closed. ■ No Start/Resume key press required to resume. ■ The installation cycle may play depending on this model 6 0:30 Wash+ Heater (Lower spray arm) 7 1:00 (Maximum 5:00) Drain Pracess Check that the lower edge of the product so that...
Dimension Guide
Page 1
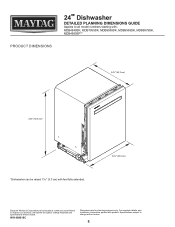
Specifications subject to change materials and specifications without notice. 1 PRODUCT DIMENSIONS 24" Dishwasher DETAILED PLANNING DIMENSIONS GUIDE Applies to all model numbers starting with product. W11409319C Dimensions are for planning purposes only. MDB4949SK, MDB7959SK, MDB8959SK, MDB9959SK, MDB9979SK, MDB4950SP** 241/2" (62.2 cm) 335/8" (85.4 cm)* *Dishwasher can ...
Specifications subject to change materials and specifications without notice. 1 PRODUCT DIMENSIONS 24" Dishwasher DETAILED PLANNING DIMENSIONS GUIDE Applies to all model numbers starting with product. W11409319C Dimensions are for planning purposes only. MDB4949SK, MDB7959SK, MDB8959SK, MDB9959SK, MDB9979SK, MDB4950SP** 241/2" (62.2 cm) 335/8" (85.4 cm)* *Dishwasher can ...


