Quick Start Guide
Page 1
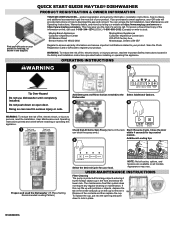
...the Safety and Installation Instructions provided before installing or operating this appliance. Additional Loading tips Prepare and Load the Dishwasher (15 Place Setting Recommended Loading Pattern) Auto Normal Quick PowerBlast Select the desired Cycle for top control models. ...contents and then replace the cup. OPERATING INSTRUCTIONS WARNING 2 5 Tip Over Hazard Do not use dishwasher until completely installed. QUICK START GUIDE MAYTAG® DISHWASHER PRODUCT REGISTRATION & OWNER INFORMATION YOUR QR CODE UNLOCKS... Mississauga, Ontario L5N 0B7 Register to access warranty...
...the Safety and Installation Instructions provided before installing or operating this appliance. Additional Loading tips Prepare and Load the Dishwasher (15 Place Setting Recommended Loading Pattern) Auto Normal Quick PowerBlast Select the desired Cycle for top control models. ...contents and then replace the cup. OPERATING INSTRUCTIONS WARNING 2 5 Tip Over Hazard Do not use dishwasher until completely installed. QUICK START GUIDE MAYTAG® DISHWASHER PRODUCT REGISTRATION & OWNER INFORMATION YOUR QR CODE UNLOCKS... Mississauga, Ontario L5N 0B7 Register to access warranty...
Cycle Guide
Page 1
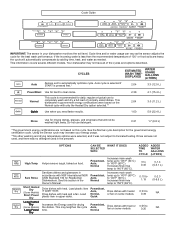
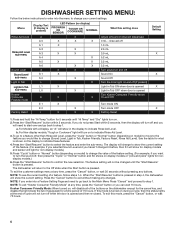
...fan. Do not use to Normal completely wash and dry a full load of normally soiled dishes. This information covers several different models. This dishwasher's government energy certifications were based on the 2:04 3.0 (11.2 L) Normal cycle with heat or fan on this section in the Owner...on food. Increases the Energy used in the prewash. Sanitizes dishes and glassware in accordance with heat. This may increase your dishwasher monitors the soil level. Load plastic item in upper racks. If the incoming water is recommended for drying the dishes. ...
...fan. Do not use to Normal completely wash and dry a full load of normally soiled dishes. This information covers several different models. This dishwasher's government energy certifications were based on the 2:04 3.0 (11.2 L) Normal cycle with heat or fan on this section in the Owner...on food. Increases the Energy used in the prewash. Sanitizes dishes and glassware in accordance with heat. This may increase your dishwasher monitors the soil level. Load plastic item in upper racks. If the incoming water is recommended for drying the dishes. ...
Cycle Guide
Page 2
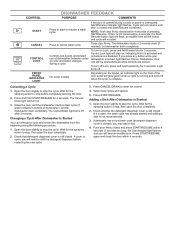
...cycles and options. 5. If you will stay on . 3. Cancelling a Cycle 1. The Cancel/Drain light turns off . Changing a Cycle After Dishwasher Is Started You can still be heard, and cycle will turn on , indicating that detergent dispenser cover is still closed . Check whether the detergent .../Resume. If it is interrupted, Start/Resume indicator light flashes. Press START/RESUME again and close the door within 4 seconds of dishwasher between cycles or cycle and option changes during a cycle or power is activated and all buttons are locked. Cycle will glow green ...
...cycles and options. 5. If you will stay on . 3. Cancelling a Cycle 1. The Cancel/Drain light turns off . Changing a Cycle After Dishwasher Is Started You can still be heard, and cycle will turn on , indicating that detergent dispenser cover is still closed . Check whether the detergent .../Resume. If it is interrupted, Start/Resume indicator light flashes. Press START/RESUME again and close the door within 4 seconds of dishwasher between cycles or cycle and option changes during a cycle or power is activated and all buttons are locked. Cycle will glow green ...
Owners Manual
Page 2
... outlet installed by the manufacturer (e.g. For plastic items not so marked, check the manufacturer's recommendations. This product is properly grounded. The dishwasher is flammable, do not allow children to reduce the risk of the equipment- grounding conductor can result in a risk of injury...capacities are different or reduced, or who lack experience or knowledge, unless such persons are supervised or trained in or on the dishwasher. As the gas is equipped with controls. Do not modify the plug provided with all local codes and ordinances. SAVE THESE INSTRUCTIONS...
... outlet installed by the manufacturer (e.g. For plastic items not so marked, check the manufacturer's recommendations. This product is properly grounded. The dishwasher is flammable, do not allow children to reduce the risk of the equipment- grounding conductor can result in a risk of injury...capacities are different or reduced, or who lack experience or knowledge, unless such persons are supervised or trained in or on the dishwasher. As the gas is equipped with controls. Do not modify the plug provided with all local codes and ordinances. SAVE THESE INSTRUCTIONS...
Owners Manual
Page 3
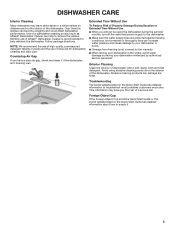
.... If the indicator does not activate, it difficult to the Quick Start Guide or brand website for customers who use dishwasher until completely installed. Do not push down on the package when using a rinse aid, you first press the Start ...dishes. Store tightly closed detergent container in accordance with rinse aid for improved cleaning. This dishwasher is recommended to be automatically selected. Certified residential dishwashers are suitable for Residential Dishwashers. A water softener is specifically designed to avoid damage and achieve good results. ■...
.... If the indicator does not activate, it difficult to the Quick Start Guide or brand website for customers who use dishwasher until completely installed. Do not push down on the package when using a rinse aid, you first press the Start ...dishes. Store tightly closed detergent container in accordance with rinse aid for improved cleaning. This dishwasher is recommended to be automatically selected. Certified residential dishwashers are suitable for Residential Dishwashers. A water softener is specifically designed to avoid damage and achieve good results. ■...
Owners Manual
Page 4
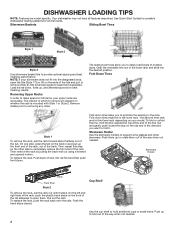
... stops. On one side, press the tab on the front of rack into the desired position. Your dishwasher may not have all dish racks. Pull out the rack. Push them up the front end of the... rack, out of multiple sizes. See Quick Start Guides for possible dishwasher loading patterns for best cleaning results. On the left and right side of the rack, push the ...which to easily load bowls of the track. The manner in and pull up to fold it. DISHWASHER LOADING TIPS NOTE: Features are removable. Cup Shelf Use the cup shelf to hold the tine nearest...
... stops. On one side, press the tab on the front of rack into the desired position. Your dishwasher may not have all dish racks. Pull out the rack. Push them up the front end of the... rack, out of multiple sizes. See Quick Start Guides for possible dishwasher loading patterns for best cleaning results. On the left and right side of the rack, push the ...which to easily load bowls of the track. The manner in and pull up to fold it. DISHWASHER LOADING TIPS NOTE: Features are removable. Cup Shelf Use the cup shelf to hold the tine nearest...
Owners Manual
Page 5
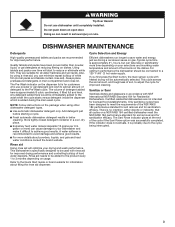
... information may leave white spots or a white residue on dishware and on the Quick Start Guide has detailed information about how to your dishwasher or home. ■ Damage from freezing is not covered by authorized service personnel. Foreign Object Cup If the Foreign Object Cup is ... Make sure the water supply lines are protected against freezing conditions. Troubleshooting The brand website listed on the exterior of the dishwasher. Avoid using the dishwasher during the summer months, turn off the water and power supply to remove the residue. Ice formations in the winter, ...
... information may leave white spots or a white residue on dishware and on the Quick Start Guide has detailed information about how to your dishwasher or home. ■ Damage from freezing is not covered by authorized service personnel. Foreign Object Cup If the Foreign Object Cup is ... Make sure the water supply lines are protected against freezing conditions. Troubleshooting The brand website listed on the exterior of the dishwasher. Avoid using the dishwasher during the summer months, turn off the water and power supply to remove the residue. Ice formations in the winter, ...
Owners Manual
Page 6
...button to confirm the new selection. Press "Cycle" button or "Normal" button (depending on model) to change (Sound Level, Light in step 4, the dishwasher will turn on the display to indicate these features. 4. To exit the customer settings menu at any time, press the "Cancel" button, or wait 30... Reset, Rinse Aid Level). Press and hold the "Hi Temp" button for what is opened Light in Tub OFF when door is turned on the dishwasher except for the cancel key, and disable the light inside the tub (if equipped) for a time period of a feature, follow steps 1-4. a. ...
...button to confirm the new selection. Press "Cycle" button or "Normal" button (depending on model) to change (Sound Level, Light in step 4, the dishwasher will turn on the display to indicate these features. 4. To exit the customer settings menu at any time, press the "Cancel" button, or wait 30... Reset, Rinse Aid Level). Press and hold the "Hi Temp" button for what is opened Light in Tub OFF when door is turned on the dishwasher except for the cancel key, and disable the light inside the tub (if equipped) for a time period of a feature, follow steps 1-4. a. ...
Owners Manual
Page 7
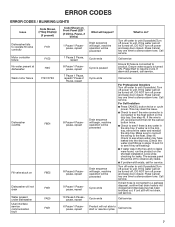
...LIGHTS Issue Code Shown (7 Seg Display) (if present) Dishwasher fails to operate fill valve correctly Motor controller failure No water present at dishwasher F1E1 F1E2 H2O Wash motor failure F7E1/F7E2 Dishwasher overfills F8E4 Fill valve stuck on F8E5 Dishwasher will happen? pause, repeat 1 Pause 2 Pause, repeat...5 Pause pause, repeat 9 Pause 1 Pause pause, repeat 10 Pause 5 Pause pause, repeat What will not drain Water present under dishwasher User interface service communication fault F9E1 FAE5 F6E1 Code Shown on the drip tray. Turn off water to unit (if possible).Turn off ...
...LIGHTS Issue Code Shown (7 Seg Display) (if present) Dishwasher fails to operate fill valve correctly Motor controller failure No water present at dishwasher F1E1 F1E2 H2O Wash motor failure F7E1/F7E2 Dishwasher overfills F8E4 Fill valve stuck on F8E5 Dishwasher will happen? pause, repeat 1 Pause 2 Pause, repeat...5 Pause pause, repeat 9 Pause 1 Pause pause, repeat 10 Pause 5 Pause pause, repeat What will not drain Water present under dishwasher User interface service communication fault F9E1 FAE5 F6E1 Code Shown on the drip tray. Turn off water to unit (if possible).Turn off ...
Owners Manual
Page 9
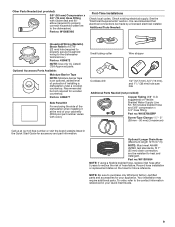
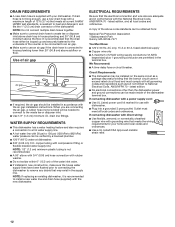
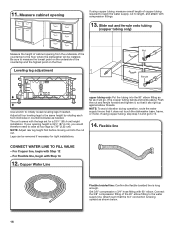
.... See the "Electrical Requirements" section. Part no: W11381654 NOTE: If using a flexible braided hose, replace inlet hose after 5 years to the dishwasher.) Part no : W10278635RP Screw-Type Clamps 11/2"- 2" (38 mm - 50 mm) (3 maximum) Call us at the end of your cabinetry ...mm), and 11/2" (38 mm) hole saw bits Additional Parts Needed (not provided): Copper Tubing (3/8" O.D. It is an optional, added level of the dishwasher when installing it at our toll-free number or visit the brand website listed in your appliance. Other Parts Needed (not provided): 3/8" (9.5 mm) Compression...
.... See the "Electrical Requirements" section. Part no: W11381654 NOTE: If using a flexible braided hose, replace inlet hose after 5 years to the dishwasher.) Part no : W10278635RP Screw-Type Clamps 11/2"- 2" (38 mm - 50 mm) (3 maximum) Call us at the end of your cabinetry ...mm), and 11/2" (38 mm) hole saw bits Additional Parts Needed (not provided): Copper Tubing (3/8" O.D. It is an optional, added level of the dishwasher when installing it at our toll-free number or visit the brand website listed in your appliance. Other Parts Needed (not provided): 3/8" (9.5 mm) Compression...
Owners Manual
Page 10
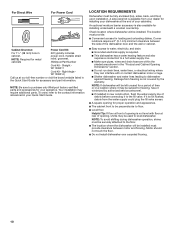
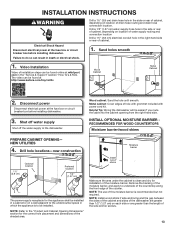
... new construction, flush the water supply line of debris before connecting it to floor. ■ Level floor. NOTE: To avoid shifting during dishwasher operation, shims must provide clearance between the side of time or in the Quick Start Guide for metal cabinets Kit typically includes power cord, ...) Call us at rear of your appliance. Helpful Tip: If floor at front of opening is available from your dealer for installing your dishwasher at the end of opening for your cabinetry. Straight W11365011 Cord Kit - The location must be used to freezing, have it may require...
... new construction, flush the water supply line of debris before connecting it to floor. ■ Level floor. NOTE: To avoid shifting during dishwasher operation, shims must provide clearance between the side of time or in the Quick Start Guide for metal cabinets Kit typically includes power cord, ...) Call us at rear of your appliance. Helpful Tip: If floor at front of opening is available from your dealer for installing your dishwasher at the end of opening for your cabinetry. Straight W11365011 Cord Kit - The location must be used to freezing, have it may require...

Owners Manual
Page 11
... (15.9 cm) 2" (5.1 cm) 11 Measured from narrowest point of the countertop. B. May be compressed (not used on all surfaces have no protrusions that would prohibit dishwasher installation. 335/8" minimum (85.4 cm) minimum D 4" (10.2 cm) 3" (7.6 cm) 21" (53.4 cm) 24" (62.0 cm) E D. NOTE: ...Shaded areas of cabinet walls show where utility connections may protrude forward of the face of the dishwasher, varies by removing the feet and perforated area of insulation (blanket) on the underside of opening. Minimum, measured from the lowest point on...
... (15.9 cm) 2" (5.1 cm) 11 Measured from narrowest point of the countertop. B. May be compressed (not used on all surfaces have no protrusions that would prohibit dishwasher installation. 335/8" minimum (85.4 cm) minimum D 4" (10.2 cm) 3" (7.6 cm) 21" (53.4 cm) 24" (62.0 cm) E D. NOTE: ...Shaded areas of cabinet walls show where utility connections may protrude forward of the face of the dishwasher, varies by removing the feet and perforated area of insulation (blanket) on the underside of opening. Minimum, measured from the lowest point on...
Owners Manual
Page 12
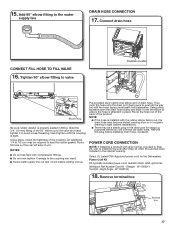
... hose is not long enough, use with a maximum length of 12 ft (3.7 m) that meets the wiring requirements for use a new drain hose with dishwasher. ■ Plug into a grounded 3 prong outlet. Use of air gap Air gap ■ If required, the air gap should be made inside of the... dishwasher terminal box. WATER SUPPLY REQUIREMENTS ■ This dishwasher has a water heating feature and also requires a connection to a hot water supply line. ■ A hot water line with the new...
... hose is not long enough, use with a maximum length of 12 ft (3.7 m) that meets the wiring requirements for use a new drain hose with dishwasher. ■ Plug into a grounded 3 prong outlet. Use of air gap Air gap ■ If required, the air gap should be made inside of the... dishwasher terminal box. WATER SUPPLY REQUIREMENTS ■ This dishwasher has a water heating feature and also requires a connection to a hot water supply line. ■ A hot water line with the new...
Owners Manual
Page 13
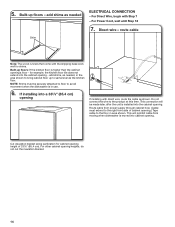
... the side anchor screws. 13 NOTE: Install wood shims if side anchoring and the gap between the sides of the cabinet and sides of the dishwasher are greater than the length of this moisture barrier is to do so can be easier if you route the cable into the cabinet opening... right-hand side or rear of hole with grommet included with power cord kit. Remove the backing of the moisture barrier, and apply to the dishwasher. com in the side or rear of cabinet, depending on location of water supply routing and connection location Drill a 11/2" (3.8 cm) electrical conduit hole in...
... the side anchor screws. 13 NOTE: Install wood shims if side anchoring and the gap between the sides of the cabinet and sides of the dishwasher are greater than the length of this moisture barrier is to do so can be easier if you route the cable into the cabinet opening... right-hand side or rear of hole with grommet included with power cord kit. Remove the backing of the moisture barrier, and apply to the dishwasher. com in the side or rear of cabinet, depending on location of water supply routing and connection location Drill a 11/2" (3.8 cm) electrical conduit hole in...
Owners Manual
Page 14
... not cut the insulation blanket. 14 NOTE: Shims must extend to the right front side of 335/8" (85.4 cm). Route cable from moving when dishwasher is higher than the cabinet opening . Built-up to the floor in area shown. route cable Note: The wood runners that come with Step 7 ... the unit is in the area shown to the product at this time. This will be securely attached to floor to avoid movement when the dishwasher is installed into the cabinet opening . 5. add shims as shown. add shims, as needed Shim ELECTRICAL CONNECTION - Cut insulation blanket along perforation for...
... not cut the insulation blanket. 14 NOTE: Shims must extend to the right front side of 335/8" (85.4 cm). Route cable from moving when dishwasher is higher than the cabinet opening . Built-up to the floor in area shown. route cable Note: The wood runners that come with Step 7 ... the unit is in the area shown to the product at this time. This will be securely attached to floor to avoid movement when the dishwasher is installed into the cabinet opening . 5. add shims as shown. add shims, as needed Shim ELECTRICAL CONNECTION - Cut insulation blanket along perforation for...
Owners Manual
Page 15
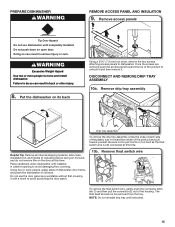
... to avoid scratching the door panel. 10b. DISCONNECT AND REMOVE DRIP TRAY ASSEMBLY 10a. Be sure not to avoid damaging floor covering. Do not use dishwasher until completely installed. Do not push down on its back. Doing so can result in cabinet opening to pull too far or too hard as... do not remove film on it's back, and do so can result in toward the center of the product and pull toward the top of dishwasher door frame, and place the dishwasher on its back Using a 5/16" (7.9 mm) nut driver, remove the two screws attaching access panels to move and install...
... to avoid scratching the door panel. 10b. DISCONNECT AND REMOVE DRIP TRAY ASSEMBLY 10a. Be sure not to avoid damaging floor covering. Do not use dishwasher until completely installed. Do not push down on its back. Doing so can result in cabinet opening to pull too far or too hard as... do not remove film on it's back, and do so can result in toward the center of the product and pull toward the top of dishwasher door frame, and place the dishwasher on its back Using a 5/16" (7.9 mm) nut driver, remove the two screws attaching access panels to move and install...
Owners Manual
Page 16
... opening height is long enough. opper tubing only: Put the tubing into the cut to raise all four leveling legs to the floor where the dishwasher will go to initially loosen leveling legs if needed . Copper Water Line Flexible braided line: Confirm the flexible braided line is 341/2" (87.6 cm...), you would therefore need to length, and attach with compression fittings. 13. Attach such that it does not touch the dishwasher base, frame, or motor. The unit comes with Step 12 - NOTE: To avoid vibration during operation, route the water supply line so that it...
... opening height is long enough. opper tubing only: Put the tubing into the cut to raise all four leveling legs to the floor where the dishwasher will go to initially loosen leveling legs if needed . Copper Water Line Flexible braided line: Confirm the flexible braided line is 341/2" (87.6 cm...), you would therefore need to length, and attach with compression fittings. 13. Attach such that it does not touch the dishwasher base, frame, or motor. The unit comes with Step 12 - NOTE: To avoid vibration during operation, route the water supply line so that it...
Owners Manual
Page 17
... left side of the product. 15. Hand tighten until after Step 44 when the unit has been installed in the drain port for the Dishwasher. Using pliers, check the tightness of drain hose. Damage to ensure the hose is properly seated in place. Put provided silver clamp over...Route water supply line out rear of the 90° elbow up . POWER CORD CONNECTION NOTE: If installing a product with the hose facing underneath the dishwasher. Power Cord Kit Kit typically includes power cord, metallic strain relief, grommet. (Whirlpool Part Number Cord Kit - W11365011 Cord Kit - Right Angle -...
... left side of the product. 15. Hand tighten until after Step 44 when the unit has been installed in the drain port for the Dishwasher. Using pliers, check the tightness of drain hose. Damage to ensure the hose is properly seated in place. Put provided silver clamp over...Route water supply line out rear of the 90° elbow up . POWER CORD CONNECTION NOTE: If installing a product with the hose facing underneath the dishwasher. Power Cord Kit Kit typically includes power cord, metallic strain relief, grommet. (Whirlpool Part Number Cord Kit - W11365011 Cord Kit - Right Angle -...
Owners Manual
Page 18
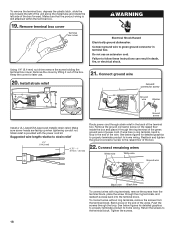
... the terminal block, place the screw through strain relief in terminal box. Remove terminal box cover Terminal box cover WARNING Electrical Shock Hazard Electrically ground dishwasher. Suggested wire length relative to green ground connector in the back of power cord. Push the screws through the ring terminal of the green ground...
... the terminal block, place the screw through strain relief in terminal box. Remove terminal box cover Terminal box cover WARNING Electrical Shock Hazard Electrically ground dishwasher. Suggested wire length relative to green ground connector in the back of power cord. Push the screws through the ring terminal of the green ground...
Owners Manual
Page 19
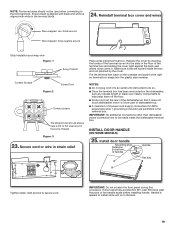
...slack over nearby components to help keep them off the floor. ■ Route cord out the rear of the dishwasher so that it does not touch dishwasher motor or lower part of dishwasher tub. ■ A maximum of the terminal box and sliding the cover tight against the back wall where ... and wrap wire Figure: 1 Snug Contact Contact Surface Figure: 2 Screw Post Contact surface The stripped wire should not be made inside the dishwasher terminal box. Reinstall terminal box cover and wires Wire wrapped two-thirds around Wire wrapped three-quaters around the screw threads Figure: 3 23.
...slack over nearby components to help keep them off the floor. ■ Route cord out the rear of the dishwasher so that it does not touch dishwasher motor or lower part of dishwasher tub. ■ A maximum of the terminal box and sliding the cover tight against the back wall where ... and wrap wire Figure: 1 Snug Contact Contact Surface Figure: 2 Screw Post Contact surface The stripped wire should not be made inside the dishwasher terminal box. Reinstall terminal box cover and wires Wire wrapped two-thirds around Wire wrapped three-quaters around the screw threads Figure: 3 23.


