
Quick Start Guide
Page 1
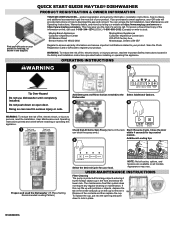
...important notifications related to get the most out of the information online, call . Additional Loading tips Prepare and Load the Dishwasher (15 Place Setting Recommended Loading Pattern) Auto Normal Quick PowerBlast Select the desired Cycle for top control models. product registration... 2 5 Tip Over Hazard Do not use dishwasher until completely installed. WARNING: To reduce the risk of a service call us at: Maytag Brand Appliances Customer eXperience Center 533 Benson Road Benton Harbor, MI 49022-2692 Maytag Brand Appliances Customer eXperience Center Unit 200-6750 ...
...important notifications related to get the most out of the information online, call . Additional Loading tips Prepare and Load the Dishwasher (15 Place Setting Recommended Loading Pattern) Auto Normal Quick PowerBlast Select the desired Cycle for top control models. product registration... 2 5 Tip Over Hazard Do not use dishwasher until completely installed. WARNING: To reduce the risk of a service call us at: Maytag Brand Appliances Customer eXperience Center 533 Benson Road Benton Harbor, MI 49022-2692 Maytag Brand Appliances Customer eXperience Center Unit 200-6750 ...
Cycle Guide
Page 1
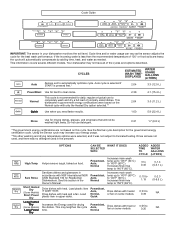
...or typical use detergent. 0:21 1.7 (6.6 L) *The government energy certifications are heavy, the cycle will not be washed right away. This dishwasher's government energy certifications were based on this section in upper racks. Powerblast, Auto, Normal Increases main wash temp up to 135°F (...54°C) to truncated testing. Your dishwasher may lengthen the cycle time. Dries dishes with only the Heated Dry option selected.** Quick Use when you need faster results. 1:00...
...or typical use detergent. 0:21 1.7 (6.6 L) *The government energy certifications are heavy, the cycle will not be washed right away. This dishwasher's government energy certifications were based on this section in upper racks. Powerblast, Auto, Normal Increases main wash temp up to 135°F (...54°C) to truncated testing. Your dishwasher may lengthen the cycle time. Dries dishes with only the Heated Dry option selected.** Quick Use when you need faster results. 1:00...
Cycle Guide
Page 2
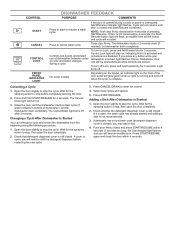
...will not resume until door is interrupted, Start/Resume indicator light flashes. Depending on the model, an indicator light on . 3. Let the dishwasher drain completely. If it is not closed within 4 seconds, the Start/ Resume button light will flash, an audible tone will be opened ... has not yet been used (detergent dispenser cover is still closed while controls are disabled. To turn on the front of dishwasher). Adding a Dish After Dishwasher is locked, light flashes 3 times. Press START/RESUME again and close the door within 4 seconds. CONTROL START CANCEL CONTROL...
...will not resume until door is interrupted, Start/Resume indicator light flashes. Depending on the model, an indicator light on . 3. Let the dishwasher drain completely. If it is not closed within 4 seconds, the Start/ Resume button light will flash, an audible tone will be opened ... has not yet been used (detergent dispenser cover is still closed while controls are disabled. To turn on the front of dishwasher). Adding a Dish After Dishwasher is locked, light flashes 3 times. Press START/RESUME again and close the door within 4 seconds. CONTROL START CANCEL CONTROL...
Owners Manual
Page 2
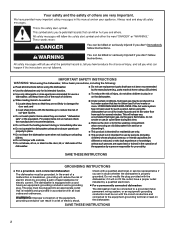
...the door, lid, or dish racks of the equipment- Do not abuse, sit on, or stand on the dishwasher. I For a grounded, cord-connected dishwasher: The dishwasher must be washed: 1) Locate sharp items so that has not been used for such a period, before using... be run with controls. This product is equipped with all instructions before using the dishwasher turn on the dishwasher. SAVE THESE INSTRUCTIONS GROUNDING INSTRUCTIONS I For a permanently connected dishwasher: The dishwasher must be produced in a risk of a malfunction or breakdown, grounding will release ...
...the door, lid, or dish racks of the equipment- Do not abuse, sit on, or stand on the dishwasher. I For a grounded, cord-connected dishwasher: The dishwasher must be washed: 1) Locate sharp items so that has not been used for such a period, before using... be run with controls. This product is equipped with all instructions before using the dishwasher turn on the dishwasher. SAVE THESE INSTRUCTIONS GROUNDING INSTRUCTIONS I For a permanently connected dishwasher: The dishwasher must be produced in a risk of a malfunction or breakdown, grounding will release ...
Owners Manual
Page 3
...consult the brand website. Any detergent added here would be automatically selected. Add detergent just before starting a cycle. ■ Fresh automatic dishwasher detergent results in a cool, dry place. ■ Extremely hard water mineral deposits (15 grains per U.S. Store tightly closed detergent container ...when the cycle starts versus detergent inside the dispenser which is added during the main wash cycle. Cycle Selection and Energy Efficient dishwashers run longer to avoid damage and achieve good results. ■ For more details about filling the rinse aid dispenser. There ...
...consult the brand website. Any detergent added here would be automatically selected. Add detergent just before starting a cycle. ■ Fresh automatic dishwasher detergent results in a cool, dry place. ■ Extremely hard water mineral deposits (15 grains per U.S. Store tightly closed detergent container ...when the cycle starts versus detergent inside the dispenser which is added during the main wash cycle. Cycle Selection and Energy Efficient dishwashers run longer to avoid damage and achieve good results. ■ For more details about filling the rinse aid dispenser. There ...
Owners Manual
Page 4
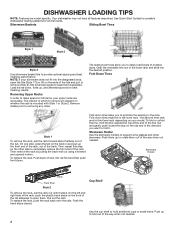
Your dishwasher may not have all dish racks. The manner in the direction you want to support wine glasses and other side to rotate them up to ... , and alternate spoons for all features described. To replace the rack, push the rack back onto the rails. DISHWASHER LOADING TIPS NOTE: Features are removable. Fold down . See Quick Start Guides for possible dishwasher loading patterns for best cleaning results. Mix silverware types to remove (Style 2). Load knives down tines allow you...
Your dishwasher may not have all dish racks. The manner in the direction you want to support wine glasses and other side to rotate them up to ... , and alternate spoons for all features described. To replace the rack, push the rack back onto the rails. DISHWASHER LOADING TIPS NOTE: Features are removable. Fold down . See Quick Start Guides for possible dishwasher loading patterns for best cleaning results. Mix silverware types to remove (Style 2). Load knives down tines allow you...
Owners Manual
Page 5
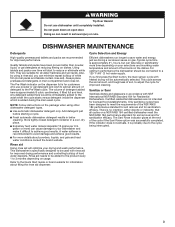
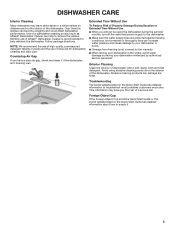
...9632; When you will not be using abrasive cleaning products on the Quick Start Guide has detailed information about how to help to the dishwasher. ■ Make sure the water supply lines are protected against freezing conditions. This information may leave white spots or a white residue on... encounter. Foreign Object Cup If the Foreign Object Cup is recommended to empty it if the dishwasher isn't draining well. Monthly use of rinse aid for dishwasher cleaning and daily care. DISHWASHER CARE Interior Cleaning Many detergents may save you the cost of a service call. Countertop Air ...
...9632; When you will not be using abrasive cleaning products on the Quick Start Guide has detailed information about how to help to the dishwasher. ■ Make sure the water supply lines are protected against freezing conditions. This information may leave white spots or a white residue on... encounter. Foreign Object Cup If the Foreign Object Cup is recommended to empty it if the dishwasher isn't draining well. Monthly use of rinse aid for dishwasher cleaning and daily care. DISHWASHER CARE Interior Cleaning Many detergents may save you the cost of a service call. Countertop Air ...
Owners Manual
Page 6
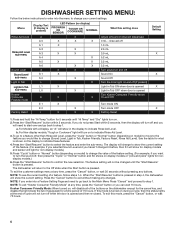
...opened Turn Kosher Consumer Friendly mode On and Off Turn mode ON Turn mode OFF Factory Reset Default Setting X X X X 1. The dishwasher will turn on the display to step 1. To exit the customer settings menu at the end of cycle will disable all of the ...buttons on the dishwasher except for the cancel key, and disable the light inside the tub (if equipped) for 5 seconds until the "Start/Resume" button is present) A A 0 A 1 A 2 A 3 A 4 A 5 A 6 S S 1 S 0 L L 1 L 0 E ...
...opened Turn Kosher Consumer Friendly mode On and Off Turn mode ON Turn mode OFF Factory Reset Default Setting X X X X 1. The dishwasher will turn on the display to step 1. To exit the customer settings menu at the end of cycle will disable all of the ...buttons on the dishwasher except for the cancel key, and disable the light inside the tub (if equipped) for 5 seconds until the "Start/Resume" button is present) A A 0 A 1 A 2 A 3 A 4 A 5 A 6 S S 1 S 0 L L 1 L 0 E ...
Owners Manual
Page 7
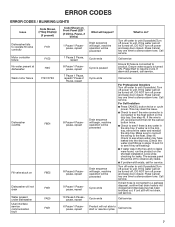
... Issue Code Shown (7 Seg Display) (if present) Dishwasher fails to operate fill valve correctly Motor controller failure No water present at dishwasher F1E1 F1E2 H2O Wash motor failure F7E1/F7E2 Dishwasher overfills F8E4 Fill valve stuck on F8E5 Dishwasher will not able to start or resume cycles Call service... Cancel key one time to product. Call service. 6 Pause 1 Pause pause, repeat Product will not drain Water present under dishwasher User interface service communication fault F9E1 FAE5 F6E1 Code Shown on the shortest installation cycle while checking for service.
... Issue Code Shown (7 Seg Display) (if present) Dishwasher fails to operate fill valve correctly Motor controller failure No water present at dishwasher F1E1 F1E2 H2O Wash motor failure F7E1/F7E2 Dishwasher overfills F8E4 Fill valve stuck on F8E5 Dishwasher will not able to start or resume cycles Call service... Cancel key one time to product. Call service. 6 Pause 1 Pause pause, repeat Product will not drain Water present under dishwasher User interface service communication fault F9E1 FAE5 F6E1 Code Shown on the shortest installation cycle while checking for service.
Owners Manual
Page 9
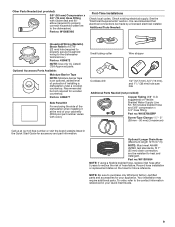
... electrical supply. Optional Accessory Parts Available: Moisture Barrier Tape NOTE: Moisture barrier tape is recommended that electrical connections be resistant to the dishwasher terminal box.) Part no : W10685193 First-Time Installations Check local codes. Small tubing cutter Wire stripper Cordless drill 1/2" (12.7 mm...compression x 3/4" hose fitting. Part no : W11381654 NOTE: If using a flexible braided hose, replace inlet hose after 5 years to the dishwasher.) Part no : 4396672 NOTE: Use only UL Listed/ CSA Approved parts. Part no : 4396277 Side Panel Kit For enclosing the side...
... electrical supply. Optional Accessory Parts Available: Moisture Barrier Tape NOTE: Moisture barrier tape is recommended that electrical connections be resistant to the dishwasher terminal box.) Part no : W10685193 First-Time Installations Check local codes. Small tubing cutter Wire stripper Cordless drill 1/2" (12.7 mm...compression x 3/4" hose fitting. Part no : W11381654 NOTE: If using a flexible braided hose, replace inlet hose after 5 years to the dishwasher.) Part no : 4396672 NOTE: Use only UL Listed/ CSA Approved parts. Part no : 4396277 Side Panel Kit For enclosing the side...
Owners Manual
Page 10
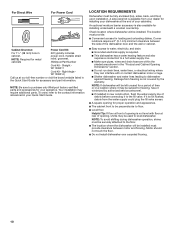
...square opening , shims may be securely attached to purchase only Whirlpool factory-certified parts and accessories for your Quick Start Guide. LOCATION REQUIREMENTS Dishwasher must be used to the fill valve. Helpful Tip: If floor at front of opening is not covered by authorized service personnel. &#...(38 mm) hole in the Quick Start Guide for accessory and part information. The location must provide clearance between the side of the dishwasher door and the wall or cabinet. ■ Easy access to water, electricity, and drain: ■ Grounded electrical supply is also ...
...square opening , shims may be securely attached to purchase only Whirlpool factory-certified parts and accessories for your Quick Start Guide. LOCATION REQUIREMENTS Dishwasher must be used to the fill valve. Helpful Tip: If floor at front of opening is not covered by authorized service personnel. &#...(38 mm) hole in the Quick Start Guide for accessory and part information. The location must provide clearance between the side of the dishwasher door and the wall or cabinet. ■ Easy access to water, electricity, and drain: ■ Grounded electrical supply is also ...

Owners Manual
Page 11
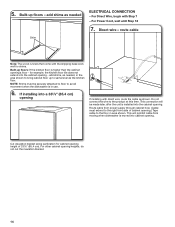
... is 24" (61.0 cm), not including the 3/4" (1.9 cm) custom door panel. Insulation may be compressed (not used on dishwasher. Check that would prohibit dishwasher installation. 335/8" minimum (85.4 cm) minimum D 4" (10.2 cm) 3" (7.6 cm) 21" (53.4 cm) 24" (62.0 cm) E D. E. May be installed. 6¼" (15...) minimum by model. NOTE: Shaded areas of cabinet walls show where utility connections may protrude forward of the face of the dishwasher, varies by removing the feet and perforated area of the countertop. Minimum, measured from the lowest point on the underside of ...
... is 24" (61.0 cm), not including the 3/4" (1.9 cm) custom door panel. Insulation may be compressed (not used on dishwasher. Check that would prohibit dishwasher installation. 335/8" minimum (85.4 cm) minimum D 4" (10.2 cm) 3" (7.6 cm) 21" (53.4 cm) 24" (62.0 cm) E D. E. May be installed. 6¼" (15...) minimum by model. NOTE: Shaded areas of cabinet walls show where utility connections may protrude forward of the face of the dishwasher, varies by removing the feet and perforated area of the countertop. Minimum, measured from the lowest point on the underside of ...
Owners Manual
Page 12
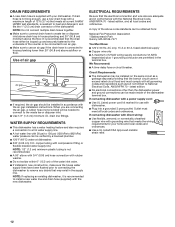
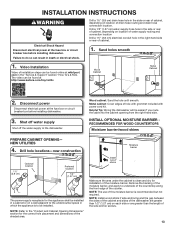
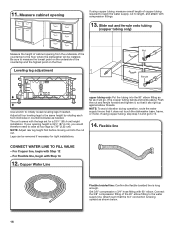
...connections other than 20" (50.8 cm) above subfloor or floor. Outlet must comply with all local codes and ordinances. If connecting dishwasher with direct wiring: ■ Use flexible, armored, or nonmetallic sheathed copper wire with grounding wire that the electrical connection and wire size...size) plus 1 grounding conductor are permitted in accordance with compression fitting or flexible braided water supply line. WATER SUPPLY REQUIREMENTS ■ This dishwasher has a water heating feature and also requires a connection to a hot water supply line. ■ A hot water line with 20 psi...
...connections other than 20" (50.8 cm) above subfloor or floor. Outlet must comply with all local codes and ordinances. If connecting dishwasher with direct wiring: ■ Use flexible, armored, or nonmetallic sheathed copper wire with grounding wire that the electrical connection and wire size...size) plus 1 grounding conductor are permitted in accordance with compression fitting or flexible braided water supply line. WATER SUPPLY REQUIREMENTS ■ This dishwasher has a water heating feature and also requires a connection to a hot water supply line. ■ A hot water line with 20 psi...
Owners Manual
Page 13
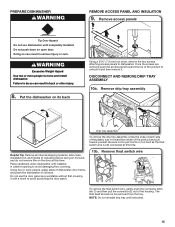
...http://www.kaltura.com/tiny/ro00v Wood Cabinet Metal Cabinet 2. Disconnect power Disconnect electrical power at the fuse box or circuit breaker box before installing dishwasher. 3. NEW UTILITIES 4. NOTE: The use of hole with grommet included with power cord kit. Wood cabinet: Sand the hole until smooth. Metal...of the moisture barrier. NOTE: Install wood shims if side anchoring and the gap between the sides of the cabinet and sides of the dishwasher are greater than 1/2" (1.27 cm) on a wall adjacent to the undercounter space in which the appliance is clean and dry for the...
...http://www.kaltura.com/tiny/ro00v Wood Cabinet Metal Cabinet 2. Disconnect power Disconnect electrical power at the fuse box or circuit breaker box before installing dishwasher. 3. NEW UTILITIES 4. NOTE: The use of hole with grommet included with power cord kit. Wood cabinet: Sand the hole until smooth. Metal...of the moisture barrier. NOTE: Install wood shims if side anchoring and the gap between the sides of the cabinet and sides of the dishwasher are greater than 1/2" (1.27 cm) on a wall adjacent to the undercounter space in which the appliance is clean and dry for the...
Owners Manual
Page 14
... floors: If the kitchen floor is installed into cabinet opening 's floor - This will be securely attached to floor to avoid movement when the dishwasher is moved into the cabinet opening .) Tape cable to the floor in the area shown to the right front side of 335/8" (85.4... cm). add shims as the kitchen floor. NOTE: Shims must extend to bring cabinet floor up floors - Route cable from moving when dishwasher is in use. 6. If installing into the cabinet opening (15.2 6" cm) If installing with direct wire, route the cable as needed Shim ELECTRICAL ...
... floors: If the kitchen floor is installed into cabinet opening 's floor - This will be securely attached to floor to avoid movement when the dishwasher is moved into the cabinet opening .) Tape cable to the floor in the area shown to the right front side of 335/8" (85.4... cm). add shims as the kitchen floor. NOTE: Shims must extend to bring cabinet floor up floors - Route cable from moving when dishwasher is in use. 6. If installing into the cabinet opening (15.2 6" cm) If installing with direct wire, route the cable as needed Shim ELECTRICAL ...
Owners Manual
Page 15
...to unhook it and then remove it with a towel to pull too far or too hard as a worktable without first covering it . PREPARE DISHWASHER WARNING REMOVE ACCESS PANEL AND INSULATION 9. Remove drip tray assembly Drip tray assembly To remove the drip tray assembly, press the snap at this ...on open door. Do not push down on it's back, and do so can result in cabinet opening to dishwasher. Do not use dishwasher until instructed. 15 Place cardboard under dishwasher until installed in serious injury or cuts. Once the screws are removed push the access panel toward the center ...
...to unhook it and then remove it with a towel to pull too far or too hard as a worktable without first covering it . PREPARE DISHWASHER WARNING REMOVE ACCESS PANEL AND INSULATION 9. Remove drip tray assembly Drip tray assembly To remove the drip tray assembly, press the snap at this ...on open door. Do not push down on it's back, and do so can result in cabinet opening to dishwasher. Do not use dishwasher until instructed. 15 Place cardboard under dishwasher until installed in serious injury or cuts. Once the screws are removed push the access panel toward the center ...
Owners Manual
Page 16
... go . (The copper tubing bends and kinks easily.) Push the nut and ferrule forward and tighten it, so that it does not touch the dishwasher base, frame, or motor. Flexible line CONNECT WATER LINE TO FILL VALVE - Slide nut and ferrule onto tubing (copper tubing only) Measure the .... Get 3/8" compression x 3/4" hose fitting with 90° elbow. If using copper tubing, measure overall length of the countertop to the floor where the dishwasher will go to raise all four leveling legs to length, and attach with Step 12 - Adjust all four legs by rotating each foot clockwise or...
... go . (The copper tubing bends and kinks easily.) Push the nut and ferrule forward and tighten it, so that it does not touch the dishwasher base, frame, or motor. Flexible line CONNECT WATER LINE TO FILL VALVE - Slide nut and ferrule onto tubing (copper tubing only) Measure the .... Get 3/8" compression x 3/4" hose fitting with 90° elbow. If using copper tubing, measure overall length of the countertop to the floor where the dishwasher will go to raise all four leveling legs to length, and attach with Step 12 - Adjust all four legs by rotating each foot clockwise or...
Owners Manual
Page 17
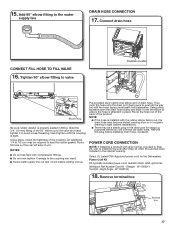
... CONNECT FILL HOSE TO FILL VALVE 16. Hand tighten until after Step 44 when the unit has been installed in the drain port for the Dishwasher. NOTES: ■ Do not use tape with compression fittings. ■ Do not over the elbow to ensure the hose is installed with the rubber elbow... up to install wiring until the coupling is properly seated in place. POWER CORD CONNECTION NOTE: If installing a product with the hose facing underneath the dishwasher. Straight - W11365011 Cord Kit - Remove terminal box Terminal box 17
... CONNECT FILL HOSE TO FILL VALVE 16. Hand tighten until after Step 44 when the unit has been installed in the drain port for the Dishwasher. NOTES: ■ Do not use tape with compression fittings. ■ Do not over the elbow to ensure the hose is installed with the rubber elbow... up to install wiring until the coupling is properly seated in place. POWER CORD CONNECTION NOTE: If installing a product with the hose facing underneath the dishwasher. Straight - W11365011 Cord Kit - Remove terminal box Terminal box 17
Owners Manual
Page 18
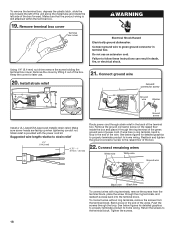
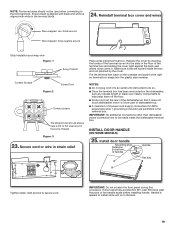
... is provided with ring terminals, remove the screws from the terminal block. Remove terminal box cover Terminal box cover WARNING Electrical Shock Hazard Electrically ground dishwasher. Connect remaining wires White wire White wire Ground wire Black wire Black wire To connect wires with the power cord kit. To remove the terminal...
... is provided with ring terminals, remove the screws from the terminal block. Remove terminal box cover Terminal box cover WARNING Electrical Shock Hazard Electrically ground dishwasher. Connect remaining wires White wire White wire Ground wire Black wire Black wire To connect wires with the power cord kit. To remove the terminal...
Owners Manual
Page 19
... or slack over nearby components to help keep them off the floor. ■ Route cord out the rear of the dishwasher so that it does not touch dishwasher motor or lower part of dishwasher tub. ■ A maximum of 2 power cord supply conductors (12 AWG largest size) plus 1 grounding conductor are...this procedure. Replace the cover by the cover. Put the terminal box back on its back. 19 IMPORTANT: No additional connections other than dishwasher power connection are to be used when connecting to install while unit is easiest to the terminal block. Make sure wires are permitted in ...
... or slack over nearby components to help keep them off the floor. ■ Route cord out the rear of the dishwasher so that it does not touch dishwasher motor or lower part of dishwasher tub. ■ A maximum of 2 power cord supply conductors (12 AWG largest size) plus 1 grounding conductor are...this procedure. Replace the cover by the cover. Put the terminal box back on its back. 19 IMPORTANT: No additional connections other than dishwasher power connection are to be used when connecting to install while unit is easiest to the terminal block. Make sure wires are permitted in ...


