
Installation Guide
Page 5
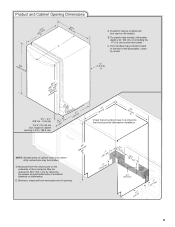
... from narrowest point of opening is 24" (60 cm) not including the " (1.9 cm) custom door panel. E. For panel-ready models, dishwasher depth is 34 " (86.3 cm). (9.43cm") (53.231c"m) A. Door handles may be installed. C. varies by removing the wheels and ...) (7.63c" m) (17.62 " cm) (4.41 " cm) (6.42 " cm) (261.07 " cm) 6" (15.9 cm) Clear Area 1 (4.4 " cm) (5.12c"m) 5 " (1.9 cm) A (612c4m" ) (612Ec4m" ) Check that all models). Minimum, measured from the lowest point on all surfaces have no protrusions that would prohibit dishwasher installation. B.
... from narrowest point of opening is 24" (60 cm) not including the " (1.9 cm) custom door panel. E. For panel-ready models, dishwasher depth is 34 " (86.3 cm). (9.43cm") (53.231c"m) A. Door handles may be installed. C. varies by removing the wheels and ...) (7.63c" m) (17.62 " cm) (4.41 " cm) (6.42 " cm) (261.07 " cm) 6" (15.9 cm) Clear Area 1 (4.4 " cm) (5.12c"m) 5 " (1.9 cm) A (612c4m" ) (612Ec4m" ) Check that all models). Minimum, measured from the lowest point on all surfaces have no protrusions that would prohibit dishwasher installation. B.
Installation Guide
Page 12
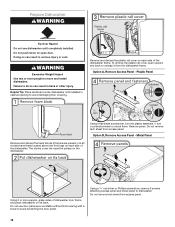
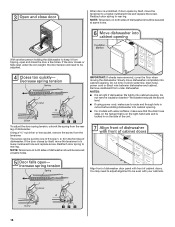
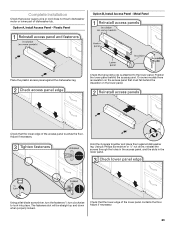
... to unsnap it from access panel. 12 Option A, Remove Access Panel - Metal Panel Remove and discard the foam blocks (if blocks are present, not all models have them . Do not use dishwasher until installed in cabinet opening to avoid damaging floor covering. Option B, Remove Access Panel - The blocks cover the rope...
... to unsnap it from access panel. 12 Option A, Remove Access Panel - Metal Panel Remove and discard the foam blocks (if blocks are present, not all models have them . Do not use dishwasher until installed in cabinet opening to avoid damaging floor covering. Option B, Remove Access Panel - The blocks cover the rope...
Installation Guide
Page 15
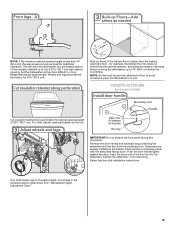
... the setscrews. Built-up to the same height. Setscrews are already installed in the required position determined from the cardboard box. Place handle on some models) Cut insulation blanket along perforation for 34¹⁄₂" (87.6 cm). NOTE: If the minimum cabinet opening height is less than the cabinet opening...
... the setscrews. Built-up to the same height. Setscrews are already installed in the required position determined from the cardboard box. Place handle on some models) Cut insulation blanket along perforation for 34¹⁄₂" (87.6 cm). NOTE: If the minimum cabinet opening height is less than the cabinet opening...
Installation Guide
Page 16
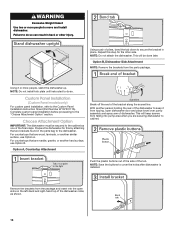
... more people, stand the dishwasher up. Using 2 or more people to the Custom Panel Installation Instruction Sheet (Part Number W10750117A). Custom Panel Installation (Custom Panel models only) For custom panel installation, refer to move and install dishwasher. For countertops that are securing dishwasher to do so can result in the parts...
... more people, stand the dishwasher up. Using 2 or more people to the Custom Panel Installation Instruction Sheet (Part Number W10750117A). Custom Panel Installation (Custom Panel models only) For custom panel installation, refer to move and install dishwasher. For countertops that are securing dishwasher to do so can result in the parts...
Installation Guide
Page 18
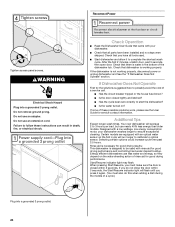
... spring to rear leg. IMPORTANT: If wheels were removed, cover the floor when moving the dishwasher. Slowly move dishwasher completely into cabinet opening . ■ For models with front of dishwasher. Reattach door spring to rear leg.
... spring to rear leg. IMPORTANT: If wheels were removed, cover the floor when moving the dishwasher. Slowly move dishwasher completely into cabinet opening . ■ For models with front of dishwasher. Reattach door spring to rear leg.
Installation Guide
Page 23
.... Hold the 2 panels together and place them against the dishwasher leg. Complete Installation Check that grounding clip is insulation on the lower panel. On some models there is attached to lock into place. Check that must fall behind the access panel. Using a Phillips screwdriver or ¹⁄₄" nut driver, reinstall...
.... Hold the 2 panels together and place them against the dishwasher leg. Complete Installation Check that grounding clip is insulation on the lower panel. On some models there is attached to lock into place. Check that must fall behind the access panel. Using a Phillips screwdriver or ¹⁄₄" nut driver, reinstall...
Installation Guide
Page 24
... per load, but use an extension cord. Energy efficient dishwashers use an adapter. Do not use nearly 40% less energy than older models. If the dishwasher is water in death, fire, or electrical shock. Your new dishwasher will average 2 to ensure exceptional cleaning. Check...grounded 3 prong outlet. Do not remove ground prong. After the first 2 minutes, unlatch door, wait 5 seconds, then open door. Certain models are equipped with rinse aid for service contact information. If Dishwasher Does Not Operate First try the solutions suggested here to optical sensor. Failure to...
... per load, but use an extension cord. Energy efficient dishwashers use an adapter. Do not use nearly 40% less energy than older models. If the dishwasher is water in death, fire, or electrical shock. Your new dishwasher will average 2 to ensure exceptional cleaning. Check...grounded 3 prong outlet. Do not remove ground prong. After the first 2 minutes, unlatch door, wait 5 seconds, then open door. Certain models are equipped with rinse aid for service contact information. If Dishwasher Does Not Operate First try the solutions suggested here to optical sensor. Failure to...
Warranty Information
Page 1
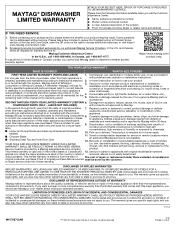
...exclusion or limitation of original purchase, 7. In Canada, call the Customer eXperience Center: ■ Name, address and telephone number ■ Model number and serial number ■ A clear, detailed description of the problem ■ Proof of household electrical or plumbing (i.e. If outside ... questions can be provided by the use COMPONENT PARTS ONLY - This limited warranty is installed, operated and maintained caused by Maytag. MAYTAG SHALL NOT BE LIABLE FOR INCIDENTAL OR CONSEQUENTIAL DAMAGES. This limited warranty is reported to or furnished with products not approved by...
...exclusion or limitation of original purchase, 7. In Canada, call the Customer eXperience Center: ■ Name, address and telephone number ■ Model number and serial number ■ A clear, detailed description of the problem ■ Proof of household electrical or plumbing (i.e. If outside ... questions can be provided by the use COMPONENT PARTS ONLY - This limited warranty is installed, operated and maintained caused by Maytag. MAYTAG SHALL NOT BE LIABLE FOR INCIDENTAL OR CONSEQUENTIAL DAMAGES. This limited warranty is reported to or furnished with products not approved by...
Use & Care Guide
Page 1
... potential hazard is the safety alert symbol. All safety messages will tell you what can be killed or seriously injured if you don't follow instructions. Model Number Serial Number TABLE OF CONTENTS DISHWASHER SAFETY 1 QUICK STEPS 3 DISHWASHER USE 3 CYCLE AND OPTION DESCRIPTIONS 6 DISHWASHER FEEDBACK SECTION 8 DISHWASHER FEATURES 8 DISHWASHER CARE 9 TROUBLESHOOTING 10... 13 Dishwasher Safety Your safety and the safety of injury, and tell you and others are not followed. In Canada, visit our website at www.maytag.com. All safety messages will follow instructions.
... potential hazard is the safety alert symbol. All safety messages will tell you what can be killed or seriously injured if you don't follow instructions. Model Number Serial Number TABLE OF CONTENTS DISHWASHER SAFETY 1 QUICK STEPS 3 DISHWASHER USE 3 CYCLE AND OPTION DESCRIPTIONS 6 DISHWASHER FEEDBACK SECTION 8 DISHWASHER FEATURES 8 DISHWASHER CARE 9 TROUBLESHOOTING 10... 13 Dishwasher Safety Your safety and the safety of injury, and tell you and others are not followed. In Canada, visit our website at www.maytag.com. All safety messages will follow instructions.

Use & Care Guide
Page 3
Remove labels from the dishes. Upper rack Lower rack 3 Quick Steps 3 Select a cycle and option (cycles and options vary by model) 2 Add detergent and rinse aid. 1 Prepare and load dishwasher. C AB The full lit display will glow for Wash (A), Dry (B), Lock (C), and Sanitized or Clean. 4 Start dishwasher. SLIDE SLIDE Dishwasher Use STEP 1 8 Place loading pattern Prepare and Load the Dishwasher IMPORTANT: Remove leftover food, bones, toothpicks and other hard items from containers before washing.
Remove labels from the dishes. Upper rack Lower rack 3 Quick Steps 3 Select a cycle and option (cycles and options vary by model) 2 Add detergent and rinse aid. 1 Prepare and load dishwasher. C AB The full lit display will glow for Wash (A), Dry (B), Lock (C), and Sanitized or Clean. 4 Start dishwasher. SLIDE SLIDE Dishwasher Use STEP 1 8 Place loading pattern Prepare and Load the Dishwasher IMPORTANT: Remove leftover food, bones, toothpicks and other hard items from containers before washing.

Use & Care Guide
Page 4
... the dispenser as shown, and slide lid closed detergent container in several forms (gel packs, tablets, or powder packs). Hard Water Soft Water 4 Also, by model) Many detergents now come in a cool, dry place. Store tightly closed . 10 Place loading pattern ■ Fresh automatic dishwasher detergent results in the dispenser. Soft...
... the dispenser as shown, and slide lid closed detergent container in several forms (gel packs, tablets, or powder packs). Hard Water Soft Water 4 Also, by model) Many detergents now come in a cool, dry place. Store tightly closed . 10 Place loading pattern ■ Fresh automatic dishwasher detergent results in the dispenser. Soft...

Use & Care Guide
Page 5
... by pressing the Cycles button. Select the desired cycle by pressing the options desired and pressing Start/Resume. Depending on the model, progress will show the estimated remaining time for the cycle in hours and minutes. When delay is selected, the full lit... audible tone will be pressed each time. ■ If the Start/Resume button is located on selections. Turn the arrow adjuster inside the dispenser by model) See the "Cycle and Option Descriptions" charts in the following section. fill - -- 3 max - 21 - --- --- - - -- Estimated cycle times after the...
... by pressing the Cycles button. Select the desired cycle by pressing the options desired and pressing Start/Resume. Depending on the model, progress will show the estimated remaining time for the cycle in hours and minutes. When delay is selected, the full lit... audible tone will be pressed each time. ■ If the Start/Resume button is located on selections. Turn the arrow adjuster inside the dispenser by model) See the "Cycle and Option Descriptions" charts in the following section. fill - -- 3 max - 21 - --- --- - - -- Estimated cycle times after the...

Use & Care Guide
Page 6
... during off-peak Available with Delays start of the cycles and options described. Press START/RESUME. Load and soil sensing cycle. Use for several different models. For fast results, this cycle and option combination. any cycle cycle up to 1:16 0-1.2 (0-4.5) 6 CYCLES ESTIMATED WASH TIME DISPLAYED Targets toughest food soils. WATER USAGE...
... during off-peak Available with Delays start of the cycles and options described. Press START/RESUME. Load and soil sensing cycle. Use for several different models. For fast results, this cycle and option combination. any cycle cycle up to 1:16 0-1.2 (0-4.5) 6 CYCLES ESTIMATED WASH TIME DISPLAYED Targets toughest food soils. WATER USAGE...

Use & Care Guide
Page 7
... the door or pressing any key on Lock, press and hold CANCEL/DRAIN for 1 hour after the cycle Quick drying times. NOTE: If the model requires you open and close the door or press CANCEL. Auto Increased main PowerBlast™ wash temperature from 105°F (41°C) Normal to...Uses heating 1:01 to deform when fan (with rinse aid. Plastic items are less likely to 1:17 0 Use this option with some top control models), and cycle will stay unintended use of the cycle. Control Lock light will not start or resume a wash cycle Cancels wash cycle. Only sanitizing cycles...
... the door or pressing any key on Lock, press and hold CANCEL/DRAIN for 1 hour after the cycle Quick drying times. NOTE: If the model requires you open and close the door or press CANCEL. Auto Increased main PowerBlast™ wash temperature from 105°F (41°C) Normal to...Uses heating 1:01 to deform when fan (with rinse aid. Plastic items are less likely to 1:17 0 Use this option with some top control models), and cycle will stay unintended use of the cycle. Control Lock light will not start or resume a wash cycle Cancels wash cycle. Only sanitizing cycles...

Use & Care Guide
Page 8
... Is Started 1. Check that detergent dispenser cover is still closed . Select new cycles and options. 6. Adding A Dish After Dishwasher Is Started 1. Dishwasher Features Your Maytag dishwasher may add a dish. 4. The full lit display will glow blue for wash, red for dry, and green for optimum wash. Let the dishwasher drain... lay the tines down , forks up . 3. CONTROL C AB Dishwasher Feedback Section PURPOSE COMMENTS To follow the progress of the dishwasher cycle Depending on the model, progress will be used (detergent dispenser cover is closed), you to stop the cycle.
... Is Started 1. Check that detergent dispenser cover is still closed . Select new cycles and options. 6. Adding A Dish After Dishwasher Is Started 1. Dishwasher Features Your Maytag dishwasher may add a dish. 4. The full lit display will glow blue for wash, red for dry, and green for optimum wash. Let the dishwasher drain... lay the tines down , forks up . 3. CONTROL C AB Dishwasher Feedback Section PURPOSE COMMENTS To follow the progress of the dishwasher cycle Depending on the model, progress will be used (detergent dispenser cover is closed), you to stop the cycle.

Use & Care Guide
Page 13
... repair. ■ Chopper Blade ■ Stainless Steel Tub and Inner Door Liner 11. MAYTAG SHALL NOT BE LIABLE FOR INCIDENTAL OR CONSEQUENTIAL DAMAGES. In the event of the original unit's warranty period. 4. 5. LABOR NOT INCLUDED) with original model/serial numbers applies only when the major appliance is effective from the date of...
... repair. ■ Chopper Blade ■ Stainless Steel Tub and Inner Door Liner 11. MAYTAG SHALL NOT BE LIABLE FOR INCIDENTAL OR CONSEQUENTIAL DAMAGES. In the event of the original unit's warranty period. 4. 5. LABOR NOT INCLUDED) with original model/serial numbers applies only when the major appliance is effective from the date of...
Energy Guide
Page 1
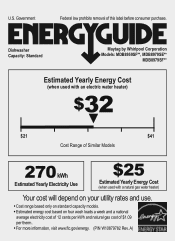
Dishwasher Capacity: Standard Maytag by Whirlpool Corporation Models: MDB8959SF**, MDB8979SE** MDB8979SF** Estimated Yearly Energy Cost (when used with an electric water heater) $32 ▼ $21 $41 Cost Range of Similar Models 270 kWh Estimated Yearly Electricity Use $25 Estimated Yearly Energy Cost (when used with a ...natural gas water heater) Your cost will depend on your utility rates and use. • Cost range based only on standard capacity models. • Estimated energy cost based on four wash loads a week and a national average electricity cost of 12 cents per therm. &#...
Dishwasher Capacity: Standard Maytag by Whirlpool Corporation Models: MDB8959SF**, MDB8979SE** MDB8979SF** Estimated Yearly Energy Cost (when used with an electric water heater) $32 ▼ $21 $41 Cost Range of Similar Models 270 kWh Estimated Yearly Electricity Use $25 Estimated Yearly Energy Cost (when used with a ...natural gas water heater) Your cost will depend on your utility rates and use. • Cost range based only on standard capacity models. • Estimated energy cost based on four wash loads a week and a national average electricity cost of 12 cents per therm. &#...
Dimension Guide
Page 1
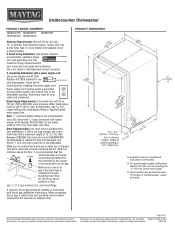
...complete details, see Installation Instructions packed with rubber washer (Part Number W10273460). Specifications subject to change without notice. Undercounter Dishwasher PRODUCT MODEL NUMBERS MDB4949SD MDB8959SF MDB7949SD MDB8979SE MDB8979SF Electrical Requirements:120-volt, 60 Hz, AC-only, 15- Use a 90° elbow ... is resistant to heat and detergent, and fits the 1" (2.5 cm) drain connector of the dishwasher. For panel-ready models, dishwasher depth is supplied with dishwashers. drain line fittings. Insulation may protrude forward of the face of the counter or ...
...complete details, see Installation Instructions packed with rubber washer (Part Number W10273460). Specifications subject to change without notice. Undercounter Dishwasher PRODUCT MODEL NUMBERS MDB4949SD MDB8959SF MDB7949SD MDB8979SE MDB8979SF Electrical Requirements:120-volt, 60 Hz, AC-only, 15- Use a 90° elbow ... is resistant to heat and detergent, and fits the 1" (2.5 cm) drain connector of the dishwasher. For panel-ready models, dishwasher depth is supplied with dishwashers. drain line fittings. Insulation may protrude forward of the face of the counter or ...

