
Installation Guide
Page 2
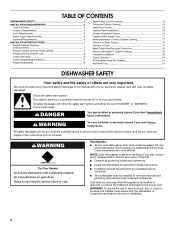
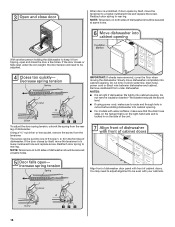
.... You Need to Drain 19 Make Direct Wire Electrical Connection 20 Secure Dishwasher in serious injury or cuts. Existing Utilities 7 Prepare Cabinet Opening-New Utilities 7 Prepare and Route Water Line 8 Install Drain Hose 9 Install Optional Moisture Barrier 11 Prepare Dishwasher 12 Make Power Cord Connection 13 Determine Cabinet Opening 14 Install Door Handle 15 Custom Panel Installation 16 Choose Attachment Option 16 Prepare Water Supply Line 17 Move Dishwasher Close to Cabinet Opening 17 Connect to Water Supply 19 Connect to : ■ Slowly open door. This...
.... You Need to Drain 19 Make Direct Wire Electrical Connection 20 Secure Dishwasher in serious injury or cuts. Existing Utilities 7 Prepare Cabinet Opening-New Utilities 7 Prepare and Route Water Line 8 Install Drain Hose 9 Install Optional Moisture Barrier 11 Prepare Dishwasher 12 Make Power Cord Connection 13 Determine Cabinet Opening 14 Install Door Handle 15 Custom Panel Installation 16 Choose Attachment Option 16 Prepare Water Supply Line 17 Move Dishwasher Close to Cabinet Opening 17 Connect to Water Supply 19 Connect to : ■ Slowly open door. This...
Installation Guide
Page 3
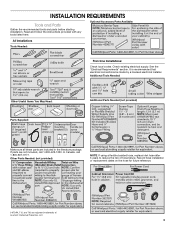
... hose, replace inlet hose after 5 years to reduce the risk of Acument Intellectual Properties, LLC. 3 If parts are included in the literature package. Check existing electrical supply. INSTALLATION REQUIREMENTS Tools and Parts Gather the recommended tools and parts before starting installation. Read and follow the instructions provided with any tools listed here. In Canada, call 1-800-422-1230. Optional Accessory Parts Available: All Installations Tools Needed: First-time Installations...
... hose, replace inlet hose after 5 years to reduce the risk of Acument Intellectual Properties, LLC. 3 If parts are included in the literature package. Check existing electrical supply. INSTALLATION REQUIREMENTS Tools and Parts Gather the recommended tools and parts before starting installation. Read and follow the instructions provided with any tools listed here. In Canada, call 1-800-422-1230. Optional Accessory Parts Available: All Installations Tools Needed: First-time Installations...
Installation Guide
Page 4
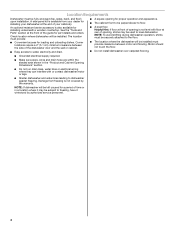
..., wires and drain hose are within the shaded area shown in a location where it may be perpendicular to freezing, have it winterized by the warranty. Damage from your cabinetry. Corner locations require a 2" (5.1 cm) minimum clearance between motor and flooring. Location Requirements Dishwasher must be installed. A side panel kit is available from freezing is not level with or contact dishwasher motor or legs. ■ Shelter dishwasher and water lines...
..., wires and drain hose are within the shaded area shown in a location where it may be perpendicular to freezing, have it winterized by the warranty. Damage from your cabinetry. Corner locations require a 2" (5.1 cm) minimum clearance between motor and flooring. Location Requirements Dishwasher must be installed. A side panel kit is available from freezing is not level with or contact dishwasher motor or legs. ■ Shelter dishwasher and water lines...
Installation Guide
Page 6
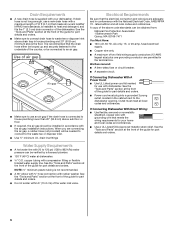
... dishwasher. A copy of the guide for use an air gap if the drain hose is recommended that the electrical connection and wire size are connecting the air gap, a rubber hose (not provided) will be looped up and securely fastened to the waste tee or disposer inlet. ■ Use ½" minimum I.D. See the "Tools and Parts" section at the front of the above the floor. If Connecting Dishwasher With A Power Cord: ■ Use UL Listed power cord kit...
... dishwasher. A copy of the guide for use an air gap if the drain hose is recommended that the electrical connection and wire size are connecting the air gap, a rubber hose (not provided) will be looped up and securely fastened to the waste tee or disposer inlet. ■ Use ½" minimum I.D. See the "Tools and Parts" section at the front of the above the floor. If Connecting Dishwasher With A Power Cord: ■ Use UL Listed power cord kit...
Installation Guide
Page 7
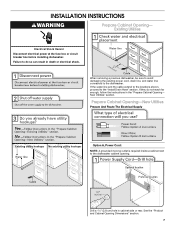
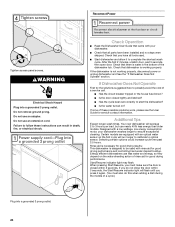
... the existing power cord, drain line, and water line connected to the "Install Drain Hose" section. New Utilities" section. Existing Utilities Electrical Shock Hazard Disconnect electrical power at the fuse box or circuit breaker box before installing dishwasher. Failure to the dishwasher cabinet opening. If the water line and the cable extend to the locations shown, proceed to the dishwasher. Prepare Cabinet Opening-New Utilities Prepare And Route The Electrical Supply Option A, Power Cord: NOTE: A grounded 3 prong outlet is required inside a cabinet next...
... the existing power cord, drain line, and water line connected to the "Install Drain Hose" section. New Utilities" section. Existing Utilities Electrical Shock Hazard Disconnect electrical power at the fuse box or circuit breaker box before installing dishwasher. Failure to the dishwasher cabinet opening. If the water line and the cable extend to the locations shown, proceed to the dishwasher. Prepare Cabinet Opening-New Utilities Prepare And Route The Electrical Supply Option A, Power Cord: NOTE: A grounded 3 prong outlet is required inside a cabinet next...
Installation Guide
Page 9
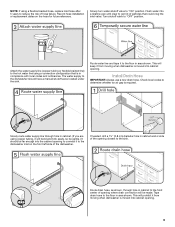
... have a manual shutoff valve located under the sink. Flush water into cabinet opening. 9 This will bend and kink easily, so be made. Attach the water supply line (copper tubing or flexible braided line) to the hot water line using a flexible braided hose, replace inlet hose after 5 years to get rid of the dishwasher. Record hose installation or replacement dates on the front left side of particles that is required. Slowly turn water shutoff valve to...
... have a manual shutoff valve located under the sink. Flush water into cabinet opening. 9 This will bend and kink easily, so be made. Attach the water supply line (copper tubing or flexible braided line) to the hot water line using a flexible braided hose, replace inlet hose after 5 years to get rid of the dishwasher. Record hose installation or replacement dates on the front left side of particles that is required. Slowly turn water shutoff valve to...
Installation Guide
Page 16
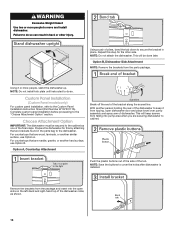
... more people to cabinet. NOTE: Save the buttons to the "Choose Attachment Option" section. For countertops that are marble, granite, or another similar surface, use Option B. NOTE: Do not attach the dishwasher. Option B, Dishwasher Side Attachment NOTE: Remove the brackets from falling into the open dishwasher door and place towel over pump assembly and spray arm of the final steps. Complete custom panel installation before proceeding to...
... more people to cabinet. NOTE: Save the buttons to the "Choose Attachment Option" section. For countertops that are marble, granite, or another similar surface, use Option B. NOTE: Do not attach the dishwasher. Option B, Dishwasher Side Attachment NOTE: Remove the brackets from falling into the open dishwasher door and place towel over pump assembly and spray arm of the final steps. Complete custom panel installation before proceeding to...
Installation Guide
Page 17
...; elbow to the water supply line prior to move and install dishwasher. Tilt dishwasher backward on wheels and move and install dishwasher. NOTE: Do not push on the front of the panel or on the left-hand side of opening and drain hose is near the center of the cabinet opening . See the "Tools and Parts" section at the edges of the guide for the other...
...; elbow to the water supply line prior to move and install dishwasher. Tilt dishwasher backward on wheels and move and install dishwasher. NOTE: Do not push on the front of the panel or on the left-hand side of opening and drain hose is near the center of the cabinet opening . See the "Tools and Parts" section at the edges of the guide for the other...
Installation Guide
Page 18
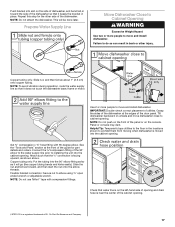
... sliding dishwasher into cabinet opening. ■ For models with water softener, make sure to a higher-numbered hole and replace the screw. Do not kink or pinch water line, drain hose, power cord or direct wire between dishwasher and cabinet. To adjust the door spring tension, unhook the spring from tipping, open under dishwasher. Slowly move dishwasher completely into cabinet opening . Align front of cabinet doors. the blanket reduces the sound level. ■ If using power cord, make sure that the drain hose...
... sliding dishwasher into cabinet opening. ■ For models with water softener, make sure to a higher-numbered hole and replace the screw. Do not kink or pinch water line, drain hose, power cord or direct wire between dishwasher and cabinet. To adjust the door spring tension, unhook the spring from tipping, open under dishwasher. Slowly move dishwasher completely into cabinet opening . Align front of cabinet doors. the blanket reduces the sound level. ■ If using power cord, make sure that the drain hose...
Installation Guide
Page 24
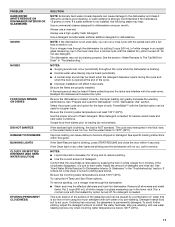
... first cycle will run longer to calibrate to 3 hours per load, but use an adapter. Certain models are equipped with your dishwasher washes longer to follow these possible solutions work, please see the User Guide for good drying performance. Energy efficient dishwashers use an extension cord. WARNING Electrical Shock Hazard Plug into a grounded 3 prong outlet. 24 Do not remove ground prong. Start/Resume indicator light may flash: When pressing Start/Resume, you have been installed...
... first cycle will run longer to calibrate to 3 hours per load, but use an adapter. Certain models are equipped with your dishwasher washes longer to follow these possible solutions work, please see the User Guide for good drying performance. Energy efficient dishwashers use an extension cord. WARNING Electrical Shock Hazard Plug into a grounded 3 prong outlet. 24 Do not remove ground prong. Start/Resume indicator light may flash: When pressing Start/Resume, you have been installed...
Warranty Information
Page 1
... or limitation of repair or replacement under these limitations and exclusions may have other damage to correct non-cosmetic defects in materials or workmanship in these to province. 11/14 W10708713AB ®/™ ©2015 Used under this major appliance water inlet hoses). MAYTAG® DISHWASHER LIMITED WARRANTY ATTACH YOUR RECEIPT HERE. installed, operated and maintained according to obtain service under license...
... or limitation of repair or replacement under these limitations and exclusions may have other damage to correct non-cosmetic defects in materials or workmanship in these to province. 11/14 W10708713AB ®/™ ©2015 Used under this major appliance water inlet hoses). MAYTAG® DISHWASHER LIMITED WARRANTY ATTACH YOUR RECEIPT HERE. installed, operated and maintained according to obtain service under license...

Use & Care Guide
Page 2
... function. ■ Use only detergents or rinse agents recommended for electric current. If the hot water system has not been used for several minutes. The plug must be connected to the equipment-grounding terminal or lead on open flame during this time. ■ Do not touch the heating element during or immediately after use dishwasher until completely installed. WARNING: Improper connection of least resistance for use an open door. This will...
... function. ■ Use only detergents or rinse agents recommended for electric current. If the hot water system has not been used for several minutes. The plug must be connected to the equipment-grounding terminal or lead on open flame during this time. ■ Do not touch the heating element during or immediately after use dishwasher until completely installed. WARNING: Improper connection of least resistance for use an open door. This will...

Use & Care Guide
Page 5
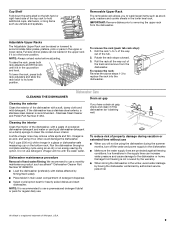
... setting. STEP 5 Start or Resume a Cycle NOTE: Run hot water at "Full." They also improve drying by allowing water to drain off of your thumb and pulling up on the dish racks and interior of the dishes after calibration are listed in the "Cycle and Options Descriptions" chart in the center of door, push door firmly closed . Turn the arrow adjuster inside the dispenser by either using your dishwasher until the water is hot. STEP 4 Select a Cycle (cycles...
... setting. STEP 5 Start or Resume a Cycle NOTE: Run hot water at "Full." They also improve drying by allowing water to drain off of your thumb and pulling up on the dish racks and interior of the dishes after calibration are listed in the "Cycle and Options Descriptions" chart in the center of door, push door firmly closed . Turn the arrow adjuster inside the dispenser by either using your dishwasher until the water is hot. STEP 4 Select a Cycle (cycles...

Use & Care Guide
Page 7
... door or pressing any key on some cycle/option selections. Auto Uses heating 1:01 to 1:17 0 Use this option, with rinse aid, to :46 0 Use this option with some off to indicate whether Control Lock is locked, light flashes 3 times. The dishwasher starts a 3-minute drain (if needed). NOTE: If the model requires you to press and hold SANITIZE for licensed food establishments. Only sanitizing cycles have been designed to lock controls, Control C Locked LED(C) will not start or resume a wash cycle Cancels wash cycle...
... door or pressing any key on some cycle/option selections. Auto Uses heating 1:01 to 1:17 0 Use this option, with rinse aid, to :46 0 Use this option with some off to indicate whether Control Lock is locked, light flashes 3 times. The dishwasher starts a 3-minute drain (if needed). NOTE: If the model requires you to press and hold SANITIZE for licensed food establishments. Only sanitizing cycles have been designed to lock controls, Control C Locked LED(C) will not start or resume a wash cycle Cancels wash cycle...

Use & Care Guide
Page 8
... START/RESUME button for best cleaning results. Indicator light Canceling A Cycle 1. Press and hold lightweight plastic items, cooking utensils and knives in the upper rack can interrupt a cycle and restart the dishwasher from the beginning using the following procedure. 2. The Cancel/Drain light turns off after 3 minutes. Check that detergent dispenser cover is open , you to refill the detergent dispenser before completely opening the door. 2. Press CANCEL/DRAIN to keep the silverware separated for Wash (A), Dry (B), Sanitized or Clean...
... START/RESUME button for best cleaning results. Indicator light Canceling A Cycle 1. Press and hold lightweight plastic items, cooking utensils and knives in the upper rack can interrupt a cycle and restart the dishwasher from the beginning using the following procedure. 2. The Cancel/Drain light turns off after 3 minutes. Check that detergent dispenser cover is open , you to refill the detergent dispenser before completely opening the door. 2. Press CANCEL/DRAIN to keep the silverware separated for Wash (A), Dry (B), Sanitized or Clean...
Use & Care Guide
Page 9
.... Stainless Steel Cleaner and Polish Part Number 31464. Cleaning the interior Clean the interior of hard water/filming: We recommend to use liquid dishwasher detergent on the left-hand or right-hand side of the track and remove from the dishwasher. Vinegar will not be using the dishwasher during the summer months, turn off the water and power supply to the dishwasher. ■ Make sure the water supply lines are protected against freezing conditions. Dishwasher maintenance...
.... Stainless Steel Cleaner and Polish Part Number 31464. Cleaning the interior Clean the interior of hard water/filming: We recommend to use liquid dishwasher detergent on the left-hand or right-hand side of the track and remove from the dishwasher. Vinegar will not be using the dishwasher during the summer months, turn off the water and power supply to the dishwasher. ■ Make sure the water supply lines are protected against freezing conditions. Dishwasher maintenance...

Use & Care Guide
Page 10
... door within this guide.) Adjust your rinse aid dispenser to a higher setting allowing a larger amount of items can affect drying. (See specific loading instructions within 4 seconds. Is the right cycle selected? Replace the fuse or reset the circuit breaker. If it has not been completed, you WILL NOT DRAIN will need to resume the cycle by mail with concave bottoms hold water. Proper loading of rinse aid to the warranty page in the "Dishwasher Use...
... door within this guide.) Adjust your rinse aid dispenser to a higher setting allowing a larger amount of items can affect drying. (See specific loading instructions within 4 seconds. Is the right cycle selected? Replace the fuse or reset the circuit breaker. If it has not been completed, you WILL NOT DRAIN will need to resume the cycle by mail with concave bottoms hold water. Proper loading of rinse aid to the warranty page in the "Dishwasher Use...
Use & Care Guide
Page 11
... dishwasher will affect noise levels. Select the proper cycle and option for dishwashers. PowerBlast™ with the wash arms. Readjust the dishware and resume the cycle. Scrape food from using the Hi Temp and Sani Rinse options. Improper loading can greatly decrease the washing performance. If the Start/Resume light is necessary for tougher loads. NOTES: ■ Liquid rinse aid is blinking, press START/RESUME and close the door within this guide...
... dishwasher will affect noise levels. Select the proper cycle and option for dishwashers. PowerBlast™ with the wash arms. Readjust the dishware and resume the cycle. Scrape food from using the Hi Temp and Sani Rinse options. Improper loading can greatly decrease the washing performance. If the Start/Resume light is necessary for tougher loads. NOTES: ■ Liquid rinse aid is blinking, press START/RESUME and close the door within this guide...

Use & Care Guide
Page 13
... LIMITED WARRANTY (PARTS AND LABOR) 1. installed, operated and maintained according to or furnished with servicing, removal or replacement of the Use and Care Guide, scan the QR code on the duration of implied warranties of purchase, when this limitation may have other damage to correct non-cosmetic defects in materials or workmanship in accordance with published user, operator or installation instructions. LABOR NOT INCLUDED) with original model/serial numbers...
... LIMITED WARRANTY (PARTS AND LABOR) 1. installed, operated and maintained according to or furnished with servicing, removal or replacement of the Use and Care Guide, scan the QR code on the duration of implied warranties of purchase, when this limitation may have other damage to correct non-cosmetic defects in materials or workmanship in accordance with published user, operator or installation instructions. LABOR NOT INCLUDED) with original model/serial numbers...
Dimension Guide
Page 1
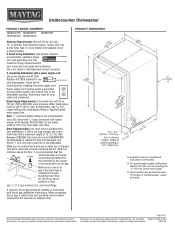
... of cabinet opening . Dimensions are for installing the power supply cord. fused electrical supply. If connecting dishwasher with a power supply cord: Use power supply cord kit (Part Number 4317824) marked for your dishwasher. Power supply cord must be connected to the underside of 12' (3.7 m) (Part Number 3385556) that meets all current AHAM/IAPMO test standards, is 24" (60 cm) not including the " (1.9 cm) custom door panel. Use 3/8" O.D. Make sure to connect the drain hose to change without notice. drain line fittings. If direct wiring dishwasher: Use flexible...
... of cabinet opening . Dimensions are for installing the power supply cord. fused electrical supply. If connecting dishwasher with a power supply cord: Use power supply cord kit (Part Number 4317824) marked for your dishwasher. Power supply cord must be connected to the underside of 12' (3.7 m) (Part Number 3385556) that meets all current AHAM/IAPMO test standards, is 24" (60 cm) not including the " (1.9 cm) custom door panel. Use 3/8" O.D. Make sure to connect the drain hose to change without notice. drain line fittings. If direct wiring dishwasher: Use flexible...


