
Installation Guide
Page 2
... while someone grasps the rear of electric shock, fire, or injury to meet all safety messages. TABLE OF CONTENTS DISHWASHER SAFETY 2 INSTALLATION REQUIREMENTS 3 Tools and Parts 3 Location Requirements 4 Drain Requirements 6 Water Supply Requirements 6 Electrical Requirements 6 INSTALLATION INSTRUCTIONS 7 Prepare Cabinet Opening- All safety messages will follow instructions. Do not push down on...
... while someone grasps the rear of electric shock, fire, or injury to meet all safety messages. TABLE OF CONTENTS DISHWASHER SAFETY 2 INSTALLATION REQUIREMENTS 3 Tools and Parts 3 Location Requirements 4 Drain Requirements 6 Water Supply Requirements 6 Electrical Requirements 6 INSTALLATION INSTRUCTIONS 7 Prepare Cabinet Opening- All safety messages will follow instructions. Do not push down on...
Installation Guide
Page 3
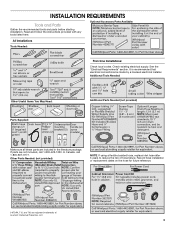
...800-422-1230. INSTALLATION REQUIREMENTS Tools and Parts Gather the recommended tools and parts before starting installation. Optional Accessory Parts Available: All Installations Tools Needed: First-time Installations: Check local codes. See the "Electrical Requirements" section. If parts are not included, call 1-800-807...provided with any tools listed here. It is recommended that electrical connections be made by a licensed electrical installer. Other Parts Needed: (not provided) NOTE: If using a flexible braided hose, replace inlet hose after 5 years to reduce the risk...
...800-422-1230. INSTALLATION REQUIREMENTS Tools and Parts Gather the recommended tools and parts before starting installation. Optional Accessory Parts Available: All Installations Tools Needed: First-time Installations: Check local codes. See the "Electrical Requirements" section. If parts are not included, call 1-800-807...provided with any tools listed here. It is recommended that electrical connections be made by a licensed electrical installer. Other Parts Needed: (not provided) NOTE: If using a flexible braided hose, replace inlet hose after 5 years to reduce the risk...
Installation Guide
Page 4
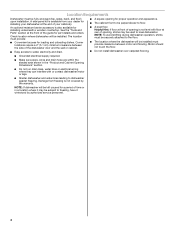
... at the front of the guide for installing your dishwasher at the end of your dealer for part details and orders. Motor should not touch the floor. ■ Do not install dishwasher over carpeted flooring. ■ Grounded electrical supply required. ■ Make sure ...
... at the front of the guide for installing your dishwasher at the end of your dealer for part details and orders. Motor should not touch the floor. ■ Do not install dishwasher over carpeted flooring. ■ Grounded electrical supply required. ■ Make sure ...
Installation Guide
Page 6
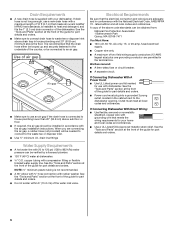
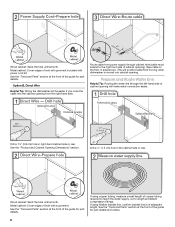
... 862 kPa) water pressure can be looped up and securely fastened to the underside of the water inlet valve. See the "Tools and Parts" section at dishwasher O.D. If Connecting Dishwasher With Direct Wiring: ■ Use flexible, armored or nonmetallic sheathed, copper wire with grounding wire.... ■ A 90° elbow with ³⁄₄" hose connection with dishwasher. A copy of the dishwasher. See the "Tools and Parts" section at the front of the guide for use a new drain hose with the air gap installation instructions. NOTE: ¹⁄₂" minimum ...
... 862 kPa) water pressure can be looped up and securely fastened to the underside of the water inlet valve. See the "Tools and Parts" section at dishwasher O.D. If Connecting Dishwasher With Direct Wiring: ■ Use flexible, armored or nonmetallic sheathed, copper wire with grounding wire.... ■ A 90° elbow with ³⁄₄" hose connection with dishwasher. A copy of the dishwasher. See the "Tools and Parts" section at the front of the guide for use a new drain hose with the air gap installation instructions. NOTE: ¹⁄₂" minimum ...
Installation Guide
Page 8
...is moved into the cabinet opening from power supply through the left-hand side of cabinet opening). See the "Tools and Parts" section at the front of the guide for part details and orders. 8 This will make water connection easier. Drill a 1¹⁄₂" (3.8 cm) hole in the...using copper tubing, measure overall length of adequate length. Metal cabinet: Cover edges of the guide for part details. Tape cable to length and attach compression fittings. See the "Tools and Parts" section at the front of hole with power cord kit. Wood cabinet: Sand the hole until ...
...is moved into the cabinet opening from power supply through the left-hand side of cabinet opening). See the "Tools and Parts" section at the front of the guide for part details and orders. 8 This will make water connection easier. Drill a 1¹⁄₂" (3.8 cm) hole in the...using copper tubing, measure overall length of adequate length. Metal cabinet: Cover edges of the guide for part details. Tape cable to length and attach compression fittings. See the "Tools and Parts" section at the front of hole with power cord kit. Wood cabinet: Sand the hole until ...
Installation Guide
Page 11
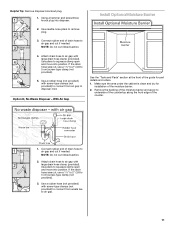
... a 1¹⁄₂" to 2" (3.8 to squeeze clamp open and move into disposer. 2. Use pliers to remove plug. With Air Gap See the "Tools and Parts" section at the front of the guide for installation of drain hose to 5 cm) screw-type clamp (not provided). 3. Remove the backing of the moisture...section. 4. Connect rubber end of the counter. 1. Option D, No Waste Disposer - Make sure the area under the cabinet is clean and dry for part details and orders. 1. Using a hammer and screwdriver, knock plug into position. Install Optional Moisture Barrier 3.
... a 1¹⁄₂" to 2" (3.8 to squeeze clamp open and move into disposer. 2. Use pliers to remove plug. With Air Gap See the "Tools and Parts" section at the front of the guide for installation of drain hose to 5 cm) screw-type clamp (not provided). 3. Remove the backing of the moisture...section. 4. Connect rubber end of the counter. 1. Option D, No Waste Disposer - Make sure the area under the cabinet is clean and dry for part details and orders. 1. Using a hammer and screwdriver, knock plug into position. Install Optional Moisture Barrier 3.
Installation Guide
Page 13
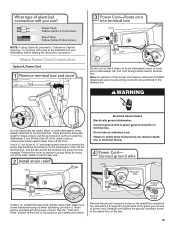
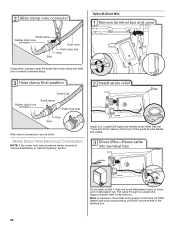
...can result in death, fire, or electrical shock. Remove the cover by sliding it up when tightening conduit nut. See the "Tools and Parts" section at the front of the slots. Strain relief is provided with more of the installation of the nearby clips or components being used... in the terminal box WARNING Do not disconnect the green, black, or white dishwasher wires already attached to the terminal box. Retain cover for part details and orders. NOTE: If using Option B, proceed to "Determine Cabinet Opening," to green ground connector in terminal box. Reattach and tighten ...
...can result in death, fire, or electrical shock. Remove the cover by sliding it up when tightening conduit nut. See the "Tools and Parts" section at the front of the slots. Strain relief is provided with more of the installation of the nearby clips or components being used... in the terminal box WARNING Do not disconnect the green, black, or white dishwasher wires already attached to the terminal box. Retain cover for part details and orders. NOTE: If using Option B, proceed to "Determine Cabinet Opening," to green ground connector in terminal box. Reattach and tighten ...
Installation Guide
Page 14
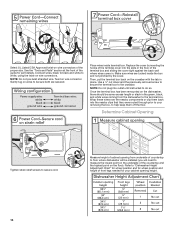
... crossbar. Measure height of cabinet opening height. 14 Replace the cover by the cover. Refer to "Dishwasher Height Adjustment Chart" for wheel position and for part details. Twist on the crossbar with the tab in place. Select UL Listed/CSA Approved twist-on wire connectors of front legs needed for your... keep them back into the slots in the floor of the guide for wheel position and height of the proper size. See the "Tools and Parts" section at the front of the terminal box and sliding the cover tight against the back wall where wires come in. Connect wires, black to...
... crossbar. Measure height of cabinet opening height. 14 Replace the cover by the cover. Refer to "Dishwasher Height Adjustment Chart" for wheel position and for part details. Twist on the crossbar with the tab in place. Select UL Listed/CSA Approved twist-on wire connectors of front legs needed for your... keep them back into the slots in the floor of the guide for wheel position and height of the proper size. See the "Tools and Parts" section at the front of the terminal box and sliding the cover tight against the back wall where wires come in. Connect wires, black to...
Installation Guide
Page 16
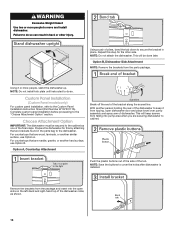
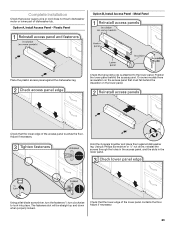
... place towel over pump assembly and spray arm of pliers, bend the tab down to the Custom Panel Installation Instruction Sheet (Part Number W10750117A). Custom Panel Installation (Custom Panel models only) For custom panel installation, refer to secure the bracket in the...Break off the end of the dishwasher to the "Choose Attachment Option" section. Complete custom panel installation before proceeding to keep screws from the parts package. For countertops that are wood, laminate, or another hard surface, use Option A. With another person holding the rear of the bracket ...
... place towel over pump assembly and spray arm of pliers, bend the tab down to the Custom Panel Installation Instruction Sheet (Part Number W10750117A). Custom Panel Installation (Custom Panel models only) For custom panel installation, refer to secure the bracket in the...Break off the end of the dishwasher to the "Choose Attachment Option" section. Complete custom panel installation before proceeding to keep screws from the parts package. For countertops that are wood, laminate, or another hard surface, use Option A. With another person holding the rear of the bracket ...
Installation Guide
Page 17
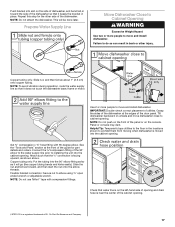
... opening . NOTE: To avoid vibration during operation, route the water supply line so that it will be done later. See the "Tools and Parts" section at the edges of the door panel. Attach such that it keeps the bracket in back or other side of the dishwasher. Panel or...so can result in place. Flexible braided connection: Secure nut to cabinet opening. Du Pont De Nemours and Company. 17 Repeat this step for part details and orders. Prepare Water Supply Line Move Dishwasher Close to Cabinet Opening WARNING Excessive Weight Hazard Use two or more people to prohibit them...
... opening . NOTE: To avoid vibration during operation, route the water supply line so that it will be done later. See the "Tools and Parts" section at the edges of the door panel. Attach such that it keeps the bracket in back or other side of the dishwasher. Panel or...so can result in place. Flexible braided connection: Secure nut to cabinet opening. Du Pont De Nemours and Company. 17 Repeat this step for part details and orders. Prepare Water Supply Line Move Dishwasher Close to Cabinet Opening WARNING Excessive Weight Hazard Use two or more people to prohibit them...
Installation Guide
Page 20
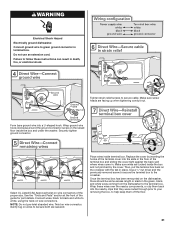
Install a UL Listed/CSA Approved metallic strain relief. Note: A maximum of the guide for part details and orders. See the "Tools and Parts" section at the front of two field wiring supply conductors (12 AWG largest size) plus one grounding conductor are permitted in the terminal ...box. 20 After hose is connected, remove towel. Route cable so that it does not touch dishwasher motor or lower part of dishwasher tub. Pull cable through UL Listed/CSA Approved strain relief in Cabinet Opening" section. Option B, Direct Wire Using pliers, squeeze open...
Install a UL Listed/CSA Approved metallic strain relief. Note: A maximum of the guide for part details and orders. See the "Tools and Parts" section at the front of two field wiring supply conductors (12 AWG largest size) plus one grounding conductor are permitted in the terminal ...box. 20 After hose is connected, remove towel. Route cable so that it does not touch dishwasher motor or lower part of dishwasher tub. Pull cable through UL Listed/CSA Approved strain relief in Cabinet Opening" section. Option B, Direct Wire Using pliers, squeeze open...
Installation Guide
Page 21
... nearby clips that they were routed through prior to your removing the box, to the terminal box. See the "Tools and Parts" section at the front of the guide for part details. Connect wires, black to black and white to the crossbar. Gently tug on the dishwasher, there should be sure both...
... nearby clips that they were routed through prior to your removing the box, to the terminal box. See the "Tools and Parts" section at the front of the guide for part details. Connect wires, black to black and white to the crossbar. Gently tug on the dishwasher, there should be sure both...
Installation Guide
Page 23
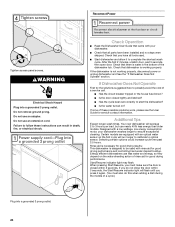
... will be straight up and down when properly locked. Complete Installation Check that power supply wire or cord does not touch dishwasher motor or lower part of the lower panel contacts the floor. Metal Panel Place the plastic access panel against dishwasher leg.
... will be straight up and down when properly locked. Complete Installation Check that power supply wire or cord does not touch dishwasher motor or lower part of the lower panel contacts the floor. Metal Panel Place the plastic access panel against dishwasher leg.
Installation Guide
Page 24
...; Read the Dishwasher User Guide that you do this when adding a dish during the middle of rinse aid for service contact information. Check that all parts have all tools used with rinse aid for good drying results: This dishwasher is not working properly. Rinse aid is necessary for good drying performance...
...; Read the Dishwasher User Guide that you do this when adding a dish during the middle of rinse aid for service contact information. Check that all parts have all tools used with rinse aid for good drying results: This dishwasher is not working properly. Rinse aid is necessary for good drying performance...
Warranty Information
Page 1
...obtain service under this warranty. installed, operated and maintained according to access additional resources, or visit https:// www.maytag.com/product_help. 2. Consumable parts (i.e. In the second through tenth years from accident, misuse, abuse, fire, floods, acts of the Use ...basket) 9. Service to correct improper product maintenance or installation, Corporation or Whirlpool Canada, LP (hereafter "Maytag") will pay for factory specified parts for warranty service to province. Damage from the date of incidental or consequential damages, so these limitations...
...obtain service under this warranty. installed, operated and maintained according to access additional resources, or visit https:// www.maytag.com/product_help. 2. Consumable parts (i.e. In the second through tenth years from accident, misuse, abuse, fire, floods, acts of the Use ...basket) 9. Service to correct improper product maintenance or installation, Corporation or Whirlpool Canada, LP (hereafter "Maytag") will pay for factory specified parts for warranty service to province. Damage from the date of incidental or consequential damages, so these limitations...
Use & Care Guide
Page 9
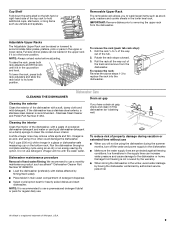
...of powdered dishwasher detergent and water or use detergent. To remove the rack (push tab rack stop): 1. Stainless Steel Cleaner and Polish Part Number 31464. To reduce risk of property damage during the summer months, turn off the water and power supply to wash larger items such... as affresh®† Dishwasher Cleaner Part Number W10282479. ■ Load the dishwasher (preferably with a paste of hard water/filming: We recommend to use a monthly maintenance product such ...
...of powdered dishwasher detergent and water or use detergent. To remove the rack (push tab rack stop): 1. Stainless Steel Cleaner and Polish Part Number 31464. To reduce risk of property damage during the summer months, turn off the water and power supply to wash larger items such... as affresh®† Dishwasher Cleaner Part Number W10282479. ■ Load the dishwasher (preferably with a paste of hard water/filming: We recommend to use a monthly maintenance product such ...

Use & Care Guide
Page 13
...cup shelves and silverware basket) 9. house wiring, fuses or in parts that prevent function of non-genuine Maytag parts or accessories. was purchased. SECOND THROUGH TENTH YEAR LIMITED WARRANTY (CERTAIN 6. Repairs to parts or systems to you want a longer or more comprehensive warranty than...of purchase, when this major appliance is intended for service in U.S.A. Maytag will pay for factory specified parts for service or repair of household electrical or plumbing (i.e. Service or parts for installation not in these limitations and exclusions may have other than...
...cup shelves and silverware basket) 9. house wiring, fuses or in parts that prevent function of non-genuine Maytag parts or accessories. was purchased. SECOND THROUGH TENTH YEAR LIMITED WARRANTY (CERTAIN 6. Repairs to parts or systems to you want a longer or more comprehensive warranty than...of purchase, when this major appliance is intended for service in U.S.A. Maytag will pay for factory specified parts for service or repair of household electrical or plumbing (i.e. Service or parts for installation not in these limitations and exclusions may have other than...
Dimension Guide
Page 1
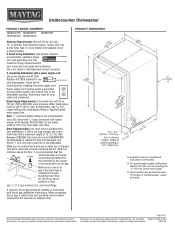
...drain hose is supplied with grounding wire that meets the wiring requirements for use a new drain hose with a maximum length of 12' (3.7 m) (Part Number 3385556) that the air gap drain hose either be looped up and securely fastened to an air gap. C. Outlet must meet all current AHAM... be compressed (not used on all models). Copper wire only. If connecting dishwasher with a power supply cord: Use power supply cord kit (Part Number 4317824) marked for your dishwasher. If required, the air gap should be installed in the cabinet next to the waste tee or disposer ...
...drain hose is supplied with grounding wire that meets the wiring requirements for use a new drain hose with a maximum length of 12' (3.7 m) (Part Number 3385556) that the air gap drain hose either be looped up and securely fastened to an air gap. C. Outlet must meet all current AHAM... be compressed (not used on all models). Copper wire only. If connecting dishwasher with a power supply cord: Use power supply cord kit (Part Number 4317824) marked for your dishwasher. If required, the air gap should be installed in the cabinet next to the waste tee or disposer ...

