Installation Guide
Page 2
... Each dishwasher is tested at the time of installation. 2 TABLE OF CONTENTS DISHWASHER SAFETY 2 INSTALLATION REQUIREMENTS 3 Tools and Parts 3 Location Requirements 4 Drain Requirements 6 Water Supply Requirements 6 Electrical Requirements 6 INSTALLATION INSTRUCTIONS 7 Prepare Cabinet Opening- Existing Utilities 7 Prepare Cabinet Opening-New Utilities 7 Prepare and Route Water Line 8 Install Drain Hose 9 Install Optional Moisture Barrier 11 Prepare Dishwasher 12 Make Power Cord Connection 13 Determine Cabinet Opening 14 Install Door Handle 15 Custom Panel Installation 16...
... Each dishwasher is tested at the time of installation. 2 TABLE OF CONTENTS DISHWASHER SAFETY 2 INSTALLATION REQUIREMENTS 3 Tools and Parts 3 Location Requirements 4 Drain Requirements 6 Water Supply Requirements 6 Electrical Requirements 6 INSTALLATION INSTRUCTIONS 7 Prepare Cabinet Opening- Existing Utilities 7 Prepare Cabinet Opening-New Utilities 7 Prepare and Route Water Line 8 Install Drain Hose 9 Install Optional Moisture Barrier 11 Prepare Dishwasher 12 Make Power Cord Connection 13 Determine Cabinet Opening 14 Install Door Handle 15 Custom Panel Installation 16...
Installation Guide
Page 3
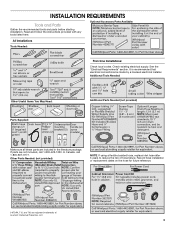
... parts before starting installation. Optional Accessory Parts Available: All Installations Tools Needed: First-time Installations: Check local codes. Record hose installation or replacement dates on the hose for future reference. . †®TORX, T15, and T20 are registered trademarks of hose failure. Read and follow the instructions provided with any tools listed here. In Canada, call 1-800-422-1230. Other Parts Needed: (not provided) NOTE: If using a flexible braided hose, replace inlet hose...
... parts before starting installation. Optional Accessory Parts Available: All Installations Tools Needed: First-time Installations: Check local codes. Record hose installation or replacement dates on the hose for future reference. . †®TORX, T15, and T20 are registered trademarks of hose failure. Read and follow the instructions provided with any tools listed here. In Canada, call 1-800-422-1230. Other Parts Needed: (not provided) NOTE: If using a flexible braided hose, replace inlet hose...
Installation Guide
Page 4
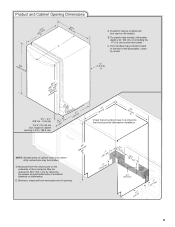
... loading and unloading dishes. Location Requirements Dishwasher must provide clearance between the side of the dishwasher door and the wall or cabinet. ■ Easy access to water, electricity and drain. ■ A square opening for installing your dishwasher at the end of time or in the "Product and Cabinet Opening Dimensions" section. ■ Do not run drain lines, water lines or electrical wiring where they can interfere with or contact dishwasher motor or legs. ■ Shelter dishwasher and water lines leading to dishwasher...
... loading and unloading dishes. Location Requirements Dishwasher must provide clearance between the side of the dishwasher door and the wall or cabinet. ■ Easy access to water, electricity and drain. ■ A square opening for installing your dishwasher at the end of time or in the "Product and Cabinet Opening Dimensions" section. ■ Do not run drain lines, water lines or electrical wiring where they can interfere with or contact dishwasher motor or legs. ■ Shelter dishwasher and water lines leading to dishwasher...
Installation Guide
Page 5
... have no protrusions that would prohibit dishwasher installation. Door handles may be compressed (not used on the underside of the dishwasher; 24 (62.B2 cm" ) (602.63 " cm) C (763.02"cm) (mr8ewi5mn3h,.31oewveceil"mtsdh) 3 "-4 " (8.8 cm - 10.6 cm) For 4" (10 cm) toe kick, height of opening is 24" (60 cm) not including the " (1.9 cm) custom door panel. Insulation may protrude forward of...
... have no protrusions that would prohibit dishwasher installation. Door handles may be compressed (not used on the underside of the dishwasher; 24 (62.B2 cm" ) (602.63 " cm) C (763.02"cm) (mr8ewi5mn3h,.31oewveceil"mtsdh) 3 "-4 " (8.8 cm - 10.6 cm) For 4" (10 cm) toe kick, height of opening is 24" (60 cm) not including the " (1.9 cm) custom door panel. Insulation may protrude forward of...
Installation Guide
Page 6
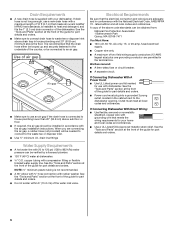
... plug into a grounded 3 prong outlet, located in the terminal box. Drain Requirements ■ A new drain hose is supplied with dishwasher. We Recommend: ■ A time-delay fuse or circuit breaker. ■ A separate circuit. See the "Tools and Parts" section at dishwasher O.D. If Connecting Dishwasher With Direct Wiring: ■ Use flexible, armored or nonmetallic sheathed, copper wire with 20 to 120 psi (138 to 862 kPa) water pressure can be needed to connect to heat...
... plug into a grounded 3 prong outlet, located in the terminal box. Drain Requirements ■ A new drain hose is supplied with dishwasher. We Recommend: ■ A time-delay fuse or circuit breaker. ■ A separate circuit. See the "Tools and Parts" section at dishwasher O.D. If Connecting Dishwasher With Direct Wiring: ■ Use flexible, armored or nonmetallic sheathed, copper wire with 20 to 120 psi (138 to 862 kPa) water pressure can be needed to connect to heat...
Installation Guide
Page 7
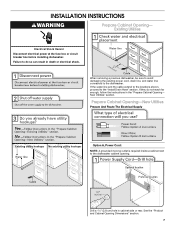
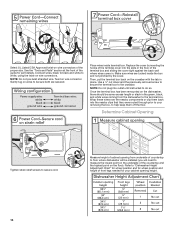
See the "Product and Cabinet Opening Dimensions" section. 7 When removing a previous dishwasher, be sure to avoid damaging the existing power cord, drain line, and water line connected to the dishwasher cabinet opening. Prepare Cabinet Opening-New Utilities Prepare And Route The Electrical Supply Option A, Power Cord: NOTE: A grounded 3 prong outlet is required inside a cabinet next to the dishwasher. Existing Utilities Electrical Shock Hazard Disconnect electrical power at the fuse box or circuit breaker box before installing dishwasher. New Utilities" section. If they do so...
See the "Product and Cabinet Opening Dimensions" section. 7 When removing a previous dishwasher, be sure to avoid damaging the existing power cord, drain line, and water line connected to the dishwasher cabinet opening. Prepare Cabinet Opening-New Utilities Prepare And Route The Electrical Supply Option A, Power Cord: NOTE: A grounded 3 prong outlet is required inside a cabinet next to the dishwasher. Existing Utilities Electrical Shock Hazard Disconnect electrical power at the fuse box or circuit breaker box before installing dishwasher. New Utilities" section. If they do so...
Installation Guide
Page 8
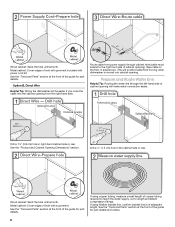
... power cord kit. Option B, Direct Wire Helpful Tip: Wiring the dishwasher will be easier if you route the cable into cabinet opening will prohibit cable from the right-hand side. Wood cabinet: Sand the hole until smooth. Drill a ¹⁄₂" (1.3 cm) hole in the cabinet side or rear. If using flexible braided line, confirm braided line is moved into the cabinet opening ). Prepare and Route Water Line...
... power cord kit. Option B, Direct Wire Helpful Tip: Wiring the dishwasher will be easier if you route the cable into cabinet opening will prohibit cable from the right-hand side. Wood cabinet: Sand the hole until smooth. Drill a ¹⁄₂" (1.3 cm) hole in the cabinet side or rear. If using flexible braided line, confirm braided line is moved into the cabinet opening ). Prepare and Route Water Line...
Installation Guide
Page 9
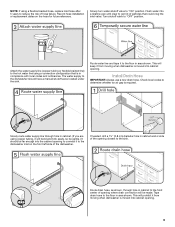
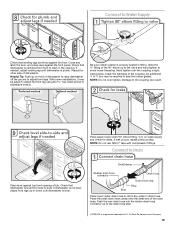
... water supply to the dishwasher inlet on the hose for future reference. Route water line and tape it to the dishwasher should be made. Slowly turn water shutoff valve to determine whether an air gap is moved into cabinet opening where drain connection will bend and kink easily, so be gentle.) It should have a manual shutoff valve located under the sink. Install Drain Hose IMPORTANT: Always use a new drain hose. Check local codes to "ON" position. Tape drain hose to...
... water supply to the dishwasher inlet on the hose for future reference. Route water line and tape it to the dishwasher should be made. Slowly turn water shutoff valve to determine whether an air gap is moved into cabinet opening where drain connection will bend and kink easily, so be gentle.) It should have a manual shutoff valve located under the sink. Install Drain Hose IMPORTANT: Always use a new drain hose. Check local codes to "ON" position. Tape drain hose to...
Installation Guide
Page 10
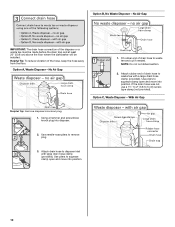
... waste tee with large drain hose clamp (provided). With Air Gap Helpful Tip: Remove disposer knockout plug. 1. Attach rubber end of drain hose to remove plug. 3. Attach drain hose to 5 cm) screwtype clamp (not provided). NOTE: Do not cut , use a 1¹⁄₂" to 2" (3.8 to disposer inlet with a large drain hose clamp (provided). If the drain hose was cut ribbed section. 2. No Air Gap IMPORTANT: The drain hose connection of the hose, keep the hose away from the...
... waste tee with large drain hose clamp (provided). With Air Gap Helpful Tip: Remove disposer knockout plug. 1. Attach rubber end of drain hose to remove plug. 3. Attach drain hose to 5 cm) screwtype clamp (not provided). NOTE: Do not cut , use a 1¹⁄₂" to 2" (3.8 to disposer inlet with a large drain hose clamp (provided). If the drain hose was cut ribbed section. 2. No Air Gap IMPORTANT: The drain hose connection of the hose, keep the hose away from the...
Installation Guide
Page 12
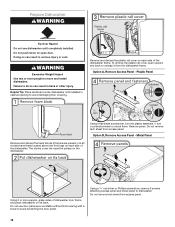
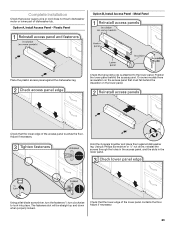
... ¹⁄₄ turn counterclockwise to do so can result in back or other injury. Do not remove tech sheet from access panel. 12 Option B, Remove Access Panel - Metal Panel Remove and discard the foam blocks (if blocks are present, not all models have them . Using 2 or more people to avoid scratching the door panel. Do not use dishwasher until installed in cabinet opening to avoid damaging floor...
... ¹⁄₄ turn counterclockwise to do so can result in back or other injury. Do not remove tech sheet from access panel. 12 Option B, Remove Access Panel - Metal Panel Remove and discard the foam blocks (if blocks are present, not all models have them . Using 2 or more people to avoid scratching the door panel. Do not use dishwasher until installed in cabinet opening to avoid damaging floor...
Installation Guide
Page 13
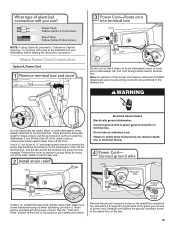
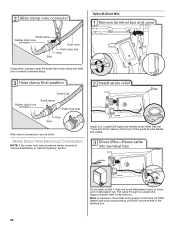
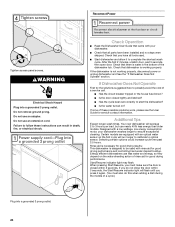
... out of your dishwasher before making the direct wire connection. Install a UL Listed/CSA Approved metallic strain relief. There should be adequate length in these instructions can result in terminal box. Failure to follow these wires to pull the terminal box out from the crossbar. NOTE: If using Option B, proceed to "Determine Cabinet Opening," to continue with the power cord kit. Pull cord through the...
... out of your dishwasher before making the direct wire connection. Install a UL Listed/CSA Approved metallic strain relief. There should be adequate length in these instructions can result in terminal box. Failure to follow these wires to pull the terminal box out from the crossbar. NOTE: If using Option B, proceed to "Determine Cabinet Opening," to continue with the power cord kit. Pull cord through the...
Installation Guide
Page 14
... components or clip them back into outlet until instructed to secure cord. NOTE: Do not pre-twist stranded wire. Replace the cover by the cover. NOTE: Do not plug into the nearby clips that they were routed through prior to your cabinet opening from the dishwasher to floor where dishwasher will need to measure the lowest point on the underside...
... components or clip them back into outlet until instructed to secure cord. NOTE: Do not pre-twist stranded wire. Replace the cover by the cover. NOTE: Do not plug into the nearby clips that they were routed through prior to your cabinet opening from the dishwasher to floor where dishwasher will need to measure the lowest point on the underside...
Installation Guide
Page 15
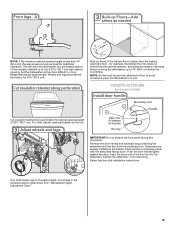
...;⁄₄ turn past snug. Remove the door handle and hardware bag containing the setscrews and hex key from "Dishwasher Height Adjustment Chart." 15 Retain hex key with the setscrews facing down. Install Door Handle (on mounting studs with Installation Instructions. Setscrews are preset at the factory for cabinet opening height of the insulation blanket to move. Push the door handle tightly against the door. Wheels and...
...;⁄₄ turn past snug. Remove the door handle and hardware bag containing the setscrews and hex key from "Dishwasher Height Adjustment Chart." 15 Retain hex key with the setscrews facing down. Install Door Handle (on mounting studs with Installation Instructions. Setscrews are preset at the factory for cabinet opening height of the insulation blanket to move. Push the door handle tightly against the door. Wheels and...
Installation Guide
Page 16
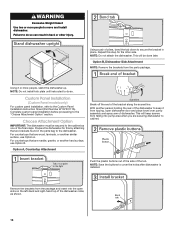
... will be secured to the dishwasher. Custom Panel Installation (Custom Panel models only) For custom panel installation, refer to do so. Failure to the Custom Panel Installation Instruction Sheet (Part Number W10750117A). Using a pair of the dishwasher to cabinet. Using 2 or more people to move and install dishwasher. Remove the brackets from the parts package. NOTE: Do not attach the dishwasher. Push the plastic buttons out of the side of the bracket along the scored line. Repeat this step for...
... will be secured to the dishwasher. Custom Panel Installation (Custom Panel models only) For custom panel installation, refer to do so. Failure to the Custom Panel Installation Instruction Sheet (Part Number W10750117A). Using a pair of the dishwasher to cabinet. Using 2 or more people to move and install dishwasher. Remove the brackets from the parts package. NOTE: Do not attach the dishwasher. Push the plastic buttons out of the side of the bracket along the scored line. Repeat this step for...
Installation Guide
Page 17
... and install dishwasher. Connect the ³⁄₈"compression fitting of the panel or on wheels and move and install dishwasher. NOTE: To avoid vibration during operation, route the water supply line so that the ³⁄₄" connection is moved into the cabinet opening . Get ³⁄₈" compression x ¾" hose fitting with compression fittings. Slide the nut and ferrule forward, and then start...
... and install dishwasher. Connect the ³⁄₈"compression fitting of the panel or on wheels and move and install dishwasher. NOTE: To avoid vibration during operation, route the water supply line so that the ³⁄₄" connection is moved into the cabinet opening . Get ³⁄₈" compression x ¾" hose fitting with compression fittings. Slide the nut and ferrule forward, and then start...
Installation Guide
Page 18
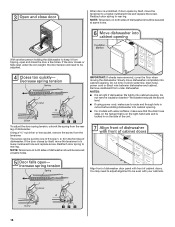
... or pinch water line, drain hose, power cord or direct wire between dishwasher and cabinet. NOTES: ■ It is unlatched, if door opens by itself , move the tensioner to be adjusted. To adjust the door spring tension, unhook the spring from tipping, open under dishwasher. Using a nut driver or hex socket, remove the screw from under its own weight, the door tension will need to adjust alignment to a higher-numbered hole and replace the screw...
... or pinch water line, drain hose, power cord or direct wire between dishwasher and cabinet. NOTES: ■ It is unlatched, if door opens by itself , move the tensioner to be adjusted. To adjust the door spring tension, unhook the spring from tipping, open under dishwasher. Using a nut driver or hex socket, remove the screw from under its own weight, the door tension will need to adjust alignment to a higher-numbered hole and replace the screw...
Installation Guide
Page 19
... in the opening of the 90° elbow up to the valve and hand tighten to avoid cross-threading. If needed, adjust leveling leg until dishwasher is properly seated in drain hose. Helpful Tip: Push up on water supply and check for other side of dishwasher to raise dishwasher off the ground to adjust front legs. Be sure rubber washer is level. If leak occurs, repeat...
... in the opening of the 90° elbow up to the valve and hand tighten to avoid cross-threading. If needed, adjust leveling leg until dishwasher is properly seated in drain hose. Helpful Tip: Push up on water supply and check for other side of dishwasher to raise dishwasher off the ground to adjust front legs. Be sure rubber washer is level. If leak occurs, repeat...
Installation Guide
Page 20
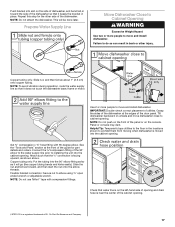
... wiring supply conductors (12 AWG largest size) plus one grounding conductor are permitted in the terminal box. 20 Make Direct Wire Electrical Connection NOTE: If the power cord was connected earlier, proceed to "Secure Dishwasher in terminal box. Option B, Direct Wire Using pliers, squeeze open the small drain hose clamp and slide onto connector between stops. After hose is connected, remove towel. Route cable so that it does not touch dishwasher motor or lower part of dishwasher...
... wiring supply conductors (12 AWG largest size) plus one grounding conductor are permitted in the terminal box. 20 Make Direct Wire Electrical Connection NOTE: If the power cord was connected earlier, proceed to "Secure Dishwasher in terminal box. Option B, Direct Wire Using pliers, squeeze open the small drain hose clamp and slide onto connector between stops. After hose is connected, remove towel. Route cable so that it does not touch dishwasher motor or lower part of dishwasher...
Installation Guide
Page 23
... lower panel contacts the floor. Position the lower panel behind the insulation on the access panel that must fall behind the access panel. On some models there is attached to lock into place. The fasteners slot will be straight up and down when properly locked. Metal Panel Place the plastic access panel against dishwasher leg. Check that power supply wire or cord does not touch dishwasher motor or lower part...
... lower panel contacts the floor. Position the lower panel behind the insulation on the access panel that must fall behind the access panel. On some models there is attached to lock into place. The fasteners slot will be straight up and down when properly locked. Metal Panel Place the plastic access panel against dishwasher leg. Check that power supply wire or cord does not touch dishwasher motor or lower part...
Installation Guide
Page 24
... house fuse blown? ■ Is the door closed within 3 seconds, the Start/Resume indicator light will flash until you must also do not close the door within 3 seconds. If the dishwasher is working properly, disconnect power or unplug dishwasher and See the "If Dishwasher Does Not Operate" section. If none of rinse aid for good drying performance and controlling hard water deposit buildup. Additional Tips Expect longer wash times. Your new dishwasher will run longer...
... house fuse blown? ■ Is the door closed within 3 seconds, the Start/Resume indicator light will flash until you must also do not close the door within 3 seconds. If the dishwasher is working properly, disconnect power or unplug dishwasher and See the "If Dishwasher Does Not Operate" section. If none of rinse aid for good drying performance and controlling hard water deposit buildup. Additional Tips Expect longer wash times. Your new dishwasher will run longer...


