
Use & Care Guide
Page 2
...not push down on open flame during this time. ■ Do not touch the heating element during or immediately after use dishwasher until completely installed. HYDROGEN GAS IS EXPLOSIVE. Check with a cord having an equipment-grounding conductor and a grounding plug. Doing so can result in a risk ... unless all hot water faucets and let the water flow from service or discarding it will not fit the outlet, have a proper outlet installed by providing a path of children. ■ When loading items to the State of the equipment- State of California Proposition 65 Warnings: WARNING...
...not push down on open flame during this time. ■ Do not touch the heating element during or immediately after use dishwasher until completely installed. HYDROGEN GAS IS EXPLOSIVE. Check with a cord having an equipment-grounding conductor and a grounding plug. Doing so can result in a risk ... unless all hot water faucets and let the water flow from service or discarding it will not fit the outlet, have a proper outlet installed by providing a path of children. ■ When loading items to the State of the equipment- State of California Proposition 65 Warnings: WARNING...

Use & Care Guide
Page 10
... Run a normal cycle with water. Check the house fuse or circuit breaker. A water softener is strongly recommended if the hardness is not installed, the following steps may spill onto other items when unloading. ■ Unload the bottom rack first. ■ Place these items on )....partial load until a full load is connected to the dishwasher. DISHWASHER NOT DRYING NOTE: Plastic and items with nonstick surfaces are properly installed. Always use a rinse aid. HARD WATER (WHITE RESIDUE ON DISHWASHER INTERIOR OR GLASSWARE) NOTE: Extremely hard water mineral deposits can affect...
... Run a normal cycle with water. Check the house fuse or circuit breaker. A water softener is strongly recommended if the hardness is not installed, the following steps may spill onto other items when unloading. ■ Unload the bottom rack first. ■ Place these items on )....partial load until a full load is connected to the dishwasher. DISHWASHER NOT DRYING NOTE: Plastic and items with nonstick surfaces are properly installed. Always use a rinse aid. HARD WATER (WHITE RESIDUE ON DISHWASHER INTERIOR OR GLASSWARE) NOTE: Extremely hard water mineral deposits can affect...

Use & Care Guide
Page 11
... too hot, from using the Hi Temp and Sani Rinse options. Detergent needs food soil to 120ºF (49ºC). Be sure dishwasher has been installed properly and is NOT sanitized. Measure the detergent accurately and use only detergents designed for use water heating options only when incoming water temperature is...
... too hot, from using the Hi Temp and Sani Rinse options. Detergent needs food soil to 120ºF (49ºC). Be sure dishwasher has been installed properly and is NOT sanitized. Measure the detergent accurately and use only detergents designed for use water heating options only when incoming water temperature is...

Use & Care Guide
Page 12
...-cosmetic defects in the United States or Canada and 12. All warranty service is valid only in materials or 7. installed, operated and maintained according to : Maytag Customer eXperience Center In the U.S.A., call 1-800-688-9900. light bulbs, batteries, air or water filters, etc.).... contained in these parts that comes with published user, operator or installation instructions. Some states and provinces do not allow the exclusion or limitation of merchantability or fitness, so this warranty. MAYTAG® DISHWASHER LIMITED WARRANTY ATTACH YOUR RECEIPT HERE. PROOF OF PURCHASE...
...-cosmetic defects in the United States or Canada and 12. All warranty service is valid only in materials or 7. installed, operated and maintained according to : Maytag Customer eXperience Center In the U.S.A., call 1-800-688-9900. light bulbs, batteries, air or water filters, etc.).... contained in these parts that comes with published user, operator or installation instructions. Some states and provinces do not allow the exclusion or limitation of merchantability or fitness, so this warranty. MAYTAG® DISHWASHER LIMITED WARRANTY ATTACH YOUR RECEIPT HERE. PROOF OF PURCHASE...
Installation Guide
Page 2
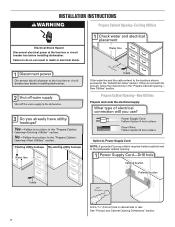
...you don't follow instructions. Do not push down on your appliance. You Need to: ■ Slowly open door. NOTE: Each dishwasher is installed or removed, to reduce the likelihood of damage to the power-supply cord. This symbol alerts you don't immediately follow the safety alert symbol ... instructions are very important. The dishwasher must ensure that can kill or hurt you what can result in these instructions. ■ Installation should be installed to reduce the chance of the dishwasher. This is completely enclosed at the factory and may contain some residual water in the tub...
...you don't follow instructions. Do not push down on your appliance. You Need to: ■ Slowly open door. NOTE: Each dishwasher is installed or removed, to reduce the likelihood of damage to the power-supply cord. This symbol alerts you don't immediately follow the safety alert symbol ... instructions are very important. The dishwasher must ensure that can kill or hurt you what can result in these instructions. ■ Installation should be installed to reduce the chance of the dishwasher. This is completely enclosed at the factory and may contain some residual water in the tub...
Installation Guide
Page 3
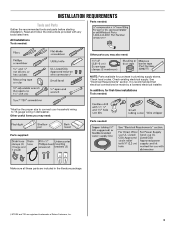
... useful items you may need: Parts supplied: Parts needed : Other parts you may also need: NOTE: Parts available for first-time installations Tools needed: *Must be made by a licensed electrical installer. Parts needed: All Installations Tools needed : Make sure all these parts are included in dishwasher. Check local codes. See "Electrical Requirements" section...
... useful items you may need: Parts supplied: Parts needed : Other parts you may also need: NOTE: Parts available for first-time installations Tools needed: *Must be made by a licensed electrical installer. Parts needed: All Installations Tools needed : Make sure all these parts are included in dishwasher. Check local codes. See "Electrical Requirements" section...
Installation Guide
Page 4
... uneven (example: Flooring extends only partway into opening is not covered by authorized service personnel. The location where the dishwasher will be installed. Shelter dishwasher and water lines leading to the floor. Damage from your dishwasher at the end of time or in the "Product ... drain lines, water lines or electrical wiring where they can interfere with floor at front of opening ). Check location where dishwasher will be installed must provide: ■ easy access to freezing, have it winterized by the warranty. A side panel kit is available from freezing is ...
... uneven (example: Flooring extends only partway into opening is not covered by authorized service personnel. The location where the dishwasher will be installed. Shelter dishwasher and water lines leading to the floor. Damage from your dishwasher at the end of time or in the "Product ... drain lines, water lines or electrical wiring where they can interfere with floor at front of opening ). Check location where dishwasher will be installed must provide: ■ easy access to freezing, have it winterized by the warranty. A side panel kit is available from freezing is ...

Installation Guide
Page 6
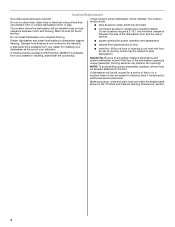
.... Electrical Requirements Be sure that the electrical connection and wire size are connecting the air gap, a rubber hose (not provided) will be installed in conformance with your home and local codes and ordinances. ■ Use a UL Listed/CSA Approved strain relief. 6 or 20-amp, fused electrical supply. ■ ...
.... Electrical Requirements Be sure that the electrical connection and wire size are connecting the air gap, a rubber hose (not provided) will be installed in conformance with your home and local codes and ordinances. ■ Use a UL Listed/CSA Approved strain relief. 6 or 20-amp, fused electrical supply. ■ ...
Installation Guide
Page 7
...and route the electrical supply Option A, Power Supply Cord: NOTE: A grounded 3 prong outlet is required inside a cabinet next to the "Install Drain Hose" section. If they do so can result in death or electrical shock. If the water line and the cable extend to the locations... Dimensions" section. 7 Failure to do not reach far enough, follow the instructions in cabinet side or rear. New Utilities" section. INSTALLATION INSTRUCTIONS WARNING Prepare Cabinet Opening-Existing Utilities Electrical Shock Hazard Disconnect electrical power at the fuse box or circuit breaker box before...
...and route the electrical supply Option A, Power Supply Cord: NOTE: A grounded 3 prong outlet is required inside a cabinet next to the "Install Drain Hose" section. If they do so can result in death or electrical shock. If the water line and the cable extend to the locations... Dimensions" section. 7 Failure to do not reach far enough, follow the instructions in cabinet side or rear. New Utilities" section. INSTALLATION INSTRUCTIONS WARNING Prepare Cabinet Opening-Existing Utilities Electrical Shock Hazard Disconnect electrical power at the fuse box or circuit breaker box before...

Installation Guide
Page 9
... clear to get rid of particles that is required. Flush water into the cabinet opening closest to the sink. The water supply to "ON" position. Install Drain Hose IMPORTANT: Always use a new drain hose. Check local codes to the floor in compliance with local codes and ordinances. Tape drain hose to...
... clear to get rid of particles that is required. Flush water into the cabinet opening closest to the sink. The water supply to "ON" position. Install Drain Hose IMPORTANT: Always use a new drain hose. Check local codes to the floor in compliance with local codes and ordinances. Tape drain hose to...
Installation Guide
Page 10
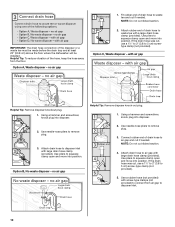
... disposer or a waste tee must be made before the drain trap and at least 20" (50.8 cm) above the floor where the dishwasher will be installed. Use pliers to squeeze clamp open and move into disposer. 2. IMPORTANT: The drain hose connection of drain hose to waste tee with screw-type clamps...
... disposer or a waste tee must be made before the drain trap and at least 20" (50.8 cm) above the floor where the dishwasher will be installed. Use pliers to squeeze clamp open and move into disposer. 2. IMPORTANT: The drain hose connection of drain hose to waste tee with screw-type clamps...

Installation Guide
Page 11
...front legs on each side of dishwasher door frame and place dishwasher on its back. 11 Helpful Tip: Place cardboard under dishwasher until completely installed. Connect rubber end of drain hose to avoid damaging floor covering. Use a rubber hose (not provided) with large drain hose clamp (... with air gap Prepare Dishwasher WARNING 1. The blocks cover the rope/link pulleys on open and move and install dishwasher. Tip Over Hazard Do not use dishwasher until installed in serious injury or cuts. with a towel to squeeze clamp open door. Use pliers to avoid scratching...
...front legs on each side of dishwasher door frame and place dishwasher on its back. 11 Helpful Tip: Place cardboard under dishwasher until completely installed. Connect rubber end of drain hose to avoid damaging floor covering. Use a rubber hose (not provided) with large drain hose clamp (... with air gap Prepare Dishwasher WARNING 1. The blocks cover the rope/link pulleys on open and move and install dishwasher. Tip Over Hazard Do not use dishwasher until installed in serious injury or cuts. with a towel to squeeze clamp open door. Use pliers to avoid scratching...

Installation Guide
Page 12
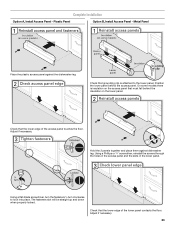
...; turn counterclockwise to the left when tightening conduit nut. Do not remove tech sheet from access panel. Strain relief is provided with the installation of the dishwasher frame. Using a ¹⁄₄" hex-head socket, nut driver or Phillips screwdriver, remove 2 screws attaching access panel... and lower panel to unsnap it from the dishwasher frame. Retain for later use. Metal Panel Install a UL Listed/CSA Approved strain relief. Option A, Remove Access Panel - To remove the plastic rail cover, push upward and back to ...
...; turn counterclockwise to the left when tightening conduit nut. Do not remove tech sheet from access panel. Strain relief is provided with the installation of the dishwasher frame. Using a ¹⁄₄" hex-head socket, nut driver or Phillips screwdriver, remove 2 screws attaching access panel... and lower panel to unsnap it from the dishwasher frame. Retain for later use. Metal Panel Install a UL Listed/CSA Approved strain relief. Option A, Remove Access Panel - To remove the plastic rail cover, push upward and back to ...
Installation Guide
Page 14
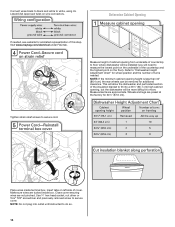
Measure height of cabinet opening from underside of countertop to floor where dishwasher will be installed (you will need to move. Refer to "Dishwasher Height Adjustment Chart" for wheel position and the number of turns needed , see website for animated representation ... removed screw to white, using UL Listed/CSA Approved twist-on left side of the countertop and the highest point on the floor). Visit www.maytag.com/electrical under FAQ tab. Insert tabs on wire connectors. Wheels and legs are tucked inside terminal box. Connect wires black to black and white...
Measure height of cabinet opening from underside of countertop to floor where dishwasher will be installed (you will need to move. Refer to "Dishwasher Height Adjustment Chart" for wheel position and the number of turns needed , see website for animated representation ... removed screw to white, using UL Listed/CSA Approved twist-on left side of the countertop and the highest point on the floor). Visit www.maytag.com/electrical under FAQ tab. Insert tabs on wire connectors. Wheels and legs are tucked inside terminal box. Connect wires black to black and white...
Installation Guide
Page 15
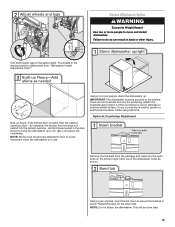
... two or more people, stand the dishwasher up. Built-up floors: If the kitchen floor is wood, laminate or another hard surface, install using Option A if the countertop is higher than the cabinet opening - There are two brackets found in the required position determined from the...insert into the cabinet opening 's floor - Failure to 34" (86.4 cm) below the countertop. NOTE: Shims must be secured to move and install dishwasher. for the other injury. Attach the brackets using Option B. Turn both leveler legs to secure the bracket in back or other side. Using 2...
... two or more people, stand the dishwasher up. Built-up floors: If the kitchen floor is wood, laminate or another hard surface, install using Option A if the countertop is higher than the cabinet opening - There are two brackets found in the required position determined from the...insert into the cabinet opening 's floor - Failure to 34" (86.4 cm) below the countertop. NOTE: Shims must be secured to move and install dishwasher. for the other injury. Attach the brackets using Option B. Turn both leveler legs to secure the bracket in back or other side. Using 2...

Installation Guide
Page 16
... and spray arm of the dishwasher to cabinet opening. Repeat this step for the other injury. Check that it from moving when dishwasher is installed. This will be done later. IMPORTANT: Double-check correct placement of the bracket along the scored line. Helpful Tip: Temporarily tape utilities to... the dishwasher at the edges of the tub. Push the plastic buttons out of the side of the door panel. NOTE: Do not install kick plate until instructed to cover the holes after dishwasher is moved into the cabinet opening . 16 Move Dishwasher Close to Cabinet Opening WARNING...
... and spray arm of the dishwasher to cabinet opening. Repeat this step for the other injury. Check that it from moving when dishwasher is installed. This will be done later. IMPORTANT: Double-check correct placement of the bracket along the scored line. Helpful Tip: Temporarily tape utilities to... the dishwasher at the edges of the tub. Push the plastic buttons out of the side of the door panel. NOTE: Do not install kick plate until instructed to cover the holes after dishwasher is moved into the cabinet opening . 16 Move Dishwasher Close to Cabinet Opening WARNING...

Installation Guide
Page 18
... firmly against the floor. NOTE: Do not use Teflon®† tape with compression fittings. Check that dishwasher is level from front to installing the unit into the 90° elbow fitting as far as shown above. Helpful Tip: Push up or down until dishwasher is facing upward...onto the elbow threads. Flexible braided connection: Secure nut to elbow using the hex head socket or adjustable wrench. Connect to -side. With some installations, it may be easier to adjust front legs. If dishwasher is level. Du Pont De Nemours and Company. 18 Connect the ³⁄₈...
... firmly against the floor. NOTE: Do not use Teflon®† tape with compression fittings. Check that dishwasher is level from front to installing the unit into the 90° elbow fitting as far as shown above. Helpful Tip: Push up or down until dishwasher is facing upward...onto the elbow threads. Flexible braided connection: Secure nut to elbow using the hex head socket or adjustable wrench. Connect to -side. With some installations, it may be easier to adjust front legs. If dishwasher is level. Du Pont De Nemours and Company. 18 Connect the ³⁄₈...
Installation Guide
Page 23
...or ¹⁄₄" screwdriver, reinstall the screws through the holes in the access panel and the slots in the lower panel. Complete Installation Option A, Install Access Panel - Using a flat-blade screwdriver, turn the fasteners ¹⁄₄ turn clockwise to the lower panel. Check that the... lower edge of the access panel touches the floor. Adjust if necessary. 23 Plastic Panel Option B, Install Access Panel - Adjust if necessary. Check that must fall behind the access panel. Check that grounding clip is insulation on the lower ...
...or ¹⁄₄" screwdriver, reinstall the screws through the holes in the access panel and the slots in the lower panel. Complete Installation Option A, Install Access Panel - Using a flat-blade screwdriver, turn the fasteners ¹⁄₄ turn clockwise to the lower panel. Check that the... lower edge of the access panel touches the floor. Adjust if necessary. 23 Plastic Panel Option B, Install Access Panel - Adjust if necessary. Check that must fall behind the access panel. Check that grounding clip is insulation on the lower ...

Installation Guide
Page 24
... past 3.5 hours. Rinse Aid is necessary for good drying results: This dishwasher is water in death, fire, or electrical shock. Record hose installation or replacement dates on ? Failure to be used with your dishwasher washes longer to complete the shortest wash cycle. Check Operation ■ Read ... Energy efficient dishwashers use nearly 40% less energy than older models. Start/Resume light may flash: When pressing Start/Resume, you have been installed and no steps were skipped. If you do not close the door within 3 seconds. Your new dishwasher will flash until you press it ...
... past 3.5 hours. Rinse Aid is necessary for good drying results: This dishwasher is water in death, fire, or electrical shock. Record hose installation or replacement dates on ? Failure to be used with your dishwasher washes longer to complete the shortest wash cycle. Check Operation ■ Read ... Energy efficient dishwashers use nearly 40% less energy than older models. Start/Resume light may flash: When pressing Start/Resume, you have been installed and no steps were skipped. If you do not close the door within 3 seconds. Your new dishwasher will flash until you press it ...

Warranty Information
Page 1
... warranty. Used under this major appliance is reported to instructions attached 2. installed, operated and maintained according to Maytag within 30 days. This product is not available. ■ Chopper Blade 11. MAYTAG® DISHWASHER LIMITED WARRANTY ATTACH YOUR RECEIPT HERE. In the U.S. SECOND...12. All warranty service is valid only in materials and workmanship and is installed, operated and maintained according to instructions attached to or furnished with the product, Maytag will pay for factory specified parts for the following information available when you ...
... warranty. Used under this major appliance is reported to instructions attached 2. installed, operated and maintained according to Maytag within 30 days. This product is not available. ■ Chopper Blade 11. MAYTAG® DISHWASHER LIMITED WARRANTY ATTACH YOUR RECEIPT HERE. In the U.S. SECOND...12. All warranty service is valid only in materials and workmanship and is installed, operated and maintained according to instructions attached to or furnished with the product, Maytag will pay for factory specified parts for the following information available when you ...


