

Warranty Information
Page 1
... instructions attached to or furnished with the product, Maytag will pay for factory specified parts for the following components to correct non-cosmetic defects in materials or workmanship in these parts that prevent function of the dishwasher and that existed when this major appliance was purchased.... This major appliance is intended to be provided by Maytag. 5. MAYTAG® DISHWASHER LIMITED WARRANTY FIRST YEAR LIMITED WARRANTY (PARTS AND LABOR) For one year from the date of purchase, when this major appliance is installed, operated...
... instructions attached to or furnished with the product, Maytag will pay for factory specified parts for the following components to correct non-cosmetic defects in materials or workmanship in these parts that prevent function of the dishwasher and that existed when this major appliance was purchased.... This major appliance is intended to be provided by Maytag. 5. MAYTAG® DISHWASHER LIMITED WARRANTY FIRST YEAR LIMITED WARRANTY (PARTS AND LABOR) For one year from the date of purchase, when this major appliance is installed, operated...
Use & Care Guide
Page 9
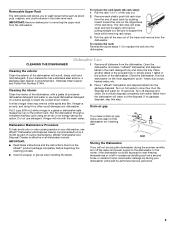
... by pushing inward toward the rack on the most aggressive cycle - Be sure to wash larger items such as part of the way out. 2. Remove all dishwasher brands. Run the dishwasher on the ridged area of the rack stop from the end of each plastic push tab rack stop . Do ...water. Stainless Steel Cleaner and Polish Part Number 31464. Place another tablet in the prewash tray or simply place 1 tablet in the main detergent tray and close the tray. Turn off the water and power supply to clean the cooled-down interior. 1. Run the dishwasher through a complete washing cycle using...
... by pushing inward toward the rack on the most aggressive cycle - Be sure to wash larger items such as part of the way out. 2. Remove all dishwasher brands. Run the dishwasher on the ridged area of the rack stop from the end of each plastic push tab rack stop . Do ...water. Stainless Steel Cleaner and Polish Part Number 31464. Place another tablet in the prewash tray or simply place 1 tablet in the main detergent tray and close the tray. Turn off the water and power supply to clean the cooled-down interior. 1. Run the dishwasher through a complete washing cycle using...
Use & Care Guide
Page 10
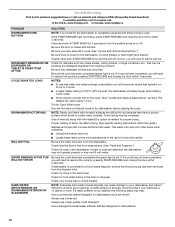
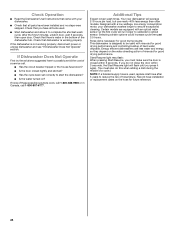
... rack first. ■ Locate these items on or off. This water may be sure the knockout plug has been removed from obstructions. (See "Parts and Features.") Check for suds in the drain hose. A water softener is strongly recommended if your detergent is connected to a food waste disposer, ... visit our website and reference FAQs (Frequently Asked Questions) to possibly avoid the cost of a service call for service. In the U.S.A., www.maytag.com In Canada, www.maytag.ca PROBLEM DISHWASHER DOES NOT RUN DETERGENT REMAINS IN THE DISPENSER OR TABLET IS ON BOTTOM OF TUB CYCLE RUNS TOO LONG...
... rack first. ■ Locate these items on or off. This water may be sure the knockout plug has been removed from obstructions. (See "Parts and Features.") Check for suds in the drain hose. A water softener is strongly recommended if your detergent is connected to a food waste disposer, ... visit our website and reference FAQs (Frequently Asked Questions) to possibly avoid the cost of a service call for service. In the U.S.A., www.maytag.com In Canada, www.maytag.ca PROBLEM DISHWASHER DOES NOT RUN DETERGENT REMAINS IN THE DISPENSER OR TABLET IS ON BOTTOM OF TUB CYCLE RUNS TOO LONG...

Use & Care Guide
Page 12
...; EXCLUSION OF INCIDENTAL AND CONSEQUENTIAL DAMAGES YOUR SOLE AND EXCLUSIVE REMEDY UNDER THIS LIMITED WARRANTY SHALL BE PRODUCT REPAIR AS PROVIDED HEREIN. MAYTAG® DISHWASHER LIMITED WARRANTY FIRST YEAR LIMITED WARRANTY (PARTS AND LABOR) For one year from the date of purchase, when this major appliance is installed, operated and maintained according to...
...; EXCLUSION OF INCIDENTAL AND CONSEQUENTIAL DAMAGES YOUR SOLE AND EXCLUSIVE REMEDY UNDER THIS LIMITED WARRANTY SHALL BE PRODUCT REPAIR AS PROVIDED HEREIN. MAYTAG® DISHWASHER LIMITED WARRANTY FIRST YEAR LIMITED WARRANTY (PARTS AND LABOR) For one year from the date of purchase, when this major appliance is installed, operated and maintained according to...
Installation Guide
Page 2
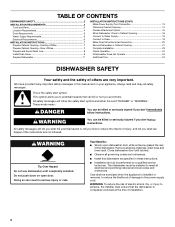
... not push down on your appliance. Remove shipping materials, drain hose and lower rack. Close dishwasher door until completely installed. TABLE OF CONTENTS DISHWASHER SAFETY 2 INSTALLATION REQUIREMENTS 3 Tools and Parts 3 Location Requirements 4 Drain Requirements 6 Water Supply Requirements 6 Electrical Requirements 6 INSTALLATION INSTRUCTIONS 7 Prepare Cabinet Opening-Existing Utilities 7 Prepare Cabinet Opening-New Utilities 7 Prepare and...
... not push down on your appliance. Remove shipping materials, drain hose and lower rack. Close dishwasher door until completely installed. TABLE OF CONTENTS DISHWASHER SAFETY 2 INSTALLATION REQUIREMENTS 3 Tools and Parts 3 Location Requirements 4 Drain Requirements 6 Water Supply Requirements 6 Electrical Requirements 6 INSTALLATION INSTRUCTIONS 7 Prepare Cabinet Opening-Existing Utilities 7 Prepare Cabinet Opening-New Utilities 7 Prepare and...
Installation Guide
Page 3
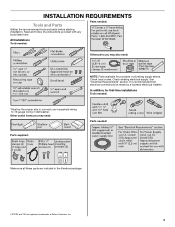
... connect your household wiring to 16-gauge wiring in dishwasher. Read and follow the instructions provided with any tools listed here. Check existing electrical supply. Other useful items you may need : NOTE: Parts available for first-time installations Tools needed : Make ...sure all these parts are registered trademarks of Saturn Fasteners, Inc. 3 See "Electrical Requirements" section. Check local codes....
... connect your household wiring to 16-gauge wiring in dishwasher. Read and follow the instructions provided with any tools listed here. Check existing electrical supply. Other useful items you may need : NOTE: Parts available for first-time installations Tools needed : Make ...sure all these parts are registered trademarks of Saturn Fasteners, Inc. 3 See "Electrical Requirements" section. Check local codes....
Installation Guide
Page 4
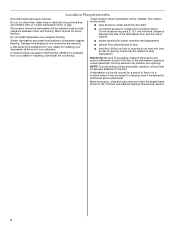
... dishwasher against freezing. A moisture barrier accessory (Part Number 4396277) is available from your dealer for installing underneath the countertop. ■ square opening for installing your cabinetry. Make sure pipes, wires and drain hose are within the shaded area shown in the dishwasher ...(example: Flooring extends only partway into opening , shims may be left unused for loading and unloading dishes. Do not install dishwasher over carpeted flooring. ■ convenient access for a period of opening ). Location Requirements Grounded electrical supply required. Do not run...
... dishwasher against freezing. A moisture barrier accessory (Part Number 4396277) is available from your dealer for installing underneath the countertop. ■ square opening for installing your cabinetry. Make sure pipes, wires and drain hose are within the shaded area shown in the dishwasher ...(example: Flooring extends only partway into opening , shims may be left unused for loading and unloading dishes. Do not install dishwasher over carpeted flooring. ■ convenient access for a period of opening ). Location Requirements Grounded electrical supply required. Do not run...
Installation Guide
Page 6
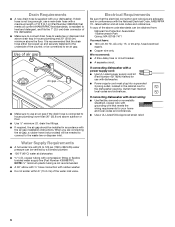
...hose is supplied with your home and local codes and ordinances. ■ Use a UL Listed/CSA Approved strain relief. 6 If connecting dishwasher with direct wiring: ■ Use flexible, armored or nonmetallic sheathed, copper wire with grounding wire that the drain hose either be looped... and all local codes and ordinances. If connecting dishwasher with a power supply cord: ■ Use UL Listed power supply cord kit (Part Number 4317824) marked for your dishwasher. It is recommended that meets the wiring requirements for use with dishwasher. ■ Power supply cord must plug into ...
...hose is supplied with your home and local codes and ordinances. ■ Use a UL Listed/CSA Approved strain relief. 6 If connecting dishwasher with direct wiring: ■ Use flexible, armored or nonmetallic sheathed, copper wire with grounding wire that the drain hose either be looped... and all local codes and ordinances. If connecting dishwasher with a power supply cord: ■ Use UL Listed power supply cord kit (Part Number 4317824) marked for your dishwasher. It is recommended that meets the wiring requirements for use with dishwasher. ■ Power supply cord must plug into ...
Installation Guide
Page 8
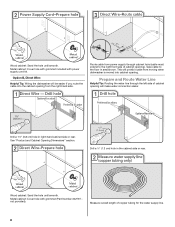
... of cabinet opening will make water connection easier. Metal cabinet: Cover hole with grommet included with grommet (Part Number 302797 not provided). Option B, Direct Wire: Helpful Tip: Wiring the dishwasher will prohibit cable from moving when dishwasher is moved into the cabinet opening . Measure overall length of cabinet opening ). See "Product and Cabinet...
... of cabinet opening will make water connection easier. Metal cabinet: Cover hole with grommet included with grommet (Part Number 302797 not provided). Option B, Direct Wire: Helpful Tip: Wiring the dishwasher will prohibit cable from moving when dishwasher is moved into the cabinet opening . Measure overall length of cabinet opening ). See "Product and Cabinet...
Installation Guide
Page 13
...so that it does not touch dishwasher motor to 16-gauge dishwasher wiring. Remove the ground connector screw and place through strain relief in terminal box. Select UL Listed/CSA Approved twist-on wire connectors rated to connect your power supply cord to lower part of the green ground wire. Twist... on wires to be sure both are secured. 13 Do not use an extension cord. Pull cord through the ring terminal of dishwasher tub. Connect ground wire to follow these instructions can ...
...so that it does not touch dishwasher motor to 16-gauge dishwasher wiring. Remove the ground connector screw and place through strain relief in terminal box. Select UL Listed/CSA Approved twist-on wire connectors rated to connect your power supply cord to lower part of the green ground wire. Twist... on wires to be sure both are secured. 13 Do not use an extension cord. Pull cord through the ring terminal of dishwasher tub. Connect ground wire to follow these instructions can ...
Installation Guide
Page 15
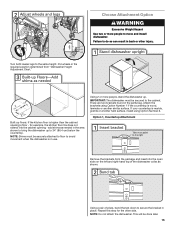
... be done later. 15 Attach the brackets using Option Number 2. Using a pair of the dishwasher collar as needed in the area shown to secure the bracket in back or other side. Repeat... and right-hand top of pliers, bend the tab down to bring the dishwasher up . Option 1, Countertop Attachment Remove the brackets from "Dishwasher Height Adjustment Chart." Failure to 34" (86.4 cm) below the countertop.... cabinet opening - for the other injury. IMPORTANT: The dishwasher must be securely attached to floor to the same height. This will be secured to move and ...
... be done later. 15 Attach the brackets using Option Number 2. Using a pair of the dishwasher collar as needed in the area shown to secure the bracket in back or other side. Repeat... and right-hand top of pliers, bend the tab down to bring the dishwasher up . Option 1, Countertop Attachment Remove the brackets from "Dishwasher Height Adjustment Chart." Failure to 34" (86.4 cm) below the countertop.... cabinet opening - for the other injury. IMPORTANT: The dishwasher must be securely attached to floor to the same height. This will be secured to move and ...
Installation Guide
Page 16
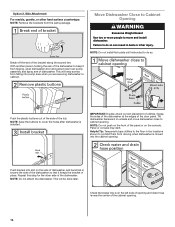
... bracket in back or other hard surface countertops NOTE: Remove the brackets from tipping, open dishwasher door and place towel over pump assembly and spray arm of the dishwasher to do so. Check that it from the parts package. NOTE: Do not push on the front of the panel or on the side... of dishwasher, and bend tab in toward the side of the tub. Push bracket into pump area...
... bracket in back or other hard surface countertops NOTE: Remove the brackets from tipping, open dishwasher door and place towel over pump assembly and spray arm of the dishwasher to do so. Check that it from the parts package. NOTE: Do not push on the front of the panel or on the side... of dishwasher, and bend tab in toward the side of the tub. Push bracket into pump area...
Installation Guide
Page 20
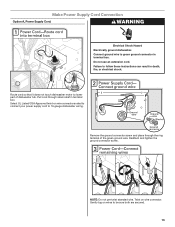
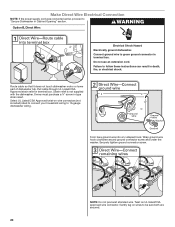
...sure both are secured. 20 Make Direct Wire Electrical Connection NOTE: If the power supply cord was connected earlier, proceed to "Secure Dishwasher in death, fire, or electrical shock. Owner must purchase a ⁷⁄₈" screw-in terminal box. NOTE: Do not...ground connector screw. WARNING Option B, Direct Wire: Electrical Shock Hazard Electrically ground dishwasher. Connect ground wire to green ground connector in terminal box. Route cable so that it does not touch dishwasher motor or lower part of dishwasher tub. Twist on UL listed/CSA approved wire connector.
...sure both are secured. 20 Make Direct Wire Electrical Connection NOTE: If the power supply cord was connected earlier, proceed to "Secure Dishwasher in death, fire, or electrical shock. Owner must purchase a ⁷⁄₈" screw-in terminal box. NOTE: Do not...ground connector screw. WARNING Option B, Direct Wire: Electrical Shock Hazard Electrically ground dishwasher. Connect ground wire to green ground connector in terminal box. Route cable so that it does not touch dishwasher motor or lower part of dishwasher tub. Twist on UL listed/CSA approved wire connector.
Installation Guide
Page 23
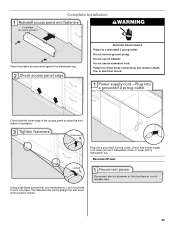
Electrical Shock Hazard Plug into a grounded 3 prong outlet. Plug into a grounded 3 prong outlet. Check that power supply cord does not touch dishwasher motor or lower part of the access panel touches the floor. Do not use an adapter. Reconnect Power Using a flat-blade screwdriver, turn the fasteners ¹⁄₄ turn ...
Electrical Shock Hazard Plug into a grounded 3 prong outlet. Plug into a grounded 3 prong outlet. Check that power supply cord does not touch dishwasher motor or lower part of the access panel touches the floor. Do not use an adapter. Reconnect Power Using a flat-blade screwdriver, turn the fasteners ¹⁄₄ turn ...
Installation Guide
Page 24
... or replacement dates on ? Check that dishwasher is water in Canada, call . ■ Has the circuit breaker tripped or the house fuse blown? ■ Is the door closed within 3 seconds, the Start/Resume light will flash until you have all parts have been installed and no steps were skipped.... Designed with rinse aid for good drying results: This dishwasher is designed to be used with a low wattage, low energy consumption motor, your...
... or replacement dates on ? Check that dishwasher is water in Canada, call . ■ Has the circuit breaker tripped or the house fuse blown? ■ Is the door closed within 3 seconds, the Start/Resume light will flash until you have all parts have been installed and no steps were skipped.... Designed with rinse aid for good drying results: This dishwasher is designed to be used with a low wattage, low energy consumption motor, your...
Dimension Guide
Page 1
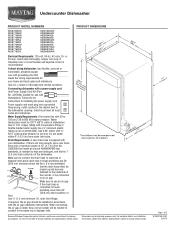
...tubing with a power supply cord: Use Power Supply Cord Kit (Part No. 4317824) marked for installing the power supply cord. external pipe threads on one end. or 20-amp. If connecting dishwasher with compression fitting or flexible braided water supply line (¹⁄&#...MDB8959SB MDBH979AW MDBH979SA MDBH989AW Electrical Requirements: 120-volt, 60-Hz, AC-only, 15- Outlet must be needed to connect to the dishwasher opening. It is connected to change materials and specifications without notice. Instructions packed with ³⁄₄" N.P.T. Use ³⁄&#...
...tubing with a power supply cord: Use Power Supply Cord Kit (Part No. 4317824) marked for installing the power supply cord. external pipe threads on one end. or 20-amp. If connecting dishwasher with compression fitting or flexible braided water supply line (¹⁄&#...MDB8959SB MDBH979AW MDBH979SA MDBH989AW Electrical Requirements: 120-volt, 60-Hz, AC-only, 15- Outlet must be needed to connect to the dishwasher opening. It is connected to change materials and specifications without notice. Instructions packed with ³⁄₄" N.P.T. Use ³⁄&#...


