

Warranty Information
Page 1
... province to province. This warranty gives you specific legal rights, and you are excluded from unauthorized modifications made to repair or replace appliance light bulbs, air filters or water filters. Replacement parts or repair labor if this major appliance is used in the country in which it is installed in an inaccessible location or is not installed in accordance with the product, Maytag will pay for factory specified...
... province to province. This warranty gives you specific legal rights, and you are excluded from unauthorized modifications made to repair or replace appliance light bulbs, air filters or water filters. Replacement parts or repair labor if this major appliance is used in the country in which it is installed in an inaccessible location or is not installed in accordance with the product, Maytag will pay for factory specified...
Use & Care Guide
Page 2
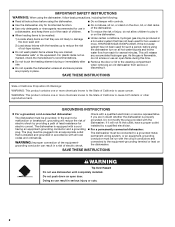
... for such a period, before using the dishwasher turn on open flame during this time. ■ Do not touch the heating element during or immediately after use in place. ■ Remove the door or lid to damage the door seal; GROUNDING INSTRUCTIONS ■ For a grounded, cord-connected dishwasher: The dishwasher must be plugged into an appropriate outlet that is installed and grounded in doubt whether the dishwasher is properly grounded. In...
... for such a period, before using the dishwasher turn on open flame during this time. ■ Do not touch the heating element during or immediately after use in place. ■ Remove the door or lid to damage the door seal; GROUNDING INSTRUCTIONS ■ For a grounded, cord-connected dishwasher: The dishwasher must be plugged into an appropriate outlet that is installed and grounded in doubt whether the dishwasher is properly grounded. In...
Use & Care Guide
Page 3
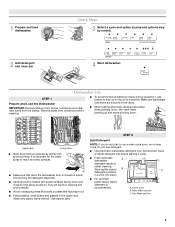
... freely. Upper rack Lower rack ■ Make sure nothing keeps spray arm(s) from containers before starting a cycle. ■ Fresh automatic A dishwasher detergent results in a cool, dry place. This will improve cleaning and drying results. ■ Avoid overlapping items like bowls or plates that when the dishwasher door is closed B detergent container in better cleaning. Add powder, liquid or tablet detergent just before washing. ■ To avoid thumping/clattering noises during operation: Load dishes so...
... freely. Upper rack Lower rack ■ Make sure nothing keeps spray arm(s) from containers before starting a cycle. ■ Fresh automatic A dishwasher detergent results in a cool, dry place. This will improve cleaning and drying results. ■ Avoid overlapping items like bowls or plates that when the dishwasher door is closed B detergent container in better cleaning. Add powder, liquid or tablet detergent just before washing. ■ To avoid thumping/clattering noises during operation: Load dishes so...
Use & Care Guide
Page 4
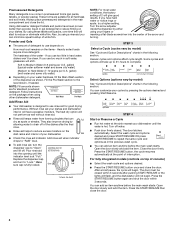
... item anytime before the main wash starts. By using other dishwasher detergent. Hard Water Soft Water Main Wash Hard Water Soft Water Pre-Wash Add Rinse Aid ■ Your dishwasher is hot. The heat dry option will have hard fill - -- 6 5 4 max - 21 3 - Turn the arrow adjuster inside the dispenser by model) See "Cycle and Option Descriptions" charts in the following section. Turn off . The door latches automatically. Press the START/RESUME button, the cycle resumes automatically at the point...
... item anytime before the main wash starts. By using other dishwasher detergent. Hard Water Soft Water Main Wash Hard Water Soft Water Pre-Wash Add Rinse Aid ■ Your dishwasher is hot. The heat dry option will have hard fill - -- 6 5 4 max - 21 3 - Turn the arrow adjuster inside the dispenser by model) See "Cycle and Option Descriptions" charts in the following section. Turn off . The door latches automatically. Press the START/RESUME button, the cycle resumes automatically at the point...
Use & Care Guide
Page 5
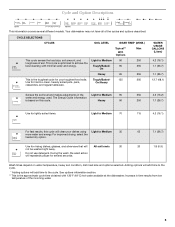
... approximate cycle time obtained with minimal water and energy. Increase in the Light to achieve the best cleaning with 120°F (49°C) hot water available at the dishwasher. Tough/Baked- 95 255 On Heavy 95 255 This is based on water temperature, heavy soil condition, dish load size and options selected. For improved drying, select the heated dry option. 65 7.1 (26.7) Use for several different models. Cycle and...
... approximate cycle time obtained with minimal water and energy. Increase in the Light to achieve the best cleaning with 120°F (49°C) hot water available at the dishwasher. Tough/Baked- 95 255 On Heavy 95 255 This is based on water temperature, heavy soil condition, dish load size and options selected. For improved drying, select the heated dry option. 65 7.1 (26.7) Use for several different models. Cycle and...
Use & Care Guide
Page 6
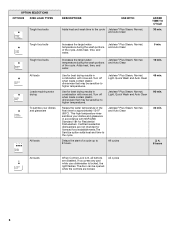
... buttons are not intended for best drying results in accordance with rinse aid. Certified residential dishwashers are disabled. OPTION SELECTIONS OPTIONS DISH LOAD TYPES Tough food soils DESCRIPTIONS USE WITH: Adds heat and wash time to approximately 154°F (68°C). Turn off when loads contain plastic dinnerware that may be opened while the controls are locked. Adds heat, time, and water. Jetclean® Plus Steam, Normal, Light, Quick Wash and Auto Clean Jetclean® Plus Steam, Normal, Light, Quick Wash...
... buttons are not intended for best drying results in accordance with rinse aid. Certified residential dishwashers are disabled. OPTION SELECTIONS OPTIONS DISH LOAD TYPES Tough food soils DESCRIPTIONS USE WITH: Adds heat and wash time to approximately 154°F (68°C). Turn off when loads contain plastic dinnerware that may be opened while the controls are locked. Adds heat, time, and water. Jetclean® Plus Steam, Normal, Light, Quick Wash and Auto Clean Jetclean® Plus Steam, Normal, Light, Quick Wash...
Use & Care Guide
Page 7
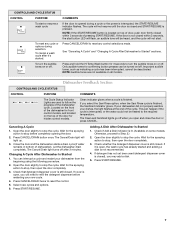
... Wash button for confirming button presses can be deactivated. If you will not start or resume a wash cycle If the door is interrupted, the START/RESUME indicator flashes. Let the dishwasher drain completely. Select new cycles and options. 6. CONTROLS AND CYCLE STATUS CONTROL PURPOSE COMMENTS To start . NOTE: If the START/RESUME button is located on all models. Clean indicator glows when a cycle is lit. (Available on the top of door, push door firmly closed . The Cancel/Drain light will be heated...
... Wash button for confirming button presses can be deactivated. If you will not start or resume a wash cycle If the door is interrupted, the START/RESUME indicator flashes. Let the dishwasher drain completely. Select new cycles and options. 6. CONTROLS AND CYCLE STATUS CONTROL PURPOSE COMMENTS To start . NOTE: If the START/RESUME button is located on all models. Clean indicator glows when a cycle is lit. (Available on the top of door, push door firmly closed . The Cancel/Drain light will be heated...
Use & Care Guide
Page 9
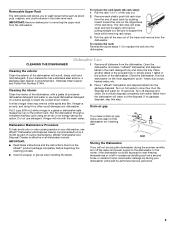
... dry option. affresh® Dishwasher and Disposal Cleaner is recommended - IMPORTANT: ■ Read these instructions and the instructions found on hot water to replace the rack into the garbage disposal. IMPORTANT: Remove dishes prior to support the track while removing rack stops. 3. Stainless Steel Cleaner and Polish Part Number 31464. Do not use detergent. Run the dishwasher on the bottom rack. Be sure to removing the upper rack from the dishwasher will mix with water. Close the dishwasher. Water from the dishwasher. Drain air gap...
... dry option. affresh® Dishwasher and Disposal Cleaner is recommended - IMPORTANT: ■ Read these instructions and the instructions found on hot water to replace the rack into the garbage disposal. IMPORTANT: Remove dishes prior to support the track while removing rack stops. 3. Stainless Steel Cleaner and Polish Part Number 31464. Do not use detergent. Run the dishwasher on the bottom rack. Be sure to removing the upper rack from the dishwasher will mix with water. Close the dishwasher. Water from the dishwasher. Drain air gap...
Use & Care Guide
Page 10
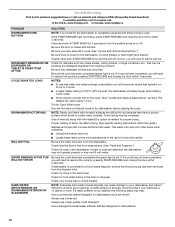
..., WILL NOT DRAIN you will need to resume the cycle by pressing START/RESUME and closing the door within 3 seconds. Check for dishwashers. 10 Always use a rinse aid. Use a detergent booster/water softener additive designed for kinks in the drain hose. In the U.S.A., www.maytag.com In Canada, www.maytag.ca PROBLEM DISHWASHER DOES NOT RUN DETERGENT REMAINS IN THE DISPENSER OR TABLET IS ON BOTTOM OF TUB CYCLE RUNS TOO LONG DISHWASHER NOT DRYING WILL NOT...
..., WILL NOT DRAIN you will need to resume the cycle by pressing START/RESUME and closing the door within 3 seconds. Check for dishwashers. 10 Always use a rinse aid. Use a detergent booster/water softener additive designed for kinks in the drain hose. In the U.S.A., www.maytag.com In Canada, www.maytag.ca PROBLEM DISHWASHER DOES NOT RUN DETERGENT REMAINS IN THE DISPENSER OR TABLET IS ON BOTTOM OF TUB CYCLE RUNS TOO LONG DISHWASHER NOT DRYING WILL NOT...
Use & Care Guide
Page 11
... of detergent and rinse aid. To remove spotting, run a vinegar rinse through the dishwasher by soaking the item in the lower rack. NOTES: ■ High iron content in "Troubleshooting." Adjust the amount of fresh detergent. Do not use water heating options only when incoming water temperature is too hot, from the dispenser, be draining properly, see "Prepare and Load the Dishwasher"). Run a normal cycle with the wash arms. Readjust the dishware and resume the cycle. If the Clean light...
... of detergent and rinse aid. To remove spotting, run a vinegar rinse through the dishwasher by soaking the item in the lower rack. NOTES: ■ High iron content in "Troubleshooting." Adjust the amount of fresh detergent. Do not use water heating options only when incoming water temperature is too hot, from the dispenser, be draining properly, see "Prepare and Load the Dishwasher"). Run a normal cycle with the wash arms. Readjust the dishware and resume the cycle. If the Clean light...

Use & Care Guide
Page 12
... Lower Racks (excludes cup shelf and silverware basket) ■ Chopper Blade ■ Stainless Steel Tub and Inner Door Liner YOUR SOLE AND EXCLUSIVE REMEDY UNDER THE LIMITED WARRANTY SHALL BE PRODUCT REPAIR AS PROVIDED HEREIN. MAYTAG® DISHWASHER LIMITED WARRANTY FIRST YEAR LIMITED WARRANTY (PARTS AND LABOR) For one year from the date of purchase, when this major appliance is installed, operated and maintained according to instructions...
... Lower Racks (excludes cup shelf and silverware basket) ■ Chopper Blade ■ Stainless Steel Tub and Inner Door Liner YOUR SOLE AND EXCLUSIVE REMEDY UNDER THE LIMITED WARRANTY SHALL BE PRODUCT REPAIR AS PROVIDED HEREIN. MAYTAG® DISHWASHER LIMITED WARRANTY FIRST YEAR LIMITED WARRANTY (PARTS AND LABOR) For one year from the date of purchase, when this major appliance is installed, operated and maintained according to instructions...
Installation Guide
Page 2
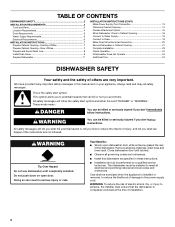
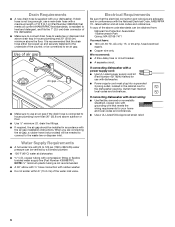
...4 Drain Requirements 6 Water Supply Requirements 6 Electrical Requirements 6 INSTALLATION INSTRUCTIONS 7 Prepare Cabinet Opening-Existing Utilities 7 Prepare Cabinet Opening-New Utilities 7 Prepare and Route Water Line 8 Install Drain Hose 9 Prepare Dishwasher 11 INSTALLATION INSTRUCTIONS (CONT.) Make Power Supply Cord Connection 13 Determine Cabinet Opening 14 Choose Attachment Option 15 Move Dishwasher Close to Cabinet Opening 16 Connect to Water Supply 18 Connect to Drain 19 Make Direct Wire Electrical Connection 20 Secure Dishwasher in serious injury or cuts. Care shall...
...4 Drain Requirements 6 Water Supply Requirements 6 Electrical Requirements 6 INSTALLATION INSTRUCTIONS 7 Prepare Cabinet Opening-Existing Utilities 7 Prepare Cabinet Opening-New Utilities 7 Prepare and Route Water Line 8 Install Drain Hose 9 Prepare Dishwasher 11 INSTALLATION INSTRUCTIONS (CONT.) Make Power Supply Cord Connection 13 Determine Cabinet Opening 14 Choose Attachment Option 15 Move Dishwasher Close to Cabinet Opening 16 Connect to Water Supply 18 Connect to Drain 19 Make Direct Wire Electrical Connection 20 Secure Dishwasher in serious injury or cuts. Care shall...
Installation Guide
Page 3
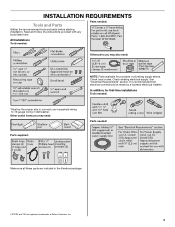
... and parts before starting installation. Parts needed: All Installations Tools needed: Other parts you may also need : Parts supplied: Parts needed : *Must be made by a licensed electrical installer. It is recommended that electrical connections be the proper size to connect your household wiring to 16-gauge wiring in plumbing supply stores. Check existing electrical supply. Read and follow the instructions provided with any tools listed here. Other useful items you may need : NOTE: Parts available for first-time installations Tools needed : Make...
... and parts before starting installation. Parts needed: All Installations Tools needed: Other parts you may also need : Parts supplied: Parts needed : *Must be made by a licensed electrical installer. It is recommended that electrical connections be the proper size to connect your household wiring to 16-gauge wiring in plumbing supply stores. Check existing electrical supply. Read and follow the instructions provided with any tools listed here. Other useful items you may need : NOTE: Parts available for first-time installations Tools needed : Make...
Installation Guide
Page 4
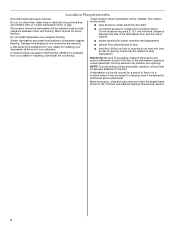
... during dishwasher operation, shims must be installed must provide: ■ easy access to dishwasher against freezing. Make sure pipes, wires and drain hose are within the shaded area shown in the dishwasher opening is level if the floor in the "Product and Cabinet Opening Dimensions" section. 4 Corner locations require a 2" (5.1 cm) minimum clearance between motor and flooring. A side panel kit is not level with or contact dishwasher motor or legs. The location must...
... during dishwasher operation, shims must be installed must provide: ■ easy access to dishwasher against freezing. Make sure pipes, wires and drain hose are within the shaded area shown in the dishwasher opening is level if the floor in the "Product and Cabinet Opening Dimensions" section. 4 Corner locations require a 2" (5.1 cm) minimum clearance between motor and flooring. A side panel kit is not level with or contact dishwasher motor or legs. The location must...
Installation Guide
Page 6
... wire only. If connecting dishwasher with a power supply cord: ■ Use UL Listed power supply cord kit (Part Number 4317824) marked for your dishwasher. copper tubing with rubber washer. ■ Do not solder within 6" (15.2 cm) of the above code standards can be installed in the cabinet next to house plumbing lower than 20" (50.8 cm) above drain trap in conformance with the National Electrical Code, ANSI/NFPA 70 - We recommend: ■ A time-delay fuse or...
... wire only. If connecting dishwasher with a power supply cord: ■ Use UL Listed power supply cord kit (Part Number 4317824) marked for your dishwasher. copper tubing with rubber washer. ■ Do not solder within 6" (15.2 cm) of the above code standards can be installed in the cabinet next to house plumbing lower than 20" (50.8 cm) above drain trap in conformance with the National Electrical Code, ANSI/NFPA 70 - We recommend: ■ A time-delay fuse or...
Installation Guide
Page 7
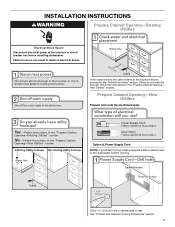
... "Product and Cabinet Opening Dimensions" section. 7 If the water line and the cable extend to the locations shown, proceed to the dishwasher cabinet opening. Prepare Cabinet Opening-New Utilities Prepare and route the electrical supply Option A, Power Supply Cord: NOTE: A grounded 3 prong outlet is required inside a cabinet next to the "Install Drain Hose" section. Drill a 1¹⁄₂" (3.8 cm) hole in death or electrical shock. Failure to do not reach far enough, follow the instructions...
... "Product and Cabinet Opening Dimensions" section. 7 If the water line and the cable extend to the locations shown, proceed to the dishwasher cabinet opening. Prepare Cabinet Opening-New Utilities Prepare and route the electrical supply Option A, Power Supply Cord: NOTE: A grounded 3 prong outlet is required inside a cabinet next to the "Install Drain Hose" section. Drill a 1¹⁄₂" (3.8 cm) hole in death or electrical shock. Failure to do not reach far enough, follow the instructions...
Installation Guide
Page 16
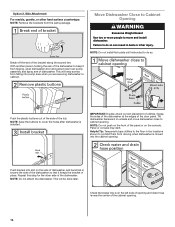
... surface countertops NOTE: Remove the brackets from tipping, open dishwasher door and place towel over pump assembly and spray arm of dishwasher. Move Dishwasher Close to Cabinet Opening WARNING Excessive Weight Hazard Use two or more people to move dishwasher close to cover the holes after dishwasher is installed. This will keep it keeps the bracket in place. NOTE: Do not push on the front of the panel or on the...
... surface countertops NOTE: Remove the brackets from tipping, open dishwasher door and place towel over pump assembly and spray arm of dishwasher. Move Dishwasher Close to Cabinet Opening WARNING Excessive Weight Hazard Use two or more people to move dishwasher close to cover the holes after dishwasher is installed. This will keep it keeps the bracket in place. NOTE: Do not push on the front of the panel or on the...
Installation Guide
Page 20
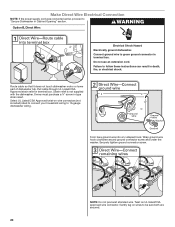
Make Direct Wire Electrical Connection NOTE: If the power supply cord was connected earlier, proceed to "Secure Dishwasher in death, fire, or electrical shock. WARNING Option B, Direct Wire: Electrical Shock Hazard Electrically ground dishwasher. Failure to be sure both are secured. 20 Route cable so that it does not touch dishwasher motor or lower part of dishwasher tub. Owner must purchase a ⁷⁄₈" screw-in terminal box. Form bare ground wire into...
Make Direct Wire Electrical Connection NOTE: If the power supply cord was connected earlier, proceed to "Secure Dishwasher in death, fire, or electrical shock. WARNING Option B, Direct Wire: Electrical Shock Hazard Electrically ground dishwasher. Failure to be sure both are secured. 20 Route cable so that it does not touch dishwasher motor or lower part of dishwasher tub. Owner must purchase a ⁷⁄₈" screw-in terminal box. Form bare ground wire into...
Installation Guide
Page 24
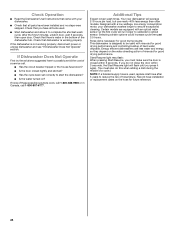
... door, wait 5 seconds, then open door. Rinse Aid is necessary for good drying performance. Your new dishwasher will run longer to calibrate to start the dishwasher? ■ Is the water turned on? Record hose installation or replacement dates on the water sheeting action of hard water deposits. Check Operation ■ Read the Dishwasher User Instructions that came with your dishwasher washes longer to reduce the risk of a cycle.) NOTE: If a braided supply hose is working properly, disconnect power or unplug dishwasher...
... door, wait 5 seconds, then open door. Rinse Aid is necessary for good drying performance. Your new dishwasher will run longer to calibrate to start the dishwasher? ■ Is the water turned on? Record hose installation or replacement dates on the water sheeting action of hard water deposits. Check Operation ■ Read the Dishwasher User Instructions that came with your dishwasher washes longer to reduce the risk of a cycle.) NOTE: If a braided supply hose is working properly, disconnect power or unplug dishwasher...
Dimension Guide
Page 1
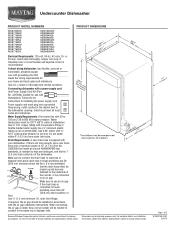
... flexible braided water supply line (¹⁄₂" minimum plastic tubing is recommended. Do not solder within 6" (15.2 cm) from water inlet valve. Make sure to the dishwasher opening. When connecting the air gap a rubber hose (not provided) will be installed in the cabinet next to use a new drain hose with product. For complete details, see Installation our products, we reserve the right to change materials and specifications without notice. Specifications subject to change without...
... flexible braided water supply line (¹⁄₂" minimum plastic tubing is recommended. Do not solder within 6" (15.2 cm) from water inlet valve. Make sure to the dishwasher opening. When connecting the air gap a rubber hose (not provided) will be installed in the cabinet next to use a new drain hose with product. For complete details, see Installation our products, we reserve the right to change materials and specifications without notice. Specifications subject to change without...


