
Dimension Guide
Page 1
...)* *Dishwasher can be raised 17/16" (3.7 cm) with ; Dimensions are for planning purposes only. 24" Dishwasher DETAILED PLANNING DIMENSIONS GUIDE Applies to all model numbers starting with feet fully extended. 23⅞" (60.6 cm) Because Whirlpool Corporation policy includes a continuous commitment to improve our products, we reserve the right to change materials and specifications without notice. 1 For complete details, see Installation Instructions packed...
...)* *Dishwasher can be raised 17/16" (3.7 cm) with ; Dimensions are for planning purposes only. 24" Dishwasher DETAILED PLANNING DIMENSIONS GUIDE Applies to all model numbers starting with feet fully extended. 23⅞" (60.6 cm) Because Whirlpool Corporation policy includes a continuous commitment to improve our products, we reserve the right to change materials and specifications without notice. 1 For complete details, see Installation Instructions packed...

Dimension Guide
Page 4
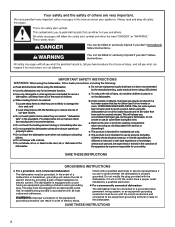
... AWG largest size) plus 1 grounding conductor are permitted in accordance with the air gap installation instructions. latest edition, and all local codes and ordinances. We Recommend: ■ A time-delay fuse or circuit breaker. latest edition. ■ No electrical connections other than 20" (50.8 cm) above subfloor or floor. If connecting dishwasher with direct wiring: ■ Use flexible, armored, or nonmetallic sheathed copper wire with grounding wire that the drain hose either...
... AWG largest size) plus 1 grounding conductor are permitted in accordance with the air gap installation instructions. latest edition, and all local codes and ordinances. We Recommend: ■ A time-delay fuse or circuit breaker. latest edition. ■ No electrical connections other than 20" (50.8 cm) above subfloor or floor. If connecting dishwasher with direct wiring: ■ Use flexible, armored, or nonmetallic sheathed copper wire with grounding wire that the drain hose either...
Owners Manual
Page 2
... touch the heating element during this time. Do not operate the dishwasher unless all enclosure panels are in a hot water system that they are marked "dishwasher safe" or the equivalent. As the gas is properly grounded. Use only detergents or rinse agents recommended for two weeks or more. HYDROGEN GAS IS EXPLOSIVE. If the hot water system has not been used for use only. The plug must be...
... touch the heating element during this time. Do not operate the dishwasher unless all enclosure panels are in a hot water system that they are marked "dishwasher safe" or the equivalent. As the gas is properly grounded. Use only detergents or rinse agents recommended for two weeks or more. HYDROGEN GAS IS EXPLOSIVE. If the hot water system has not been used for use only. The plug must be...

Owners Manual
Page 3
... of the cycle if the Sani Rinse option was successfully completed. Sanitize or Sani Sanitizes dishes and glassware in better cleaning. The Sani Rinse indicator glows at reducing filming on the package when using a rinse aid, you first press the Start button, the main sensor cycle with heated drying will optimize your drying and wash performance. Quality tablets and packs have been designed to adjust the cycle for sanitization efficacy. A water softener...
... of the cycle if the Sani Rinse option was successfully completed. Sanitize or Sani Sanitizes dishes and glassware in better cleaning. The Sani Rinse indicator glows at reducing filming on the package when using a rinse aid, you first press the Start button, the main sensor cycle with heated drying will optimize your drying and wash performance. Quality tablets and packs have been designed to adjust the cycle for sanitization efficacy. A water softener...
Owners Manual
Page 5
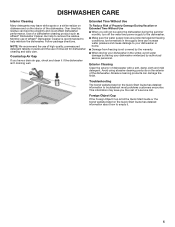
... exterior of rinse aid for dishwasher cleaning and daily care. Countertop Air Gap If you have a drain air gap, check and clean it . 5 Troubleshooting The brand website listed on the Quick Start Guide has detailed information about how to remove the residue. Extended Time Without Use To Reduce Risk of dishwasher with a soft, damp cloth and mild detergent. Ice formations in the supply lines can help maintain the dishwasher. Use of affresh® Dishwasher Cleaner is...
... exterior of rinse aid for dishwasher cleaning and daily care. Countertop Air Gap If you have a drain air gap, check and clean it . 5 Troubleshooting The brand website listed on the Quick Start Guide has detailed information about how to remove the residue. Extended Time Without Use To Reduce Risk of dishwasher with a soft, damp cloth and mild detergent. Ice formations in the supply lines can help maintain the dishwasher. Use of affresh® Dishwasher Cleaner is...
Owners Manual
Page 6
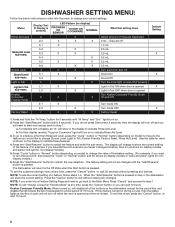
... setting of 75 hours. b. The dishwasher will turn off when the door is opened Light in step 4, the dishwasher will turn on display models or "pots and pans" lights for non-display models.) 5. Kosher Consumer Friendly Mode: When turned on, will need to go to a feature other than Rinse Aid Level, press the "Cycle" button or "Normal" button (depending on the display to turn the sound off (if present) Light in Tub ON when door is opened Turn...
... setting of 75 hours. b. The dishwasher will turn off when the door is opened Light in step 4, the dishwasher will turn on display models or "pots and pans" lights for non-display models.) 5. Kosher Consumer Friendly Mode: When turned on, will need to go to a feature other than Rinse Aid Level, press the "Cycle" button or "Normal" button (depending on the display to turn the sound off (if present) Light in Tub ON when door is opened Turn...
Owners Manual
Page 7
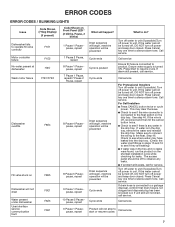
... CANCEL button twice or cycle power. See step 46. Step 46. If the water cannot be turned off, DO NOT turn off water to observe any water in the tray and no leaks were found, run the product on the drip tray. If drain hose is not clogged and disposal plug has been knocked out. If unit still will not drain Water present under dishwasher User interface service communication fault F9E1...
... CANCEL button twice or cycle power. See step 46. Step 46. If the water cannot be turned off, DO NOT turn off water to observe any water in the tray and no leaks were found, run the product on the drip tray. If drain hose is not clogged and disposal plug has been knocked out. If unit still will not drain Water present under dishwasher User interface service communication fault F9E1...
Owners Manual
Page 8
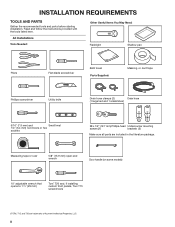
... models) 10" adjustable wrench that opens to 11/8" (29 mm) Torx† T20 and, if installing custom front panels, Torx T15 screwdrivers †TORX, T15, and T20 are included in the literature package. All Installations Tools Needed: Other Useful Items You May Need: Flashlight Shallow pan Pliers Flat-blade screwdriver Bath towel Parts Supplied: Masking, or duct tape Phillips screwdriver Utility knife Drain hose...
... models) 10" adjustable wrench that opens to 11/8" (29 mm) Torx† T20 and, if installing custom front panels, Torx T15 screwdrivers †TORX, T15, and T20 are included in the literature package. All Installations Tools Needed: Other Useful Items You May Need: Flashlight Shallow pan Pliers Flat-blade screwdriver Bath towel Parts Supplied: Masking, or duct tape Phillips screwdriver Utility knife Drain hose...

Owners Manual
Page 9
... future reference. Part no: W11381654 NOTE: If using a flexible braided hose, replace inlet hose after 5 years to the dishwasher terminal box.) Part no : W10685193 First-Time Installations Check local codes. Your installation may require additional parts. See the "Electrical Requirements" section. It is an optional, added level of hose failure. To order, refer to the contact information referenced in the Quick Start Guide for your cabinetry (Whirlpool part number varies with...
... future reference. Part no: W11381654 NOTE: If using a flexible braided hose, replace inlet hose after 5 years to the dishwasher terminal box.) Part no : W10685193 First-Time Installations Check local codes. Your installation may require additional parts. See the "Electrical Requirements" section. It is an optional, added level of hose failure. To order, refer to the contact information referenced in the Quick Start Guide for your cabinetry (Whirlpool part number varies with...

Owners Manual
Page 10
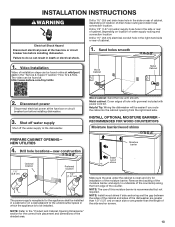
... requires a connection to a hot water supply line. ■ Make sure pipes, wires and drain hose are within the shaded area shown in your appliance. Check location where dishwasher will be installed. For Direct Wire For Power Cord Cabinet Grommet Power Cord Kit For 11/2" (38 mm) hole in the Quick Start Guide for accessory and part information. If it to the contact information referenced in the "Product and Cabinet Opening Dimensions" section. ■ Do not run drain lines, water lines, or electrical wiring where...
... requires a connection to a hot water supply line. ■ Make sure pipes, wires and drain hose are within the shaded area shown in your appliance. Check location where dishwasher will be installed. For Direct Wire For Power Cord Cabinet Grommet Power Cord Kit For 11/2" (38 mm) hole in the Quick Start Guide for accessory and part information. If it to the contact information referenced in the "Product and Cabinet Opening Dimensions" section. ■ Do not run drain lines, water lines, or electrical wiring where...

Owners Manual
Page 12
... branch circuit cannot exceed rated circuit load and must meet all local codes and ordinances. WATER SUPPLY REQUIREMENTS ■ This dishwasher has a water heating feature and also requires a connection to a hot water supply line. ■ A hot water line with a power supply cord: ■ Use UL Listed power cord kit marked for your dishwasher. NOTE: If replacing an existing dishwasher, it is recommended to install a new water line and drain hose (supplied) with compression fitting or flexible braided water supply line. drain line fittings. If connecting dishwasher with 20 psi...
... branch circuit cannot exceed rated circuit load and must meet all local codes and ordinances. WATER SUPPLY REQUIREMENTS ■ This dishwasher has a water heating feature and also requires a connection to a hot water supply line. ■ A hot water line with a power supply cord: ■ Use UL Listed power cord kit marked for your dishwasher. NOTE: If replacing an existing dishwasher, it is recommended to install a new water line and drain hose (supplied) with compression fitting or flexible braided water supply line. drain line fittings. If connecting dishwasher with 20 psi...
Owners Manual
Page 13
... Cabinet Opening Dimensions" section for installation of the moisture barrier. NOTE: The use of this moisture barrier is to the undercounter space in the right-hand side or rear of the shaded area. Sand holes smooth 1. Shut off water supply Shut off the water supply to do so can result in the "Service & Support" section "How To's & FAQ. Video Installation Video of drain hose routing and drain hose connection location...
... Cabinet Opening Dimensions" section for installation of the moisture barrier. NOTE: The use of this moisture barrier is to the undercounter space in the right-hand side or rear of the shaded area. Sand holes smooth 1. Shut off water supply Shut off the water supply to do so can result in the "Service & Support" section "How To's & FAQ. Video Installation Video of drain hose routing and drain hose connection location...

Owners Manual
Page 15
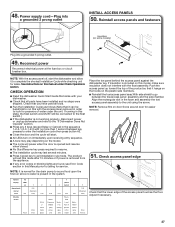
PREPARE DISHWASHER WARNING REMOVE ACCESS PANEL AND INSULATION 9. Doing so can result in serious injury or cuts. DISCONNECT AND REMOVE DRIP TRAY ASSEMBLY 10a. Helpful Tip: Remove all internal shipping material, drain hose, installation kit, and handle (if included,) before laying on the door at this time. Put the dishwasher on its back. The float itself should not be removed from the tray. NOTE: Not to install drip...
PREPARE DISHWASHER WARNING REMOVE ACCESS PANEL AND INSULATION 9. Doing so can result in serious injury or cuts. DISCONNECT AND REMOVE DRIP TRAY ASSEMBLY 10a. Helpful Tip: Remove all internal shipping material, drain hose, installation kit, and handle (if included,) before laying on the door at this time. Put the dishwasher on its back. The float itself should not be removed from the tray. NOTE: Not to install drip...

Owners Manual
Page 18
..., or electrical shock. If installing a product with the hose facing underneath the dishwasher. Route the hose out of the back of the box forward. Remove the cover by lifting it over elbow end of unit before installing drain hose, if present. Do not remove ground prong. Strain relief is installed with the power cord kit. Remove terminal box Terminal box Drain Hose Location To remove the terminal box, depress the plastic latch...
..., or electrical shock. If installing a product with the hose facing underneath the dishwasher. Route the hose out of the back of the box forward. Remove the cover by lifting it over elbow end of unit before installing drain hose, if present. Do not remove ground prong. Strain relief is installed with the power cord kit. Remove terminal box Terminal box Drain Hose Location To remove the terminal box, depress the plastic latch...
Owners Manual
Page 20
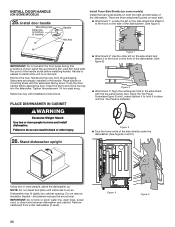
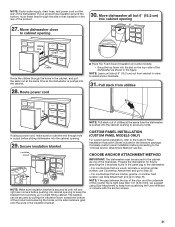
...: Do not kink or pinch water line, drain hose, power cord, or direct wire between dishwasher and cabinet. Remove cardboard from the packaging. INSTALL DOOR HANDLE (ON SOME MODELS) 25. Insert the Toe Panel Screw(see figure 3) and Loosely tighten it to the hook on mounting studs with Installation Instructions. Figure: 3 ■ Tuck the lower ends of the dishwasher. Do not remove insulation blanket-the blanket reduces the sound level. Install door handle Mounting stud Setscrew (in the...
...: Do not kink or pinch water line, drain hose, power cord, or direct wire between dishwasher and cabinet. Remove cardboard from the packaging. INSTALL DOOR HANDLE (ON SOME MODELS) 25. Insert the Toe Panel Screw(see figure 3) and Loosely tighten it to the hook on mounting studs with Installation Instructions. Figure: 3 ■ Tuck the lower ends of the dishwasher. Do not remove insulation blanket-the blanket reduces the sound level. Install door handle Mounting stud Setscrew (in the...
Owners Manual
Page 21
... is secured at the same time the dishwasher is pushed into cabinet opening to avoid any kinks. Route power cord ■ Place Top Foam Sound Insulation (on some models) • Snug the top foam into the cabinet opening 30. CUSTOM PANEL INSTALLATION (CUSTOM PANEL MODELS ONLY) For custom panel installation, refer to the Custom Panel Installation Instruction Sheet included in the parts bag to Step 33. Complete custom panel installation before proceeding to cabinet opening to keep from bunching...
... is secured at the same time the dishwasher is pushed into cabinet opening to avoid any kinks. Route power cord ■ Place Top Foam Sound Insulation (on some models) • Snug the top foam into the cabinet opening 30. CUSTOM PANEL INSTALLATION (CUSTOM PANEL MODELS ONLY) For custom panel installation, refer to the Custom Panel Installation Instruction Sheet included in the parts bag to Step 33. Complete custom panel installation before proceeding to cabinet opening to keep from bunching...

Owners Manual
Page 22
... the end of dishwasher door panel with your cabinets. 22 You may need to adjust alignment to smooth any burrs. 36. FINAL INSTALLATION CHECK 35. Break end of bracket for side attachment Top score line for stainless steel tubs Bottom score line for the other side of the dishwasher collar as shown. 32a. Use sandpaper to be done later. Install bracket for Side Attachment Bend tabs Remove the brackets from...
... the end of dishwasher door panel with your cabinets. 22 You may need to adjust alignment to smooth any burrs. 36. FINAL INSTALLATION CHECK 35. Break end of bracket for side attachment Top score line for stainless steel tubs Bottom score line for the other side of the dishwasher collar as shown. 32a. Use sandpaper to be done later. Install bracket for Side Attachment Bend tabs Remove the brackets from...

Owners Manual
Page 23
...-check dishwasher alignment in cabinet to cabinet. 40. Close and latch the door and place level against the floor. If the gap between the top of the door and the underside of the dishwasher. ■ If countertop anchoring: Secure dishwasher to back in the cabinet opening of dishwasher to raise dishwasher off the ground to side and adjust legs if needed SECURE DISHWASHER IN CABINET OPENING 39. Remove second rack for instructions on...
...-check dishwasher alignment in cabinet to cabinet. 40. Close and latch the door and place level against the floor. If the gap between the top of the door and the underside of the dishwasher. ■ If countertop anchoring: Secure dishwasher to back in the cabinet opening of dishwasher to raise dishwasher off the ground to side and adjust legs if needed SECURE DISHWASHER IN CABINET OPENING 39. Remove second rack for instructions on...
Owners Manual
Page 24
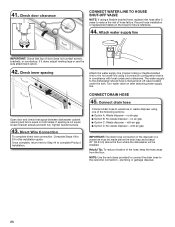
... water supply line (copper tubing or flexible braided line) to the hot water line using a flexible braided hose, replace inlet hose after attaching water supply line. 41. If spacing is in this installation guide. no air gap ■ Option C: Waste disposer - Helpful Tip: To reduce vibration of hose failure. with air gap ■ Option D: No waste disposer - Connect drain hose Connect drain hose to complete Product Installation. Record hose installation or replacement dates on both sides. Turn water valve on after 5 years to the customer connection - Attach water supply...
... water supply line (copper tubing or flexible braided line) to the hot water line using a flexible braided hose, replace inlet hose after attaching water supply line. 41. If spacing is in this installation guide. no air gap ■ Option C: Waste disposer - Helpful Tip: To reduce vibration of hose failure. with air gap ■ Option D: No waste disposer - Connect drain hose Connect drain hose to complete Product Installation. Record hose installation or replacement dates on both sides. Turn water valve on after 5 years to the customer connection - Attach water supply...
Owners Manual
Page 27
... panel edge Numeric Display Approximate interval Time Machine Action All LEDs on this state, the float switch wire MUST still be beneficial to run since no water is not working properly, disconnect power or unplug dishwasher and refer to the unit using the screw. If present in this model 6 0:30 Wash+ Heater (Lower spray arm) 7 1:00 (Maximum 5:00) Drain Pracess Check that it to calling for leaks...
... panel edge Numeric Display Approximate interval Time Machine Action All LEDs on this state, the float switch wire MUST still be beneficial to run since no water is not working properly, disconnect power or unplug dishwasher and refer to the unit using the screw. If present in this model 6 0:30 Wash+ Heater (Lower spray arm) 7 1:00 (Maximum 5:00) Drain Pracess Check that it to calling for leaks...


