
Owners Manual
Page 2
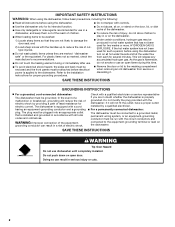
... for proper grounding procedures. ■ Do not tamper with a cord having an equipment-grounding conductor and a grounding plug. The plug must be attached before electrical power is flammable, do not allow children to play in doubt whether the dishwasher is installed and grounded in a dishwasher, and keep them out of the...
... for proper grounding procedures. ■ Do not tamper with a cord having an equipment-grounding conductor and a grounding plug. The plug must be attached before electrical power is flammable, do not allow children to play in doubt whether the dishwasher is installed and grounded in a dishwasher, and keep them out of the...
Owners Manual
Page 6
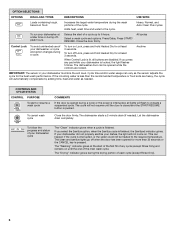
..." indicator glows at least 3 seconds. Heavy, Normal, and Auto Clean Plus cycles To run your dishwasher, or cycle and option changes during a cycle or the power is finished, the Sanitized indicator glows. CONTROLS AND CYCLE STATUS CONTROL PURPOSE To start of your dishes, the light will automatically compensate by adding time...
..." indicator glows at least 3 seconds. Heavy, Normal, and Auto Clean Plus cycles To run your dishwasher, or cycle and option changes during a cycle or the power is finished, the Sanitized indicator glows. CONTROLS AND CYCLE STATUS CONTROL PURPOSE To start of your dishes, the light will automatically compensate by adding time...

Owners Manual
Page 7
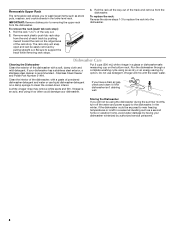
... cups, stemware, or long items such as utensils and spatulas. Utensil Basket Use the utensil basket to focus cleaning power on your silverware. NOTE: Always unload racks before adjusting. Dishwasher Features Your Maytag dishwasher may have some or all of each holder toward the center rack and lay the tines down. 7 Load...
... cups, stemware, or long items such as utensils and spatulas. Utensil Basket Use the utensil basket to focus cleaning power on your silverware. NOTE: Always unload racks before adjusting. Dishwasher Features Your Maytag dishwasher may have some or all of each holder toward the center rack and lay the tines down. 7 Load...
Owners Manual
Page 8
... rack stop . Storing the Dishwasher If you will snap open and can be using the dishwasher during the summer months, turn off the water and power supply to removing the upper rack from the dishwasher. Remove each plastic push tab rack stop ): 1. IMPORTANT: Remove dishes prior to the dishwasher. Be sure...
... rack stop . Storing the Dishwasher If you will snap open and can be using the dishwasher during the summer months, turn off the water and power supply to removing the upper rack from the dishwasher. Remove each plastic push tab rack stop ): 1. IMPORTANT: Remove dishes prior to the dishwasher. Be sure...
Owners Manual
Page 9
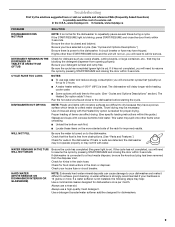
... If foam or suds are difficult to dry because they have selected a cycle. (See "Cycles and Options Descriptions.") Be sure there is power to the dishwasher. Check your hardness is 15 grains or more slanted side of the rack for dishwashers once per month. Use a detergent booster... reference FAQs (Frequently Asked Questions) to possibly avoid the cost of 120°F (49ºC) is best. In the U.S.A., www.maytag.com In Canada, www.maytag.ca PROBLEM SOLUTION DISHWASHER DOES NOT RUN NOTE: It is normal for dishwashers. 9 The dishwasher will delay longer while heating cooler water....
... If foam or suds are difficult to dry because they have selected a cycle. (See "Cycles and Options Descriptions.") Be sure there is power to the dishwasher. Check your hardness is 15 grains or more slanted side of the rack for dishwashers once per month. Use a detergent booster... reference FAQs (Frequently Asked Questions) to possibly avoid the cost of 120°F (49ºC) is best. In the U.S.A., www.maytag.com In Canada, www.maytag.ca PROBLEM SOLUTION DISHWASHER DOES NOT RUN NOTE: It is normal for dishwashers. 9 The dishwasher will delay longer while heating cooler water....
Installation Instructions
Page 2
... Opening-New Utilities 7 Prepare and Route Water Line 8 Install Drain Hose 9 Install Moisture Barrier (on some models 10 Prepare Dishwasher 11 Installation Instructions (cont.) Make Power Cord Electrical Connection 12 Determine Cabinet Opening 13 Install the Door Handle (on some models 14 Choose Attachment Option 14 Move Dishwasher into Cabinet Opening...
... Opening-New Utilities 7 Prepare and Route Water Line 8 Install Drain Hose 9 Install Moisture Barrier (on some models 10 Prepare Dishwasher 11 Installation Instructions (cont.) Make Power Cord Electrical Connection 12 Determine Cabinet Opening 13 Install the Door Handle (on some models 14 Choose Attachment Option 14 Move Dishwasher into Cabinet Opening...
Installation Instructions
Page 3
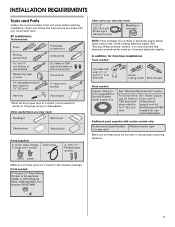
... barrier tape in lower rack) Make sure all these parts are included in plumbing supply stores. In addition, for use UL listed power supply cord kit Part Number 4317824 marked for first-time installations Tools needed: Cordless drill with and 1¹⁄₂ " hole saw...or ruler 10" adjustable wrench that electrical connections be the proper size to connect your household wiring to fit 2.2 cm) hole For Power Supply Cord: use with dishwasher Additional parts supplied with any tools listed here. INSTALLATION REQUIREMENTS Tools and Parts Gather the recommended tools ...
... barrier tape in lower rack) Make sure all these parts are included in plumbing supply stores. In addition, for use UL listed power supply cord kit Part Number 4317824 marked for first-time installations Tools needed: Cordless drill with and 1¹⁄₂ " hole saw...or ruler 10" adjustable wrench that electrical connections be the proper size to connect your household wiring to fit 2.2 cm) hole For Power Supply Cord: use with dishwasher Additional parts supplied with any tools listed here. INSTALLATION REQUIREMENTS Tools and Parts Gather the recommended tools ...
Installation Instructions
Page 6
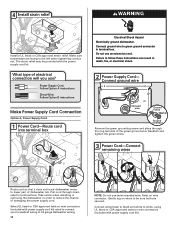
... wiring: • Use flexible, armored or nonmetallic sheathed, copper wire with grounding wire that meets the wiring requirements for use with dishwasher. • Power supply cord must plug into a grounded 3 prong outlet, located in accordance with 20-120 psi (138-862 kPa) water pressure can be connected to... be looped up and securely fastened to house plumbing lower than 20" (50.8 cm) above drain trap in conformance with a power supply cord: • Use UL listed power supply cord kit (Part No. 4317824) marked for your dishwasher. If drain hose is not long enough, use an air gap...
... wiring: • Use flexible, armored or nonmetallic sheathed, copper wire with grounding wire that meets the wiring requirements for use with dishwasher. • Power supply cord must plug into a grounded 3 prong outlet, located in accordance with 20-120 psi (138-862 kPa) water pressure can be connected to... be looped up and securely fastened to house plumbing lower than 20" (50.8 cm) above drain trap in conformance with a power supply cord: • Use UL listed power supply cord kit (Part No. 4317824) marked for your dishwasher. If drain hose is not long enough, use an air gap...

Installation Instructions
Page 7
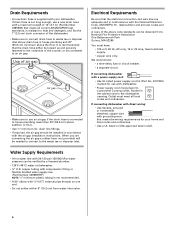
... Opening-New Utilities Prepare and route the electrical supply What type of electrical connection will you already have utility hookups? See product and cabinet opening . 1 Power Supply Cord-Drill hole Optional loactaiotinon Preefferrereddlolocactaiotinon (3.8 cm) Drill a 1¹⁄₂" (3.8 cm) hole in the "Prepare Cabinet Opening-New Utilities" section. INSTALLATION INSTRUCTIONS WARNING...
... Opening-New Utilities Prepare and route the electrical supply What type of electrical connection will you already have utility hookups? See product and cabinet opening . 1 Power Supply Cord-Drill hole Optional loactaiotinon Preefferrereddlolocactaiotinon (3.8 cm) Drill a 1¹⁄₂" (3.8 cm) hole in the "Prepare Cabinet Opening-New Utilities" section. INSTALLATION INSTRUCTIONS WARNING...
Installation Instructions
Page 8
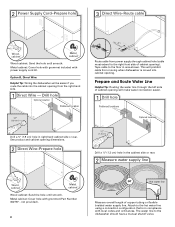
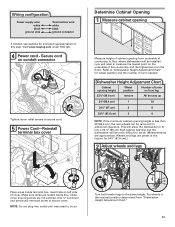
...side or rear. 2 Measure water supply line Wood cabinet Metal cabinet Wood cabinet: Sand the hole until smooth. Metal cabinet: Cover hole with power supply cord kit. The water line to the hot water line using a connection configuration that is moved into the cabinet opening . Prepare and...cabinet: Cover hole with grommet included with grommet (Part Number 302797 - See product and cabinet opening ). This will prohibit cable from power supply through the left side of copper tubing or flexible braided water supply line. Attach to the dishwasher should have a manual shutoff valve...
...side or rear. 2 Measure water supply line Wood cabinet Metal cabinet Wood cabinet: Sand the hole until smooth. Metal cabinet: Cover hole with power supply cord kit. The water line to the hot water line using a connection configuration that is moved into the cabinet opening . Prepare and...cabinet: Cover hole with grommet included with grommet (Part Number 302797 - See product and cabinet opening ). This will prohibit cable from power supply through the left side of copper tubing or flexible braided water supply line. Attach to the dishwasher should have a manual shutoff valve...
Installation Instructions
Page 12
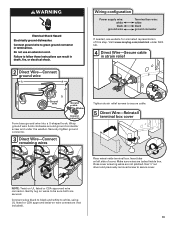
... grounding screw and place through strain relief in order to white, using UL listed or CSA approved twist-on wire connectors (included with power supply cord kit). Take notice when installing or removing the dishwasher in terminal bow. Connect wires black to black and white to reduce ... part of the green ground wire. 4 WARNING Install a UL listed or CSA approved strain relief. Reattach and tighten the green screw. 3 Power Cord-Connect remaining wires Route cord so that it does not touch dishwasher motor to the left when tightening conduit nut. Pull cord through the...
... grounding screw and place through strain relief in order to white, using UL listed or CSA approved twist-on wire connectors (included with power supply cord kit). Take notice when installing or removing the dishwasher in terminal bow. Connect wires black to black and white to reduce ... part of the green ground wire. 4 WARNING Install a UL listed or CSA approved strain relief. Reattach and tighten the green screw. 3 Power Cord-Connect remaining wires Route cord so that it does not touch dishwasher motor to the left when tightening conduit nut. Pull cord through the...
Installation Instructions
Page 13
... allow the dishwasher to fit into outlet until instructed to do so. 1 2 3 wheel Turn both leveler legs to secure cord. 5 Power Cord-Reinstall terminal box cover Determine Cabinet Opening 1 Measure cabinet opening Measure height of cabinet opening height Wheel position Number of turns on the ...underside of this step. Visit www.maytag.com under FAQ tab. 4 Tighten strain relief screws to the same height. Use ¹⁄₄" nut driver and previously removed ...
... allow the dishwasher to fit into outlet until instructed to do so. 1 2 3 wheel Turn both leveler legs to secure cord. 5 Power Cord-Reinstall terminal box cover Determine Cabinet Opening 1 Measure cabinet opening Measure height of cabinet opening height Wheel position Number of turns on the ...underside of this step. Visit www.maytag.com under FAQ tab. 4 Tighten strain relief screws to the same height. Use ¹⁄₄" nut driver and previously removed ...

Installation Instructions
Page 16
...were removed, avoid damage to route end through hole in the front leg of dishwasher. Do not kink or pinch water line, drain hose, power supply cord or direct wire between dishwasher and cabinet. Remove cardboard from the rear leg of dishwasher. the blanket reduces the sound level. Increase spring...Tensioners on the left side of opening and drain hose is near the center of dishwasher should be adjusted. 5 Closes too quickly- NOTE: If using power cord, make sure to the floor when moving the dishwasher. 3 Check water and drain hose position 6 Door falls open and close door When door...
...were removed, avoid damage to route end through hole in the front leg of dishwasher. Do not kink or pinch water line, drain hose, power supply cord or direct wire between dishwasher and cabinet. Remove cardboard from the rear leg of dishwasher. the blanket reduces the sound level. Increase spring...Tensioners on the left side of opening and drain hose is near the center of dishwasher should be adjusted. 5 Closes too quickly- NOTE: If using power cord, make sure to the floor when moving the dishwasher. 3 Check water and drain hose position 6 Door falls open and close door When door...
Installation Instructions
Page 18
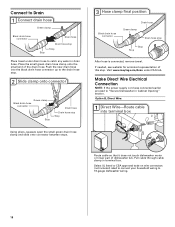
Place the small green drain hose clamp onto the small end of dishwasher tub. Visit www.maytag.com/drain under drain hose to "Secure Dishwasher in terminal box. Make Direct Wire Electrical Connection NOTE: If the power supply cord was connected earlier proceed to catch any water in drain hose. Select UL listed...
Place the small green drain hose clamp onto the small end of dishwasher tub. Visit www.maytag.com/drain under drain hose to "Secure Dishwasher in terminal box. Make Direct Wire Electrical Connection NOTE: If the power supply cord was connected earlier proceed to catch any water in drain hose. Select UL listed...
Installation Instructions
Page 19
...and under FAQ tab. 4 Direct Wire-Secure cable in death, fire, or electrical shock. 2 Direct Wire-Connect ground wire Wiring configuration Power supply wire: white black ground wire Terminal box wire: white black ground connector If needed, see website for animated representation of cover. Insert... tabs on wires to secure cable. 5 Direct Wire-Reinstall terminal box cover Place wires inside box. Visit www.maytag.com/electrical under the washer. Make sure wires are secured. Close cover ensuring wires are not pinched. NOTE: Twist on wire connectors (...
...and under FAQ tab. 4 Direct Wire-Secure cable in death, fire, or electrical shock. 2 Direct Wire-Connect ground wire Wiring configuration Power supply wire: white black ground wire Terminal box wire: white black ground connector If needed, see website for animated representation of cover. Insert... tabs on wires to secure cable. 5 Direct Wire-Reinstall terminal box cover Place wires inside box. Visit www.maytag.com/electrical under the washer. Make sure wires are secured. Close cover ensuring wires are not pinched. NOTE: Twist on wire connectors (...
Installation Instructions
Page 22
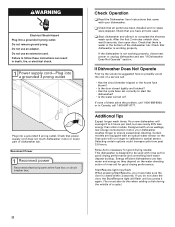
...energy so they depend on ? If you do this when adding a dish during the middle of the dishwasher tub. Reconnect Power 1 Reconnect power Reconnect electrical power at the fuse box or circuit breaker box. If none of these instructions can result in the bottom of a cycle.)... After the first 2 minutes unlatch door, wait 5 seconds, then open door. If the dishwasher is water in death, fire, or electrical shock. 1 Power supply cord-Plug into a grounded 3 prong outlet Plug into a grounded 3 prong outlet. WARNING Electrical Shock Hazard Plug into a grounded 3 prong outlet....
...energy so they depend on ? If you do this when adding a dish during the middle of the dishwasher tub. Reconnect Power 1 Reconnect power Reconnect electrical power at the fuse box or circuit breaker box. If none of these instructions can result in the bottom of a cycle.)... After the first 2 minutes unlatch door, wait 5 seconds, then open door. If the dishwasher is water in death, fire, or electrical shock. 1 Power supply cord-Plug into a grounded 3 prong outlet Plug into a grounded 3 prong outlet. WARNING Electrical Shock Hazard Plug into a grounded 3 prong outlet....


