Owners Manual
Page 4
... little in hard water, dishes won't be clean. Heavier cycles and options affect cycle length. You can customize your cycles by Add allowing water to drain off of the dishes after a slight delay, the cycle will resume at the sink nearest your water hardness, fill the Main Wash section of 2 will...
... little in hard water, dishes won't be clean. Heavier cycles and options affect cycle length. You can customize your cycles by Add allowing water to drain off of the dishes after a slight delay, the cycle will resume at the sink nearest your water hardness, fill the Main Wash section of 2 will...
Owners Manual
Page 6
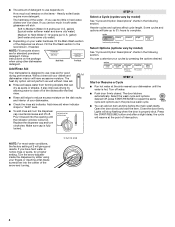
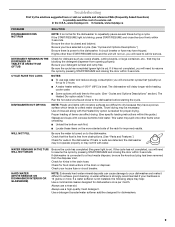
... fill of the main wash cycle. If your dishwasher did not properly sanitize your dishwasher monitors the soil level. The dishwasher starts a 2-minute drain (if needed . Let the dishwasher drain completely. If you press any cycle (except Rinse Only) and remains on food. Press START/ RESUME. Close the door firmly. This can...
... fill of the main wash cycle. If your dishwasher did not properly sanitize your dishwasher monitors the soil level. The dishwasher starts a 2-minute drain (if needed . Let the dishwasher drain completely. If you press any cycle (except Rinse Only) and remains on food. Press START/ RESUME. Close the door firmly. This can...
Owners Manual
Page 8
... the water and power supply to the dishwasher. Be sure to near freezing temperatures or is an acid, and using it if the dishwasher isn't draining well. If your dishwasher. Do not use liquid dishwasher detergent on the bottom rack. Clean the interior of the track and remove from the dishwasher...
... the water and power supply to the dishwasher. Be sure to near freezing temperatures or is an acid, and using it if the dishwasher isn't draining well. If your dishwasher. Do not use liquid dishwasher detergent on the bottom rack. Clean the interior of the track and remove from the dishwasher...
Owners Manual
Page 9
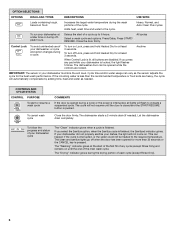
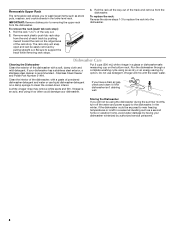
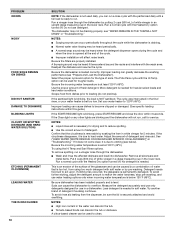
...is connected to a food waste disposer, be blocking the detergent dispenser from obstructions. (See "Parts and Features.") Check for suds in the drain hose. Proper loading of items can cause damage to your house fuse or circuit breaker. If foam or suds are difficult to dry because ... Heated Dry option adds ½ hour. Use a detergent booster/water softener additive designed for food obstructions in the drain or disposer. In the U.S.A., www.maytag.com In Canada, www.maytag.ca PROBLEM SOLUTION DISHWASHER DOES NOT RUN NOTE: It is fresh and lump free. Be sure the cycle has completed...
...is connected to a food waste disposer, be blocking the detergent dispenser from obstructions. (See "Parts and Features.") Check for suds in the drain hose. Proper loading of items can cause damage to your house fuse or circuit breaker. If foam or suds are difficult to dry because ... Heated Dry option adds ½ hour. Use a detergent booster/water softener additive designed for food obstructions in the drain or disposer. In the U.S.A., www.maytag.com In Canada, www.maytag.ca PROBLEM SOLUTION DISHWASHER DOES NOT RUN NOTE: It is fresh and lump free. Be sure the cycle has completed...
Owners Manual
Page 10
...cycle. Be sure the incoming water temperature is at 120°F (49ºC). Scrape food from the dispenser, be draining properly, see "WATER REMAINS IN THE TUB/WILL NOT DRAIN" in the final rinse, or your water heater to 120ºF (49ºC). If the sanitized light is blinking...9632; Wash and rinse the affected dishware and load into dishwasher. NOTES: ■ Surging sounds can occur periodically throughout the cycle while the dishwasher is draining. ■ Normal water valve hissing may be heard periodically. ■ A normal snap sound may not be sure the lid is securely attached and...
...cycle. Be sure the incoming water temperature is at 120°F (49ºC). Scrape food from the dispenser, be draining properly, see "WATER REMAINS IN THE TUB/WILL NOT DRAIN" in the final rinse, or your water heater to 120ºF (49ºC). If the sanitized light is blinking...9632; Wash and rinse the affected dishware and load into dishwasher. NOTES: ■ Surging sounds can occur periodically throughout the cycle while the dishwasher is draining. ■ Normal water valve hissing may be heard periodically. ■ A normal snap sound may not be sure the lid is securely attached and...
Installation Instructions
Page 2
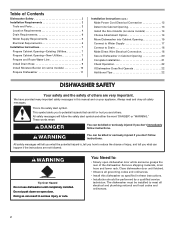
...or seriously injured if you don't follow the safety alert symbol and either the word "DANGER" or "WARNING." Remove shipping materials, drain hose and lower rack. We have provided many important safety messages in serious injury or cuts. All safety messages will follow instructions. Always ...Handle (on some models 14 Choose Attachment Option 14 Move Dishwasher into Cabinet Opening 15 Connect to Water Supply 17 Connect to Drain 18 Make Direct Wire Electrical Connection 18 Secure Dishwasher in Cabinet Opening 20 Complete Installation 21 Check Operation 22 If Dishwasher Does ...
...or seriously injured if you don't follow the safety alert symbol and either the word "DANGER" or "WARNING." Remove shipping materials, drain hose and lower rack. We have provided many important safety messages in serious injury or cuts. All safety messages will follow instructions. Always ...Handle (on some models 14 Choose Attachment Option 14 Move Dishwasher into Cabinet Opening 15 Connect to Water Supply 17 Connect to Drain 18 Make Direct Wire Electrical Connection 18 Secure Dishwasher in Cabinet Opening 20 Complete Installation 21 Check Operation 22 If Dishwasher Does ...
Installation Instructions
Page 3
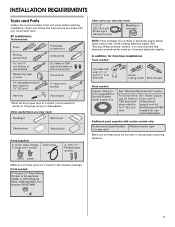
Read and follow the instructions provided with and 1¹⁄₂ " hole saw bits Small tubing cutter Wire stripper Parts needed: Copper tubing O.D. Drain hose clamps (1 large and 1 small) Drain hose 2 - #10 x ¹⁄₂" Phillips-head screws Silver Green Make sure all these parts are included in dishwasher Other useful items you...
Read and follow the instructions provided with and 1¹⁄₂ " hole saw bits Small tubing cutter Wire stripper Parts needed: Copper tubing O.D. Drain hose clamps (1 large and 1 small) Drain hose 2 - #10 x ¹⁄₂" Phillips-head screws Silver Green Make sure all these parts are included in dishwasher Other useful items you...
Installation Instructions
Page 4
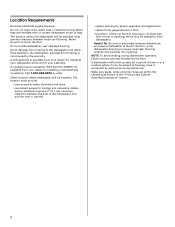
... installed must provide: • easy access to order. Avoid damage from your cabinetry. Call 1-800-688-9900 to water, electricity and drain. • convenient access for installing underneath the countertop. The location must provide clearance between the side of opening ). Do not run... or contact dishwasher motor or legs. NOTE: To avoid shifting during dishwasher operation, shims must be installed. Make sure pipes, wires and drain hose are within the shaded area shown in the dishwasher opening is uneven (example: Flooring extends only partway into opening is level if the...
... installed must provide: • easy access to order. Avoid damage from your cabinetry. Call 1-800-688-9900 to water, electricity and drain. • convenient access for installing underneath the countertop. The location must provide clearance between the side of opening ). Do not run... or contact dishwasher motor or legs. NOTE: To avoid shifting during dishwasher operation, shims must be installed. Make sure pipes, wires and drain hose are within the shaded area shown in the dishwasher opening is uneven (example: Flooring extends only partway into opening is level if the...
Installation Instructions
Page 6
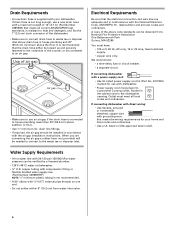
... with grounding wire that the electrical connection and wire size are connecting the air gap a rubber hose (not provided) will be connected to use a new drain hose with 20-120 psi (138-862 kPa) water pressure can be installed in conformance with ³⁄₈" N.P.T. O.D. A copy of air gap Air... in the cabinet next to the waste tee or disposer inlet. If drain hose is not long enough, use an air gap if the drain hose is resistant to heat and detergent, and fits the 1" (2.5 cm) drain connector of the counter, or be needed to connect to the dishwasher opening. Water ...
... with grounding wire that the electrical connection and wire size are connecting the air gap a rubber hose (not provided) will be connected to use a new drain hose with 20-120 psi (138-862 kPa) water pressure can be installed in conformance with ³⁄₈" N.P.T. O.D. A copy of air gap Air... in the cabinet next to the waste tee or disposer inlet. If drain hose is not long enough, use an air gap if the drain hose is resistant to heat and detergent, and fits the 1" (2.5 cm) drain connector of the counter, or be needed to connect to the dishwasher opening. Water ...

Installation Instructions
Page 7
... Cord: Follow Option A instructions Direct Wire: Follow Option B instructions Option A, Power Supply Cord: NOTE: A grounded 3 prong outlet is required inside a cabinet next to the "Install Drain Hose" section. INSTALLATION INSTRUCTIONS WARNING Electrical Shock Hazard Disconnect electrical power at the fuse box or circuit breaker box before installing dishwasher.
... Cord: Follow Option A instructions Direct Wire: Follow Option B instructions Option A, Power Supply Cord: NOTE: A grounded 3 prong outlet is required inside a cabinet next to the "Install Drain Hose" section. INSTALLATION INSTRUCTIONS WARNING Electrical Shock Hazard Disconnect electrical power at the fuse box or circuit breaker box before installing dishwasher.
Installation Instructions
Page 9
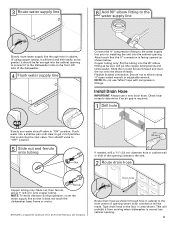
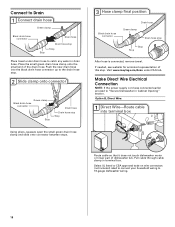
...4 Flush water supply line Connect the ³⁄₈" compression fitting to the water supply line prior to "ON" position. NOTE: Do not use a new drain hose. Turn shutoff valve to "OFF" position. 5 Slide nut and ferrule onto tubing Nut 1¹⁄₂" (3.8 cm) If needed, drill a 1¹&#...This will prohibit it will bend and kink easily, so be gentle.) It should be made. Du Pont De Nemours and Company. Drain hose Route drain hose as it from moving when dishwasher is a registered trademark of particles that could clog the inlet valve. Flexible braided connection: Secure ...
...4 Flush water supply line Connect the ³⁄₈" compression fitting to the water supply line prior to "ON" position. NOTE: Do not use a new drain hose. Turn shutoff valve to "OFF" position. 5 Slide nut and ferrule onto tubing Nut 1¹⁄₂" (3.8 cm) If needed, drill a 1¹&#...This will prohibit it will bend and kink easily, so be gentle.) It should be made. Du Pont De Nemours and Company. Drain hose Route drain hose as it from moving when dishwasher is a registered trademark of particles that could clog the inlet valve. Flexible braided connection: Secure ...
Installation Instructions
Page 10
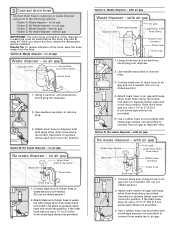
...remove 2 plug. 3 Black end 3. with air gap Screw-type clamps Disposer inlet Air gap Large silver drain hhoossee ccllaammpp (provided) Rubber hose connector Drain hose Drain trap 1 1. Connect black end of drain hose to air gap and cut if needed . (Do not cut ribbed section.) 2. Use pliers to... clamp open and move into disposer. 2 2. with air gap Screw-type clamps Waste tee Air gap Large silver drain hose clamp (provided) Rubber hose connector Drain hose 1 Black end 2 3 Drain trap 1. no air gap • Option C, Waste disposer - no air gap • Option B, No Waste...
...remove 2 plug. 3 Black end 3. with air gap Screw-type clamps Disposer inlet Air gap Large silver drain hhoossee ccllaammpp (provided) Rubber hose connector Drain hose Drain trap 1 1. Connect black end of drain hose to air gap and cut if needed . (Do not cut ribbed section.) 2. Use pliers to... clamp open and move into disposer. 2 2. with air gap Screw-type clamps Waste tee Air gap Large silver drain hose clamp (provided) Rubber hose connector Drain hose 1 Black end 2 3 Drain trap 1. no air gap • Option C, Waste disposer - no air gap • Option B, No Waste...
Installation Instructions
Page 15
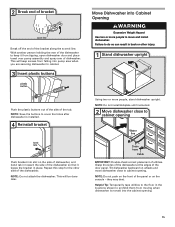
Failure to prohibit them from moving when dishwasher is installed. 4 Reinstall bracket bend tabs Push bracket into the cabinet opening Water line Drain hose Cable IMPORTANT: Double-check correct placement of the dishwasher so that it from falling into Cabinet Opening score line Break off the end of ...
Failure to prohibit them from moving when dishwasher is installed. 4 Reinstall bracket bend tabs Push bracket into the cabinet opening Water line Drain hose Cable IMPORTANT: Double-check correct placement of the dishwasher so that it from falling into Cabinet Opening score line Break off the end of ...

Installation Instructions
Page 16
... screw. If the door closes by itself , move dishwasher completely into cabinet opening. Do not remove insulation blanket - 3 Check water and drain hose position 6 Door falls open and close door When door is all right if dishwasher fits tightly into cabinet opening Insulation blanket With another ...If using power cord, make sure to a lower numbered hole and replace the screw. NOTE: Tensioners on both sides of the cabinet opening and drain hose is near the center of dishwasher should be adjusted. 5 Closes too quickly- Using a nut driver or hex socket, remove the screw from...
... screw. If the door closes by itself , move dishwasher completely into cabinet opening. Do not remove insulation blanket - 3 Check water and drain hose position 6 Door falls open and close door When door is all right if dishwasher fits tightly into cabinet opening Insulation blanket With another ...If using power cord, make sure to a lower numbered hole and replace the screw. NOTE: Tensioners on both sides of the cabinet opening and drain hose is near the center of dishwasher should be adjusted. 5 Closes too quickly- Using a nut driver or hex socket, remove the screw from...
Installation Instructions
Page 18
... touch dishwasher motor or lower part of dishwasher tub. Visit www.maytag.com/drain under drain hose to the drain hose stop. 2 Slide clamp onto connector Green clamp Black drain hose connector Stop Drain hose Drain hose stop Stop Using pliers, squeeze open the small green drain hose clamp and slide onto connector between stops. 3 Hose clamp final...
... touch dishwasher motor or lower part of dishwasher tub. Visit www.maytag.com/drain under drain hose to the drain hose stop. 2 Slide clamp onto connector Green clamp Black drain hose connector Stop Drain hose Drain hose stop Stop Using pliers, squeeze open the small green drain hose clamp and slide onto connector between stops. 3 Hose clamp final...


