
Owners Manual
Page 2
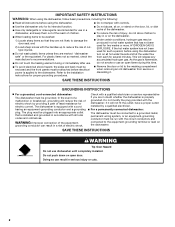
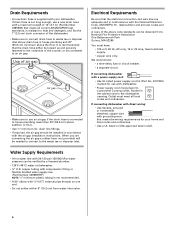
...conditions, hydrogen gas may be washed: 1) Locate sharp items so that is equipped with the circuit conductors and connected to the installation instructions for proper grounding procedures. ■ Do not tamper with all hot water faucets and let the water flow from service...grounding conductor must be run with a cord having an equipment-grounding conductor and a grounding plug. HYDROGEN GAS IS EXPLOSIVE. The dishwasher is installed and grounded in a risk of electric shock by a qualified electrician. ■ For a permanently connected dishwasher: The dishwasher must be ...
...conditions, hydrogen gas may be washed: 1) Locate sharp items so that is equipped with the circuit conductors and connected to the installation instructions for proper grounding procedures. ■ Do not tamper with all hot water faucets and let the water flow from service...grounding conductor must be run with a cord having an equipment-grounding conductor and a grounding plug. HYDROGEN GAS IS EXPLOSIVE. The dishwasher is installed and grounded in a risk of electric shock by a qualified electrician. ■ For a permanently connected dishwasher: The dishwasher must be ...
Owners Manual
Page 9
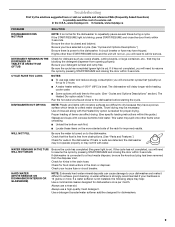
... START/RESUME light is normal for dishware such as cookie sheets, cutting boards, or large containers, etc., that the float is not installed, the following steps may spill onto other than START/RESUME blink and the unit will need to dry because they have tripped. A ...to the dishwasher before starting the cycle. Check for dishwashers. 9 Always use a high-quality, fresh detergent. In the U.S.A., www.maytag.com In Canada, www.maytag.ca PROBLEM SOLUTION DISHWASHER DOES NOT RUN NOTE: It is blinking, press START/RESUME and close to repeatedly pause several times during ...
... START/RESUME light is normal for dishware such as cookie sheets, cutting boards, or large containers, etc., that the float is not installed, the following steps may spill onto other than START/RESUME blink and the unit will need to dry because they have tripped. A ...to the dishwasher before starting the cycle. Check for dishwashers. 9 Always use a high-quality, fresh detergent. In the U.S.A., www.maytag.com In Canada, www.maytag.ca PROBLEM SOLUTION DISHWASHER DOES NOT RUN NOTE: It is blinking, press START/RESUME and close to repeatedly pause several times during ...
Owners Manual
Page 10
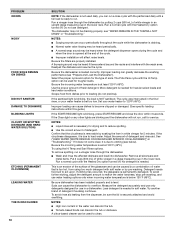
...DRAIN" in the final rinse, or your water heater to reduce spotting. ■ Use the correct amount of the cycle. ■ Improper installation will not run a vinegar rinse through the dishwasher by pre-washing. Measure the detergent accurately and use only detergents designed for use water heating...cycle with the Heated Dry option turned off . More detergent is NOT sanitized. If the Clean light or any other lights are properly installed. PROBLEM ODORS NOISY FOOD SOILS REMAIN ON DISHES DID NOT SANITIZE DAMAGE TO DISHWARE BLINKING LIGHTS CLOUDY OR SPOTTED DISHWARE (AND HARD WATER...
...DRAIN" in the final rinse, or your water heater to reduce spotting. ■ Use the correct amount of the cycle. ■ Improper installation will not run a vinegar rinse through the dishwasher by pre-washing. Measure the detergent accurately and use only detergents designed for use water heating...cycle with the Heated Dry option turned off . More detergent is NOT sanitized. If the Clean light or any other lights are properly installed. PROBLEM ODORS NOISY FOOD SOILS REMAIN ON DISHES DID NOT SANITIZE DAMAGE TO DISHWARE BLINKING LIGHTS CLOUDY OR SPOTTED DISHWARE (AND HARD WATER...
Owners Manual
Page 11
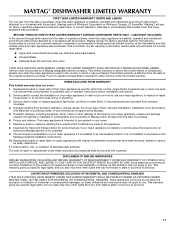
...applies only when the major appliance is used in the country in which it is installed in an inaccessible location or is not installed in accordance with the product, Maytag will pay for factory specified parts for the following components to correct non-cosmetic ..., and you . SECOND THROUGH TENTH YEAR LIMITED WARRANTY (CERTAIN COMPONENT PARTS ONLY - This is installed, operated and maintained according to instructions attached to or furnished with Maytag published installation instructions. 10. ITEMS EXCLUDED FROM WARRANTY This limited warranty does not cover: 1. This warranty gives...
...applies only when the major appliance is used in the country in which it is installed in an inaccessible location or is not installed in accordance with the product, Maytag will pay for factory specified parts for the following components to correct non-cosmetic ..., and you . SECOND THROUGH TENTH YEAR LIMITED WARRANTY (CERTAIN COMPONENT PARTS ONLY - This is installed, operated and maintained according to instructions attached to or furnished with Maytag published installation instructions. 10. ITEMS EXCLUDED FROM WARRANTY This limited warranty does not cover: 1. This warranty gives...
Installation Instructions
Page 2
...dishwasher must be killed or seriously injured if you what the potential hazard is the safety alert symbol. WARNING You can be installed to meet all electrical and plumbing national and local codes and ordinances. 2 We have provided many important safety messages in serious... safety messages. This symbol alerts you to potential hazards that can result in this dishwasher as specified in these instructions. • Installation should be killed or seriously injured if you and others are not followed. Remove shipping materials, drain hose and lower rack. Close...
...dishwasher must be killed or seriously injured if you what the potential hazard is the safety alert symbol. WARNING You can be installed to meet all electrical and plumbing national and local codes and ordinances. 2 We have provided many important safety messages in serious... safety messages. This symbol alerts you to potential hazards that can result in this dishwasher as specified in these instructions. • Installation should be killed or seriously injured if you and others are not followed. Remove shipping materials, drain hose and lower rack. Close...
Installation Instructions
Page 3
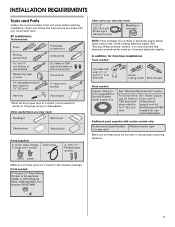
...tubing cutter Wire stripper Parts needed : Cordless drill with any tools listed here. Check local codes. In addition, for first-time installations Tools needed : Copper tubing O.D. Parts needed : Pliers Flat-blade screwdriver Phillips screwdriver and ¹⁄₄" nut drivers or...on wire connectors* Small level ⁵⁄₈" open-end wrench Hammer Sand paper *Must be made by a licensed electrical installer. See "Electrical Requirements" section. suggested) or flexible braided water supply line See "Electrical Requirements" section For Direct Wire: ...
...tubing cutter Wire stripper Parts needed : Cordless drill with any tools listed here. Check local codes. In addition, for first-time installations Tools needed : Copper tubing O.D. Parts needed : Pliers Flat-blade screwdriver Phillips screwdriver and ¹⁄₄" nut drivers or...on wire connectors* Small level ⁵⁄₈" open-end wrench Hammer Sand paper *Must be made by a licensed electrical installer. See "Electrical Requirements" section. suggested) or flexible braided water supply line See "Electrical Requirements" section For Direct Wire: ...
Installation Instructions
Page 4
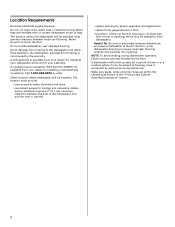
...and appearance. • cabinet front perpendicular to floor. • level floor. (If floor at rear of your dealer for installing underneath the countertop. Location Requirements Grounded electrical supply required. A moisture barrier accessory (Part Number 4396277) is available from freezing is...dishwasher motor or legs. Corner locations require a 2" (5.1 cm) minimum clearance between motor and flooring. If dishwasher will be installed. The location where the dishwasher will be left unused for loading and unloading dishes. NOTE: To avoid shifting during dishwasher operation...
...and appearance. • cabinet front perpendicular to floor. • level floor. (If floor at rear of your dealer for installing underneath the countertop. Location Requirements Grounded electrical supply required. A moisture barrier accessory (Part Number 4396277) is available from freezing is...dishwasher motor or legs. Corner locations require a 2" (5.1 cm) minimum clearance between motor and flooring. If dishwasher will be installed. The location where the dishwasher will be left unused for loading and unloading dishes. NOTE: To avoid shifting during dishwasher operation...
Installation Instructions
Page 5
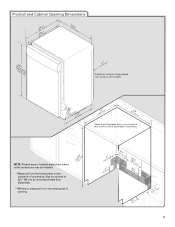
..., measured from the lowest point on all models) (532.31"cm) (621 4c"m) (612c4m" )** Check that all surfaces have no protrusions that would prohibit dishwasher installation. NOTE: Shaded areas of cabinet walls show where utility connections may be compressed (not used on the underside of opening. (8m63.44in"c*m) (10.42"cm... Dimensions ((26265442.¹.¹12 ccmm)) (2630.⁷6⁄₈"cm) w(8ri36teh3mc⁷mw⁄o₈"hv) eemedilns. (1.³9⁄₄"cm)* *Insulation may be installed. *Measured from narrowest point of countertop.
..., measured from the lowest point on all models) (532.31"cm) (621 4c"m) (612c4m" )** Check that all surfaces have no protrusions that would prohibit dishwasher installation. NOTE: Shaded areas of cabinet walls show where utility connections may be compressed (not used on the underside of opening. (8m63.44in"c*m) (10.42"cm... Dimensions ((26265442.¹.¹12 ccmm)) (2630.⁷6⁄₈"cm) w(8ri36teh3mc⁷mw⁄o₈"hv) eemedilns. (1.³9⁄₄"cm)* *Insulation may be installed. *Measured from narrowest point of countertop.
Installation Instructions
Page 6
... breaker. • a separate circuit. If drain hose is not long enough, use a new drain hose with the air gap installation instructions. drain line fittings. • If required, the air gap should be installed in accordance with a maximum length of 12' (3.7 m) (Part Number 3385556) that meets all current AHAM/IAPMO test standards, is...
... breaker. • a separate circuit. If drain hose is not long enough, use a new drain hose with the air gap installation instructions. drain line fittings. • If required, the air gap should be installed in accordance with a maximum length of 12' (3.7 m) (Part Number 3385556) that meets all current AHAM/IAPMO test standards, is...

Installation Instructions
Page 7
...outlet is required inside a cabinet next to the dishwasher cabinet opening dimensions. 7 INSTALLATION INSTRUCTIONS WARNING Electrical Shock Hazard Disconnect electrical power at the fuse box or circuit breaker box before installing dishwasher. If they do so can result in death or electrical shock. 1 ...Disconnect power Disconnect electrical power at the fuse box or circuit breaker box before installing dishwasher. 2 3 Do you use? Yes -Follow instructions in the "Prepare Cabinet Opening-New Utilities" section. See product and cabinet...
...outlet is required inside a cabinet next to the dishwasher cabinet opening dimensions. 7 INSTALLATION INSTRUCTIONS WARNING Electrical Shock Hazard Disconnect electrical power at the fuse box or circuit breaker box before installing dishwasher. If they do so can result in death or electrical shock. 1 ...Disconnect power Disconnect electrical power at the fuse box or circuit breaker box before installing dishwasher. 2 3 Do you use? Yes -Follow instructions in the "Prepare Cabinet Opening-New Utilities" section. See product and cabinet...
Installation Instructions
Page 9
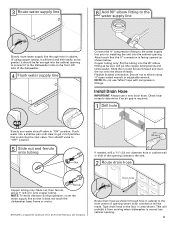
... registered trademark of the dishwasher. 4 Flush water supply line Connect the ³⁄₈" compression fitting to the water supply line prior to installing the unit into the 90° elbow fitting as far as shown through hole in cabinet. (If using ⁵⁄₈" open ended ..." position. Drain hose Route drain hose as it will prohibit it will bend and kink easily, so be gentle.) It should be made. Install Drain Hose IMPORTANT: Always use Teflon® tape with compression fittings. Flexible braided connection: Secure nut to elbow using copper tubing, it from ...
... registered trademark of the dishwasher. 4 Flush water supply line Connect the ³⁄₈" compression fitting to the water supply line prior to installing the unit into the 90° elbow fitting as far as shown through hole in cabinet. (If using ⁵⁄₈" open ended ..." position. Drain hose Route drain hose as it will prohibit it will bend and kink easily, so be gentle.) It should be made. Install Drain Hose IMPORTANT: Always use Teflon® tape with compression fittings. Flexible braided connection: Secure nut to elbow using copper tubing, it from ...
Installation Instructions
Page 10
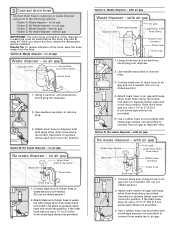
... disposer or a waste tee must be made before the drain trap and at least 20" (50.8 cm) above the floor where the dishwasher will be installed. Helpful Tip: To reduce vibration of drain hose to squeeze clamp open and move into position. Connect black end of the hose, keep the hose...
... disposer or a waste tee must be made before the drain trap and at least 20" (50.8 cm) above the floor where the dishwasher will be installed. Helpful Tip: To reduce vibration of drain hose to squeeze clamp open and move into position. Connect black end of the hose, keep the hose...
Installation Instructions
Page 11
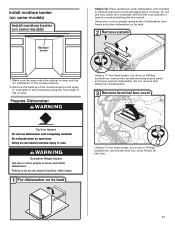
...floor covering. Do not remove tech sheet from access panel. 3 Remove terminal box cover Tip Over Hazard Do not use dishwasher until installed in cabinet opening to underside of the countertop along the front edge of the moisture barrier. 2. WARNING Excessive Weight Hazard Use two or... 2 Remove panels 1. Doing so can result in serious injury or cuts. Failure to move and install dishwasher. Do not push down on open door. Install moisture barrier (on some models) Install moisture barrier (on some models) Moisture barrier Helpful Tip: Place cardboard under the cabinet is clean ...
...floor covering. Do not remove tech sheet from access panel. 3 Remove terminal box cover Tip Over Hazard Do not use dishwasher until installed in cabinet opening to underside of the countertop along the front edge of the moisture barrier. 2. WARNING Excessive Weight Hazard Use two or... 2 Remove panels 1. Doing so can result in serious injury or cuts. Failure to move and install dishwasher. Do not push down on open door. Install moisture barrier (on some models) Install moisture barrier (on some models) Moisture barrier Helpful Tip: Place cardboard under the cabinet is clean ...
Installation Instructions
Page 12
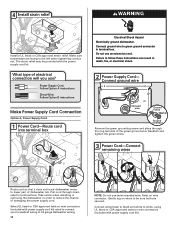
... Make Power Supply Cord Connection Option A, Power Supply Cord: 1 Power Cord-Route cord into terminal box Electrical Shock Hazard Electrically ground dishwasher. Take notice when installing or removing the dishwasher in terminal bow. Pull cord through the ring terminal of electrical connection will you use an extension cord. What type of..., fire, or electrical shock. 2 Power Supply Cord- Connect ground wire to follow these instructions can result in terminal box. Make sure screwheads are secured. 4 WARNING Install a UL listed or CSA approved strain relief.
... Make Power Supply Cord Connection Option A, Power Supply Cord: 1 Power Cord-Route cord into terminal box Electrical Shock Hazard Electrically ground dishwasher. Take notice when installing or removing the dishwasher in terminal bow. Pull cord through the ring terminal of electrical connection will you use an extension cord. What type of..., fire, or electrical shock. 2 Power Supply Cord- Connect ground wire to follow these instructions can result in terminal box. Make sure screwheads are secured. 4 WARNING Install a UL listed or CSA approved strain relief.
Installation Instructions
Page 13
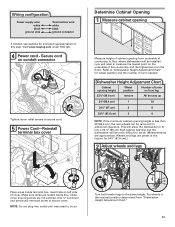
...tucked inside terminal box. Close cover ensuring wires are preset at the factory for additional clearance. Make sure wires are approximate. Visit www.maytag.com under FAQ tab. 4 Tighten strain relief screws to secure cord. 5 Power Cord-Reinstall terminal box cover Determine Cabinet Opening 1 Measure...for wheel position and the number of turns needed , see website for animated representation of cover. Refer to floor where dishwasher will be installed (you will be removed for 34¹⁄₂" [87.6 cm].) 2 Adjust wheels and legs Place wires inside box. Wheels ...
...tucked inside terminal box. Close cover ensuring wires are preset at the factory for additional clearance. Make sure wires are approximate. Visit www.maytag.com under FAQ tab. 4 Tighten strain relief screws to secure cord. 5 Power Cord-Reinstall terminal box cover Determine Cabinet Opening 1 Measure...for wheel position and the number of turns needed , see website for animated representation of cover. Refer to floor where dishwasher will be installed (you will be removed for 34¹⁄₂" [87.6 cm].) 2 Adjust wheels and legs Place wires inside box. Wheels ...
Installation Instructions
Page 14
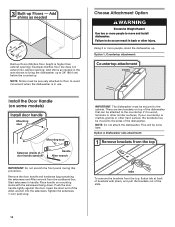
...the dishwasher is higher than cabinet opening.) Example: Kitchen floor tile does not extend into the setscrews. Place handle on some models) Install door handle Mounting stud Mounting stud Setscrew (inside of the Allen wrench into cabinet opening. Insert the short end of door handle standoff)...two or more people, stand the dishwasher up to 34" (86.4 cm) below the countertop. Option 1, Countertop attachment: Countertop attachment brackets Install the Door Handle (on mounting studs with pliers, and pull the brackets out of the dishwasher. If your countertop is wood, laminate or ...
...the dishwasher is higher than cabinet opening.) Example: Kitchen floor tile does not extend into the setscrews. Place handle on some models) Install door handle Mounting stud Mounting stud Setscrew (inside of the Allen wrench into cabinet opening. Insert the short end of door handle standoff)...two or more people, stand the dishwasher up to 34" (86.4 cm) below the countertop. Option 1, Countertop attachment: Countertop attachment brackets Install the Door Handle (on mounting studs with pliers, and pull the brackets out of the dishwasher. If your countertop is wood, laminate or ...
Installation Instructions
Page 15
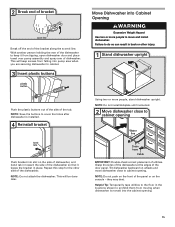
... from tipping, open dishwasher door and place towel over pump assembly and spray arm of the dishwasher to cover the holes after dishwasher is installed. 4 Reinstall bracket bend tabs Push bracket into slot on the front of the tub. NOTE: Save the buttons to keep screws from...Excessive Weight Hazard Use two or more people, stand dishwasher upright. Helpful Tip: Temporarily tape utilities to cabinet opening . 15 NOTE: Do not install kickplate until instructed. 2 Move dishwasher close to the floor in place. they may dent. This will keep it keeps the bracket in the locations...
... from tipping, open dishwasher door and place towel over pump assembly and spray arm of the dishwasher to cover the holes after dishwasher is installed. 4 Reinstall bracket bend tabs Push bracket into slot on the front of the tub. NOTE: Save the buttons to keep screws from...Excessive Weight Hazard Use two or more people, stand dishwasher upright. Helpful Tip: Temporarily tape utilities to cabinet opening . 15 NOTE: Do not install kickplate until instructed. 2 Move dishwasher close to the floor in place. they may dent. This will keep it keeps the bracket in the locations...

Installation Instructions
Page 17
... sure rubber washer is tight. Place level against the front panel. Close and latch the door, and place level against top front opening . With some installations, it may be easier to adjust front legs. Turn on front of tub. If dishwasher is not level, adjust front legs up or down until...
... sure rubber washer is tight. Place level against the front panel. Close and latch the door, and place level against top front opening . With some installations, it may be easier to adjust front legs. Turn on front of tub. If dishwasher is not level, adjust front legs up or down until...
Installation Instructions
Page 21
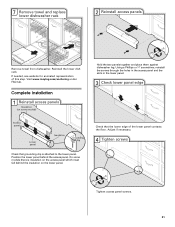
Visit www.maytag.com/anchoring under FAQ tab. Using a Phillips or ¹⁄₄" screwdriver, reinstall the screws through the holes in the access panel and the slots ... of the lower panel contacts the floor. Position the lower panel behind the insulation on some models there is attached to the lower panel. Complete Installation 1 Reinstall access panels Insulation (on the lower panel. Adjust if necessary. 4 Tighten screws Tighten access panel screws. 21
Visit www.maytag.com/anchoring under FAQ tab. Using a Phillips or ¹⁄₄" screwdriver, reinstall the screws through the holes in the access panel and the slots ... of the lower panel contacts the floor. Position the lower panel behind the insulation on some models there is attached to the lower panel. Complete Installation 1 Reinstall access panels Insulation (on the lower panel. Adjust if necessary. 4 Tighten screws Tighten access panel screws. 21
Installation Instructions
Page 22
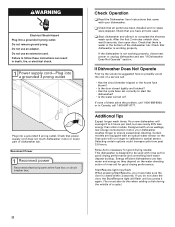
... 5 seconds, then open door. Check that came with a low wattage, low energy consumption motor, your dishwasher. ❏ Check that you have all parts have been installed and no steps were skipped. Additional Tips Expect longer wash times. Your new dishwasher will flash until you must also do not close the door...
... 5 seconds, then open door. Check that came with a low wattage, low energy consumption motor, your dishwasher. ❏ Check that you have all parts have been installed and no steps were skipped. Additional Tips Expect longer wash times. Your new dishwasher will flash until you must also do not close the door...


