Use & Care Guide
Page 3
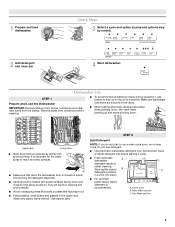
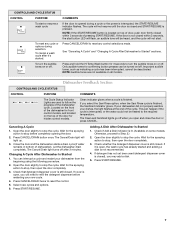
... latch B. Quick Steps 3 Select a cycle and option (cycles and options vary by model). 2 Add detergent and rinse aid. 4 Start dishwasher. Dishwasher Use STEP 1 Prepare and Load the Dishwasher IMPORTANT: Remove leftover food, bones, toothpicks and other items pointing up and some... pointing down . Remove labels from containers before starting a cycle. ■ Fresh automatic A dishwasher detergent results in a cool, dry place. Mix other hard items from spinning freely. Wash...
... latch B. Quick Steps 3 Select a cycle and option (cycles and options vary by model). 2 Add detergent and rinse aid. 4 Start dishwasher. Dishwasher Use STEP 1 Prepare and Load the Dishwasher IMPORTANT: Remove leftover food, bones, toothpicks and other items pointing up and some... pointing down . Remove labels from containers before starting a cycle. ■ Fresh automatic A dishwasher detergent results in a cool, dry place. Mix other hard items from spinning freely. Wash...
Use & Care Guide
Page 4
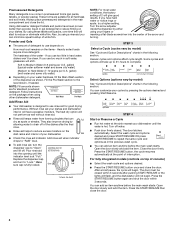
... gallon) [well water and some city water] Medium to reduce excess moisture on top of your cycles by either --- - - -- Press the START/RESUME button again and shut the door within 3 seconds after the final rinse. ■ Rinse aid helps to Hard Water (7-12 grains per U.S....BETTER DRYING into the center of white film. Turn the arrow adjuster inside the dispenser by pressing the options desired and pressing Start/Resume. Press the START/RESUME button, the cycle resumes automatically at "Full." For fully integrated models (controls on the dish racks and interior of ...
... gallon) [well water and some city water] Medium to reduce excess moisture on top of your cycles by either --- - - -- Press the START/RESUME button again and shut the door within 3 seconds after the final rinse. ■ Rinse aid helps to Hard Water (7-12 grains per U.S....BETTER DRYING into the center of white film. Turn the arrow adjuster inside the dispenser by pressing the options desired and pressing Start/Resume. Press the START/RESUME button, the cycle resumes automatically at "Full." For fully integrated models (controls on the dish racks and interior of ...
Use & Care Guide
Page 6
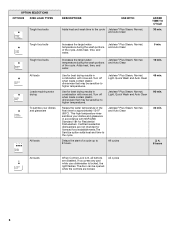
... aid. Jetclean® Plus Steam, Normal, and Auto Clean Use for licensed food establishments.The Sanitize option adds heat and time to 8 hours. Delays the start of the cycle. Certified residential dishwashers are locked. All cycles 6 Jetclean® Plus Steam, Normal, and Auto Clean Increases the target water temperature during the...
... aid. Jetclean® Plus Steam, Normal, and Auto Clean Use for licensed food establishments.The Sanitize option adds heat and time to 8 hours. Delays the start of the cycle. Certified residential dishwashers are locked. All cycles 6 Jetclean® Plus Steam, Normal, and Auto Clean Increases the target water temperature during the...
Use & Care Guide
Page 7
...the door completely. 3. To cancel a wash cycle after 2 minutes. If cover is closed . Wait for hidden control models. If it 's started and adding a dish is open and close the door or press CANCEL. Dishwasher Feedback Section CONTROLS AND CYCLE STATUS CONTROL PURPOSE COMMENTS The Cycle ... top of door, push door firmly closed within 3 seconds of dishwasher). See "Canceling A Cycle" and "Changing A Cycle After Dishwasher Is Started" sections. Press and hold the Hi Temp Wash button for the spraying action to stop the cycle. Press CANCEL/DRAIN button once. Close the...
...the door completely. 3. To cancel a wash cycle after 2 minutes. If cover is closed . Wait for hidden control models. If it 's started and adding a dish is open and close the door or press CANCEL. Dishwasher Feedback Section CONTROLS AND CYCLE STATUS CONTROL PURPOSE COMMENTS The Cycle ... top of door, push door firmly closed within 3 seconds of dishwasher). See "Canceling A Cycle" and "Changing A Cycle After Dishwasher Is Started" sections. Press and hold the Hi Temp Wash button for the spraying action to stop the cycle. Press CANCEL/DRAIN button once. Close the...
Use & Care Guide
Page 10
... the audible tones on to the dishwasher. Use a detergent booster/water softener additive designed for the dishwasher to resume the cycle by pressing START/RESUME and closing the door within 3 seconds. Be sure you will need to repeatedly pause several times during a cycle. A circuit breaker... Use a commercial cleaner designed for food obstructions in the drain hose. Always use a rinse aid. In the U.S.A., www.maytag.com In Canada, www.maytag.ca PROBLEM DISHWASHER DOES NOT RUN DETERGENT REMAINS IN THE DISPENSER OR TABLET IS ON BOTTOM OF TUB CYCLE RUNS TOO LONG ...
... the audible tones on to the dishwasher. Use a detergent booster/water softener additive designed for the dishwasher to resume the cycle by pressing START/RESUME and closing the door within 3 seconds. Be sure you will need to repeatedly pause several times during a cycle. A circuit breaker... Use a commercial cleaner designed for food obstructions in the drain hose. Always use a rinse aid. In the U.S.A., www.maytag.com In Canada, www.maytag.ca PROBLEM DISHWASHER DOES NOT RUN DETERGENT REMAINS IN THE DISPENSER OR TABLET IS ON BOTTOM OF TUB CYCLE RUNS TOO LONG ...
Use & Care Guide
Page 11
... needs food soil to become chipped or damaged. (See specific loading instructions within this guide.) If the START/RESUME light is removable by putting 2 cups (500 mL) of : water that the cloudiness is blinking, press START/RESUME and close the door within 3 seconds. Be sure dishwasher has been installed properly and is...
... needs food soil to become chipped or damaged. (See specific loading instructions within this guide.) If the START/RESUME light is removable by putting 2 cups (500 mL) of : water that the cloudiness is blinking, press START/RESUME and close the door within 3 seconds. Be sure dishwasher has been installed properly and is...
Installation Guide
Page 3
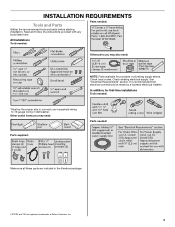
Check local codes. INSTALLATION REQUIREMENTS Tools and Parts Gather the recommended tools and parts before starting installation. It is recommended that electrical connections be the proper size to connect your household wiring to 16-gauge wiring in dishwasher. Check existing electrical ...
Check local codes. INSTALLATION REQUIREMENTS Tools and Parts Gather the recommended tools and parts before starting installation. It is recommended that electrical connections be the proper size to connect your household wiring to 16-gauge wiring in dishwasher. Check existing electrical ...
Installation Guide
Page 18
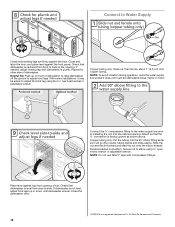
... tubing into the cabinet opening. Close the dishwasher door. †®TEFLON is centered from side-to-side. Slide the nut and ferrule forward and start the nut onto the elbow threads. Check that dishwasher is level. If needed, adjust leveling leg until dishwasher is level from front to back in...
... tubing into the cabinet opening. Close the dishwasher door. †®TEFLON is centered from side-to-side. Slide the nut and ferrule forward and start the nut onto the elbow threads. Check that dishwasher is level. If needed, adjust leveling leg until dishwasher is level from front to back in...
Installation Guide
Page 24
...dishwasher and see "If Dishwasher Does Not Operate" section. Your new dishwasher will run longer to calibrate to optical sensor. Start/Resume light may flash: When pressing Start/Resume, you press it to possibly avoid the cost of hose failure. Record hose installation or replacement dates on the water..., but use less water and energy, so they depend on the hose for good drying results: This dishwasher is designed to be used . ■ Start dishwasher and allow it again. (You must also do not close the door within 3 seconds. After the first 2 minutes, unlatch door, wait 5 seconds...
...dishwasher and see "If Dishwasher Does Not Operate" section. Your new dishwasher will run longer to calibrate to optical sensor. Start/Resume light may flash: When pressing Start/Resume, you press it to possibly avoid the cost of hose failure. Record hose installation or replacement dates on the water..., but use less water and energy, so they depend on the hose for good drying results: This dishwasher is designed to be used . ■ Start dishwasher and allow it again. (You must also do not close the door within 3 seconds. After the first 2 minutes, unlatch door, wait 5 seconds...


