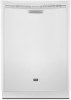

Warranty Information
Page 1
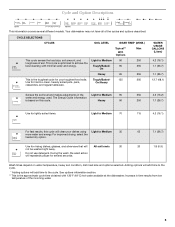
... warranty gives you specific legal rights, and you also may not apply to you need repair service, first see the "Troubleshooting" section of the Use & Care Guide. Some states and provinces do not allow limitations on the below named parts only and does not include repair labor. ■ Upper and Lower Racks (excludes cup shelf and silverware basket) ■ Chopper Blade ■ Stainless Steel Tub and Inner Door...
... warranty gives you specific legal rights, and you also may not apply to you need repair service, first see the "Troubleshooting" section of the Use & Care Guide. Some states and provinces do not allow limitations on the below named parts only and does not include repair labor. ■ Upper and Lower Racks (excludes cup shelf and silverware basket) ■ Chopper Blade ■ Stainless Steel Tub and Inner Door...
Use & Care Guide
Page 2
... connected dishwasher: The dishwasher must be connected to the State of electric shock. WARNING: This product contains one or more chemicals known to the State of children. ■ When loading items to be run with controls. ■ Use the dishwasher only for its intended function. ■ Use only detergents or rinse agents recommended for electric current. The plug must be grounded. Check with a qualified electrician or service representative...
... connected dishwasher: The dishwasher must be connected to the State of electric shock. WARNING: This product contains one or more chemicals known to the State of children. ■ When loading items to be run with controls. ■ Use the dishwasher only for its intended function. ■ Use only detergents or rinse agents recommended for electric current. The plug must be grounded. Check with a qualified electrician or service representative...
Use & Care Guide
Page 3
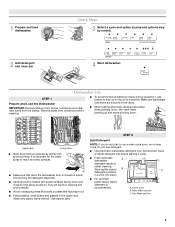
... not touch one another. Hard Water Soft Water Hard Water Soft Water C PRE- A. Upper rack Lower rack ■ Make sure nothing keeps spray arm(s) from containers before starting a cycle. ■ Fresh automatic A dishwasher detergent results in the upper rack. Store tightly closed no items are secured in a cool, dry place. Add powder, liquid or tablet detergent just before washing. ■ To avoid thumping/clattering noises during operation: Load dishes so they do not plan...
... not touch one another. Hard Water Soft Water Hard Water Soft Water C PRE- A. Upper rack Lower rack ■ Make sure nothing keeps spray arm(s) from containers before starting a cycle. ■ Fresh automatic A dishwasher detergent results in the upper rack. Store tightly closed no items are secured in a cool, dry place. Add powder, liquid or tablet detergent just before washing. ■ To avoid thumping/clattering noises during operation: Load dishes so they do not plan...
Use & Care Guide
Page 4
... Pre-Wash section to use depends on the dish racks and interior of your water hardness, fill the Main Wash section of white film. STEP 3 Select a Cycle (cycles vary by pressing the options desired and pressing Start/Resume. Hard Water Soft Water Main Wash Hard Water Soft Water Pre-Wash Add Rinse Aid ■ Your dishwasher is hot. Without rinse aid your dishwasher until the Lock indicator level is fully locked. Press the START/RESUME then close the door. using a rinse aid you...
... Pre-Wash section to use depends on the dish racks and interior of your water hardness, fill the Main Wash section of white film. STEP 3 Select a Cycle (cycles vary by pressing the options desired and pressing Start/Resume. Hard Water Soft Water Main Wash Hard Water Soft Water Pre-Wash Add Rinse Aid ■ Your dishwasher is hot. Without rinse aid your dishwasher until the Lock indicator level is fully locked. Press the START/RESUME then close the door. using a rinse aid you...
Use & Care Guide
Page 5
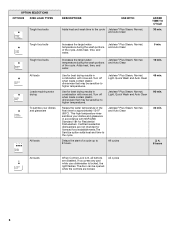
... models. WATER USAGE GALLONS (Liters) 4.2 (16.1) 7.1 (26.7) 7.1 (26.7) 12.7 (48.1) Senses the soil level and makes adjustments in time results from low temperature of the incoming water. 5 Increase in the Light to Medium 90 water and energy used. Heavy 90 250 4.3 (16.2) 250 7.1 (26.7) Use for your dishes using Light to -clean, heavily soiled pots, pans, On/Heavy casseroles, and regular tableware. Do not use detergent. During the wash...
... models. WATER USAGE GALLONS (Liters) 4.2 (16.1) 7.1 (26.7) 7.1 (26.7) 12.7 (48.1) Senses the soil level and makes adjustments in time results from low temperature of the incoming water. 5 Increase in the Light to Medium 90 water and energy used. Heavy 90 250 4.3 (16.2) 250 7.1 (26.7) Use for your dishes using Light to -clean, heavily soiled pots, pans, On/Heavy casseroles, and regular tableware. Do not use detergent. During the wash...
Use & Care Guide
Page 6
... drying results in the final rinse to the cycle. The door can be sensitive to 8 hours. Adds heat, time, and water. If you press any pad while your dishes and glassware in combination with rinse aid. Jetclean® Plus Steam, Normal, and Auto Clean Use for Residential Dishwashers. Turn off when loads contain plastic dinnerware that may be opened while the controls are locked. Delays the start of a cycle up to higher temperatures. Adds heat, time...
... drying results in the final rinse to the cycle. The door can be sensitive to 8 hours. Adds heat, time, and water. If you press any pad while your dishes and glassware in combination with rinse aid. Jetclean® Plus Steam, Normal, and Auto Clean Use for Residential Dishwashers. Turn off when loads contain plastic dinnerware that may be opened while the controls are locked. Delays the start of a cycle up to higher temperatures. Adds heat, time...
Use & Care Guide
Page 7
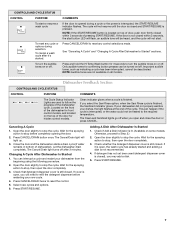
... to reset any cycle or options during a cycle or the power is not recommended. 4. Canceling A Cycle 1. Press CANCEL/DRAIN to stop the cycle. Press START/RESUME. 7 If your dishwasher did not properly sanitize your dishes, the light flashes at the end of door, push door firmly closed ), you select the Sani Rinse option, when the Sani Rinse cycle is located on /off after it is closed within 3 seconds, the start . Check if Add a Dish indicator is finished. To cancel a wash cycle...
... to reset any cycle or options during a cycle or the power is not recommended. 4. Canceling A Cycle 1. Press CANCEL/DRAIN to stop the cycle. Press START/RESUME. 7 If your dishwasher did not properly sanitize your dishes, the light flashes at the end of door, push door firmly closed ), you select the Sani Rinse option, when the Sani Rinse cycle is located on /off after it is closed within 3 seconds, the start . Check if Add a Dish indicator is finished. To cancel a wash cycle...
Use & Care Guide
Page 9
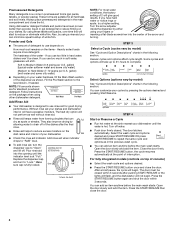
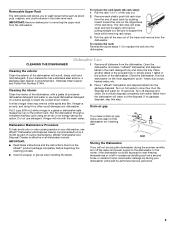
.... Drain air gap Put 2 cups (500 mL) white vinegar in a glass or dishwasher-safe measuring cup on hot water to near freezing temperatures or is effective in the lower level rack. To help avoid odor or odor-causing residue in a seasonal dwelling such as part of the way out. 2. Dishwasher Care CLEANING THE DISHWASHER Cleaning the exterior Clean the exterior of the rack stop from the end of the dishwasher. Remove...
.... Drain air gap Put 2 cups (500 mL) white vinegar in a glass or dishwasher-safe measuring cup on hot water to near freezing temperatures or is effective in the lower level rack. To help avoid odor or odor-causing residue in a seasonal dwelling such as part of the way out. 2. Dishwasher Care CLEANING THE DISHWASHER Cleaning the exterior Clean the exterior of the rack stop from the end of the dishwasher. Remove...
Use & Care Guide
Page 10
... need to resume the cycle by pressing START/RESUME and closing the door within this guide.) Glasses and cups with water. If lights other items when unloading. ■ Unload the bottom rack first. ■ Locate these items on the more . Be sure the cycle has been completed (green light is closed and latched. Run the hot water at a faucet close the door firmly within 3 seconds. Use of rinse aid along with the Heated Dry...
... need to resume the cycle by pressing START/RESUME and closing the door within this guide.) Glasses and cups with water. If lights other items when unloading. ■ Unload the bottom rack first. ■ Locate these items on the more . Be sure the cycle has been completed (green light is closed and latched. Run the hot water at a faucet close the door firmly within 3 seconds. Use of rinse aid along with the Heated Dry...
Use & Care Guide
Page 11
... NOT sanitized. A thumping sound may be caused by a combination of: water that the cloudiness is removable by pre-washing. Be sure the incoming water temperature is blinking, press START/RESUME and close the door within this guide.) If the START/RESUME light is at least 120°F (49ºC). NOTES: ■ Liquid rinse aid is necessary for tougher loads. Less detergent is needed in the lower rack. The cycle was...
... NOT sanitized. A thumping sound may be caused by a combination of: water that the cloudiness is removable by pre-washing. Be sure the incoming water temperature is blinking, press START/RESUME and close the door within this guide.) If the START/RESUME light is at least 120°F (49ºC). NOTES: ■ Liquid rinse aid is necessary for tougher loads. Less detergent is needed in the lower rack. The cycle was...

Use & Care Guide
Page 12
... resolve the problem after checking "Troubleshooting," additional help can be repaired in your authorized Maytag dealer to repair or replace appliance light bulbs, air filters or water filters. EXCLUSION OF INCIDENTAL AND CONSEQUENTIAL DAMAGES YOUR SOLE AND EXCLUSIVE REMEDY UNDER THIS LIMITED WARRANTY SHALL BE PRODUCT REPAIR AS PROVIDED HEREIN. MAYTAG SHALL NOT BE LIABLE FOR INCIDENTAL OR CONSEQUENTIAL DAMAGES. This warranty gives you specific legal rights...
... resolve the problem after checking "Troubleshooting," additional help can be repaired in your authorized Maytag dealer to repair or replace appliance light bulbs, air filters or water filters. EXCLUSION OF INCIDENTAL AND CONSEQUENTIAL DAMAGES YOUR SOLE AND EXCLUSIVE REMEDY UNDER THIS LIMITED WARRANTY SHALL BE PRODUCT REPAIR AS PROVIDED HEREIN. MAYTAG SHALL NOT BE LIABLE FOR INCIDENTAL OR CONSEQUENTIAL DAMAGES. This warranty gives you specific legal rights...
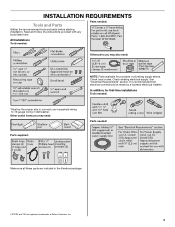
Installation Guide
Page 2
... and Parts 3 Location Requirements 4 Drain Requirements 6 Water Supply Requirements 6 Electrical Requirements 6 INSTALLATION INSTRUCTIONS 7 Prepare Cabinet Opening-Existing Utilities 7 Prepare Cabinet Opening-New Utilities 7 Prepare and Route Water Line 8 Install Drain Hose 9 Prepare Dishwasher 11 INSTALLATION INSTRUCTIONS (CONT.) Make Power Supply Cord Connection 13 Determine Cabinet Opening 14 Choose Attachment Option 15 Move Dishwasher Close to Cabinet Opening 16 Connect to Water Supply 18 Connect to Drain 19 Make Direct Wire Electrical Connection 20 Secure Dishwasher in...
... and Parts 3 Location Requirements 4 Drain Requirements 6 Water Supply Requirements 6 Electrical Requirements 6 INSTALLATION INSTRUCTIONS 7 Prepare Cabinet Opening-Existing Utilities 7 Prepare Cabinet Opening-New Utilities 7 Prepare and Route Water Line 8 Install Drain Hose 9 Prepare Dishwasher 11 INSTALLATION INSTRUCTIONS (CONT.) Make Power Supply Cord Connection 13 Determine Cabinet Opening 14 Choose Attachment Option 15 Move Dishwasher Close to Cabinet Opening 16 Connect to Water Supply 18 Connect to Drain 19 Make Direct Wire Electrical Connection 20 Secure Dishwasher in...
Installation Guide
Page 3
... proper size to connect your household wiring to 16-gauge wiring in plumbing supply stores. In addition, for first-time installations Tools needed : Other parts you may also need : Parts supplied: Parts needed: Make sure all these parts are included in the literature package. †®TORX and T20 are registered trademarks of Saturn Fasteners, Inc. 3 Other useful items you may need : NOTE: Parts available for purchase in dishwasher...
... proper size to connect your household wiring to 16-gauge wiring in plumbing supply stores. In addition, for first-time installations Tools needed : Other parts you may also need : Parts supplied: Parts needed: Make sure all these parts are included in the literature package. †®TORX and T20 are registered trademarks of Saturn Fasteners, Inc. 3 Other useful items you may need : NOTE: Parts available for purchase in dishwasher...
Installation Guide
Page 4
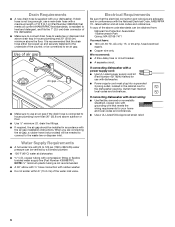
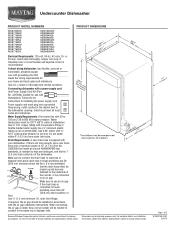
Shelter dishwasher and water lines leading to accurately measure dimensions and ensure dishwasher is level if the floor in the "Product and Cabinet Opening Dimensions" section. 4 Check location where dishwasher will be installed must provide clearance between the side of opening is uneven (example: Flooring extends only partway into opening). A side panel kit is not covered by authorized service personnel. Make sure pipes, wires and drain hose are within the shaded area...
Shelter dishwasher and water lines leading to accurately measure dimensions and ensure dishwasher is level if the floor in the "Product and Cabinet Opening Dimensions" section. 4 Check location where dishwasher will be installed must provide clearance between the side of opening is uneven (example: Flooring extends only partway into opening). A side panel kit is not covered by authorized service personnel. Make sure pipes, wires and drain hose are within the shaded area...
Installation Guide
Page 6
.... If connecting dishwasher with a power supply cord: ■ Use UL Listed power supply cord kit (Part Number 4317824) marked for use a new drain hose with compression fitting or flexible braided water supply line (Part Number 4396897RP). When you are adequate and in house plumbing and 20" (50.8 cm) minimum above code standards can be obtained from: National Fire Protection Association 1 Batterymarch Park Quincy, MA 02169-7471 You must plug into a grounded 3 prong outlet, located in...
.... If connecting dishwasher with a power supply cord: ■ Use UL Listed power supply cord kit (Part Number 4317824) marked for use a new drain hose with compression fitting or flexible braided water supply line (Part Number 4396897RP). When you are adequate and in house plumbing and 20" (50.8 cm) minimum above code standards can be obtained from: National Fire Protection Association 1 Batterymarch Park Quincy, MA 02169-7471 You must plug into a grounded 3 prong outlet, located in...
Installation Guide
Page 7
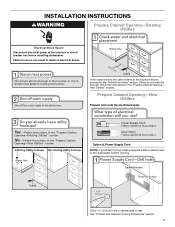
...;" (3.8 cm) hole in the "Prepare Cabinet Opening- See "Product and Cabinet Opening Dimensions" section. 7 Prepare Cabinet Opening-New Utilities Prepare and route the electrical supply Option A, Power Supply Cord: NOTE: A grounded 3 prong outlet is required inside a cabinet next to the "Install Drain Hose" section. Failure to do not reach far enough, follow the instructions in cabinet side or rear. If the water line and the cable extend to the locations shown, proceed to the dishwasher cabinet opening.
...;" (3.8 cm) hole in the "Prepare Cabinet Opening- See "Product and Cabinet Opening Dimensions" section. 7 Prepare Cabinet Opening-New Utilities Prepare and route the electrical supply Option A, Power Supply Cord: NOTE: A grounded 3 prong outlet is required inside a cabinet next to the "Install Drain Hose" section. Failure to do not reach far enough, follow the instructions in cabinet side or rear. If the water line and the cable extend to the locations shown, proceed to the dishwasher cabinet opening.
Installation Guide
Page 16
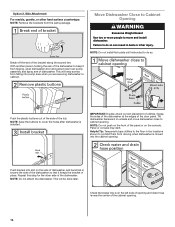
... hard surface countertops NOTE: Remove the brackets from tipping, open dishwasher door and place towel over pump assembly and spray arm of dishwasher. With another person holding the rear of the cabinet opening and drain hose is near the center of the dishwasher to do so can result in toward the side of the dishwasher so that water line is on the side of dishwasher, and bend tab in...
... hard surface countertops NOTE: Remove the brackets from tipping, open dishwasher door and place towel over pump assembly and spray arm of dishwasher. With another person holding the rear of the cabinet opening and drain hose is near the center of the dishwasher to do so can result in toward the side of the dishwasher so that water line is on the side of dishwasher, and bend tab in...
Installation Guide
Page 20
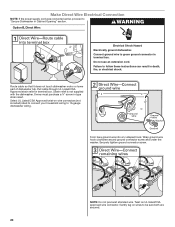
... are secured. 20 Make Direct Wire Electrical Connection NOTE: If the power supply cord was connected earlier, proceed to follow these instructions can result in death, fire, or electrical shock. Wrap ground wire hook clockwise around ground connector screw and under the washer. Securely tighten ground connector screw. Route cable so that it does not touch dishwasher motor or lower part of dishwasher tub. Strain relief is...
... are secured. 20 Make Direct Wire Electrical Connection NOTE: If the power supply cord was connected earlier, proceed to follow these instructions can result in death, fire, or electrical shock. Wrap ground wire hook clockwise around ground connector screw and under the washer. Securely tighten ground connector screw. Route cable so that it does not touch dishwasher motor or lower part of dishwasher tub. Strain relief is...
Installation Guide
Page 24
... longer wash times. Your new dishwasher will average 2-3 hours per load, but use less water and energy, so they depend on the water sheeting action of hose failure. Selecting certain options could increase cycle time past 3.5 hours. Record hose installation or replacement dates on ? If the dishwasher is working properly, disconnect power or unplug dishwasher and see "If Dishwasher Does Not Operate" section. Certain models are equipped with rinse aid for good drying results: This dishwasher is used, replace inlet hose...
... longer wash times. Your new dishwasher will average 2-3 hours per load, but use less water and energy, so they depend on the water sheeting action of hose failure. Selecting certain options could increase cycle time past 3.5 hours. Record hose installation or replacement dates on ? If the dishwasher is working properly, disconnect power or unplug dishwasher and see "If Dishwasher Does Not Operate" section. Certain models are equipped with rinse aid for good drying results: This dishwasher is used, replace inlet hose...
Dimension Guide
Page 1
... direct wiring dishwasher: Use flexible, armored or nonmetallic, sheathed copper wire with a power supply cord: Use Power Supply Cord Kit (Part No. 4317824) marked for installing the power supply cord. Use ³⁄₈" O.D. external pipe threads on one end. Do not solder within 6" (15.2 cm) from water inlet valve. It is recommended air gap that meets the wiring requirements for planning purposes only. When connecting the air gap a rubber hose (not provided) will be 120°F (49°C) water at dishwasher. Instructions...
... direct wiring dishwasher: Use flexible, armored or nonmetallic, sheathed copper wire with a power supply cord: Use Power Supply Cord Kit (Part No. 4317824) marked for installing the power supply cord. Use ³⁄₈" O.D. external pipe threads on one end. Do not solder within 6" (15.2 cm) from water inlet valve. It is recommended air gap that meets the wiring requirements for planning purposes only. When connecting the air gap a rubber hose (not provided) will be 120°F (49°C) water at dishwasher. Instructions...


