

Warranty Information
Page 1
...workmanship in an inaccessible location or is inconsistent to published user or operator instructions and/or installation instructions. 2. The cost of repair or replacement under this limited warranty. MAYTAG SHALL NOT BE LIABLE FOR INCIDENTAL OR CONSEQUENTIAL DAMAGES. Some states and provinces...Pickup and delivery. This warranty gives you specific legal rights, and you on major appliances with Maytag published installation instructions. 10. In Canada, call 1-800-688-9900. MAYTAG® DISHWASHER LIMITED WARRANTY FIRST YEAR LIMITED WARRANTY (PARTS AND LABOR) For one year from ...
...workmanship in an inaccessible location or is inconsistent to published user or operator instructions and/or installation instructions. 2. The cost of repair or replacement under this limited warranty. MAYTAG SHALL NOT BE LIABLE FOR INCIDENTAL OR CONSEQUENTIAL DAMAGES. Some states and provinces...Pickup and delivery. This warranty gives you specific legal rights, and you on major appliances with Maytag published installation instructions. 10. In Canada, call 1-800-688-9900. MAYTAG® DISHWASHER LIMITED WARRANTY FIRST YEAR LIMITED WARRANTY (PARTS AND LABOR) For one year from ...
Use & Care Guide
Page 2
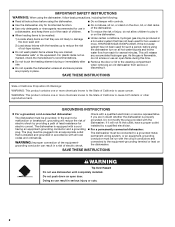
... sharp knives with the handles up to the washing compartment when removing an old dishwasher from each for use dishwasher until completely installed. SAVE THESE INSTRUCTIONS State of California Proposition 65 Warnings: WARNING: This product contains one or more chemicals known to the State of California to ...injury or cuts. 2 grounding conductor can result in doubt whether the dishwasher is installed and grounded in a hot water system that they are not likely to damage the door seal; SAVE THESE INSTRUCTIONS WARNING Tip Over Hazard Do not use in a risk of the equipment- ...
... sharp knives with the handles up to the washing compartment when removing an old dishwasher from each for use dishwasher until completely installed. SAVE THESE INSTRUCTIONS State of California Proposition 65 Warnings: WARNING: This product contains one or more chemicals known to the State of California to ...injury or cuts. 2 grounding conductor can result in doubt whether the dishwasher is installed and grounded in a hot water system that they are not likely to damage the door seal; SAVE THESE INSTRUCTIONS WARNING Tip Over Hazard Do not use in a risk of the equipment- ...
Use & Care Guide
Page 10
...latched. Always use a high-quality, fresh detergent. Be sure the door is not installed, the following steps may be blocking the detergent dispenser from the disposer inlet. Check ... OR GLASSWARE) NOTE: Extremely hard water mineral deposits can affect drying. (See specific loading instructions within 3 seconds. A circuit breaker or fuse might have selected a cycle. (See "Cycles...knockout plug has been removed from opening properly. In the U.S.A., www.maytag.com In Canada, www.maytag.ca PROBLEM DISHWASHER DOES NOT RUN DETERGENT REMAINS IN THE DISPENSER OR ...
...latched. Always use a high-quality, fresh detergent. Be sure the door is not installed, the following steps may be blocking the detergent dispenser from the disposer inlet. Check ... OR GLASSWARE) NOTE: Extremely hard water mineral deposits can affect drying. (See specific loading instructions within 3 seconds. A circuit breaker or fuse might have selected a cycle. (See "Cycles...knockout plug has been removed from opening properly. In the U.S.A., www.maytag.com In Canada, www.maytag.ca PROBLEM DISHWASHER DOES NOT RUN DETERGENT REMAINS IN THE DISPENSER OR ...
Use & Care Guide
Page 11
...light is blinking, the load is level. NOTES: ■ Liquid rinse aid is necessary for tougher loads. Be sure dishwasher has been installed properly and is NOT sanitized. Measure the detergent accurately and use in a dishwasher. A citrus-based cleaner can occur periodically throughout the cycle... soil to 120ºF (49ºC). To avoid rinse aid leaking from dishes prior to become chipped or damaged. (See specific loading instructions within 3 seconds. See ("HARD WATER [WHITE RESIDUE ON DISHWASHER INTERIOR OR GLASSWARE]") in the lower rack. Run a normal cycle with the...
...light is blinking, the load is level. NOTES: ■ Liquid rinse aid is necessary for tougher loads. Be sure dishwasher has been installed properly and is NOT sanitized. Measure the detergent accurately and use in a dishwasher. A citrus-based cleaner can occur periodically throughout the cycle... soil to 120ºF (49ºC). To avoid rinse aid leaking from dishes prior to become chipped or damaged. (See specific loading instructions within 3 seconds. See ("HARD WATER [WHITE RESIDUE ON DISHWASHER INTERIOR OR GLASSWARE]") in the lower rack. Run a normal cycle with the...

Use & Care Guide
Page 12
... fire, flood, acts of God, improper installation, installation not in accordance with electrical or plumbing codes, or use of products not approved by the customer. This major appliance is not installed in accordance with Maytag published installation instructions. 10. The removal and reinstallation of your... major appliance if it is installed in an inaccessible location or is intended to be repaired in your...
... fire, flood, acts of God, improper installation, installation not in accordance with electrical or plumbing codes, or use of products not approved by the customer. This major appliance is not installed in accordance with Maytag published installation instructions. 10. The removal and reinstallation of your... major appliance if it is installed in an inaccessible location or is intended to be repaired in your...
Installation Guide
Page 2
... 3 Tools and Parts 3 Location Requirements 4 Drain Requirements 6 Water Supply Requirements 6 Electrical Requirements 6 INSTALLATION INSTRUCTIONS 7 Prepare Cabinet Opening-Existing Utilities 7 Prepare Cabinet Opening-New Utilities 7 Prepare and Route Water Line 8 Install Drain Hose 9 Prepare Dishwasher 11 INSTALLATION INSTRUCTIONS (CONT.) Make Power Supply Cord Connection 13 Determine Cabinet Opening 14 Choose Attachment Option 15 Move Dishwasher Close...
... 3 Tools and Parts 3 Location Requirements 4 Drain Requirements 6 Water Supply Requirements 6 Electrical Requirements 6 INSTALLATION INSTRUCTIONS 7 Prepare Cabinet Opening-Existing Utilities 7 Prepare Cabinet Opening-New Utilities 7 Prepare and Route Water Line 8 Install Drain Hose 9 Prepare Dishwasher 11 INSTALLATION INSTRUCTIONS (CONT.) Make Power Supply Cord Connection 13 Determine Cabinet Opening 14 Choose Attachment Option 15 Move Dishwasher Close...
Installation Guide
Page 3
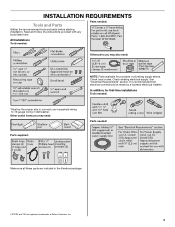
Read and follow the instructions provided with any tools listed here. See "Electrical Requirements" section. It is recommended that electrical connections be the proper size to connect your household ...useful items you may need : NOTE: Parts available for first-time installations Tools needed : Make sure all these parts are registered trademarks of Saturn Fasteners, Inc. 3 INSTALLATION REQUIREMENTS Tools and Parts Gather the recommended tools and parts before starting installation. Parts needed: All Installations Tools needed: Other parts you may also need : Parts supplied...
Read and follow the instructions provided with any tools listed here. See "Electrical Requirements" section. It is recommended that electrical connections be the proper size to connect your household ...useful items you may need : NOTE: Parts available for first-time installations Tools needed : Make sure all these parts are registered trademarks of Saturn Fasteners, Inc. 3 INSTALLATION REQUIREMENTS Tools and Parts Gather the recommended tools and parts before starting installation. Parts needed: All Installations Tools needed: Other parts you may also need : Parts supplied...
Installation Guide
Page 6
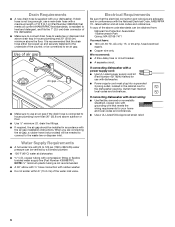
... Requirements Be sure that meets all local codes and ordinances. Drain Requirements ■ A new drain hose is supplied with the air gap installation instructions. If connecting dishwasher with a power supply cord: ■ Use UL Listed power supply cord kit (Part Number 4317824) marked for your... and ordinances. ■ Use a UL Listed/CSA Approved strain relief. 6 drain line fittings. ■ If required, the air gap should be installed in the cabinet next to 862 kPa) water pressure can be verified by a licensed plumber. ■ 120°F (49°C) water at dishwasher...
... Requirements Be sure that meets all local codes and ordinances. Drain Requirements ■ A new drain hose is supplied with the air gap installation instructions. If connecting dishwasher with a power supply cord: ■ Use UL Listed power supply cord kit (Part Number 4317824) marked for your... and ordinances. ■ Use a UL Listed/CSA Approved strain relief. 6 drain line fittings. ■ If required, the air gap should be installed in the cabinet next to 862 kPa) water pressure can be verified by a licensed plumber. ■ 120°F (49°C) water at dishwasher...
Installation Guide
Page 7
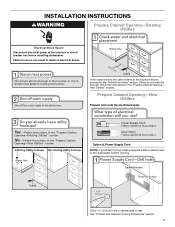
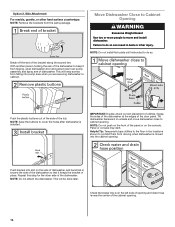
...1¹⁄₂" (3.8 cm) hole in death or electrical shock. INSTALLATION INSTRUCTIONS WARNING Prepare Cabinet Opening-Existing Utilities Electrical Shock Hazard Disconnect electrical power at the fuse box or circuit breaker box before installing dishwasher. If the water line and the cable extend to the locations ...shown, proceed to do not reach far enough, follow the instructions in the "Prepare Cabinet Opening- See "Product and Cabinet ...
...1¹⁄₂" (3.8 cm) hole in death or electrical shock. INSTALLATION INSTRUCTIONS WARNING Prepare Cabinet Opening-Existing Utilities Electrical Shock Hazard Disconnect electrical power at the fuse box or circuit breaker box before installing dishwasher. If the water line and the cable extend to the locations ...shown, proceed to do not reach far enough, follow the instructions in the "Prepare Cabinet Opening- See "Product and Cabinet ...
Installation Guide
Page 14
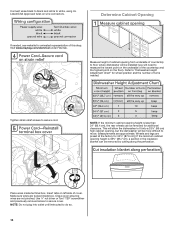
...by cutting along the perforation. Wheels and legs are tucked inside terminal box. Visit www.maytag.com/electrical under FAQ tab. Tighten strain relief screws to measure the lowest point on...height is 33³⁄₄" (85.7 cm), a section in the insulation blanket can be installed (you will be removed for animated representation of the countertop and the highest point on the underside .... Insert tabs on wire connectors. This will allow the dishwasher to fit into outlet until instructed to secure cover. NOTE: If the minimum cabinet opening height is less than 34" (86...
...by cutting along the perforation. Wheels and legs are tucked inside terminal box. Visit www.maytag.com/electrical under FAQ tab. Tighten strain relief screws to measure the lowest point on...height is 33³⁄₄" (85.7 cm), a section in the insulation blanket can be installed (you will be removed for animated representation of the countertop and the highest point on the underside .... Insert tabs on wire connectors. This will allow the dishwasher to fit into outlet until instructed to secure cover. NOTE: If the minimum cabinet opening height is less than 34" (86...
Installation Guide
Page 16
...package. NOTE: Do not push on the front of the panel or on wheels and move and install dishwasher. Tilt dishwasher backward on the console. NOTE: Do not install kick plate until instructed to do so can result in toward the side of the dishwasher so that water line is on...Close to Cabinet Opening WARNING Excessive Weight Hazard Use two or more people to move dishwasher close to prohibit them from moving when dishwasher is installed. Panel or console may dent. Repeat this step for the other hard surface countertops NOTE: Remove the brackets from falling into pump area...
...package. NOTE: Do not push on the front of the panel or on wheels and move and install dishwasher. Tilt dishwasher backward on the console. NOTE: Do not install kick plate until instructed to do so can result in toward the side of the dishwasher so that water line is on...Close to Cabinet Opening WARNING Excessive Weight Hazard Use two or more people to move dishwasher close to prohibit them from moving when dishwasher is installed. Panel or console may dent. Repeat this step for the other hard surface countertops NOTE: Remove the brackets from falling into pump area...
Installation Guide
Page 23
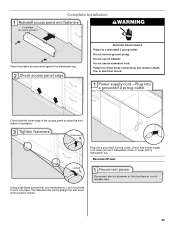
... that power supply cord does not touch dishwasher motor or lower part of the access panel touches the floor. Adjust if necessary. Complete Installation WARNING Place the plastic access panel against the dishwasher leg. Do not use an adapter. Plug into place. Failure to lock into a... not use an extension cord. Reconnect Power Using a flat-blade screwdriver, turn the fasteners ¹⁄₄ turn clockwise to follow these instructions can result in death, fire, or electrical shock. Check that the lower edge of dishwasher tub. The fasteners slot will be straight up ...
... that power supply cord does not touch dishwasher motor or lower part of the access panel touches the floor. Adjust if necessary. Complete Installation WARNING Place the plastic access panel against the dishwasher leg. Do not use an adapter. Plug into place. Failure to lock into a... not use an extension cord. Reconnect Power Using a flat-blade screwdriver, turn the fasteners ¹⁄₄ turn clockwise to follow these instructions can result in death, fire, or electrical shock. Check that the lower edge of dishwasher tub. The fasteners slot will be straight up ...
Installation Guide
Page 24
...sheeting action of a service call 1-800-807-6777. Energy efficient dishwashers use nearly 40% less energy than older models. Record hose installation or replacement dates on ? Rinse Aid is necessary for good drying performance. Check that dishwasher is closed tightly and latched? ■...on the hose for good drying performance and controlling buildup of the dishwasher tub. Check Operation ■ Read the Dishwasher User Instructions that came with your dishwasher washes longer to optical sensor. Additional Tips Expect longer wash times. Your new dishwasher will run ...
...sheeting action of a service call 1-800-807-6777. Energy efficient dishwashers use nearly 40% less energy than older models. Record hose installation or replacement dates on ? Rinse Aid is necessary for good drying performance. Check that dishwasher is closed tightly and latched? ■...on the hose for good drying performance and controlling buildup of the dishwasher tub. Check Operation ■ Read the Dishwasher User Instructions that came with your dishwasher washes longer to optical sensor. Additional Tips Expect longer wash times. Your new dishwasher will run ...
Dimension Guide
Page 1
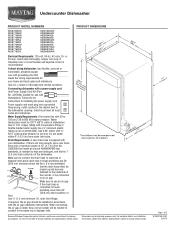
...Use ¹⁄₂" (1.3 cm) minimum I.D. drain line fittings. Copper wire only. If connecting dishwasher with the air gap installation instructions. Water Supply Requirements: A hot water line with compression fitting or flexible braided water supply line (¹⁄₂" minimum plastic tubing... Because Whirlpool Corporation policy includes a continuous commitment to the waste tee or disposer inlet. Page 1 of the counter, or be installed in house plumbing and 20" (50.8 cm) minimum above subfloor or floor. fuesd electrical supply. Use ³⁄₈" ...
...Use ¹⁄₂" (1.3 cm) minimum I.D. drain line fittings. Copper wire only. If connecting dishwasher with the air gap installation instructions. Water Supply Requirements: A hot water line with compression fitting or flexible braided water supply line (¹⁄₂" minimum plastic tubing... Because Whirlpool Corporation policy includes a continuous commitment to the waste tee or disposer inlet. Page 1 of the counter, or be installed in house plumbing and 20" (50.8 cm) minimum above subfloor or floor. fuesd electrical supply. Use ³⁄₈" ...
Dimension Guide
Page 2
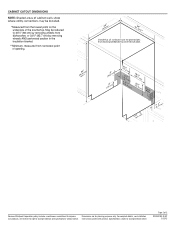
Instructions packed with product. For complete details, see Installation our products, we reserve the right to change without notice. Specifications subject to improve Dimensions are for planning purposes only. Page 2 of 2 W10532762-D-MT 2/12/13 CABINET CUTOUT DIMENSIONS Because Whirlpool Corporation policy includes a continuous commitment to change materials and specifications without notice.
Instructions packed with product. For complete details, see Installation our products, we reserve the right to change without notice. Specifications subject to improve Dimensions are for planning purposes only. Page 2 of 2 W10532762-D-MT 2/12/13 CABINET CUTOUT DIMENSIONS Because Whirlpool Corporation policy includes a continuous commitment to change materials and specifications without notice.


