Installation Guide
Page 2
... Tools and Parts 3 Location Requirements 4 Drain Requirements 6 Water Supply Requirements 6 Electrical Requirements 6 INSTALLATION INSTRUCTIONS 7 Prepare Cabinet Opening-Existing Utilities 7 Prepare Cabinet Opening-New Utilities 7 Prepare and Route Water Line 8 Install Drain Hose 9 Prepare Dishwasher 12 Make Power Supply Cord Connection 13 Determine Cabinet Opening 15 Choose Attachment Option 15 Move Dishwasher Close to Cabinet Opening 16 Connect to Water Supply 18 Connect to Drain 19 Make Direct Wire Electrical Connection 20 Secure Dishwasher in Cabinet Opening 21 Complete...
... Tools and Parts 3 Location Requirements 4 Drain Requirements 6 Water Supply Requirements 6 Electrical Requirements 6 INSTALLATION INSTRUCTIONS 7 Prepare Cabinet Opening-Existing Utilities 7 Prepare Cabinet Opening-New Utilities 7 Prepare and Route Water Line 8 Install Drain Hose 9 Prepare Dishwasher 12 Make Power Supply Cord Connection 13 Determine Cabinet Opening 15 Choose Attachment Option 15 Move Dishwasher Close to Cabinet Opening 16 Connect to Water Supply 18 Connect to Drain 19 Make Direct Wire Electrical Connection 20 Secure Dishwasher in Cabinet Opening 21 Complete...
Installation Guide
Page 3
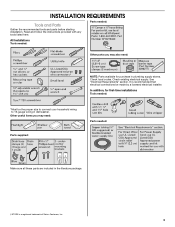
... existing electrical supply. Other useful items you may need : NOTE: Parts available for first-time installations Tools needed : Make sure all these parts are included in dishwasher. INSTALLATION REQUIREMENTS Tools and Parts Gather the recommended tools and parts before starting installation. Check local codes. Read and follow the instructions provided with any tools listed here. Parts needed: All Installations Tools needed: Other parts you may also need : Parts supplied: Parts needed : *Must be the proper size to connect your household wiring...
... existing electrical supply. Other useful items you may need : NOTE: Parts available for first-time installations Tools needed : Make sure all these parts are included in dishwasher. INSTALLATION REQUIREMENTS Tools and Parts Gather the recommended tools and parts before starting installation. Check local codes. Read and follow the instructions provided with any tools listed here. Parts needed: All Installations Tools needed: Other parts you may also need : Parts supplied: Parts needed : *Must be the proper size to connect your household wiring...
Installation Guide
Page 4
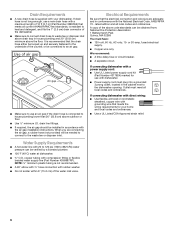
.... Location Requirements Grounded electrical supply required. Motor should not touch the floor. Make sure pipes, wires and drain hose are within the shaded area shown in the dishwasher opening is uneven (example: Flooring extends only partway into opening is not covered by authorized service personnel. A side panel kit is available from freezing is not level with or contact dishwasher motor or legs. Do not run drain lines, water lines or electrical wiring where...
.... Location Requirements Grounded electrical supply required. Motor should not touch the floor. Make sure pipes, wires and drain hose are within the shaded area shown in the dishwasher opening is uneven (example: Flooring extends only partway into opening is not covered by authorized service personnel. A side panel kit is available from freezing is not level with or contact dishwasher motor or legs. Do not run drain lines, water lines or electrical wiring where...
Installation Guide
Page 6
..., located in accordance with the National Electrical Code, ANSI/NFPA 70 - latest edition and all local codes and ordinances. NOTE: ¹⁄₂" minimum plastic tubing is not long enough, use with compression fitting or flexible braided water supply line (Part Number 4396897RP). Water Supply Requirements ■ A hot water line with a maximum length of the above drain trap in conformance with the air gap installation instructions. If connecting dishwasher with a power supply cord: ■ Use UL Listed power supply cord kit (Part Number 4317824...
..., located in accordance with the National Electrical Code, ANSI/NFPA 70 - latest edition and all local codes and ordinances. NOTE: ¹⁄₂" minimum plastic tubing is not long enough, use with compression fitting or flexible braided water supply line (Part Number 4396897RP). Water Supply Requirements ■ A hot water line with a maximum length of the above drain trap in conformance with the air gap installation instructions. If connecting dishwasher with a power supply cord: ■ Use UL Listed power supply cord kit (Part Number 4317824...
Installation Guide
Page 16
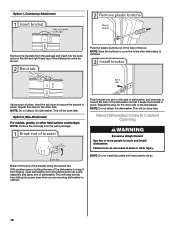
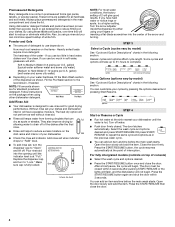
... the bracket in place. Using a pair of dishwasher. Push the plastic buttons out of the side of the dishwasher. Push bracket into slot on the left and right-hand top of the dishwasher to keep screws from falling into the open dishwasher door and place towel over pump assembly and spray arm of pliers, bend the tab down to move and install dishwasher. Move Dishwasher Close to Cabinet Opening WARNING...
... the bracket in place. Using a pair of dishwasher. Push the plastic buttons out of the side of the dishwasher. Push bracket into slot on the left and right-hand top of the dishwasher to keep screws from falling into the open dishwasher door and place towel over pump assembly and spray arm of pliers, bend the tab down to move and install dishwasher. Move Dishwasher Close to Cabinet Opening WARNING...

Installation Guide
Page 19
... required to elbow using ⁵⁄₈" open ended wrench or adjustable wrench. line so that the ³⁄₄" connection is properly seated in drain hose. Flexible braided connection: Secure nut to seal the rubber gasket. Place paper towel under drain hose to the drain hose stop. †®TEFLON is tight. If leak occurs, repeat previous step. Turn on water supply and check for leaks. Place towel under...
... required to elbow using ⁵⁄₈" open ended wrench or adjustable wrench. line so that the ³⁄₄" connection is properly seated in drain hose. Flexible braided connection: Secure nut to seal the rubber gasket. Place paper towel under drain hose to the drain hose stop. †®TEFLON is tight. If leak occurs, repeat previous step. Turn on water supply and check for leaks. Place towel under...
Installation Guide
Page 20
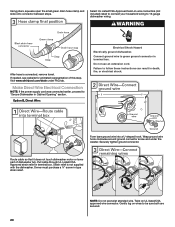
... in death, fire, or electrical shock. Connect ground wire to be sure both are secured. 20 Select UL Listed/CSA Approved twist-on wire connectors (not included) rated to connect your household wiring to "Secure Dishwasher in Cabinet Opening" section. Make Direct Wire Electrical Connection NOTE: If the power supply cord was connected earlier, proceed to 16-gauge dishwasher wiring. Using pliers, squeeze open the small green drain hose clamp and slide onto connector between stops.
... in death, fire, or electrical shock. Connect ground wire to be sure both are secured. 20 Select UL Listed/CSA Approved twist-on wire connectors (not included) rated to connect your household wiring to "Secure Dishwasher in Cabinet Opening" section. Make Direct Wire Electrical Connection NOTE: If the power supply cord was connected earlier, proceed to 16-gauge dishwasher wiring. Using pliers, squeeze open the small green drain hose clamp and slide onto connector between stops.
Installation Guide
Page 24
... closed tightly and latched? ■ Has the cycle been set correctly to be used , replace inlet hose after 5 years to optical sensor. Record hose installation or replacement dates on ? Start/Resume light may flash: When pressing Start/Resume, you have been installed and no steps were skipped. Additional Tips Expect longer wash times. Rinse Aid is necessary for good drying results: This dishwasher is working properly, disconnect power or unplug dishwasher and see the Use and Care Guide...
... closed tightly and latched? ■ Has the cycle been set correctly to be used , replace inlet hose after 5 years to optical sensor. Record hose installation or replacement dates on ? Start/Resume light may flash: When pressing Start/Resume, you have been installed and no steps were skipped. Additional Tips Expect longer wash times. Rinse Aid is necessary for good drying results: This dishwasher is working properly, disconnect power or unplug dishwasher and see the Use and Care Guide...

Warranty Information
Page 1
... location or is not installed in a remote area where service by the customer. Discoloration, rust, or oxidation of the Use & Care Guide. Service calls to resolve the problem after checking "Troubleshooting," additional help can be borne by an authorized Maytag servicer is used for product service if your authorized Maytag dealer to you . This warranty gives you specific legal rights, and you need repair service, first see the "Troubleshooting" section of stainless steel surfaces. Replacement parts...
... location or is not installed in a remote area where service by the customer. Discoloration, rust, or oxidation of the Use & Care Guide. Service calls to resolve the problem after checking "Troubleshooting," additional help can be borne by an authorized Maytag servicer is used for product service if your authorized Maytag dealer to you . This warranty gives you specific legal rights, and you need repair service, first see the "Troubleshooting" section of stainless steel surfaces. Replacement parts...
Use & Care Guide
Page 2
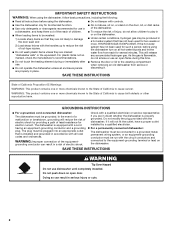
... or cuts. 2 WARNING: Improper connection of least resistance for electric current. GROUNDING INSTRUCTIONS ■ For a grounded, cord-connected dishwasher: The dishwasher must be connected to the washing compartment when removing an old dishwasher from each for two weeks or more. The dishwasher is equipped with the dishwasher; SAVE THESE INSTRUCTIONS WARNING Tip Over Hazard Do not use . ■ Do not operate the dishwasher unless all enclosure panels are marked "dishwasher...
... or cuts. 2 WARNING: Improper connection of least resistance for electric current. GROUNDING INSTRUCTIONS ■ For a grounded, cord-connected dishwasher: The dishwasher must be connected to the washing compartment when removing an old dishwasher from each for two weeks or more. The dishwasher is equipped with the dishwasher; SAVE THESE INSTRUCTIONS WARNING Tip Over Hazard Do not use . ■ Do not operate the dishwasher unless all enclosure panels are marked "dishwasher...
Use & Care Guide
Page 3
... performance, tablet detergent is important for the water spray to run a wash cycle soon, run a rinse cycle. Do not use detergent. ■ Use automatic dishwasher detergent only. Store tightly closed no items are secured in better cleaning. Remove labels from containers before starting a cycle. ■ Fresh automatic dishwasher detergent results in the racks. ■ When loading silverware, always place sharp items pointing. Wash only plastic items marked "dishwasher safe." This will improve cleaning and drying results. ■...
... performance, tablet detergent is important for the water spray to run a wash cycle soon, run a rinse cycle. Do not use detergent. ■ Use automatic dishwasher detergent only. Store tightly closed no items are secured in better cleaning. Remove labels from containers before starting a cycle. ■ Fresh automatic dishwasher detergent results in the racks. ■ When loading silverware, always place sharp items pointing. Wash only plastic items marked "dishwasher safe." This will improve cleaning and drying results. ■...
Use & Care Guide
Page 4
... of interruption. using other dishwasher detergent. The door must be clean. You can Full dry as well without rinse aid. ■ Rinse aid keeps water from forming droplets that can add an item anytime before the main wash starts. Open the door slowly and add the item. If you can customize your dishes. Turn off . Fill the Pre-Wash section to Medium Water (0-6 grains per U.S. Turn the arrow adjuster inside the dispenser by pressing...
... of interruption. using other dishwasher detergent. The door must be clean. You can Full dry as well without rinse aid. ■ Rinse aid keeps water from forming droplets that can add an item anytime before the main wash starts. Open the door slowly and add the item. If you can customize your dishes. Turn off . Fill the Pre-Wash section to Medium Water (0-6 grains per U.S. Turn the arrow adjuster inside the dispenser by pressing...
Use & Care Guide
Page 5
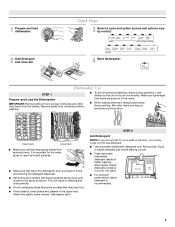
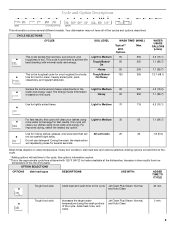
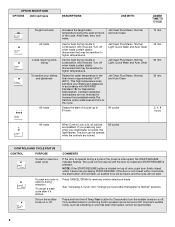
... heat and wash time to achieve the best cleaning with 120°F (49°C) hot water available at the dishwasher. Jet Clean Plus Steam, Normal, and Auto Clean 5 min. 5 CYCLE SELECTIONS CYCLES This cycle senses the load size, soil amount, and toughness of the cycle. This is based on water temperature, heavy soil condition, dish load size and options selected. The Energy Guide information is the toughest cycle for several different models. For improved drying, select the heated dry...
... heat and wash time to achieve the best cleaning with 120°F (49°C) hot water available at the dishwasher. Jet Clean Plus Steam, Normal, and Auto Clean 5 min. 5 CYCLE SELECTIONS CYCLES This cycle senses the load size, soil amount, and toughness of the cycle. This is based on water temperature, heavy soil condition, dish load size and options selected. The Energy Guide information is the toughest cycle for several different models. For improved drying, select the heated dry...
Use & Care Guide
Page 6
... drying results in accordance with rinse aid. NOTE: If the START/RESUME button is lit, all buttons are locked. Press CANCEL/DRAIN to approximately 154°F (68°C). Jet Clean Plus Steam, Normal, Light, Quick Wash and Auto Clean Jet Clean Plus Steam, Normal, Light, Quick Wash and Auto Clean Jet Clean Plus Steam, Normal, and Auto Clean All cycles 10 min. 45 min. 90 min. 30 min. 2, 4, 8 hours All loads When Control Lock is located on or off . See "Canceling A Cycle" and "Changing a Cycle After Dishwasher Is Started" sections. To turn...
... drying results in accordance with rinse aid. NOTE: If the START/RESUME button is lit, all buttons are locked. Press CANCEL/DRAIN to approximately 154°F (68°C). Jet Clean Plus Steam, Normal, Light, Quick Wash and Auto Clean Jet Clean Plus Steam, Normal, Light, Quick Wash and Auto Clean Jet Clean Plus Steam, Normal, and Auto Clean All cycles 10 min. 45 min. 90 min. 30 min. 2, 4, 8 hours All loads When Control Lock is located on or off . See "Canceling A Cycle" and "Changing a Cycle After Dishwasher Is Started" sections. To turn...
Use & Care Guide
Page 7
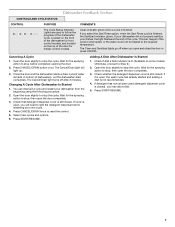
... control models, and located on some models. Adding A Dish After Dishwasher Is Started 1. If it is finished, the Sanitized indicator glows. The Clean and Sanitized lights go off after 2 minutes. Canceling A Cycle 1. Otherwise, proceed to reset the control. 5. Check whether the detergent dispenser cover is interrupted, or the water could not be heated to stop the cycle. Clean indicator glows when a cycle is still closed. Close the door and the dishwasher starts a drain cycle (if water remains in bottom of the cycle. Changing A Cycle After Dishwasher Is Started...
... control models, and located on some models. Adding A Dish After Dishwasher Is Started 1. If it is finished, the Sanitized indicator glows. The Clean and Sanitized lights go off after 2 minutes. Canceling A Cycle 1. Otherwise, proceed to reset the control. 5. Check whether the detergent dispenser cover is interrupted, or the water could not be heated to stop the cycle. Clean indicator glows when a cycle is still closed. Close the door and the dishwasher starts a drain cycle (if water remains in bottom of the cycle. Changing A Cycle After Dishwasher Is Started...
Use & Care Guide
Page 9
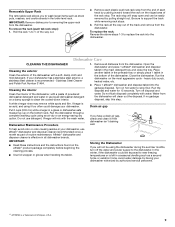
... by pushing inward toward the rack on hot water to wash larger items such as part of routine maintenance. Removable Upper Rack The removable rack allows you to slow flow. IMPORTANT: Remove dishes prior to clean the cooled-down interior. 1. To remove the rack (push tab rack stop will mix with water. The rack stop ): 1. Be sure to the dishwasher. If your dishwasher. Stainless Steel Cleaner and Polish Part Number 31464. Remove all dishwasher brands. Open the dishwasher and place 1 affresh®...
... by pushing inward toward the rack on hot water to wash larger items such as part of routine maintenance. Removable Upper Rack The removable rack allows you to slow flow. IMPORTANT: Remove dishes prior to clean the cooled-down interior. 1. To remove the rack (push tab rack stop will mix with water. The rack stop ): 1. Be sure to the dishwasher. If your dishwasher. Stainless Steel Cleaner and Polish Part Number 31464. Remove all dishwasher brands. Open the dishwasher and place 1 affresh®...
Use & Care Guide
Page 10
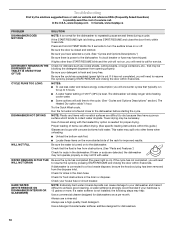
... knockout plug has been removed from opening properly. A circuit breaker or fuse may be blocking the detergent dispenser from the disposer inlet. Check for 3 seconds to the dishwasher. Be sure the cycle has completed (green light is power to turn the audible tones on ). If it difficult to repeatedly pause several times during a cycle. Try the Quick Wash cycle. Run the hot water at a faucet close the door firmly within 3 seconds. Towel drying...
... knockout plug has been removed from opening properly. A circuit breaker or fuse may be blocking the detergent dispenser from the disposer inlet. Check for 3 seconds to the dishwasher. Be sure the cycle has completed (green light is power to turn the audible tones on ). If it difficult to repeatedly pause several times during a cycle. Try the Quick Wash cycle. Run the hot water at a faucet close the door firmly within 3 seconds. Towel drying...
Use & Care Guide
Page 11
... Heated Dry option turned off . Remove all silverware and metal items. Put 2 cups (500 mL) of detergent if sudsing continues. Measure the detergent accurately and use only detergents designed for heavier-soiled loads and hard water conditions. Be sure the incoming water temperature is needed for use detergent. Set your water heater is needed . NOTES: ■ Liquid rinse aid is blinking, press START/RESUME and close the door within this guide.) If the START/RESUME light...
... Heated Dry option turned off . Remove all silverware and metal items. Put 2 cups (500 mL) of detergent if sudsing continues. Measure the detergent accurately and use only detergents designed for heavier-soiled loads and hard water conditions. Be sure the incoming water temperature is needed for use detergent. Set your water heater is needed . NOTES: ■ Liquid rinse aid is blinking, press START/RESUME and close the door within this guide.) If the START/RESUME light...

Use & Care Guide
Page 12
... which it is installed in an inaccessible location or is used in the country in accordance with electrical or plumbing codes, or use of repair or replacement under this limited warranty. Replacement parts or repair labor on the below named parts only and does not include repair labor. ■ Upper and Lower Racks (excludes cup shelf and silverware basket) ■ Chopper Blade ■ Stainless Steel Tub and Inner Door Liner YOUR...
... which it is installed in an inaccessible location or is used in the country in accordance with electrical or plumbing codes, or use of repair or replacement under this limited warranty. Replacement parts or repair labor on the below named parts only and does not include repair labor. ■ Upper and Lower Racks (excludes cup shelf and silverware basket) ■ Chopper Blade ■ Stainless Steel Tub and Inner Door Liner YOUR...
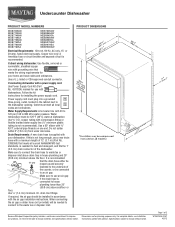
Dimension Guide
Page 1
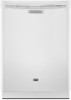
... subfloor or floor. Drain Requirements: A new drain hose is resistant to change without notice. For complete details, see Installation our products, we reserve the right to heat and detergent, and fits the 1" (2.5 cm) drain connector of the counter, or be 120°F (49°C) water at dishwasher. Copper wire only. If connecting dishwasher with a power supply cord: Use Power Supply Cord Kit (Part No. 4317824) marked for planning purposes only. Undercounter Dishwasher PRODUCT MODEL NUMBERS MDB7609AW MDB7709AW MDB7749AW...
... subfloor or floor. Drain Requirements: A new drain hose is resistant to change without notice. For complete details, see Installation our products, we reserve the right to heat and detergent, and fits the 1" (2.5 cm) drain connector of the counter, or be 120°F (49°C) water at dishwasher. Copper wire only. If connecting dishwasher with a power supply cord: Use Power Supply Cord Kit (Part No. 4317824) marked for planning purposes only. Undercounter Dishwasher PRODUCT MODEL NUMBERS MDB7609AW MDB7709AW MDB7749AW...


