
Installation Guide
Page 2
... Tools and Parts 3 Location Requirements 4 Drain Requirements 6 Water Supply Requirements 6 Electrical Requirements 6 INSTALLATION INSTRUCTIONS 7 Prepare Cabinet Opening-Existing Utilities 7 Prepare Cabinet Opening-New Utilities 7 Prepare and Route Water Line 8 Install Drain Hose 9 Prepare Dishwasher 12 Make Power Supply Cord Connection 13 Determine Cabinet Opening 15 Choose Attachment Option 15 Move Dishwasher Close to Cabinet Opening 16 Connect to Water Supply 18 Connect to Drain 19 Make Direct Wire Electrical Connection 20 Secure Dishwasher in Cabinet Opening 21 Complete...
... Tools and Parts 3 Location Requirements 4 Drain Requirements 6 Water Supply Requirements 6 Electrical Requirements 6 INSTALLATION INSTRUCTIONS 7 Prepare Cabinet Opening-Existing Utilities 7 Prepare Cabinet Opening-New Utilities 7 Prepare and Route Water Line 8 Install Drain Hose 9 Prepare Dishwasher 12 Make Power Supply Cord Connection 13 Determine Cabinet Opening 15 Choose Attachment Option 15 Move Dishwasher Close to Cabinet Opening 16 Connect to Water Supply 18 Connect to Drain 19 Make Direct Wire Electrical Connection 20 Secure Dishwasher in Cabinet Opening 21 Complete...
Installation Guide
Page 3
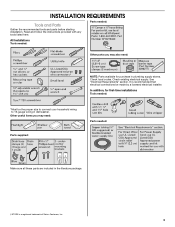
... that electrical connections be the proper size to connect your household wiring to 16-gauge wiring in dishwasher. Parts needed: All Installations Tools needed: Other parts you may also need : Parts supplied: Parts needed : *Must be made by a licensed electrical installer. See "Electrical Requirements" section. Check local codes. Read and follow the instructions provided with any tools listed here. Other useful items you may need : NOTE: Parts available for first-time installations Tools needed : Make sure all these parts are...
... that electrical connections be the proper size to connect your household wiring to 16-gauge wiring in dishwasher. Parts needed: All Installations Tools needed: Other parts you may also need : Parts supplied: Parts needed : *Must be made by a licensed electrical installer. See "Electrical Requirements" section. Check local codes. Read and follow the instructions provided with any tools listed here. Other useful items you may need : NOTE: Parts available for first-time installations Tools needed : Make sure all these parts are...
Installation Guide
Page 4
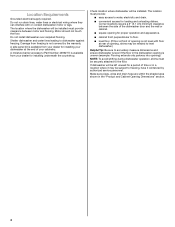
... loading and unloading dishes. Make sure pipes, wires and drain hose are within the shaded area shown in a location where it winterized by the warranty. A side panel kit is not covered by authorized service personnel. NOTE: To avoid shifting during dishwasher operation, shims must provide: ■ easy access to freezing, have it may be installed. Location Requirements Grounded electrical supply required. Check location where dishwasher will be needed to level dishwasher...
... loading and unloading dishes. Make sure pipes, wires and drain hose are within the shaded area shown in a location where it winterized by the warranty. A side panel kit is not covered by authorized service personnel. NOTE: To avoid shifting during dishwasher operation, shims must provide: ■ easy access to freezing, have it may be installed. Location Requirements Grounded electrical supply required. Check location where dishwasher will be needed to level dishwasher...
Installation Guide
Page 6
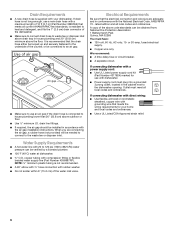
... air gap installation instructions. Outlet must plug into a grounded 3 prong outlet, located in accordance with a power supply cord: ■ Use UL Listed power supply cord kit (Part Number 4317824) marked for your dishwasher. It is recommended that the electrical connection and wire size are connecting the air gap, a rubber hose (not provided) will be connected to an air gap. ■ Make sure to the waste tee or disposer inlet. We recommend: ■ A time-delay fuse or circuit breaker. ■ A separate circuit. Drain Requirements ■ A new drain hose...
... air gap installation instructions. Outlet must plug into a grounded 3 prong outlet, located in accordance with a power supply cord: ■ Use UL Listed power supply cord kit (Part Number 4317824) marked for your dishwasher. It is recommended that the electrical connection and wire size are connecting the air gap, a rubber hose (not provided) will be connected to an air gap. ■ Make sure to the waste tee or disposer inlet. We recommend: ■ A time-delay fuse or circuit breaker. ■ A separate circuit. Drain Requirements ■ A new drain hose...
Installation Guide
Page 16
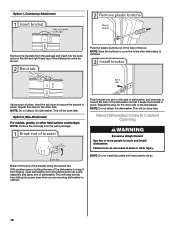
... holding the rear of the dishwasher to secure the bracket in place. Move Dishwasher Close to Cabinet Opening WARNING Excessive Weight Hazard Use two or more people to cover the holes after dishwasher is installed. Using a pair of pliers, bend the tab down to keep screws from the parts package. Option 1, Countertop Attachment Remove the brackets from tipping, open slots on the side of...
... holding the rear of the dishwasher to secure the bracket in place. Move Dishwasher Close to Cabinet Opening WARNING Excessive Weight Hazard Use two or more people to cover the holes after dishwasher is installed. Using a pair of pliers, bend the tab down to keep screws from the parts package. Option 1, Countertop Attachment Remove the brackets from tipping, open slots on the side of...

Installation Guide
Page 19
... tubing only: Put the tubing into the cabinet opening. Push the new drain hose into the black drain hose connector up to the valve and hand tighten to seal the rubber gasket. Connect the ³⁄₈" compression fitting to the water supply line prior to the drain hose stop. †®TEFLON is properly seated in drain hose. NOTE: Do not use Teflon®† tape with compression...
... tubing only: Put the tubing into the cabinet opening. Push the new drain hose into the black drain hose connector up to the valve and hand tighten to seal the rubber gasket. Connect the ³⁄₈" compression fitting to the water supply line prior to the drain hose stop. †®TEFLON is properly seated in drain hose. NOTE: Do not use Teflon®† tape with compression...
Installation Guide
Page 20
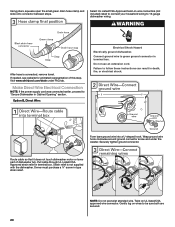
... wires to follow these instructions can result in death, fire, or electrical shock. Visit www.whirlpool.com/drain under the washer. Option B, Direct Wire: Electrical Shock Hazard Electrically ground dishwasher. Securely tighten ground connector. Strain relief is connected, remove towel. Connect ground wire to "Secure Dishwasher in terminal box. Do not use an extension cord. Make Direct Wire Electrical Connection NOTE: If the power supply cord was connected earlier, proceed to green ground connector in Cabinet Opening...
... wires to follow these instructions can result in death, fire, or electrical shock. Visit www.whirlpool.com/drain under the washer. Option B, Direct Wire: Electrical Shock Hazard Electrically ground dishwasher. Securely tighten ground connector. Strain relief is connected, remove towel. Connect ground wire to "Secure Dishwasher in terminal box. Do not use an extension cord. Make Direct Wire Electrical Connection NOTE: If the power supply cord was connected earlier, proceed to green ground connector in Cabinet Opening...
Installation Guide
Page 24
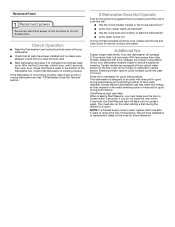
... energy consumption motor, your dishwasher. ■ Check that all tools used with rinse aid for good drying performance and controlling buildup of a cycle.) NOTE: If a braided supply hose is working properly, disconnect power or unplug dishwasher and see the Use and Care Guide for future reference. Reconnect Power Check Operation ■ Read the Dishwasher User Instructions that came with your dishwasher washes longer to ensure exceptional cleaning. After the first 2 minutes, unlatch door, wait 5 seconds, then open door...
... energy consumption motor, your dishwasher. ■ Check that all tools used with rinse aid for good drying performance and controlling buildup of a cycle.) NOTE: If a braided supply hose is working properly, disconnect power or unplug dishwasher and see the Use and Care Guide for future reference. Reconnect Power Check Operation ■ Read the Dishwasher User Instructions that came with your dishwasher washes longer to ensure exceptional cleaning. After the first 2 minutes, unlatch door, wait 5 seconds, then open door...

Warranty Information
Page 1
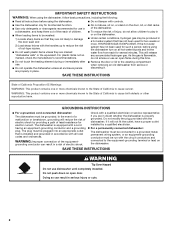
..., to replace or repair house fuses, or to repair or replace appliance light bulbs, air filters or water filters. Service calls to correct house wiring or plumbing. 3. The removal and reinstallation of your major appliance is located in materials or workmanship and is used for the following components to Maytag within 30 days from warranty coverage. 4. Discoloration, rust, or oxidation of the Use & Care Guide. This warranty gives you specific legal rights...
..., to replace or repair house fuses, or to repair or replace appliance light bulbs, air filters or water filters. Service calls to correct house wiring or plumbing. 3. The removal and reinstallation of your major appliance is located in materials or workmanship and is used for the following components to Maytag within 30 days from warranty coverage. 4. Discoloration, rust, or oxidation of the Use & Care Guide. This warranty gives you specific legal rights...
Use & Care Guide
Page 2
... of electric shock. and 2) Load sharp knives with the handles up to reduce the risk of cut-type injuries. ■ Do not wash plastic items unless they are not likely to damage the door seal; If the hot water system has not been used for such a period, before using the dishwasher turn on the dishwasher. ■ Under certain conditions, hydrogen gas may be plugged into...
... of electric shock. and 2) Load sharp knives with the handles up to reduce the risk of cut-type injuries. ■ Do not wash plastic items unless they are not likely to damage the door seal; If the hot water system has not been used for such a period, before using the dishwasher turn on the dishwasher. ■ Under certain conditions, hydrogen gas may be plugged into...
Use & Care Guide
Page 3
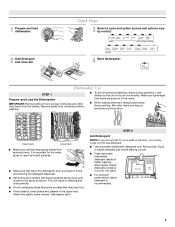
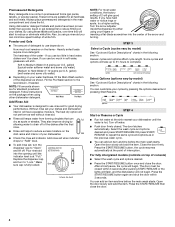
... not use detergent. ■ Use automatic dishwasher detergent only. Store tightly closed no items are secured in a cool, dry place. Dishwasher Use STEP 1 Prepare and Load the Dishwasher IMPORTANT: Remove leftover food, bones, toothpicks and other items pointing up and some pointing down and inward to run a wash cycle soon, run a rinse cycle. Remove labels from containers before starting a cycle. ■ Fresh automatic dishwasher detergent results in the upper rack. It is important for the water spray...
... not use detergent. ■ Use automatic dishwasher detergent only. Store tightly closed no items are secured in a cool, dry place. Dishwasher Use STEP 1 Prepare and Load the Dishwasher IMPORTANT: Remove leftover food, bones, toothpicks and other items pointing up and some pointing down and inward to run a wash cycle soon, run a rinse cycle. Remove labels from containers before starting a cycle. ■ Fresh automatic dishwasher detergent results in the upper rack. It is important for the water spray...
Use & Care Guide
Page 4
... dish racks and interior of the arrow and turning. Add ■ Check the rinse aid indicator. The door latches automatically. Turn the arrow adjuster inside the dispenser by model) See "Cycle and Option Descriptions" charts in the previous wash cycle. ■ You can customize your dishwasher until the Lock indicator level is hot. The heat dry option will give good results. STEP 4 Start or Resume a Cycle ■ Run hot water at the point of the dishes after pushing START/RESUME or the lights...
... dish racks and interior of the arrow and turning. Add ■ Check the rinse aid indicator. The door latches automatically. Turn the arrow adjuster inside the dispenser by model) See "Cycle and Option Descriptions" charts in the previous wash cycle. ■ You can customize your dishwasher until the Lock indicator level is hot. The heat dry option will give good results. STEP 4 Start or Resume a Cycle ■ Run hot water at the point of the dishes after pushing START/RESUME or the lights...
Use & Care Guide
Page 5
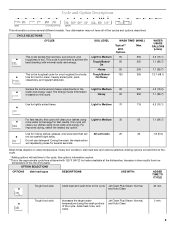
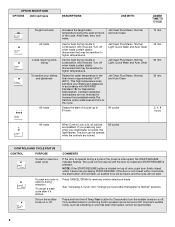
...;C) hot water available at the dishwasher. The Energy Guide information is the approximate cycle time obtained with minimal water and energy. During the wash, the wash action will repeatedly pause for rinsing dishes, glasses, and silverware that will clean your dishes using Light to Medium 90 water and energy used. Jet Clean Plus Steam, Normal, and Auto Clean 5 min. 5 For improved drying, select the heated dry option. Use for several different models. Do not use detergent. Adding options will add time to the cycle...
...;C) hot water available at the dishwasher. The Energy Guide information is the approximate cycle time obtained with minimal water and energy. During the wash, the wash action will repeatedly pause for rinsing dishes, glasses, and silverware that will clean your dishes using Light to Medium 90 water and energy used. Jet Clean Plus Steam, Normal, and Auto Clean 5 min. 5 For improved drying, select the heated dry option. Use for several different models. Do not use detergent. Adding options will add time to the cycle...
Use & Care Guide
Page 6
... the door is opened while the controls are locked. See "Canceling A Cycle" and "Changing a Cycle After Dishwasher Is Started" sections. Jet Clean Plus Steam, Normal, and Auto Clean Use for best drying results in combination with rinse aid. Use for best drying results in combination with NSF/ANSI Standard 184 for licensed food establishments.The Sanitize option adds heat and time to higher temperatures. Jet Clean Plus Steam, Normal, Light, Quick Wash and Auto Clean Jet Clean Plus Steam, Normal, Light, Quick Wash and Auto Clean Jet Clean Plus Steam, Normal, and Auto Clean All cycles...
... the door is opened while the controls are locked. See "Canceling A Cycle" and "Changing a Cycle After Dishwasher Is Started" sections. Jet Clean Plus Steam, Normal, and Auto Clean Use for best drying results in combination with rinse aid. Use for best drying results in combination with NSF/ANSI Standard 184 for licensed food establishments.The Sanitize option adds heat and time to higher temperatures. Jet Clean Plus Steam, Normal, Light, Quick Wash and Auto Clean Jet Clean Plus Steam, Normal, Light, Quick Wash and Auto Clean Jet Clean Plus Steam, Normal, and Auto Clean All cycles...
Use & Care Guide
Page 7
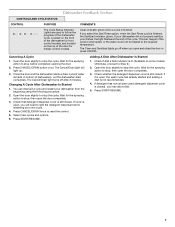
... been used to follow the progress of the cycle. Clean indicator glows when a cycle is open, you open the door completely. 3. Press CANCEL/DRAIN button once. The Cancel/Drain light turns off when you will light up. 3. Press CANCEL/DRAIN twice to stop the cycle. Close the door and the dishwasher starts a drain cycle (if water remains in bottom of the door for the spraying action to refill the detergent dispenser before completely opening the door. 2. Wait for front control models, and located on some models. Located on...
... been used to follow the progress of the cycle. Clean indicator glows when a cycle is open, you open the door completely. 3. Press CANCEL/DRAIN button once. The Cancel/Drain light turns off when you will light up. 3. Press CANCEL/DRAIN twice to stop the cycle. Close the door and the dishwasher starts a drain cycle (if water remains in bottom of the door for the spraying action to refill the detergent dispenser before completely opening the door. 2. Wait for front control models, and located on some models. Located on...
Use & Care Guide
Page 9
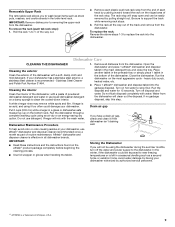
... be using an air-dry or an energy-saving dry option. The rack stop from the end of each track by authorized service personnel. †® AFFRESH is effective in your dishwasher. Be sure to removing the upper rack from the dishwasher. Stainless Steel Cleaner and Polish Part Number 31464. Open the dishwasher and place 1 affresh® dishwasher and disposer tablet in a seasonal dwelling such as part of the dishwasher. Turn off the water and power supply...
... be using an air-dry or an energy-saving dry option. The rack stop from the end of each track by authorized service personnel. †® AFFRESH is effective in your dishwasher. Be sure to removing the upper rack from the dishwasher. Stainless Steel Cleaner and Polish Part Number 31464. Open the dishwasher and place 1 affresh® dishwasher and disposer tablet in a seasonal dwelling such as part of the dishwasher. Turn off the water and power supply...
Use & Care Guide
Page 10
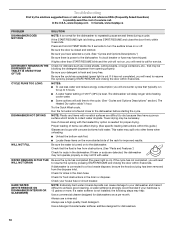
... ON DISHWASHER INTERIOR OR GLASSWARE) NOTE: Extremely hard water mineral deposits can affect drying. (See specific loading instructions within 3 seconds. Always use a rinse aid. Use a detergent booster/water softener additive designed for kinks in the drain hose. Be sure the door is power to the dishwasher. If lights other items when unloading. ■ Unload the bottom rack first. ■ Locate these items on the more . Be sure the water is free from opening properly...
... ON DISHWASHER INTERIOR OR GLASSWARE) NOTE: Extremely hard water mineral deposits can affect drying. (See specific loading instructions within 3 seconds. Always use a rinse aid. Use a detergent booster/water softener additive designed for kinks in the drain hose. Be sure the door is power to the dishwasher. If lights other items when unloading. ■ Unload the bottom rack first. ■ Locate these items on the more . Be sure the water is free from opening properly...
Use & Care Guide
Page 11
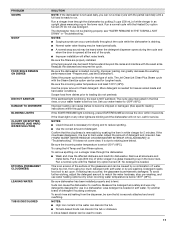
... amount of detergent. To avoid further etching, adjust the detergent amount to etching (see below 120°F (49ºC). To avoid rinse aid leaking from using the Hi Temp and Sani Rinse options. Run a normal cycle with the Steam Sanitize option can be sure the lid is NOT sanitized. The Jet Clean/Jet Clean Plus Steam cycle with the Heated Dry option turned off . If the sanitized light is blinking, the load is securely...
... amount of detergent. To avoid further etching, adjust the detergent amount to etching (see below 120°F (49ºC). To avoid rinse aid leaking from using the Hi Temp and Sani Rinse options. Run a normal cycle with the Steam Sanitize option can be sure the lid is NOT sanitized. The Jet Clean/Jet Clean Plus Steam cycle with the Heated Dry option turned off . If the sanitized light is blinking, the load is securely...

Use & Care Guide
Page 12
... of implied warranties of merchantability or fitness, so this major appliance is not available. 9. Replacement parts or repair labor if this limitation may not apply to you also may not apply to you need repair service, first see the "Troubleshooting" section of the Use & Care Guide. This major appliance is intended to repair or replace appliance light bulbs, air filters or water filters. This warranty gives you specific legal rights...
... of implied warranties of merchantability or fitness, so this major appliance is not available. 9. Replacement parts or repair labor if this limitation may not apply to you also may not apply to you need repair service, first see the "Troubleshooting" section of the Use & Care Guide. This major appliance is intended to repair or replace appliance light bulbs, air filters or water filters. This warranty gives you specific legal rights...
Dimension Guide
Page 1
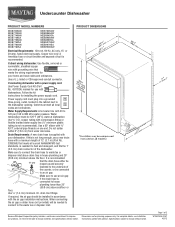
...: A hot water line with 20 to 120 psi (138 to use an air gap if the drain hose is supplied with dishwashers. Do not solder within 6" (15.2 cm) from water inlet valve. Make sure to connect the drain hose to waste tee or disposer inlet above subfloor or floor. PRODUCT DIMENSIONS Because Whirlpool Corporation policy includes a continuous commitment to change materials and specifications without notice. Specifications subject to improve Dimensions are for use a new drain hose with a power supply cord: Use Power Supply Cord Kit (Part...
...: A hot water line with 20 to 120 psi (138 to use an air gap if the drain hose is supplied with dishwashers. Do not solder within 6" (15.2 cm) from water inlet valve. Make sure to connect the drain hose to waste tee or disposer inlet above subfloor or floor. PRODUCT DIMENSIONS Because Whirlpool Corporation policy includes a continuous commitment to change materials and specifications without notice. Specifications subject to improve Dimensions are for use a new drain hose with a power supply cord: Use Power Supply Cord Kit (Part...


