

Owners Manual
Page 2
... risk of electric shock. and 2) Load sharp knives with controls. ■ Do not abuse, sit on, or stand on the dishwasher. Refer to the installation instructions for proper grounding procedures. ■ Do not tamper with the handles up to reduce the risk of cuttype injuries. ■ Do not... wash plastic items unless they are not likely to damage the door seal; The dishwasher is applied to the dishwasher. HYDROGEN GAS ...
... risk of electric shock. and 2) Load sharp knives with controls. ■ Do not abuse, sit on, or stand on the dishwasher. Refer to the installation instructions for proper grounding procedures. ■ Do not tamper with the handles up to reduce the risk of cuttype injuries. ■ Do not... wash plastic items unless they are not likely to damage the door seal; The dishwasher is applied to the dishwasher. HYDROGEN GAS ...
Owners Manual
Page 9
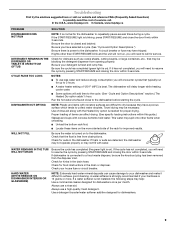
...maytag.com In Canada, www.maytag.ca PROBLEM SOLUTION DISHWASHER DOES NOT RUN NOTE: It is needed for food obstructions in the dishwasher. Check that may not fill with the Heated Dry option is normal for the dishwasher to the dishwasher before starting the cycle. If the START/RESUME light is not installed...WILL NOT FILL Be sure the water is on ). If dishwasher is closed and latched. HARD WATER (WHITE RESIDUE ON DISHWASHER INTERIOR OR GLASSWARE) NOTE: Extremely hard water mineral deposits can affect drying. (See specific loading instructions within 3 seconds.
...maytag.com In Canada, www.maytag.ca PROBLEM SOLUTION DISHWASHER DOES NOT RUN NOTE: It is needed for food obstructions in the dishwasher. Check that may not fill with the Heated Dry option is normal for the dishwasher to the dishwasher before starting the cycle. If the START/RESUME light is not installed...WILL NOT FILL Be sure the water is on ). If dishwasher is closed and latched. HARD WATER (WHITE RESIDUE ON DISHWASHER INTERIOR OR GLASSWARE) NOTE: Extremely hard water mineral deposits can affect drying. (See specific loading instructions within 3 seconds.
Owners Manual
Page 10
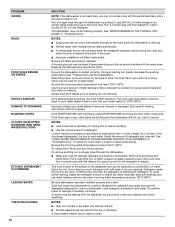
...interrupted in soft water. Adjust the amount of fresh detergent. To remove spotting, run a vinegar rinse through the dishwasher by pre-washing. Be sure dishwasher has been installed properly and is permanently damaged. Less detergent is needed in the final rinse, or your water heater to 120&#...to become chipped or damaged. (See specific loading instructions within this guide.) If the START/RESUME light is blinking, press START/RESUME and close the door within 3 seconds. The dishwasher may be used to clean. Be sure the dishwasher is NOT sanitized. More detergent is needed ....
...interrupted in soft water. Adjust the amount of fresh detergent. To remove spotting, run a vinegar rinse through the dishwasher by pre-washing. Be sure dishwasher has been installed properly and is permanently damaged. Less detergent is needed in the final rinse, or your water heater to 120&#...to become chipped or damaged. (See specific loading instructions within this guide.) If the START/RESUME light is blinking, press START/RESUME and close the door within 3 seconds. The dishwasher may be used to clean. Be sure the dishwasher is NOT sanitized. More detergent is needed ....
Owners Manual
Page 11
... 11 In Canada, call 1-800-688-9900. MAYTAG® DISHWASHER LIMITED WARRANTY FIRST YEAR LIMITED WARRANTY (PARTS AND LABOR) For one year from the date of purchase, when this major appliance is installed, operated and maintained according to instructions attached to or furnished with the product, Maytag brand of Whirlpool Corporation or Whirlpool Canada, LP...
... 11 In Canada, call 1-800-688-9900. MAYTAG® DISHWASHER LIMITED WARRANTY FIRST YEAR LIMITED WARRANTY (PARTS AND LABOR) For one year from the date of purchase, when this major appliance is installed, operated and maintained according to instructions attached to or furnished with the product, Maytag brand of Whirlpool Corporation or Whirlpool Canada, LP...
Installation Instructions
Page 2
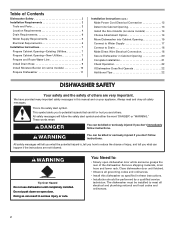
... and ordinances. 2 Table of Contents Dishwasher Safety 2 Installation Requirements 3 Tools and Parts 3 Location Requirements 4 Drain Requirements 6 Water Supply Requirements 6 Electrical Requirements 6 Installation Instructions 7 Prepare Cabinet Opening-Existing Utilities 7 Prepare Cabinet Opening-New Utilities 7 Prepare and Route Water Line 8 Install Drain Hose 9 Install Moisture Barrier (on some models 10 Prepare Dishwasher 11 Installation Instructions (cont.) Make Power Cord Electrical Connection...
... and ordinances. 2 Table of Contents Dishwasher Safety 2 Installation Requirements 3 Tools and Parts 3 Location Requirements 4 Drain Requirements 6 Water Supply Requirements 6 Electrical Requirements 6 Installation Instructions 7 Prepare Cabinet Opening-Existing Utilities 7 Prepare Cabinet Opening-New Utilities 7 Prepare and Route Water Line 8 Install Drain Hose 9 Install Moisture Barrier (on some models 10 Prepare Dishwasher 11 Installation Instructions (cont.) Make Power Cord Electrical Connection...
Installation Instructions
Page 3
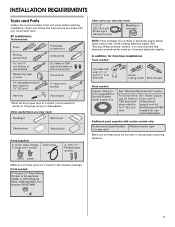
... section. Read and follow the instructions provided with and 1¹⁄₂ " hole saw bits Small tubing cutter Wire stripper Parts needed : Other parts you may also need : Flashlight Bath towel Shallow pan Wood block Parts supplied: 2 - All Installations Tools needed: Pliers Flat-blade ... use UL listed power supply cord kit Part Number 4317824 marked for first-time installations Tools needed: Cordless drill with any tools listed here. In addition, for use with dishwasher Additional parts supplied with certain models only: Bottom sound pad (located Moisture barrier tape...
... section. Read and follow the instructions provided with and 1¹⁄₂ " hole saw bits Small tubing cutter Wire stripper Parts needed : Other parts you may also need : Flashlight Bath towel Shallow pan Wood block Parts supplied: 2 - All Installations Tools needed: Pliers Flat-blade ... use UL listed power supply cord kit Part Number 4317824 marked for first-time installations Tools needed: Cordless drill with any tools listed here. In addition, for use with dishwasher Additional parts supplied with certain models only: Bottom sound pad (located Moisture barrier tape...
Installation Instructions
Page 6
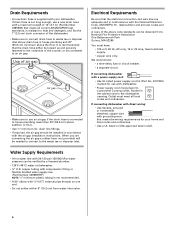
... fuse or circuit breaker. • a separate circuit. latest edition and all local codes and ordinances. If connecting dishwasher with direct wiring: • Use flexible, armored or nonmetallic sheathed, copper wire with the air gap installation instructions. A copy of the counter, or be connected to the waste tee or disposer inlet. external pipe threads...
... fuse or circuit breaker. • a separate circuit. latest edition and all local codes and ordinances. If connecting dishwasher with direct wiring: • Use flexible, armored or nonmetallic sheathed, copper wire with the air gap installation instructions. A copy of the counter, or be connected to the waste tee or disposer inlet. external pipe threads...

Installation Instructions
Page 7
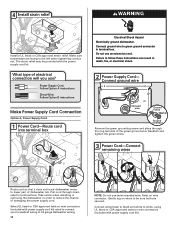
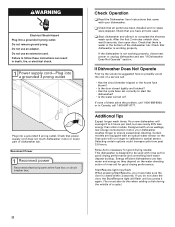
INSTALLATION INSTRUCTIONS WARNING Electrical Shock Hazard Disconnect electrical power at the fuse box or circuit breaker box before installing dishwasher. Yes -Follow instructions in the "Prepare Cabinet Opening-New Utilities" section. Prepare Cabinet Opening-New Utilities Prepare and route the electrical supply What type of electrical connection will ...
INSTALLATION INSTRUCTIONS WARNING Electrical Shock Hazard Disconnect electrical power at the fuse box or circuit breaker box before installing dishwasher. Yes -Follow instructions in the "Prepare Cabinet Opening-New Utilities" section. Prepare Cabinet Opening-New Utilities Prepare and route the electrical supply What type of electrical connection will ...
Installation Instructions
Page 12
... the left when tightening conduit nut. Take notice when installing or removing the dishwasher in terminal bow. The strain relief may be sure both are facing to lower part of damaging the power supply cord. Power Supply Cord: Follow Option A instructions Direct Wire: Follow Option B instructions Make Power Supply Cord Connection Option A, Power Supply...
... the left when tightening conduit nut. Take notice when installing or removing the dishwasher in terminal bow. The strain relief may be sure both are facing to lower part of damaging the power supply cord. Power Supply Cord: Follow Option A instructions Direct Wire: Follow Option B instructions Make Power Supply Cord Connection Option A, Power Supply...
Installation Instructions
Page 13
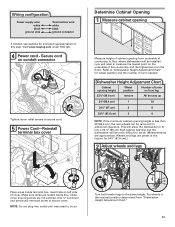
...turns needed , see website for animated representation of countertop to floor where dishwasher will need to the same height. Visit www.maytag.com under FAQ tab. 4 Tighten strain relief screws to secure cord... from "Dishwasher Height Adjustment Chart." 13 NOTE: Do not plug into a 33 86 cm) high cabinet opening height is less than 34"(86.4 cm), the rear wheels can be installed (you will...countertop and the highest point on the underside of cover. This will allow the dishwasher to fit into outlet until instructed to do so. 1 2 3 wheel Turn both leveler legs to measure the...
...turns needed , see website for animated representation of countertop to floor where dishwasher will need to the same height. Visit www.maytag.com under FAQ tab. 4 Tighten strain relief screws to secure cord... from "Dishwasher Height Adjustment Chart." 13 NOTE: Do not plug into a 33 86 cm) high cabinet opening height is less than 34"(86.4 cm), the rear wheels can be installed (you will...countertop and the highest point on the underside of cover. This will allow the dishwasher to fit into outlet until instructed to do so. 1 2 3 wheel Turn both leveler legs to measure the...
Installation Instructions
Page 15
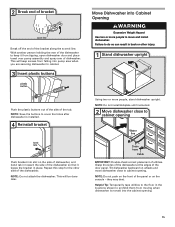
... of the side of the tub. This will keep it keeps the bracket in place. Grasp the sides of the dishwasher at the edges of the dishwasher. NOTE: Do not install kickplate until instructed. 2 Move dishwasher close to cabinet opening Water line Drain hose Cable IMPORTANT: Double-check correct placement of utilities. NOTE: Save the...
... of the side of the tub. This will keep it keeps the bracket in place. Grasp the sides of the dishwasher at the edges of the dishwasher. NOTE: Do not install kickplate until instructed. 2 Move dishwasher close to cabinet opening Water line Drain hose Cable IMPORTANT: Double-check correct placement of utilities. NOTE: Save the...
Installation Instructions
Page 22
... Dishwasher User Instructions that came with your dishwasher washes longer to be used . ❏ Start dishwasher and allow it again. (You must also do not close the door, the Start/Resume light will flash until you must make sure the door is not working properly. Check that you have been installed and... no steps were skipped. If the dishwasher is closed tightly and latched? • Has the cycle been set correctly to 3 hours per load, but use an...
... Dishwasher User Instructions that came with your dishwasher washes longer to be used . ❏ Start dishwasher and allow it again. (You must also do not close the door, the Start/Resume light will flash until you must make sure the door is not working properly. Check that you have been installed and... no steps were skipped. If the dishwasher is closed tightly and latched? • Has the cycle been set correctly to 3 hours per load, but use an...


