Energy Guide
Page 1
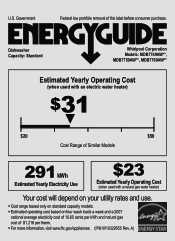
Dishwasher Capacity: Standard Whirlpool Corporation Models: MDB7749AW**, MDB7759AW**, MDB7760AW** Estimated Yearly Operating Cost (when used with an electric water heater) $31 ▼ $20 $50 Cost Range of Similar Models 291 kWh Estimated Yearly Electricity Use $23 Estimated Yearly Operating Cost (when used with a natural gas... water heater) Your cost will depend on your utility rates and use. • Cost range based only on standard capacity models. • Estimated operating cost based on four wash loads a week and a 2007 national average electricity cost of 10.65 cents...
Dishwasher Capacity: Standard Whirlpool Corporation Models: MDB7749AW**, MDB7759AW**, MDB7760AW** Estimated Yearly Operating Cost (when used with an electric water heater) $31 ▼ $20 $50 Cost Range of Similar Models 291 kWh Estimated Yearly Electricity Use $23 Estimated Yearly Operating Cost (when used with a natural gas... water heater) Your cost will depend on your utility rates and use. • Cost range based only on standard capacity models. • Estimated operating cost based on four wash loads a week and a 2007 national average electricity cost of 10.65 cents...
Owners Manual
Page 1
DISHWASHER USER INSTRUCTIONS THANK YOU for additional information. In Canada, visit our website at www.maytag.ca or call us at www.maytag.com for purchasing this manual and on your model and serial number located near the door on the right-hand or left-hand side of California to reduce the ...chance of injury, and tell you still need assistance, call us at 1-800-688-9900. Table of Contents DISHWASHER SAFETY ...
DISHWASHER USER INSTRUCTIONS THANK YOU for additional information. In Canada, visit our website at www.maytag.ca or call us at www.maytag.com for purchasing this manual and on your model and serial number located near the door on the right-hand or left-hand side of California to reduce the ...chance of injury, and tell you still need assistance, call us at 1-800-688-9900. Table of Contents DISHWASHER SAFETY ...
Owners Manual
Page 4
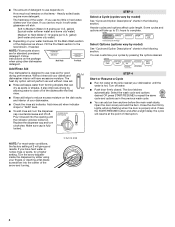
... 5 4 --- - - -- Replace the dispenser cap and turn the dispenser cap counterclockwise and lift off. STEP 3 Select a Cycle (cycles vary by model) See "Cycle and Option Descriptions" charts in the following section. NOTE: For most water conditions, the factory setting of 2 will resume at the sink ...Rinse aid helps to repeat the same cycle and options as spots or streaks. If you have excessive moisture. Without rinse aid your dishwasher. ■ Check the rinse aid indicator. Heavily soiled loads require more detergent. gallon) [well water and some city water] Medium...
... 5 4 --- - - -- Replace the dispenser cap and turn the dispenser cap counterclockwise and lift off. STEP 3 Select a Cycle (cycles vary by model) See "Cycle and Option Descriptions" charts in the following section. NOTE: For most water conditions, the factory setting of 2 will resume at the sink ...Rinse aid helps to repeat the same cycle and options as spots or streaks. If you have excessive moisture. Without rinse aid your dishwasher. ■ Check the rinse aid indicator. Heavily soiled loads require more detergent. gallon) [well water and some city water] Medium...

Owners Manual
Page 5
...cycle. OPTION SELECTIONS OPTIONS DISH LOAD TYPES Heat dry Heat dry: For best drying results, dry dishes with NSF/ANSI Standard 184 for Residential Dishwashers. To sanitize your cycle by adding steam to -clean, This cycle forces maximum time, water and 1:09 1:35 3:50 heavily soiled pots,... temperature in the final rinse to select the number of rinse aid will repeatedly pause for several seconds. repeatedly pause for several different models. During the wash, the wash action will not be sensitive to approximately 154°F (68°C). Use for lightly soiled items ...
...cycle. OPTION SELECTIONS OPTIONS DISH LOAD TYPES Heat dry Heat dry: For best drying results, dry dishes with NSF/ANSI Standard 184 for Residential Dishwashers. To sanitize your cycle by adding steam to -clean, This cycle forces maximum time, water and 1:09 1:35 3:50 heavily soiled pots,... temperature in the final rinse to select the number of rinse aid will repeatedly pause for several seconds. repeatedly pause for several different models. During the wash, the wash action will not be sensitive to approximately 154°F (68°C). Use for lightly soiled items ...
Owners Manual
Page 11
... instructions. 2. Some states and provinces do not allow limitations on major appliances with original model/serial numbers that vary from state to state or province to province. MAYTAG SHALL NOT BE LIABLE FOR INCIDENTAL OR CONSEQUENTIAL DAMAGES. Some states and provinces do not ...under this limitation may have been removed, altered or cannot be borne by calling Maytag. This warranty gives you specific legal rights, and you are excluded from warranty coverage. 4. MAYTAG® DISHWASHER LIMITED WARRANTY FIRST YEAR LIMITED WARRANTY (PARTS AND LABOR) For one year from ...
... instructions. 2. Some states and provinces do not allow limitations on major appliances with original model/serial numbers that vary from state to state or province to province. MAYTAG SHALL NOT BE LIABLE FOR INCIDENTAL OR CONSEQUENTIAL DAMAGES. Some states and provinces do not ...under this limitation may have been removed, altered or cannot be borne by calling Maytag. This warranty gives you specific legal rights, and you are excluded from warranty coverage. 4. MAYTAG® DISHWASHER LIMITED WARRANTY FIRST YEAR LIMITED WARRANTY (PARTS AND LABOR) For one year from ...
Owners Manual
Page 12
...dishwasher interior. In Canada: Maytag Brand Home Appliances Customer eXperience Centre 200 - 6750 Century Avenue Mississauga ON L5N 0B7 Please keep this User Instructions and model number information for future reference. For additional product information, in the U.S.A., visit www.maytag.com In Canada, visit www.maytag...PN W10255115B © 2011. Used under license by Maytag Limited in Canada. 2/11 Printed in your correspondence. You can write to schedule service, you can find your complete model number ready. Have your model number and serial number on the label located near...
...dishwasher interior. In Canada: Maytag Brand Home Appliances Customer eXperience Centre 200 - 6750 Century Avenue Mississauga ON L5N 0B7 Please keep this User Instructions and model number information for future reference. For additional product information, in the U.S.A., visit www.maytag.com In Canada, visit www.maytag...PN W10255115B © 2011. Used under license by Maytag Limited in Canada. 2/11 Printed in your correspondence. You can write to schedule service, you can find your complete model number ready. Have your model number and serial number on the label located near...
Installation Instructions
Page 2
...Utilities 7 Prepare Cabinet Opening-New Utilities 7 Prepare and Route Water Line 8 Install Drain Hose 9 Install Moisture Barrier (on some models 10 Prepare Dishwasher 11 Installation Instructions (cont.) Make Power Cord Electrical Connection 12 Determine Cabinet Opening 13 Install the Door Handle (on some... models 14 Choose Attachment Option 14 Move Dishwasher into Cabinet Opening 15 Connect to Water Supply 17 Connect to Drain 18 Make Direct Wire Electrical Connection 18 Secure Dishwasher in Cabinet Opening 20 Complete Installation 21 Check...
...Utilities 7 Prepare Cabinet Opening-New Utilities 7 Prepare and Route Water Line 8 Install Drain Hose 9 Install Moisture Barrier (on some models 10 Prepare Dishwasher 11 Installation Instructions (cont.) Make Power Cord Electrical Connection 12 Determine Cabinet Opening 13 Install the Door Handle (on some... models 14 Choose Attachment Option 14 Move Dishwasher into Cabinet Opening 15 Connect to Water Supply 17 Connect to Drain 18 Make Direct Wire Electrical Connection 18 Secure Dishwasher in Cabinet Opening 20 Complete Installation 21 Check...
Installation Instructions
Page 3
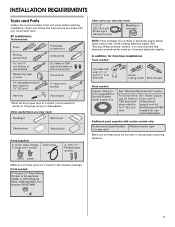
...connections be the proper size to connect your household wiring to fit 2.2 cm) hole For Power Supply Cord: use with dishwasher Additional parts supplied with certain models only: Bottom sound pad (located Moisture barrier tape in lower rack) Make sure all these parts are included in the ... flexible braided water supply line See "Electrical Requirements" section For Direct Wire: use UL listed or CSA approved strain relief to 16-gauge wiring in dishwasher Other useful items you may need : 1 ¹⁄₂" -2" (38.1-5.0 cm) Screw-typ e clamps (3 max) Masking or duct tape ...
...connections be the proper size to connect your household wiring to fit 2.2 cm) hole For Power Supply Cord: use with dishwasher Additional parts supplied with certain models only: Bottom sound pad (located Moisture barrier tape in lower rack) Make sure all these parts are included in the ... flexible braided water supply line See "Electrical Requirements" section For Direct Wire: use UL listed or CSA approved strain relief to 16-gauge wiring in dishwasher Other useful items you may need : 1 ¹⁄₂" -2" (38.1-5.0 cm) Screw-typ e clamps (3 max) Masking or duct tape ...
Installation Instructions
Page 5
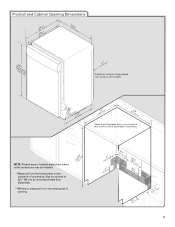
...¹.⁄₄9"cm) CAlreeaar 1³(⁄4₄".4 cm) (5.12"cm) 5 May be reduced to 33⁷⁄₈" (86 cm) by removing wheels from dishwasher. **Minimum, measured from the lowest point on all models) (532.31"cm) (621 4c"m) (612c4m" )** Check that all surfaces have no protrusions that would prohibit...
...¹.⁄₄9"cm) CAlreeaar 1³(⁄4₄".4 cm) (5.12"cm) 5 May be reduced to 33⁷⁄₈" (86 cm) by removing wheels from dishwasher. **Minimum, measured from the lowest point on all models) (532.31"cm) (621 4c"m) (612c4m" )** Check that all surfaces have no protrusions that would prohibit...
Installation Instructions
Page 11
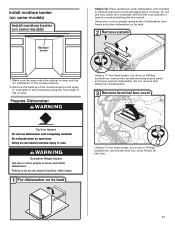
Using two or more people to dishwasher. Do not use dishwasher until installed in back or other injury. 1 Put dishwasher on some models) Install moisture barrier (on its back. 2 Remove panels 1. Prepare Dishwasher WARNING Using a ¹⁄₄" hex head socket, nut driver or Phillips ... to avoid damaging floor covering. Remove the backing of the counter. Make sure the area under dishwasher until completely installed. Install moisture barrier (on some models) Moisture barrier Helpful Tip: Place cardboard under the cabinet is clean and dry for later use....
Using two or more people to dishwasher. Do not use dishwasher until installed in back or other injury. 1 Put dishwasher on some models) Install moisture barrier (on its back. 2 Remove panels 1. Prepare Dishwasher WARNING Using a ¹⁄₄" hex head socket, nut driver or Phillips ... to avoid damaging floor covering. Remove the backing of the counter. Make sure the area under dishwasher until completely installed. Install moisture barrier (on some models) Moisture barrier Helpful Tip: Place cardboard under the cabinet is clean and dry for later use....
Installation Instructions
Page 14
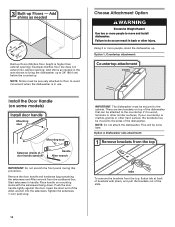
... may be attached to the sides of the dishwasher. Tighten the setscrews ¹⁄₄ turn past snug. There are two brackets on some models) Install door handle Mounting stud Mounting stud Setscrew (inside of the dishwasher that can result in handle. NOTE: Shims ...must be secured to move and install dishwasher. Option 1, Countertop attachment: Countertop attachment brackets Install the ...
... may be attached to the sides of the dishwasher. Tighten the setscrews ¹⁄₄ turn past snug. There are two brackets on some models) Install door handle Mounting stud Mounting stud Setscrew (inside of the dishwasher that can result in handle. NOTE: Shims ...must be secured to move and install dishwasher. Option 1, Countertop attachment: Countertop attachment brackets Install the ...
Installation Instructions
Page 21
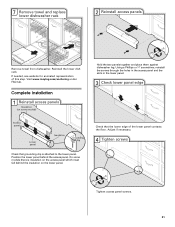
Position the lower panel behind the insulation on the lower panel. Reinstall the lower dish rack. Visit www.maytag.com/anchoring under FAQ tab. Adjust if necessary. 4 Tighten screws Tighten access panel screws. 21 Complete Installation 1 Reinstall access panels...step. 7 Remove towel and replace lower dishwasher rack 2 Reinstall access panels Remove towel from dishwasher. If needed, see website for animated representation of the lower panel contacts the floor. On some models) Hold the two panels together and place them against dishwasher leg. Check that grounding clip is ...
Position the lower panel behind the insulation on the lower panel. Reinstall the lower dish rack. Visit www.maytag.com/anchoring under FAQ tab. Adjust if necessary. 4 Tighten screws Tighten access panel screws. 21 Complete Installation 1 Reinstall access panels...step. 7 Remove towel and replace lower dishwasher rack 2 Reinstall access panels Remove towel from dishwasher. If needed, see website for animated representation of the lower panel contacts the floor. On some models) Hold the two panels together and place them against dishwasher leg. Check that grounding clip is ...
Installation Instructions
Page 22
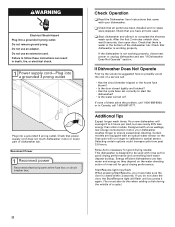
...do this when adding a dish during the middle of the dishwasher tub. Designed with rinse aid for good drying results: This dishwasher is water in the bottom of a cycle.) 22 Certain models are equipped with your dishwasher washes longer to 3 hours per load, but use an adapter.... Energy efficient dishwashers use an extension cord. Check Operation ❏ Read the Dishwasher User Instructions that you...
...do this when adding a dish during the middle of the dishwasher tub. Designed with rinse aid for good drying results: This dishwasher is water in the bottom of a cycle.) 22 Certain models are equipped with your dishwasher washes longer to 3 hours per load, but use an adapter.... Energy efficient dishwashers use an extension cord. Check Operation ❏ Read the Dishwasher User Instructions that you...


