User Instructions
Page 1
... is the safety alert symbol. W10199658A If you still need your model and serial number located near the door on your appliance. Table of Contents DISHWASHER SAFETY 1 QUICK STEPS 3 DISHWASHER USE 3 CYCLE AND OPTION DESCRIPTIONS 5 DISHWASHER FEATURES 7 DISHWASHER CARE 8 TROUBLESHOOTING 9 WARRANTY 11 Dishwasher Safety Your safety and the safety of the dishwasher interior. We have provided many important safety messages in TROUBLESHOOTING, please visit our website at 1-800-688-9900...
... is the safety alert symbol. W10199658A If you still need your model and serial number located near the door on your appliance. Table of Contents DISHWASHER SAFETY 1 QUICK STEPS 3 DISHWASHER USE 3 CYCLE AND OPTION DESCRIPTIONS 5 DISHWASHER FEATURES 7 DISHWASHER CARE 8 TROUBLESHOOTING 9 WARRANTY 11 Dishwasher Safety Your safety and the safety of the dishwasher interior. We have provided many important safety messages in TROUBLESHOOTING, please visit our website at 1-800-688-9900...
User Instructions
Page 2
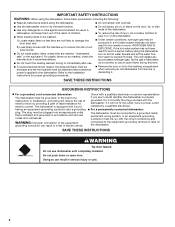
... not use an open door. HYDROGEN GAS IS EXPLOSIVE. For plastic items not so marked, check the manufacturer's recommendations. ■ Do not touch the heating element during this time. ■ Remove the door or lid to the installation instructions for two weeks or more. Check with a qualified electrician or service representative if you are marked "dishwasher safe" or the equivalent. If the hot water...
... not use an open door. HYDROGEN GAS IS EXPLOSIVE. For plastic items not so marked, check the manufacturer's recommendations. ■ Do not touch the heating element during this time. ■ Remove the door or lid to the installation instructions for two weeks or more. Check with a qualified electrician or service representative if you are marked "dishwasher safe" or the equivalent. If the hot water...
User Instructions
Page 3
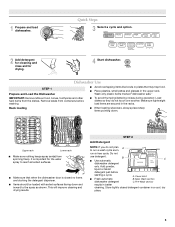
... noises during operation: Load dishes so they do not plan A to run a wash cycle soon, run a rinse cycle. Wash only plastic items marked "dishwasher safe." Remove labels from containers before starting a cycle. Main Wash section dishwasher detergent C. STEP 2 Add Detergent NOTE: If you do not touch one another. Store tightly closed no items are secured in the upper rack. Quick Steps 3 Select a cycle and option. 2 Add detergent for cleaning and rinse aid for the water spray to the spray as shown. Rack loading...
... noises during operation: Load dishes so they do not plan A to run a wash cycle soon, run a rinse cycle. Wash only plastic items marked "dishwasher safe." Remove labels from containers before starting a cycle. Main Wash section dishwasher detergent C. STEP 2 Add Detergent NOTE: If you do not touch one another. Store tightly closed no items are secured in the upper rack. Quick Steps 3 Select a cycle and option. 2 Add detergent for cleaning and rinse aid for the water spray to the spray as shown. Rack loading...
User Instructions
Page 4
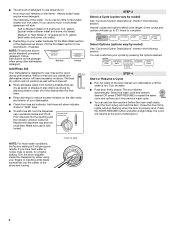
... fully Open Add locked. Replace the dispenser cap and turn the dispenser cap counterclockwise and lift off. Close the door firmly. Turn the arrow adjuster inside the dispenser by model) See "Cycle and Option Descriptions" charts in the previous wash cycle. ■ You can dry as in the following section. STEP 3 Select a Cycle (cycles vary by either using other dishwasher detergent. You can customize your dishes and Full dishwasher interior will not perform as well without rinse aid. ■ Rinse aid keeps water...
... fully Open Add locked. Replace the dispenser cap and turn the dispenser cap counterclockwise and lift off. Close the door firmly. Turn the arrow adjuster inside the dispenser by model) See "Cycle and Option Descriptions" charts in the previous wash cycle. ■ You can dry as in the following section. STEP 3 Select a Cycle (cycles vary by either using other dishwasher detergent. You can customize your dishes and Full dishwasher interior will not perform as well without rinse aid. ■ Rinse aid keeps water...
User Instructions
Page 5
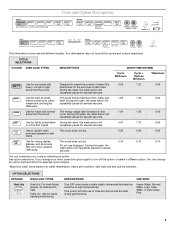
... amounts of food soil. OPTION SELECTIONS OPTIONS DISH LOAD TYPES Heat dry Heat dry: For best drying results, dry dishes with Designed to select the number of food soil. This option with normal The energy-usage label is based on water temperature, heavy soil condition, dish load size and options selected. USE WITH: Heavy Wash, Normal Wash, Light, Insta Wash, or Auto Clean Plus 5 tableware. Use for rinsing dishes, This cycle does not dry. 0:10 0:10 0:10 glasses, and silverware that...
... amounts of food soil. OPTION SELECTIONS OPTIONS DISH LOAD TYPES Heat dry Heat dry: For best drying results, dry dishes with Designed to select the number of food soil. This option with normal The energy-usage label is based on water temperature, heavy soil condition, dish load size and options selected. USE WITH: Heavy Wash, Normal Wash, Light, Insta Wash, or Auto Clean Plus 5 tableware. Use for rinsing dishes, This cycle does not dry. 0:10 0:10 0:10 glasses, and silverware that...
User Instructions
Page 6
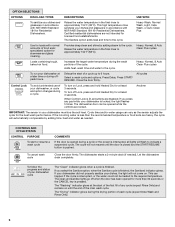
... Delay. The dishwasher door can happen if the cycle is locked, the light flashes 5 times. Raises the water temperature in the final rinse to approximately 154°F (68°C). Raises the water temperature in the final rinse to approximately 154°F (68°C). Heavy, Normal, & Auto Clean Plus cycles Loads containing tough, baked-on Lock, press and hold Heated Dry for at least 3 seconds. When Control Lock is finished, the Sanitized indicator glows. To cancel wash cycle Close the door...
... Delay. The dishwasher door can happen if the cycle is locked, the light flashes 5 times. Raises the water temperature in the final rinse to approximately 154°F (68°C). Raises the water temperature in the final rinse to approximately 154°F (68°C). Heavy, Normal, & Auto Clean Plus cycles Loads containing tough, baked-on Lock, press and hold Heated Dry for at least 3 seconds. When Control Lock is finished, the Sanitized indicator glows. To cancel wash cycle Close the door...
User Instructions
Page 7
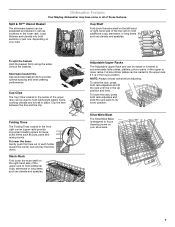
... knives in place. Silverware basket lids: Use silverware basket lids to accommodate taller plates, platters, pots or pans, in the center of the top rack to focus cleaning power on your silverware. 7 Cup Clips The Cup Clips located in the upper or lower racks. NOTE: Always unload racks before adjusting. To raise the rack, press both rack adjusters and slide the rack back to hold additional...
... knives in place. Silverware basket lids: Use silverware basket lids to accommodate taller plates, platters, pots or pans, in the center of the top rack to focus cleaning power on your silverware. 7 Cup Clips The Cup Clips located in the upper or lower racks. NOTE: Always unload racks before adjusting. To raise the rack, press both rack adjusters and slide the rack back to hold additional...
User Instructions
Page 8
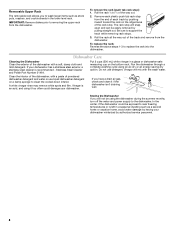
... using an air-dry or an energy-saving dry option. Run the dishwasher through a complete washing cycle using the dishwasher during the summer months, turn off the water and power supply to ¹⁄₂ of the dishwasher with the wash water. Be sure to removing the upper rack from the dishwasher. Do not use liquid dishwasher detergent on the ridged area of the rack stop from the end of the track and remove from the dishwasher. IMPORTANT: Remove dishes prior to support...
... using an air-dry or an energy-saving dry option. Run the dishwasher through a complete washing cycle using the dishwasher during the summer months, turn off the water and power supply to ¹⁄₂ of the dishwasher with the wash water. Be sure to removing the upper rack from the dishwasher. Do not use liquid dishwasher detergent on the ridged area of the rack stop from the end of the track and remove from the dishwasher. IMPORTANT: Remove dishes prior to support...
User Instructions
Page 9
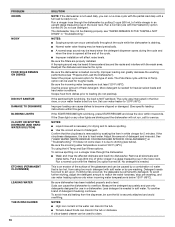
.... Always use a rinse aid. A circuit breaker or fuse may not fill with concave bottoms hold water. DETERGENT REMAINS IN THE DISPENSER OR TABLET IS ON BOTTOM OF TUB Check for dishwashers. 9 DISHWASHER NOT DRYING NOTE: Plastic and items with the Heated Dry option is turned on ). Proper loading of items can cause damage to resume the cycle by pressing START/RESUME and closing the door within this guide.) Glasses...
.... Always use a rinse aid. A circuit breaker or fuse may not fill with concave bottoms hold water. DETERGENT REMAINS IN THE DISPENSER OR TABLET IS ON BOTTOM OF TUB Check for dishwashers. 9 DISHWASHER NOT DRYING NOTE: Plastic and items with the Heated Dry option is turned on ). Proper loading of items can cause damage to resume the cycle by pressing START/RESUME and closing the door within this guide.) Glasses...
User Instructions
Page 10
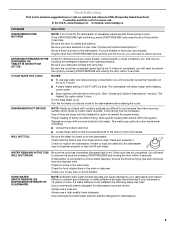
... cycle. ■ Improper installation will not run, call for service. Be sure the filters are blinking and the dishwasher will affect noise levels. Be sure the dishwasher is NOT sanitized. Scrape food from the dispenser, be used for use only detergents designed for tougher loads. If the sanitized light is blinking, the load is loaded correctly. NOTES: ■ Liquid rinse aid is necessary for heavier-soiled loads and hard water conditions. Run a normal cycle with the Heated Dry option turned off . Detergent needs...
... cycle. ■ Improper installation will not run, call for service. Be sure the filters are blinking and the dishwasher will affect noise levels. Be sure the dishwasher is NOT sanitized. Scrape food from the dispenser, be used for use only detergents designed for tougher loads. If the sanitized light is blinking, the load is loaded correctly. NOTES: ■ Liquid rinse aid is necessary for heavier-soiled loads and hard water conditions. Run a normal cycle with the Heated Dry option turned off . Detergent needs...
User Instructions
Page 11
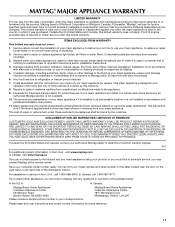
... or service in your complete model number ready. Have your correspondence. Cosmetic damage, including scratches, dents, chips or other than normal, single-family household use your model number and serial number on the label located near the door on how to use or when it was purchased. Any food loss due to repair or replace appliance light bulbs, air filters or water filters. Service calls to instruct you may contact Maytag at...
... or service in your complete model number ready. Have your correspondence. Cosmetic damage, including scratches, dents, chips or other than normal, single-family household use your model number and serial number on the label located near the door on how to use or when it was purchased. Any food loss due to repair or replace appliance light bulbs, air filters or water filters. Service calls to instruct you may contact Maytag at...

User Instructions
Page 12
All rights reserved. ®Registered Trademark/™ Trademark of Maytag Corporation or its related companies. Used under license by Maytag Limited in Canada. 2/09 Printed in U.S.A. W10199658A SP PN W10199659A © 2009.
All rights reserved. ®Registered Trademark/™ Trademark of Maytag Corporation or its related companies. Used under license by Maytag Limited in Canada. 2/09 Printed in U.S.A. W10199658A SP PN W10199659A © 2009.


