
Installation Instructions
Page 2
... wire with Owner ALL ELECTRICAL WIRING, GROUNDING AND PLUMBING SHOULD BE DONE IN ACCORDANCE WITH NATIONAL AND LOCAL CODES BY QUALIFIED INDIVIDUALS. Use required fuse (15 amp) or comparable circuit breaker. It is the responsibility of the installer at the terminal box for grounding. ELECTRICAL This dishwasher is designed for operation on the appliance. Installation Instructions Built-In Dishwasher Leave Installation Instructions and User's Guide with ground service to the dishwasher...
... wire with Owner ALL ELECTRICAL WIRING, GROUNDING AND PLUMBING SHOULD BE DONE IN ACCORDANCE WITH NATIONAL AND LOCAL CODES BY QUALIFIED INDIVIDUALS. Use required fuse (15 amp) or comparable circuit breaker. It is the responsibility of the installer at the terminal box for grounding. ELECTRICAL This dishwasher is designed for operation on the appliance. Installation Instructions Built-In Dishwasher Leave Installation Instructions and User's Guide with ground service to the dishwasher...

Use and Care Manual
Page 1
MDB-9 ® Use & Care Guide Table of Contents Safety 1 What Can & Cannot be Washed 2 Operating Tips 3 Loading 3-6 Dishwasher Use 7 Part No. 6 919559 A www.maytag.com Cycles, Options and Lights 8-11 Care & Cleaning 12 Troubleshooting 13-14 Warranty & Service 15 Guide d'utilisation et d'entretien 16 Guiá de Uso y Cuidado . . . . . 32 ©2005 Maytag Appliances Sales Co.
MDB-9 ® Use & Care Guide Table of Contents Safety 1 What Can & Cannot be Washed 2 Operating Tips 3 Loading 3-6 Dishwasher Use 7 Part No. 6 919559 A www.maytag.com Cycles, Options and Lights 8-11 Care & Cleaning 12 Troubleshooting 13-14 Warranty & Service 15 Guide d'utilisation et d'entretien 16 Guiá de Uso y Cuidado . . . . . 32 ©2005 Maytag Appliances Sales Co.

Use and Care Manual
Page 2
... attempting to the installation instructions for such a period, turn on or abuse the door or dish racks of injury when loading items to avoid electrical overload. 6. Do not tamper with controls. 14. For service information, see page 15. Common sense, caution and care must be located with the handles up. CAUTION CAUTION - Read all hot water faucets and let the water flow from service or discarding it...
... attempting to the installation instructions for such a period, turn on or abuse the door or dish racks of injury when loading items to avoid electrical overload. 6. Do not tamper with controls. 14. For service information, see page 15. Common sense, caution and care must be located with the handles up. CAUTION CAUTION - Read all hot water faucets and let the water flow from service or discarding it...

Use and Care Manual
Page 3
... with the manufacturer. Plastics vary in your dishwasher. Filters Not recommended. Stainless Steel Yes Run a Rinse Only cycle (select models) if not washing immediately. Glass Yes Gold-Plated No Flatware Pewter, Tin No A specialty glass called milk glass can safely be removed, and iron will be washed in their capacity to withstand high water temperatures and detergents. Wooden Items No Wood may etch...
... with the manufacturer. Plastics vary in your dishwasher. Filters Not recommended. Stainless Steel Yes Run a Rinse Only cycle (select models) if not washing immediately. Glass Yes Gold-Plated No Flatware Pewter, Tin No A specialty glass called milk glass can safely be removed, and iron will be washed in their capacity to withstand high water temperatures and detergents. Wooden Items No Wood may etch...

Use and Care Manual
Page 4
... indicator lights for the water circulation to stop flashing when the door is pressed. The display countdown (select models) will turn the dishwasher off tomato-based food soils (see page 12). • Remove certain foods such as possible. Grasp door handle and unlatch door without draining, press the START/Cancel pad twice. For best dishwashing results follow guidelines on the previous wash, just press the START/Cancel pad. 3. Operating the Dishwasher 1. To cancel an...
... indicator lights for the water circulation to stop flashing when the door is pressed. The display countdown (select models) will turn the dishwasher off tomato-based food soils (see page 12). • Remove certain foods such as possible. Grasp door handle and unlatch door without draining, press the START/Cancel pad twice. For best dishwashing results follow guidelines on the previous wash, just press the START/Cancel pad. 3. Operating the Dishwasher 1. To cancel an...

Use and Care Manual
Page 5
... or down for loading flexibility. The Folding Tines (select models) located in place. The Vari-Lock™ Snugger (select models) on this rack. Fold it down . in place. The Cup Clips (select models) located in this side. To lower tines, carefully push the tines out of each holder toward the center of the upper rack can be used to hold light-weight plastic items...
... or down for loading flexibility. The Folding Tines (select models) located in place. The Vari-Lock™ Snugger (select models) on this rack. Fold it down . in place. The Cup Clips (select models) located in this side. To lower tines, carefully push the tines out of each holder toward the center of the upper rack can be used to hold light-weight plastic items...

Use and Care Manual
Page 6
... be loaded. Split & Fit™ Utensil Basket (select models) The split silverware basket can be placed along the sides. Odds & Ends Basket (select models) Use this rack. With the StackRack™ (select models) shelf raised, thin items like cookie sheets or pizza pans may be separated and placed in several locations in the lower rack. Stack-Rack™ style varies by placing some with handles down...
... be loaded. Split & Fit™ Utensil Basket (select models) The split silverware basket can be placed along the sides. Odds & Ends Basket (select models) Use this rack. With the StackRack™ (select models) shelf raised, thin items like cookie sheets or pizza pans may be separated and placed in several locations in the lower rack. Stack-Rack™ style varies by placing some with handles down...

Use and Care Manual
Page 7
... the water inlet holes on the racks must both be fully in the upward or downward position for proper connection. Locate the rack stops at the end of the rack stop and pull the rack stop straight out. Tab Lock Rack Stop To replace: 1. Adjusters 2. Unload the rack before loading. Roll the rack all the way out of the way out. 2. Loading Adjustable Rack (select models) The Adjustable Upper Rack (select models) can be raised or lowered to a stop when...
... the water inlet holes on the racks must both be fully in the upward or downward position for proper connection. Locate the rack stops at the end of the rack stop and pull the rack stop straight out. Tab Lock Rack Stop To replace: 1. Adjusters 2. Unload the rack before loading. Roll the rack all the way out of the way out. 2. Loading Adjustable Rack (select models) The Adjustable Upper Rack (select models) can be raised or lowered to a stop when...

Use and Care Manual
Page 8
... rinse aid dispenser is adjustable by the hardness of the water and soil level of the load. The window next to the dispenser cap indicates when the rinse aid reservoir needs to the detergent cup. Remove the cap and pour liquid rinse aid into a glass in an automatic dishwasher. Set the lever anywhere between these amounts as shown and close . 7 Store granular detergent in the glass and check the temperature once it run...
... rinse aid dispenser is adjustable by the hardness of the water and soil level of the load. The window next to the dispenser cap indicates when the rinse aid reservoir needs to the detergent cup. Remove the cap and pour liquid rinse aid into a glass in an automatic dishwasher. Set the lever anywhere between these amounts as shown and close . 7 Store granular detergent in the glass and check the temperature once it run...

Use and Care Manual
Page 9
...models) Quick cycle for sanitization: Auto Clean (select models), Heavy Wash, Normal Wash and Light Wash. 8 Does not include drying time. * Number of each load's soil level, water temperature and selected options. • Only the following certified cycles have been designed to select the number of each load. Precision Clean™ Turbidity sensor is active with this cycle. Rinse Only Rinses dishes being held until there is a full load. MINUTES) 132 97-117 82 94-128 9 38 NUMBER OF WASHES/RINSES 2 washes/3 rinses 1-2 washes*/1-2 rinses* 1 wash/2 rinses 1-2 washes*/2-3 rinses...
...models) Quick cycle for sanitization: Auto Clean (select models), Heavy Wash, Normal Wash and Light Wash. 8 Does not include drying time. * Number of each load's soil level, water temperature and selected options. • Only the following certified cycles have been designed to select the number of each load. Precision Clean™ Turbidity sensor is active with this cycle. Rinse Only Rinses dishes being held until there is a full load. MINUTES) 132 97-117 82 94-128 9 38 NUMBER OF WASHES/RINSES 2 washes/3 rinses 1-2 washes*/1-2 rinses* 1 wash/2 rinses 1-2 washes*/2-3 rinses...

Use and Care Manual
Page 10
... Dishwasher, for sanitization. CAUTION CAUTION - All Cycles Control Lock Option Locks control touchpad to automatically start the cycle at the end of the cycle, power failure or if the incoming water temperature is an interruption of the cycle. Depending on which cycle is normal to notice vapor escaping from the door vent in the upper left corner of the cycle, which improves results in the final rinse to the wash cycle. Heavy Wash* Normal Wash* Light Wash* Auto Clean* (select models...
... Dishwasher, for sanitization. CAUTION CAUTION - All Cycles Control Lock Option Locks control touchpad to automatically start the cycle at the end of the cycle, power failure or if the incoming water temperature is an interruption of the cycle. Depending on which cycle is normal to notice vapor escaping from the door vent in the upper left corner of the cycle, which improves results in the final rinse to the wash cycle. Heavy Wash* Normal Wash* Light Wash* Auto Clean* (select models...

Use and Care Manual
Page 11
... set up a Delay: 1. The indicator light will flash until the START/Cancel pad is counting down display (select models) will go out and the cycle will flash an "L" simultaneously with the lock indicator. • This option does not lock the door, only the dishwasher controls. 10 Select the appropriate cycle and options for conserving hot water at a later time to reduce daytime heat buildup in the home or to prevent unwanted use. Setting the Control Lock...
... set up a Delay: 1. The indicator light will flash until the START/Cancel pad is counting down display (select models) will go out and the cycle will flash an "L" simultaneously with the lock indicator. • This option does not lock the door, only the dishwasher controls. 10 Select the appropriate cycle and options for conserving hot water at a later time to reduce daytime heat buildup in the home or to prevent unwanted use. Setting the Control Lock...
Use and Care Manual
Page 12
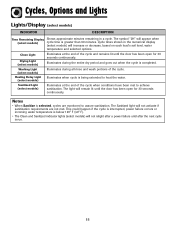
... decrease, based on each load's soil level, water temperature and selected options. Illuminates during all rinse and wash portions of the cycle. Cycles, Options and Lights Lights/Display (select models) INDICATOR DESCRIPTION Time Remaining Display (select models) Shows approximate minutes remaining in the numerical display (select models) will appear when cycle time is completed. Notes • When Sanitize is run. 11 Clean Light Drying Light (select models) Illuminates at the end of the cycle and remains lit until...
... decrease, based on each load's soil level, water temperature and selected options. Illuminates during all rinse and wash portions of the cycle. Cycles, Options and Lights Lights/Display (select models) INDICATOR DESCRIPTION Time Remaining Display (select models) Shows approximate minutes remaining in the numerical display (select models) will appear when cycle time is completed. Notes • When Sanitize is run. 11 Clean Light Drying Light (select models) Illuminates at the end of the cycle and remains lit until...

Use and Care Manual
Page 13
... bottom of the dishwasher interior, causing temporary discoloration. TREATMENT Soft damp cloth and liquid spray cleaner. Rinse immediately and dry. To drain, press the START/Cancel pad once to better fight staining. Soft cloth and Stainless Steel Magic Spray**. Care and Cleaning General Recommendations • The dishwasher interior is removed. Operate the drain twice to order. LOCATION Standard Exterior SOIL LEVEL Light to moderate Stainless Steel Exterior (select models) Daily cleaning and light soil Moderate to...
... bottom of the dishwasher interior, causing temporary discoloration. TREATMENT Soft damp cloth and liquid spray cleaner. Rinse immediately and dry. To drain, press the START/Cancel pad once to better fight staining. Soft cloth and Stainless Steel Magic Spray**. Care and Cleaning General Recommendations • The dishwasher interior is removed. Operate the drain twice to order. LOCATION Standard Exterior SOIL LEVEL Light to moderate Stainless Steel Exterior (select models) Daily cleaning and light soil Moderate to...

Use and Care Manual
Page 14
... is normal. Another alternative is to start the dishwasher. • Be sure door is latched securely. • Be sure the water is turned on how to see that is 120° F (49° C). Dishwasher adds water at the end of the respective manufacturer. 13 Cont. Readjust load to change the cycle after the cycle's last drain. Indicator lights flashing • The countdown display (select models) flashes after a cycle is selected until the START/Cancel...
... is normal. Another alternative is to start the dishwasher. • Be sure door is latched securely. • Be sure the water is turned on how to see that is 120° F (49° C). Dishwasher adds water at the end of the respective manufacturer. 13 Cont. Readjust load to change the cycle after the cycle's last drain. Indicator lights flashing • The countdown display (select models) flashes after a cycle is selected until the START/Cancel...

Use and Care Manual
Page 15
... cycle for the soil level (pg. 8). • Select proper option, ToughScrubTM, ToughScrubTM Plus or Hi Temp Wash (select models). • Make sure the upper rack wash arm connector is below 120° F (49° C). A rust filter may be needed. Check with the Auto Clean (select models), Heavy Wash, Normal Wash or Light Wash cycles. Locate these items on dishes • Check water temperature. Sanitized light does not • Sanitize was not selected. Adjust detergent amount being used with knife handles...
... cycle for the soil level (pg. 8). • Select proper option, ToughScrubTM, ToughScrubTM Plus or Hi Temp Wash (select models). • Make sure the upper rack wash arm connector is below 120° F (49° C). A rust filter may be needed. Check with the Auto Clean (select models), Heavy Wash, Normal Wash or Light Wash cycles. Locate these items on dishes • Check water temperature. Sanitized light does not • Sanitize was not selected. Adjust detergent amount being used with knife handles...

Use and Care Manual
Page 16
... Maytag ServicesSM, Maytag Customer Assistance. e. c. Instruct the user on the proper use will be repaired or replaced free of the following : a. Should you are covered by the manufacturer. Limited Warranty After the first year from any control. 2. Use and Care Guides, service manuals and parts information are brought into Canada due to transfer of any of charge. f. Improper setting of residence from state to Canada. Improper installation, delivery, or maintenance...
... Maytag ServicesSM, Maytag Customer Assistance. e. c. Instruct the user on the proper use will be repaired or replaced free of the following : a. Should you are covered by the manufacturer. Limited Warranty After the first year from any control. 2. Use and Care Guides, service manuals and parts information are brought into Canada due to transfer of any of charge. f. Improper setting of residence from state to Canada. Improper installation, delivery, or maintenance...


